How to copy slides to or from another presentation
- Copy the slides from the original presentation to the new presentation,
- Use the Reuse Slides tool , which displays the content of an original presentation and allows choosing the slides you want to insert in the new presentation.

Copy slides
To copy the slides from the original presentation to the new presentation, do the following:
1. Open both presentations:
- The presentation from which you want to copy slides – source presentation,
- The presentation to which you need to copy slides – working or destination presentation.
2. On the View tab, in the Window group, click the Arrange All button:

Or place the presentations on the screen like you want to see both of them simultaneously.
3. Select slide or slides to be copied:

- In the Slide Sorter view, click the slide on the Slide pane.
- In the Normal/Outline/Slide Sorter view, click the first slide you want to select.
- To select a contiguous series of slides, press and hold the Shift key, then click the last slide you want to select.
- To select noncontiguous slides, press and hold the Ctrl key, then click each additional slide you want to select.
For example:
| Slides 3-5: | Slides 3, 5: |
4. Copy the selection to the Clipboard by doing one of the following:

5. In the working (destination) presentation, do one of the following:

PowerPoint inserts the copied slide(s) and applies the destination theme to the copies.

Reuse Slides tool
The Reuse Slides pane displays all slides from any presentation and copies some of them to the working presentation. To open the Reuse Slides pane, do the following:
1. On the Home tab or Insert tab, in the Slides group, click the New Slide arrow, then on the New Slide menu, below the gallery, click the Reuse Slides... command:

2. On the Reuse Slides pane (by default, it is opened on the right side), do one of the following:

In the Browse dialog box, browse to the folder that contains the presentation from which you want to use slides, and then double-click the presentation or click the Open button.
If you've recently opened the presentation from which you want to import slides:
- Click the down arrow in the Insert slide from field to expand the list, then select the presentation from the list.

The Reuse Slides pane displays thumbnails of the available slides.
3. On the Reuse Slides pane, click the thumbnail of each slide you want to insert into your presentation.
PowerPoint automatically applies the new theme to reused slides:

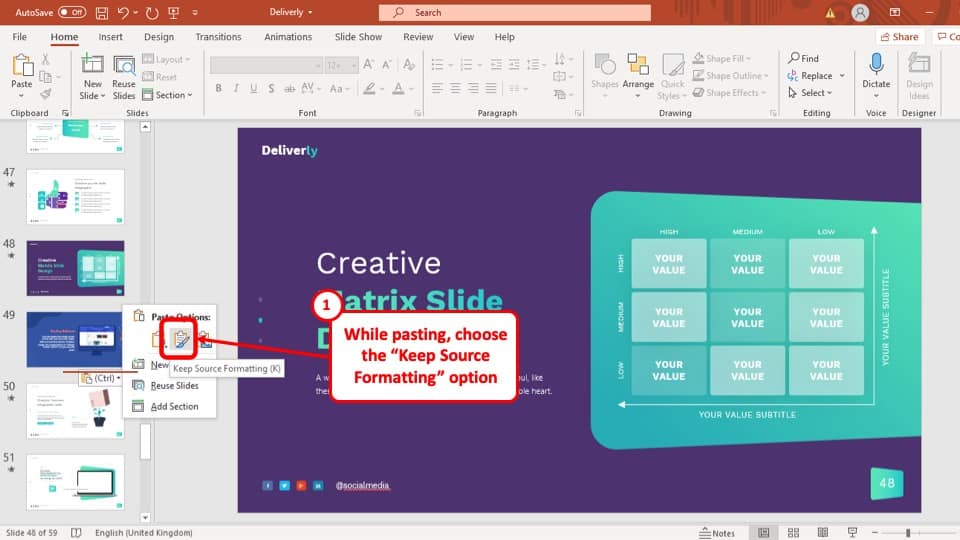
If you want the slide to keep the formatting from the source presentation instead, select the Keep Source Formatting checkbox at the bottom of the Reuse Slides pane:

Please, disable AdBlock and reload the page to continue
Today, 30% of our visitors use Ad-Block to block ads.We understand your pain with ads, but without ads, we won't be able to provide you with free content soon. If you need our content for work or study, please support our efforts and disable AdBlock for our site. As you will see, we have a lot of helpful information to share.

How to create a dynamic presentation
Byte Bite Bit
How to Copy a Slide from One PowerPoint to Another: A Step-by-Step Guide
Creating impactful PowerPoint presentations often means borrowing slides from previous decks or collaborating with colleagues. When faced with this task, it’s reassuring to know that copying a slide from one PowerPoint presentation to another is a simple process . This task can greatly streamline your workflow, saving you both time and effort.

In our experience, utilizing the built-in features of PowerPoint allows for seamless integration of slides. By using options like ‘Copy and Paste’ or ‘Reuse Slides’, you can transfer content without a hitch. One handy tip is that you can drag and drop slides, which feels almost as intuitive as shuffling a deck of cards. This approach is not only efficient but also keeps your formatting intact.
| Select slide → Ctrl+C → Ctrl+V in new presentation | A few seconds | |
| Insert tab → Reuse Slides → Select slides | A few minutes | |
| Drag slide thumbnail into new presentation | Instant |
By mastering these methods, we empower ourselves to craft polished and cohesive presentations swiftly. Whether you’re preparing for a crucial meeting or collaborating on a big project, knowing how to effectively copy slides will undoubtedly enhance your productivity. Let’s dig into these techniques and make your next PowerPoint project a breeze!
- 1.1 Choosing the Right Design Theme
- 1.2 Implementing Effective Source Formatting
- 2.1 Utilizing the Reuse Slides Feature
- 2.2 Mastering Slide Arrangement Techniques
- 3.1 Navigating Between Different Views
- 3.2 Optimizing Your Workflow with Shortcuts
- 4.1 Incorporating Multimedia Elements
- 4.2 Exploring PowerPoint Alternatives
Creating and Designing Professional Slides
Let’s explore practical steps to create and design eye-catching PowerPoint slides that make a lasting impact. From selecting a fitting design theme to ensuring consistent formatting, we’ve got you covered.
Choosing the Right Design Theme
Selecting the appropriate design theme sets the tone for a professional presentation. PowerPoint offers a wide variety of themes to choose from. We can find themes by navigating to Design > Themes in the PowerPoint desktop app.
We should consider the topic and audience when picking a theme. For instance, a business presentation might benefit from a clean, minimalist theme, while a more creative topic could use a vibrant, colorful one.
Also, it’s essential to maintain consistency throughout the presentation. Here’s a quick tip: Apply the chosen theme to all slides by selecting Design > Apply to All Slides .
Implementing Effective Source Formatting
Ensuring consistency in formatting across all slides enhances the overall look. We can copy and paste source formatting from one slide to another using tools like Format Painter . This tool is available under Home > Format Painter .
To copy slide formatting:
- Select the slide with the desired formatting.
- Click on Format Painter.
- Click on the slides to which you want to apply the formatting.
For copying entire slides from another presentation, open both presentations in the PowerPoint desktop app. In the source presentation, right-click on the slide thumbnail and select Copy Slide . Then, paste the slide in the destination presentation. This process ensures the formatting and design elements remain intact.
This consistency reinforces our message and keeps our audience focused.
Managing Slide Consistency and Reusability
Consistency and reusability are key to making effective presentations. We can achieve this by utilizing built-in PowerPoint features and mastering slide arrangement techniques.
Utilizing the Reuse Slides Feature
When we want to maintain consistent styling across presentations, the Reuse Slides feature comes in handy. We can open the destination presentation and navigate to the Home tab.
Select Reuse Slides from the New Slide dropdown menu.
The Reuse Slides Pane will open on the right. Here, we can browse for the source presentation. Clicking on a slide will insert it into our current presentation while preserving the original formatting.
This feature helps us save time and ensure all our slides look unified, whether we’re using Microsoft 365 or PowerPoint for the web . With it, we don’t have to worry about manually adjusting design elements every time we import a slide.
Mastering Slide Arrangement Techniques
Once we’ve imported slides, arranging them efficiently is crucial. Using the Slide Sorter view, accessible from the View tab, allows us to see all our slides at once. This visual overview helps in organizing the slides logically.
We can also use Normal View for a more detailed look at each slide. By selecting multiple slides with Shift+Click, we easily move entire sections around.
Another powerful tool is the Arrange All option in the View tab. This allows us to work on multiple presentations side-by-side, simplifying the process of transferring slides while maintaining the flow and consistency of our presentation.
Efficient Slide Handling and Navigation
Efficient handling and navigation of slides in PowerPoint significantly enhance productivity. This section will discuss key strategies for effectively moving, copying, and managing slides.
Navigating Between Different Views
When juggling multiple slides, navigating between different views is essential. In PowerPoint, the Normal view is highly functional as it displays the slides pane, offering a clear thumbnail view of each slide. This aids in quickly selecting the slides we need.
The Slide Sorter view provides a bird’s-eye view, making it easier to move and copy slides. To access Slide Sorter, click on the View tab on the ribbon and select Slide Sorter . This allows us to see all slides at once, facilitating efficient reorganization.
To toggle between these views quickly, use the shortcuts Alt + W, L for Normal view and Alt + W, I for Slide Sorter view on Windows. On a Mac, use Cmd + 1 for Normal view and Cmd + 2 for Slide Sorter view.
Optimizing Your Workflow with Shortcuts
Leveraging shortcuts can streamline our workflow significantly. For instance, to copy a slide, select the desired slide thumbnail and press Ctrl + C for Windows or Cmd + C for Mac. To paste the slide, use Ctrl + V or Cmd + V respectively.
We can also utilize the Duplicate Slide function. Right-click on the slide thumbnail and select Duplicate Slide , or use Ctrl + D (Cmd + D on Mac). This creates an exact copy instantly, saving time compared to traditional copy-paste.
Moreover, the Ribbon provides quick access to the New Slide and Paste Options buttons, enhancing our flexibility. The Paste Options menu even allows us to choose different formatting options for the pasted slides, maintaining consistency.
By mastering these shortcuts and navigation strategies, we can handle our slides more efficiently and create polished presentations with ease.
Advanced PowerPoint Techniques and Alternatives
When working with PowerPoint presentations, there are several advanced techniques to enhance your slides and also alternatives that provide unique capabilities.
Incorporating Multimedia Elements
We can elevate our PowerPoint slides by integrating multimedia components such as videos, pictures , and animations . Adding a video to a slide not only captivates the audience’s attention but also effectively communicates complex ideas. In PowerPoint 2019, inserting a video is straightforward—just go to the Insert tab , choose Video , and select the desired file.
Animations are another powerful tool. They can help emphasize points or make data flow logically on a single slide. When using animations, keep feedback in mind so they enhance, rather than distract from our message.
Interactive pictures can also make a presentation more engaging. Instead of static images, we can use animated GIFs or create clickable hotspots that link to detailed information slides or external resources. Using PowerPoint’s built-in editing tools , we can overlay text and shapes onto images, creating interactive and compelling visuals.
Exploring PowerPoint Alternatives
While PowerPoint 2013 and 2019 are robust tools, sometimes we need something different. Google Slides is a popular alternative, offering seamless collaboration and cloud-based accessibility. Its interface is intuitive, and it supports real-time feedback and edits from multiple users, making it ideal for team projects.
For those who need highly customizable and visually striking graphics, Prezi offers a unique approach with its zoomable canvas. This tool lets us create dynamic, flowing narratives that can stand out in a sea of linear slide presentations.
Additionally, Keynote is perfect for those integrated into the Apple ecosystem, providing powerful design tools and templates. Its smooth transitions and ease of use make it a strong contender.
Using different platforms, we can import slides from one to another, maintaining our design consistency. Embracing these alternatives gives us flexibility and the ability to choose the best tool for each project.
Related posts:
- How to Add Speaker Notes in PowerPoint for Effective Presentations
- How to Add Music to PowerPoint: A Step-by-Step Guide for Seamless Presentations
- How to Curve Text in PowerPoint: Step-by-Step Guide
- How to Add Slide Numbers in PowerPoint: A Step-by-Step Guide
- How to Insert GIF into PowerPoint: A Step-by-Step Guide
- How to Present PowerPoint with Notes: Master Speaker Tips
- How to Create a PowerPoint Template: Step-by-Step Guide for Beginners
- How to Add Notes to PowerPoint: Enhance Your Presentations with Ease
- How to Add Music to PowerPoint: Step-by-Step Guide for Seamless Presentations
- How to Create an Org Chart in PowerPoint: Step-by-Step Guide for Beginners
- How to Wrap Text in PowerPoint: A Step-by-Step Guide
- How to Insert a Slide from Another PowerPoint: A Step-by-Step Guide
Leave a Comment Cancel reply
Save my name, email, and website in this browser for the next time I comment.
How to Copy Slides From One Powerpoint to Another
While creating presentations on similar subjects to the existing ones, you might need to incorporate specific slides from the original presentation.
Suppose the executive team has already created a detailed presentation on your company’s revenue. If you’re tasked with creating a similar presentation, you can copy a few slides from the original one as a reference.
Normally, we use the Click and Drag method to copy slides from one PowerPoint to another. But, if you don’t want to open the slides, you do so via the Reuse Slides option, or if you’re familiar with the language, you can also use VBA code.
Click and Drag Method
As the name suggests, you can simply drag and drop slides from one PowerPoint file to another. While doing so, you can insert multiple slides anywhere to your liking.
- Open both the PowerPoint files — one which contains the slides you want to copy and another where you need to copy them.

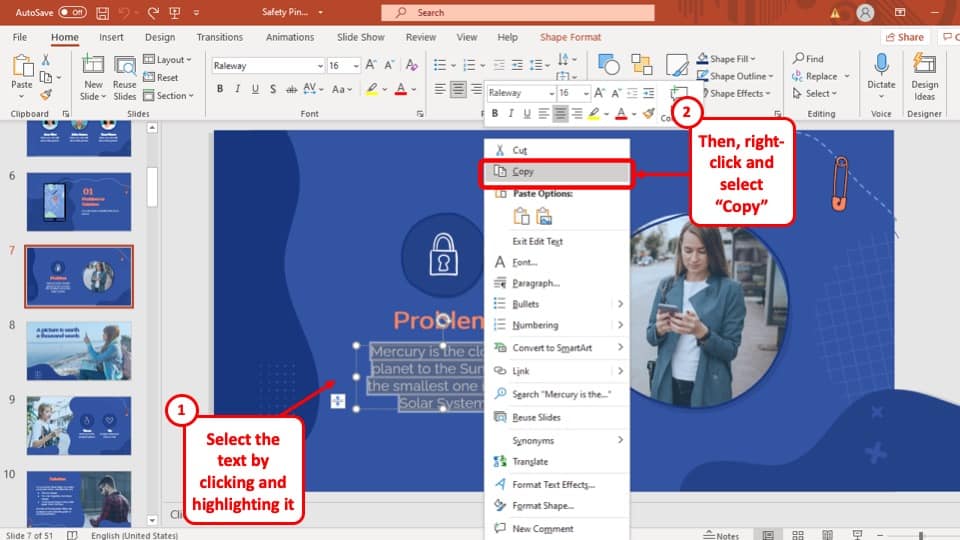
- Select the slides you want to copy.

Copy and Paste Method
Copy-pasting is one of the simplest methods to copy slides from one PowerPoint presentation to another. You can use the shortcuts Ctrl + C to copy and Ctrl + V to paste slides.
- Open the PowerPoint from which you can want to copy the slides.

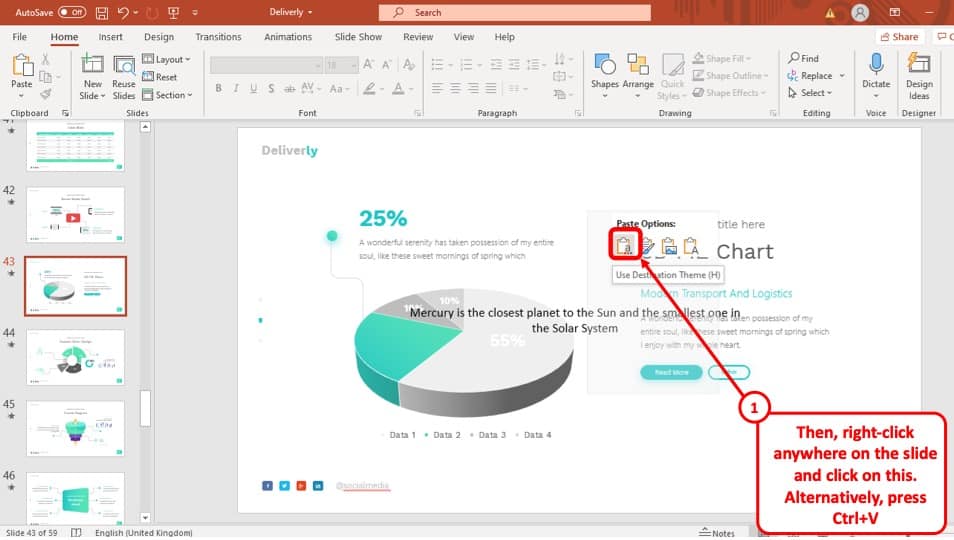
- Now open the presentation where you want to paste and press Ctrl + V.
While pasting, if you want to paste without losing the formatting of the slides, you can right-click and select Keep Source Formatting in Paste Options.
Likewise, select Use Destination Theme while pasting to take the theme of the presentation you are pasting into.
Using the Reuse Slides Option
With the Reuse Slides option, you don’t need to open another PowerPoint file in a separate window. You can browse other PowerPoint files within the same file you are currently working on and insert the necessary slides from there.
Even better, the source file from where you copied the files will remain intact. So you are safe from accidentally making changes to the original file.
Open the PowerPoint file where you want to paste the slides. To start with a new presentation, launch PowerPoint and click Blank Presentation .

- Insert Slide : Insert the selected slide below the selected slide.
- Insert All Slides : Insert all the slides from the right pane.
- Apply Theme to All Slides : Apply the theme of the slides in the right pane to existing slides.
- Apply Theme to Selected Slides : Apply the theme of the selected slide in the right pane to every existing slide selected in the Slides pane.

Using VBA Code
Using VBA, you can easily insert codes to copy slides from one PowerPoint to another.
You can access VBA by simply pressing Alt + F11 on your keyboard. Moreover, you can also access it from the Developer tab on the ribbon.
- Go to the File tab and click Options .

- Paste the following code in the blank spaces.

- Now, run the module by pressing F5 or clicking the Run option in the Macros window.
Meet Aadarsh—a technology and Artificial Intelligence Enthusiast. Currently, he is pursuing a degree in Computer Science and Information Technology and is set to graduate in a few months. At Insidetheweb, he specializes in PowerPoint and presentation how-to guides. Aadarsh has an innate talent for public speaking, undoubtedly fueled by his love for PowerPoint presentations. Over the years, he has created hundreds of presentations, including lesson plans, quizzes, games, and projects. Now, with plenty of hands-on experience and a deep understanding of PowerPoint, he has been creating user-friendly content that helps people master PowerPoint. Aadarsh embraces self-motivation, acceptance, and consistency as his guiding principles. When not glued to the monitor writing, he finds solace in music and meditation.
Related Posts
How to quickly flip image on powerpoint, how to add new fonts on your powerpoint presentation, best way to create a pie chart in powerpoint.
Type above and press Enter to search. Press Esc to cancel.
How to Copy Slides to a Different PowerPoint Presentation
Copying slides from one PowerPoint presentation to another is a great way to reuse content and save time. Whether you want to consolidate projects, update old presentations, or simply pull useful slides from past decks, there are a few easy ways to transfer slides between PowerPoint files.
Before You Copy Slides
Before copying any slides, open both the source presentation (with the slides you want to copy) and the target presentation (where you want to paste them). You can arrange the PowerPoint windows side-by-side or switch between them with the taskbar.
Method 1: Copy and Paste Slides
The fastest way to copy slides between PowerPoint presentations is using copy/paste:
Tip: You can choose different paste options like “Paste Link” and “Keep Source Formatting.”
Method 2: Import Slides from Another Presentation
Method 3: drag and drop slides.
You can also copy slides by dragging and dropping:
Repeat for any other slides you want to copy.
Tips for Copying Slides
Follow these tips when copying slides between presentations:
Reusing slides from old presentations is an excellent way to build new decks faster. With the right technique, you can quickly copy one or more slides exactly where you need them.
About The Author
Vegaslide staff, related posts, disable using esc in powerpointviewer 97, how to insert an image into a shape in powerpoint, how to insert a countdown timer in a powerpoint presentation, how to print powerpoint with the notes on mac.
How to copy or duplicate a PowerPoint slide and put it anywhere in your slideshow
- You can copy a slide in the PowerPoint app or online version, and then paste it somewhere else in the slideshow.
- To copy a PowerPoint slide, you just need to right-click it, or open the "Home" menu.
- You can also use PowerPoint's "Duplicate" function, which will create a copy of a slide automatically, without having to paste anything.
- Visit Business Insider's Tech Reference library for more stories .
Copying a slide in PowerPoint takes only a few clicks, whether you choose to do so in a web browser or in the app.
Additionally, you can also choose to directly duplicate a slide, which eliminates the need to click again to paste. The "Duplicate" option will create a copy of the slide, right behind its original.
Here's how to do copy or duplicate in either version of PowerPoint on your Mac or PC.
Check out the products mentioned in this article:
Apple macbook pro (from $1,299.00 at apple), acer chromebook 15 (from $179.99 at walmart), how to copy a slide in powerpoint 's online app.
1. Open Office365 in any internet browser, and log into your account.
2. Open a PowerPoint presentation by selecting one from the "Recent" list or other tabs. You can also click "Start new" below the plus sign icon, followed by "Presentation." Additonally, you can click "PowerPoint" from the options at the top.
3. Once your presentation is open, you can right-click on any slide in the left sidebar, and then select "Copy." You can select multiple slides at once by holding Copy or Command on your keyboard as you click.
4. Right-click again in a different spot on the sidebar and click "Paste" to paste the slide you copied. Pasting in the gray space at the bottom will copy the slide to the end of your slideshow. If you right-click and click "Paste" in the space in between two slides, you can insert the copied slide there instead,
5. You can also select "Duplicate Slide" instead of "Copy." This eliminates the need to right-click again to paste, as it automatically creates a copy of the slide or slides selected. Slides will immediately appear in order, directly behind their originals.
You can also select slides, and then find the Copy, Paste, and Duplicate options by clicking the clipboard icon at the top of the screen. If you don't see it, make sure you're in the "Home" tab.
How to copy a slide in the PowerPoint desktop app
1. Open a PowerPoint presentation on your Mac or PC.
2. Right-click on a slide in the left sidebar to copy it. You can also press Command + C or Ctrl + C on your keyboard. If you hold down Command or Ctrl, you can click multiple slides to select them all at once.
3. Right-click in the space between slides or the blank area at the end of a presentation to paste. You can also use Command + V or Ctrl + V.
4. When you right-click on the original slide to be copied, you can also choose the "Duplicate Slide" option instead. The keyboard shortcut for this is Shift + Command + D, or Shift + Ctrl + D. This eliminates the need to right-click again to paste, and instead immediately creates a copy directly behind the selected slide.
5. You can also access any of these options on the far left side of the "Home" tab. Click the page icon to copy the selected slide, or click the small arrow next to it to choose between "Copy" or "Duplicate." The "Paste" clipboard icon appears next to these options.
Related coverage from Tech Reference :
How to download and access microsoft powerpoint on your mac computer, how to embed a youtube video into your microsoft powerpoint presentations using a mac or pc, how to convert google slides to a powerpoint presentation in 4 easy steps, how to convert a powerpoint to google slides in 2 different ways, how to change the background on your google slides presentation.
Insider Inc. receives a commission when you buy through our links.
Watch: We compared the $1,200 MacBook Air with the $500 Surface Go, and the results were a mess
- Main content
- Customer Help
- X (Twitter)
How to Copy Slides from One PowerPoint Presentation to Another?
You’ve just created a stellar PowerPoint presentation for an upcoming meeting. But wait – you remember another presentation with slides that would fit perfectly in this one. If only there was a way to integrate them! Oh, wait. There is. Wondering how to copy slides from one PowerPoint to another? Dive in, and let’s unravel the mystery together.
Step-by-Step Guide: How to Copy Slides from One PowerPoint to Another

- Shortcut: As a shortcut, press Ctrl+C after selecting the slides.
- Navigate to the Destination: Shift to your second presentation – this is your destination presentation.

- Mismatched Slide Numbers: Ensure continuity by adjusting slide numbers through the ‘Insert’ tab, selecting ‘Slide Number’.
- PowerPoint Versions: If you’re using older versions like PowerPoint 2007 or PowerPoint 2013, some methods may slightly vary. Check Microsoft Support for specific instructions.
- Feedback & Further Assistance: If you encounter any issues, remember to give feedback. For comprehensive guides, the “See Also” section in Microsoft Office support can be beneficial. Also, PowerPoint for the web offers a streamlined interface if you’re working online.
- Final Words: Mastering the art of moving slides from one presentation to another can save you time and effort, enhancing your productivity. Whether you use drag and drop, shortcut methods, or repurpose slides, you’ll find this knowledge invaluable.
Transferring PowerPoint slides between presentations is essential for efficient workflow. To copy a slide, start by selecting the slide that you want from one presentation and then paste it into another PowerPoint presentation. Always consider the design theme, and you might choose to use the destination theme for consistency. Utilize tools like SharePoint and OneDrive for streamlined collaboration and storage. By practicing these methods, managing your slides will become a breeze. Happy presenting!
Yes, but be aware that some formatting issues might arise due to version differences.
The animations should copy over, but always review to ensure they function as intended.
Yes, PowerPoint’s fundamental functions remain consistent across Windows and macOS.
It could be due to different design themes applied in each presentation. Adjust via the ‘Design’ tab.
There isn’t a set limit, but copying a vast number of slides may slow down the program temporarily.
You must be logged in to post a comment.
- Business articles (22)
- Google Slides (57)
- Keynote (27)
- PowerPoint (83)
- Support (2)
Hi, I am Donna Hocking a freelance graphic designer. I specialise in working with smaller businesses, start ups & freelancers to build their brand & online presence. I also work with larger companies providing ad hoc graphic design or artworking support.
Get in touch to discuss your project.
I offer a range of services such as: Logo design; Branding development; Design for printed materials including, flyers, posters, brochures, POS, & outdoor; Digital design including web banners (static, gif & HTML), social posts, website design &/or build; Presentation design
07508 760 098 [email protected]
Copy & paste slides in PowerPoint and keep slide formatting
In this post I will show you how to copy & paste slides in PowerPoint and keep slide formatting. Some of you may know this already but if you are like me you may have never had the need for it and when you do, like me you may realise that the instructions on the PowerPoint help centre are less than straightforward so I intend to explain it in simple terms as it is actually a very straightforward and quick process.
You will notice that if you try to copy slides from one PowerPoint presentation and paste them into another just using the standard copy (command+C for mac) and paste (command+V for mac) buttons the format of the slides change. They try to pick up or merge with the format of the presentation you are copying the slides into. Well this does not need to be the case. You can easily copy and paste multiple slides from one PowerPoint presentation to another and maintain formatting really easily.
Below is a quick video and a written guide as ever I have tried to keep it to simple quick instructions so I hope you find it useful.
Copy & paste slides in PowerPoint and keep slide formatting – Video guide
Copy & paste slides in PowerPoint and keep slide formatting – Written guide
STEP 1 Select the slides from the presentation you wish to copy from by clicking on each slide you wish to copy whilst holding down the command (on mac) button. Then press command+C (on a mac) or right click to copy those slides.
STEP 2 Now open the presentation you wish to copy the slides into. Click on the slide in that presentation which you want the new slides to follow. Now in the top ribbon find the paste button and click the arrow to see the dropdown menu. Then select ‘Keep source formatting’.
This will paste the slides into your new presentation but keep the formatting of the presentation they came from.
Written by Donna Hocking, graphic designer and creative artworker. If you are a designer / agency in need of support or a business looking for someone to create your print & web materials get in touch I’d love to hear from you. You can also read more about what services I provide here .
Insert editable vectors into PowerPoint for Mac
No comments.
Sorry, the comment form is closed at this time.
How-To Geek
How to duplicate slides in microsoft powerpoint.

Your changes have been saved
Email is sent
Email has already been sent
Please verify your email address.
You’ve reached your account maximum for followed topics.
Microsoft Office vs. Google Docs, Sheets, Slides: Which Is Best?
Have the top 5 highest-grossing mobile games of all time aged well, 7 ways i use chatgpt for language learning as a non-native.
If you want to reuse a slide that appears on your presentation, but you don’t want to manually redesign the entire slide , you can duplicate it instead. Here’s how to duplicate slides in Microsoft PowerPoint.
Duplicating a slide is nothing more than copying and pasting the desired slide. However, there are multiple ways to achieve this low-effort task. We’ll go through each method.
Related: How to Cut, Copy, and Paste in Microsoft Word
The first method is using the “Duplicate Slide” method. Start by opening your slideshow and then selecting the slide thumbnail that you’d like to duplicate.

Once selected, right-click the slide and a menu will appear. Select “Duplicate Slide” from the menu.

The slide will now be duplicated. It will appear immediately after the source slide.

If you want the duplicated slide to appear somewhere else, you can simply click and drag the slide to the desired location.
Another method is to copy and paste the slide to be duplicated. Select the slide you’d like to copy and then press Ctrl+C (Command+C on Mac) to copy the slide to your clipboard.
Related: How to Combine PowerPoint Presentations
Alternatively, right-click the slide and then select “Copy” from the menu.

Unlike the “Duplicate Slide” option, you can select where you want the copied slide to be pasted. To do this, select the area between the two slides that you’d like your slide to appear. You’ll know it’s selected when you see a bar appear between the two slides.

Now press Ctrl+V on your keyboard (Command+V on Mac) to paste the slide.
Alternatively, right-click the bar between the two slides and then select the left-most clipboard under “Paste Options” from the menu that appears.
The copied slide will now be pasted to the selected location.
- Microsoft Office
- Microsoft PowerPoint
How to Drag Slides From One PowerPoint to Another: A Step-by-Step Guide
Dragging slides from one PowerPoint to another is a simple process. Open both presentations, select the slide or slides you wish to move, and drag them to the destination PowerPoint’s slide sorter or slide panel. After completing this action, the moved slides will appear in the second presentation, ready for further editing or presenting.
After you complete the action of dragging slides from one PowerPoint to another, the slides you moved will be incorporated into the new PowerPoint presentation. They will appear in the sequence you placed them, and you can then rearrange, edit, or style them as needed to fit the flow of your new presentation.
Introduction
Have you ever been working on a PowerPoint presentation and realized that a slide or two from another presentation would fit perfectly? Maybe you’re consolidating information for a big meeting, or maybe you’re a teacher who wants to reuse a particularly effective slide in a new lesson. Whatever the reason, PowerPoint makes it relatively simple to move slides from one presentation to another, ensuring you can create the most impactful presentation possible without having to recreate content from scratch.
Knowing how to drag slides from one PowerPoint to another can save you time and help maintain consistency across different presentations. It’s also a useful skill for anyone who frequently presents, whether in a business, academic, or personal setting. Once you get the hang of it, you’ll wonder how you ever managed without this handy little trick.
Step by Step Tutorial: How to Drag Slides from One PowerPoint to Another
Before diving into the steps, let’s clarify what we’ll achieve. We’ll learn how to efficiently transfer slides from one PowerPoint presentation to another. This technique is handy when you want to merge presentations or move content around without starting from scratch.
Step 1: Open Both PowerPoint Presentations
First things first – open both the PowerPoint presentations: the one with the slides you want to move and the one where you want to move them to.
When you have both presentations open, make sure they’re both in a view that allows you to see the slides. A good view for this is the “Slide Sorter” view, which you can access from the “View” tab in PowerPoint. This way, you can see all slides at once, making it easier to select and move them.
Step 2: Select the Slides You Want to Move
In the presentation with the slides you want to move, click on the slide you wish to transfer. If you’re moving multiple slides, hold down the Ctrl key (Command on Mac) and click each slide.
Make sure you select every slide you want to move before you start dragging. If you accidentally miss one, you’ll have to repeat the process for the missed slide. Also, remember that any changes you make to the original slide will not be reflected in the copy once it’s moved.
Step 3: Drag and Drop the Slides into the New Presentation
Click and hold on the selected slides, then drag them to the other open PowerPoint window. Drop them in the desired location in the second presentation’s slide thumbnail pane or slide sorter view.
As you drag the slides over to the new presentation, you’ll see a faint outline or a cursor indicating where the slides will be dropped. Be precise with where you place them, as this will determine their order in the new presentation. If you make a mistake, don’t worry; you can always rearrange the slides later.
| Benefit | Explanation |
|---|---|
| Time-Efficiency | Dragging slides from one presentation to another saves time compared to recreating the same slides. |
| Consistency | It helps maintain a consistent look and feel across different presentations. |
| Flexibility | This method allows for easy collaboration and sharing of content between presentations. |
Time-efficiency is a significant benefit of dragging slides between PowerPoint presentations. Instead of spending precious minutes or even hours recreating a slide you know exists elsewhere, you can simply move it over. This leaves you more time to focus on other aspects of your presentation.
Ensuring consistency across presentations is another advantage. By moving slides, you can maintain the same formatting, branding, and messaging, which can be crucial in a professional setting. It’s also less prone to human error than recreating slides from memory.
Flexibility is key when working on presentations, especially if you’re collaborating with others. If someone else created a great slide, you can easily incorporate it into your presentation. This method keeps everyone on the same page and ensures the best content is used.
| Drawback | Explanation |
|---|---|
| Potential Formatting Issues | Slides may not always transfer perfectly and may require some reformatting. |
| Version Compatibility | There may be compatibility issues between different versions of PowerPoint. |
| Missing Elements | Some elements, like fonts or media, may not transfer if they’re not available on the second computer. |
One potential issue with dragging slides between PowerPoint presentations is formatting discrepancies. Sometimes, slides may not look exactly the same in the new presentation, especially if you’re using different templates or themes. This can mean spending time readjusting the slides to make sure they fit in with the rest.
Version compatibility can also be a problem. If you’re moving slides from a newer version of PowerPoint to an older one, some features may not be supported, which could cause issues with how the slide appears or functions.
Finally, if your slide includes specific fonts, media, or other elements that aren’t available on the computer you’re moving the slides to, these elements might be missing or look different. It’s always a good idea to check for these discrepancies before finalizing your presentation.
Additional Information
When dragging slides from one PowerPoint to another, it’s essential to consider the design and layout of your new presentation. You might need to tweak the slides a bit to make them fit seamlessly into their new home. For example, the color scheme or fonts used in one presentation might clash with the other, so be prepared to do some editing to ensure a cohesive look.
Another tip is to use the “Reuse Slides” feature if you’re dealing with a large number of slides or want more control over the insertion process. This feature, found under the “New Slide” dropdown, allows you to browse and insert slides from other presentations with the option to preserve or discard formatting.
Additionally, remember that any animations, transitions, or embedded media will also be transferred with the slides. So, make sure everything works as intended in the new presentation. It’s always a good idea to do a quick run-through after incorporating the new slides to catch any issues.
Using the prompt keyword, remember that when you drag slides from one PowerPoint to another, you’re essentially copying and pasting content. This can be incredibly helpful for constructing comprehensive presentations without unnecessary duplication of efforts.
- Open both PowerPoint presentations.
- Select the slides you want to move.
- Drag and drop the slides into the new presentation.
Frequently Asked Questions
Can i move multiple slides at once.
Yes, you can move multiple slides at once by holding down the Ctrl key (Command on Mac) and clicking each slide you want to transfer, then dragging them together to the new presentation.
Will animations and transitions also be moved with the slides?
Yes, animations and transitions that are applied to the slides will also be transferred when you drag them to the new presentation.
What if the design themes of the two presentations are different?
If the design themes are different, you may need to do some reformatting after moving the slides to ensure they match the new presentation’s style.
Can I undo the action if I make a mistake?
Yes, you can undo the action by pressing Ctrl+Z (Command+Z on Mac) if you accidentally move the slides to the wrong spot or change your mind.
What should I do if a font or media doesn’t transfer correctly?
If a font, media, or any other element doesn’t transfer properly, you may need to manually add it to the new presentation or choose suitable replacements that are available on the second computer.
Mastering the art of dragging slides from one PowerPoint to another can revolutionize the way you create presentations. It’s a skill that’s easy to learn but has a significant impact on your workflow, saving you time and helping to ensure your slides are always up to snuff. Whether you’re a student, a business professional, or just someone who likes to create killer slideshows for family and friends, knowing this trick can make all the difference.
For further reading, consider exploring more advanced PowerPoint features like the “Reuse Slides” function or diving into tutorials on how to make the most of PowerPoint’s vast array of tools. And, of course, never underestimate the importance of practice. The more you work with PowerPoint, the more seamless and intuitive these processes will become.
Remember, dragging slides from one PowerPoint to another is just one of many ways to enhance your presentations. Stay curious, keep learning, and your next slideshow might just be your best one yet.

Matthew Burleigh has been writing tech tutorials since 2008. His writing has appeared on dozens of different websites and been read over 50 million times.
After receiving his Bachelor’s and Master’s degrees in Computer Science he spent several years working in IT management for small businesses. However, he now works full time writing content online and creating websites.
His main writing topics include iPhones, Microsoft Office, Google Apps, Android, and Photoshop, but he has also written about many other tech topics as well.
Read his full bio here.
Share this:
Join our free newsletter.
Featured guides and deals
You may opt out at any time. Read our Privacy Policy
Related posts:
- How to Save Powerpoint as PDF with Notes
- Can I Convert My Powerpoint to Google Slides?
- How to Set Time for Slides in Powerpoint
- How to Unhide a Slide in Powerpoint 2013
- How to Add Page Numbers in Powerpoint 2010
- How to Make a Powerpoint Slide Vertical in Powerpoint 2013
- How to Delete a Slide in Powerpoint 2010
- How to Hide a Slide in Powerpoint 2010
- How to Change the Font on All Slides in Google Slides
- How to Loop a Slideshow on Powerpoint 2013
- How to Delete Multiple Slides in Google Slides
- How to Insert Slides from Another Presentation in Powerpoint 2010
- How to Rotate a Slide in PowerPoint: A Step-by-Step Guide
- How to Create a PowerPoint Presentation Step by Step: 2024 Guide
- How to End Powerpoint on Last Slide in Powerpoint 2010
- How to Change Hyperlink Color in Powerpoint 2010 (An Easy 5 Step Guide)
- How to Duplicate a Slide in Powerpoint 2010
- How to Change Line Spacing in Powerpoint for Every Slide at Once
- How to Do Vertical & Horizontal Slides in PowerPoint: A Step-by-Step Guide
- How to Check Word Count on Powerpoint 2010
- Shop Now: Amazon Labor Day Tech Sale
- Get These 12 Student Discounts!
How to Copy a PowerPoint Design Template to Another Presentation
It's quick and easy to copy over a design template
- Brock University
What to Know
- In the source presentation, select View > Slide Master . In the Slide pane, right-click the Slide Master and select Copy .
- Go to View > Switch Windows and choose the second presentation. Go to View > Slide Master . Right-click the Slide pane and select Paste .
- Choose Use Destination Theme (keeps colors, fonts, and effects) or Keep Source Formatting (copies the source's colors, fonts, effects).
This article explains how to copy a PowerPoint design template over to another presentation. Instructions apply to PowerPoint 2019, PowerPoint 2016, PowerPoint 2013, and PowerPoint for Microsoft 365.
How to Copy a Presentation's Design Template
It's often quicker to copy a design template from a presentation than to find it in the list of PowerPoint templates.
Go to View in the presentation that contains the design template you want to copy and select Slide Master .
Right-click the Slide Master in the Slide pane on the left side of the screen and select Copy .
The Slide Master is the large thumbnail image at the top of the Slide pane. Some presentations contain more than one slide master.
Go to View , select Switch Windows , and choose the presentation you want to paste the Slide Master into.
If you don't see the other PowerPoint presentation on this list, it means that the other file isn't open. Open it now and return to this step to select it from the list.
In the second presentation, go to View and select Slide Master to open the Slide Master .
To insert the Slide Master from the other presentation, right-click on the Slide pane to the left, select Paste , and do one of the following:
- Choose Use Destination Theme to keep the theme colors, fonts, and effects of the presentation you are pasting to.
- Choose Keep Source Formatting to copy the theme colors, fonts, and effects of the template you are copying from.
Select Close Master View .
Changes made to individual slides in the original presentation, such as font styles, do not change the design template of that presentation. Therefore, graphic objects or font changes added to individual slides do not copy over to a new presentation.
To copy PowerPoint slides to another presentation , right-click the thumbnail of the slide you want to copy and choose Copy . Right-click a blank area of the Slides pane where you want to place it and choose one of the pasting options.
To save a copy of a PowerPoint presentation on your computer, go to the File tab and select Download As > Download a Copy . Select Download to continue.
To embed YouTube videos in PowerPoint , select Share > Embed . Select the HTML code and choose Copy . In your PowerPoint slide, select Insert > Video > Insert Video From Website . In the dialog box, right-click the blank area and choose Paste > Insert .
Get the Latest Tech News Delivered Every Day
- Copy Slides to Another PowerPoint Presentation
- How to Create a Microsoft Sway Presentation
- Create a Default Presentation Template in PowerPoint
- What Is Microsoft PowerPoint and How Do I Use It?
- The 10 Most Common PowerPoint Terms
- Use This PowerPoint Template for a Multiple Choice Quiz
- How to Create a Timeline in PowerPoint
- 13 Free PowerPoint Game Templates
- How to Make a Poster in PowerPoint
- 10 Best Places for Free PowerPoint Templates
- Tips for Memorial PowerPoint Presentations
- What's New in Microsoft PowerPoint 2010?
- How to Add an Excel Chart to a PowerPoint Presentation
- 10 Free PowerPoint Game Templates
- The Definition of a Slide (or Slides) in a PowerPoint Presentation
- What Is Microsoft PowerPoint?
How to Copy and Paste in PowerPoint? [With Shortcuts & Tips!]
By: Author Shrot Katewa
![How to Copy and Paste in PowerPoint? [With Shortcuts & Tips!]](https://artofpresentations.com/wp-content/uploads/2021/05/Featured-Image-How-to-Copy-and-Paste-in-PowerPoint.jpg "powerpoint copy slide to new presentation")
Using Copy and Paste in PowerPoint is really one of the basic features. That said, it is also one of the most powerful and commonly used options in PowerPoint. So, how exactly does copy and paste work in PowerPoint?
Select the text or an object that you want to copy by clicking on it. Then, press Ctrl+C on your keyboard (Cmd+C on Mac) or right-click and select “Copy”. Go to the destination slide and press Ctrl+V (Cmd+V on Mac) or right-click and select “Paste” to paste the text or the object that you had copied.
As easy as the answer may seem, the copy and paste command can actually be used for more than just duplicating a line of text or creating another shape.
So, in this article, we will learn how to use the copy and paste command in PowerPoint for more than just a few basic things! Plus, you will get to know how to disable copy and paste for your audience. Additionally, I will also help you understand how to use copy and paste function correctly when working with images and charts!
That and much more! So, let’s get started!
[A Quick Note Before We Begin – for this article, I will be using one of the presentation templates from Envato Elements . With Envato Elements, you get access to thousands of presentation designs with unlimited downloads so you never run out of options again. Plus, you get free previews so you know exactly what you’re getting before buying! It is also very affordable. Check out their pricing here ]
1. How to Copy and Paste in PowerPoint?
In general, copying and pasting in PowerPoint is very straight forward. Here is how you do it in 6 simple steps:
Step-1: Select the object or text you want to copy
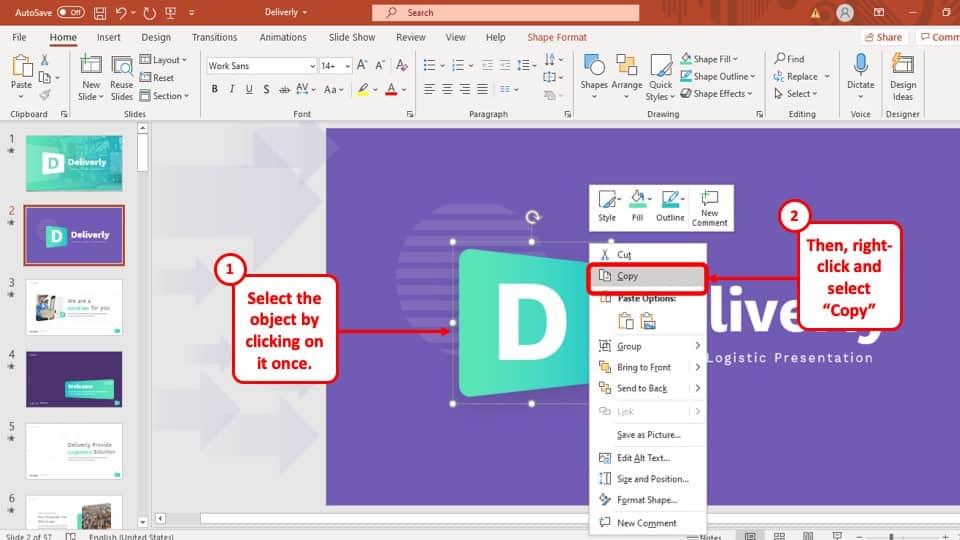
At first, you have to select the object or text you want to copy by clicking on the ‘ Left ’ mouse button and dragging the cursor over it.
Step-2: Click on the ‘Right’ mouse button on the selected object to open the drop-down menu
After you have selected the object that you want to copy, hit the ‘ Right ’ mouse button. A drop-down menu will appear with several options.
Step-3: Press the ‘Copy’ option
In the drop-down menu, select the ‘ Copy ’ option. This will make a copy of the object and temporarily save it in the ‘ Clipboard ’ menu ready to be pasted in your preferred location.
Step-4: Click on the ‘Right’ mouse button on the slide you want to paste your object or text.
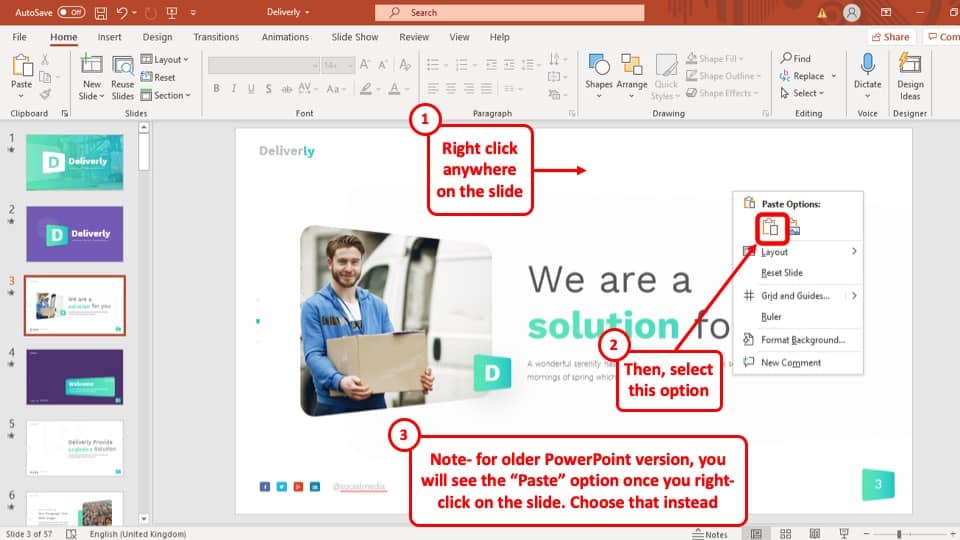
After you have copied the object, go to the slide where you want to paste the object, ‘ Right click ’ on your mouse anywhere in the slide to access the drop-down menu.
Step-5: Click on the ‘Use Destination Theme’ option.
Finally, after you have ‘ Right clicked ’ on the slide where you want to paste your object, select the ‘ Use Destination Theme’ option located under ‘ Paste Options ’ with an icon of a clipboard with a lower case ‘a’ on it. You can do the same for copied texts as well.
1a. How to Copy and Paste in PowerPoint on Mac?
Copy and pasting in PowerPoint on Mac is almost the same as it is on Windows . Follow these simple steps to copy and paste objects on your Mac computer:
Step-1: Select the object and click on the ‘Right’ mouse button
At first, go to the slide where the object or text you want to copy is located. Select it by clicking on the ‘ Left ’ mouse button. Then, press the ‘ Right ’ mouse button. This will give you access to a drop-down menu.
Step-2: Click on the ‘Copy’ button
Now click on the ‘ Copy ’ option from the drop-down menu. Similar to Windows operating systems, this will make a copy of the object and temporarily save it on the ‘ Clipboard ’ of your PowerPoint presentation.
Step-3: Go to the destination slide, and right-click on the slide
After you have copied the object, go to the destination slide where you want to paste the object and hit the ‘ Right ’ mouse button. This will again give you access to the drop-down menu.
Step-4: Click on “Paste” option
Finally, click on the ‘ Paste ’ option that is located on the menu. This will paste the copied object or text onto the destination slide.
1b. Keyboard Shortcuts for Copy and Paste in PowerPoint (For PC & Mac)
Microsoft PowerPoint has keyboard shortcuts to bypass the drop-down menu that makes the process much more efficient. To use your keyboard to copy and paste objects in your PowerPoint presentation, use the following keyboard shortcuts –
- To copy – Press Ctrl+C
- To paste – Press Ctrl+V
- To copy – Press Cmd+C
- To paste – Press Cmd+V
2. How to Copy and Paste a PowerPoint Slide?
While making your PowerPoint presentation, you might often need to copy an entire slide from one destination to another. The process is explained in 3 easy steps below:
Step-1: ‘Right Click’ using your mouse on the Slide you want to copy.

To begin, you have to move your cursor to the slide that you want to copy and click on the ‘ Right ’ mouse button to open the drop-down menu.
Step-2: Select ‘Copy’ option or press ‘Ctrl + C’
From the drop-down menu, Select the ‘ Copy ’ option. This will make a copy of the slide to your clipboard. Alternatively, you can skip ‘ Step-1 ’ by just selecting the slide and pressing ‘ Ctrl + C ’
Step-3: Right-click between the two slides and Paste the Copied Slide
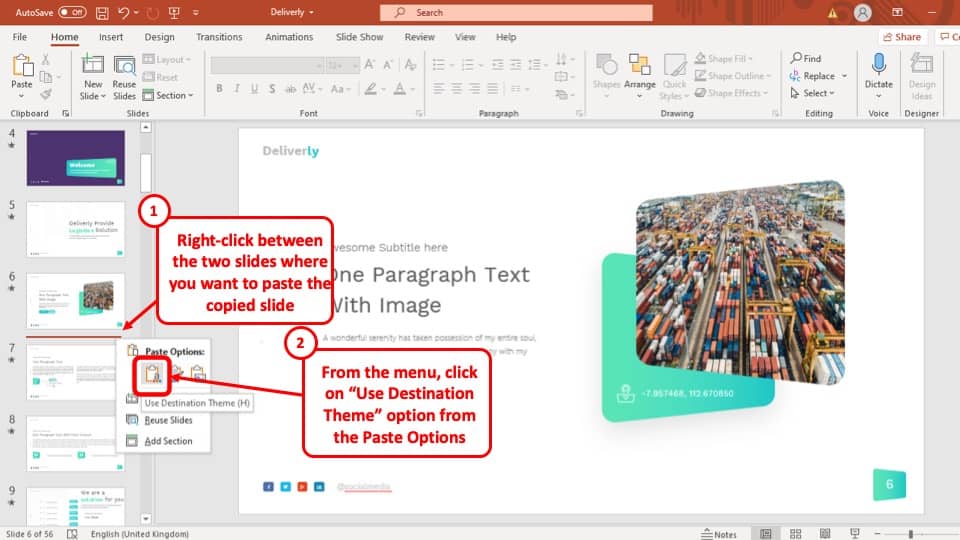
Finally, position your cursor on the slide bar where you want to paste the copied slide. Hit the ‘ Right ’ mouse button and select the ‘ Use Destination Format ’ option under ‘ Paste Options ’. Alternatively, you can also use the keyboard shortcuts ‘ Ctrl + V ’ to get the job done.
This will immediately paste your slide to your preferred position in the PowerPoint presentation.
2a. How to Copy and Paste a PowerPoint Slide in Another Presentation?
Copy and pasting a PowerPoint slide from another presentation is almost identical to copy and pasting a slide from the same presentation. The whole process is described below:
Step-1: Copy the Original Slide

At first, go to the PowerPoint presentation that has the slide that you want to copy into your presentation and then copy the slide.
Step-2: Paste the Slide in the Destination presentation
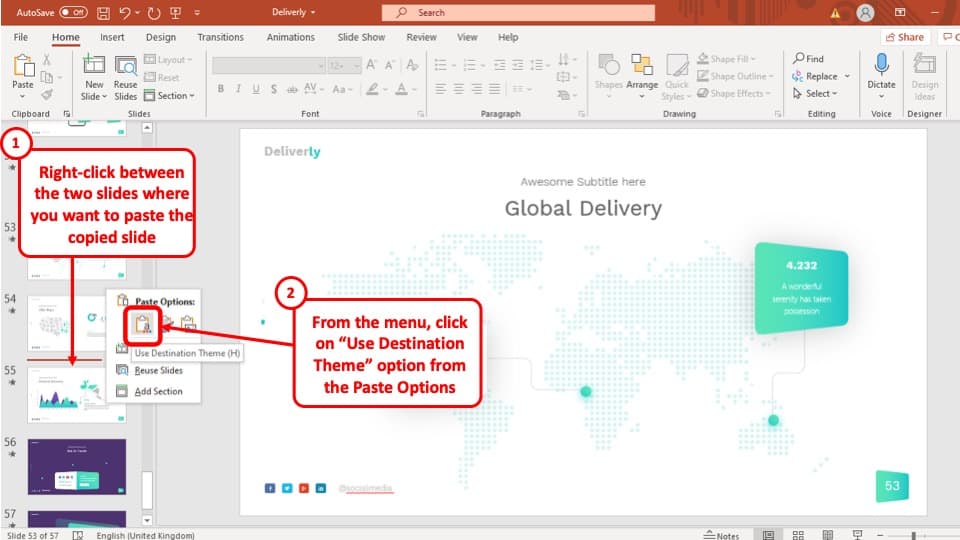
Now simply paste the slide you have copied from the other slide by positioning your cursor on the slide bar and clicking on the ‘ Right ’ mouse button and selecting ‘Use Destination Themes’ under the ‘Paste Options.’

This will paste the slide you have copied to your preferred location while matching the theme used in your PowerPoint presentation.
2b. How to Copy and Paste a PowerPoint Slide without Losing Formatting?
PowerPoint also has the option to paste slides from other presentations while maintaining the original format of the slide. Below is a step-by-step guide on how to do that.
Step-1: Copy the slide you want to paste from the source presentation
Go to the presentation that has your preferred slide and copy it by hitting the ‘ Right ’ mouse button and then selecting the ‘ Copy ’ option from the drop-down menu.
Step-2: Go back to your PowerPoint presentation and click on the ‘Right’ mouse button in your preferred location.
In the next step, you have to go back to your PowerPoint presentation and click on the ‘ Right ’ mouse button on the position where you want to paste the slide that you copied. This will open the drop-down menu.
Step-3: Click the ‘Keep Source Format’ option under ‘Paste Options’
After you have accessed the drop-down menu, instead of clicking on the ‘ Use Destination Format ’ option, click on the ‘ Keep Source Format ’ option, the icon looks like a paintbrush on a clipboard as shown in the screenshot.
After selecting the ‘ Keep Source Format ’ option, the slide had copied will be pasted on your PowerPoint presentation, but it will match the format of the presentation it was originally in.
3. How to Copy and Paste Text in PowerPoint?
Copy and pasting text in your PowerPoint presentation is an easy 2 step process. They are explained below:
Step-1: Select the text that you want to copy in your PowerPoint presentation
At first you have to copy the text that you want to paste in your PowerPoint presentation. Simply select the text, press the ‘ Right ’ mouse button and click on the ‘ Copy ’ option from the drop-down menu.
Step-2: Go to the slide in your PowerPoint presentation and paste the copied text
Once you have copied the text you want to paste on your presentation, go to the slide where you want to paste the text, press the ‘ Right ’ mouse button and click on the ‘ Use Destination Format ’ option.
Check out our article on How to Format Text in PowerPoint to edit the text the correct way in PowerPoint and save some time!
4. How to Copy and Paste Pictures in PowerPoint?
The process of copying and pasting pictures in PowerPoint is almost the same as copying and pasting texts in PowerPoint. Simply copy your preferred picture and paste it in your PowerPoint presentation.
It is important to note that you can also copy and paste an image from a folder into your PowerPoint presentation. You can also do it using the keyboard shortcuts ‘Ctrl + C’ to copy and ‘Ctrl + V’ to paste.
“Unable to Paste Image” Error in PowerPoint
In some cases, users are unable to paste pictures in their PowerPoint presentation if the image is copied from a folder. In such a case, you will have to insert the image into your PowerPoint slide, instead of pasting it. The process is described step-by-step below.
Step-1: Click on the “Insert” tab to add an Picture

At first, you have to go to the slide where you want to insert the image and then go to the ‘ Insert ’ ribbon located in the upper left area of your PowerPoint window. Now click on the ‘ Pictures ’ option.
Step-2: Select the ‘This Device…’ option
After clicking on the ‘ Pictures ’ option, select ‘ This Device… ’ from the drop-down menu.
Step-3: Select the image click ‘Insert’
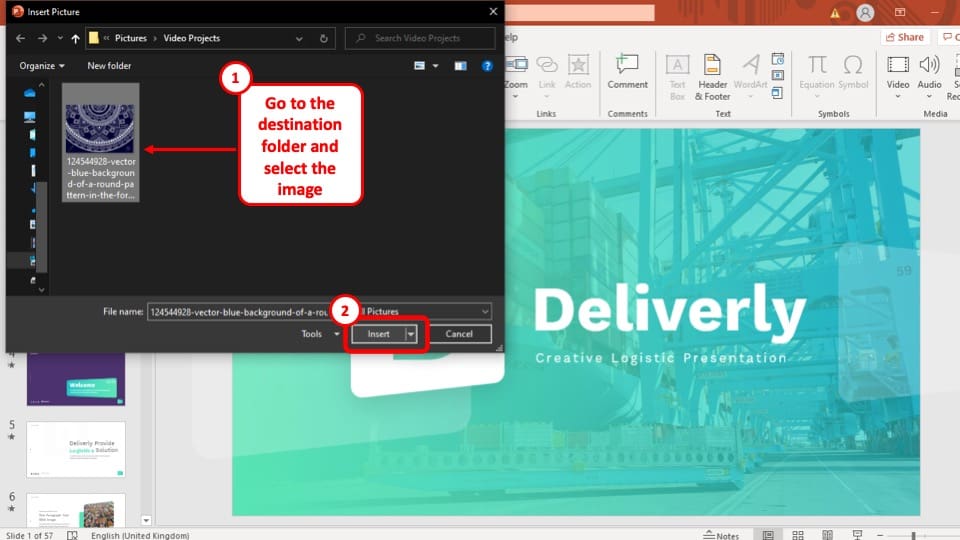
A pop-up window will appear, where you have to select the image, you want to add to your presentation. After selecting the image, click on the ‘ Insert ’ button at the bottom right corner of the pop-up window to successfully insert it to your presentation.
The image will be added to the slide in your PowerPoint presentation. Now all you have to do is resize it and place it in your preferred position.
5. How to Disable Copy and Paste in PowerPoint?
Although you cannot completely turn off the copy and paste option from your PowerPoint presentation file, you can, however, restrict the PowerPoint file to ‘ View Only ’ for permitted users.
This way only permitted users will be able to view the presentation file and they will not be able to edit or copy anything from it. A step-by-step guide to the whole process is given below.
Step-1: Go to the ‘Info’ section in the ‘File’ tab.
To restrict your PowerPoint presentation, at first you have to go to the ‘ Info ’ section which is located in the ‘ File ’ tab.
Step-2: Restrict the Access of the PowerPoint Presentation
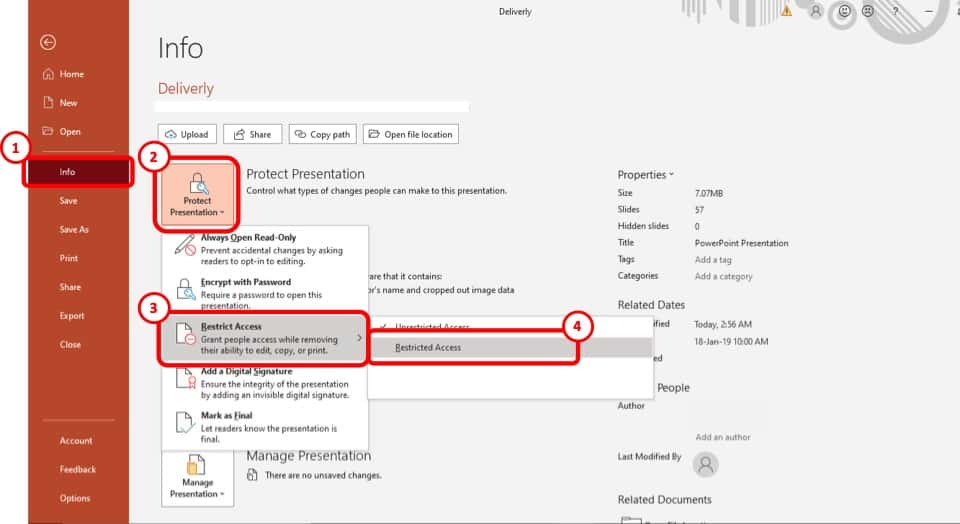
Now you have to go the ‘ Restrict Action ’ option under ‘ Protect Presentation ’ and select the ‘ Restricted Action ’ option.
Step-3: Tick the box that says, ‘Restrict permission to this presentation’
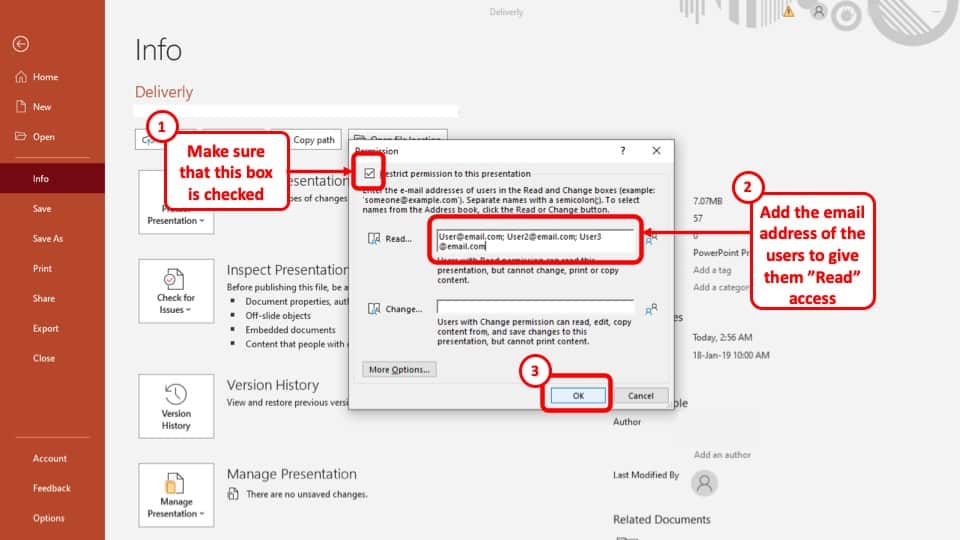
After you press the ‘ Restricted Action ’ option, a pop-up window will appear. Tick the box that says ‘ Restrict permission to this presentation ’ on the pop-up window to enable the restriction on your presentation. This will allow you to limit the viewership and use of your PowerPoint presentation file to selected users only.
Step-4: Add the email addresses of the users and press ‘Ok’
Add the email addresses of the users you want to show the presentation to in the first box that says ‘ Read… ’ and press the ‘ Ok ’ button at the bottom right corner of the pop-up window.
Now email the presentation to the users with access to your presentation. This way, only the users you added to the box will be able to see the presentation, without being able to edit or copy anything on it.
6. Troubleshooting Copy and Paste Issues in PowerPoint
There may be more than a few reasons why you cannot copy and paste in you PowerPoint presentation. In this section I will be discussing some of the reasons why that maybe and how to fix them.
6a. PowerPoint Won’t Copy and Paste? Here’s Why!
Although this is quite a rare occurrence, however, this can happen from time to time. Here’s what you can do to troubleshoot this problem –
- Restart Microsoft Office – Sometimes, the problem gets solved by simply restarting the PowerPoint or even Microsoft Office application. If it gets solved, then great! Else, move on to the next step.
- Restart your Computer – Restarting your computer will most definitely fix the problem. Perhaps your computer had an update or even the Microsoft Office application received an update and needed to restart. However, if the problem is still not fixed, then you need to check to see if any of the other common reasons have caused an issue! (mentioned below)
The 3 most common reasons why you might be having trouble copying and pasting in your PowerPoint Presentation are:
1. The latest update in you Microsoft Office may have a bug that needs fixing
2. The Microsoft Office installed in your computer maybe broken and needs to be repaired
3. One of the installed add-ins in your Microsoft PowerPoint might be causing this problem.
If you have managed to fix the above 3 errors, it is highly unlikely that you will have a copy and paste issue. If the issue still exists, you would be better off to check if this is a system-wide issue or just an issue in PowerPoint. Based on this, 2 scenario’s can emerge –
- Copy and paste issue is still seen only in PowerPoint – then, reach out to a customer support executive from Microsoft.
- You are unable to copy and paste anywhere on your computer – perhaps check to see if the “Control” key on your keyboard is functioning fine. Other than that, there isn’t any other solution apart from resetting your computer to factory default or replacing your computer altogether.
6b. Excel Chart Won’t Paste into PowerPoint!
Sometimes, the paste function just doesn’t work when trying to paste a chart from Excel to PowerPoint. This can be really annoying especially when you are in a hurry.
Below, I’ve shared 3 methods to fix the issue of an excel chart not pasting into your PowerPoint –
Method 1 – Using “Paste Special” Option
One of the solutions to not being able to paste your Excel Chart is to use the “ Paste Special ” option. Here is a step-by-step explanation of the process.
Step-1: Copy the chart from your Excel Workbook
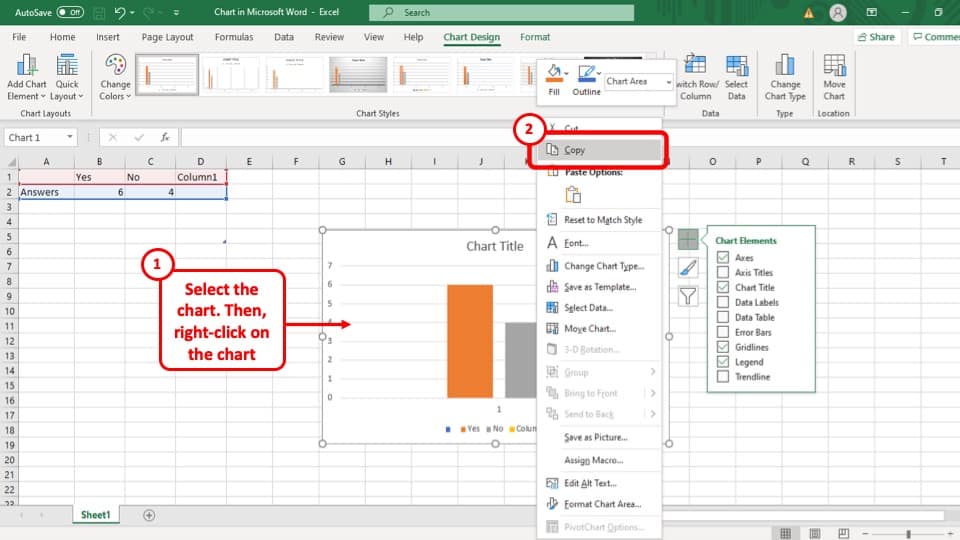
At first you have to copy the Chart by “ Right clicking ” on it and selecting the “ Copy ” option.
Step-2: Click on the arrow under the “Paste” option
After that, you have to go back to the slide you want to paste the chart. Click on the arrow under the “ Paste ” option in the “ Clipboard ” section of your “Home” tab . This will open a drop-down menu.
Step-3: Click on the “Paste Special” option

After opening the drop-down menu, click on the “ Paste Special ” option. This will open a pop-up window.
Step-4: Select “Microsoft Office Graphic Object” and press “Ok”
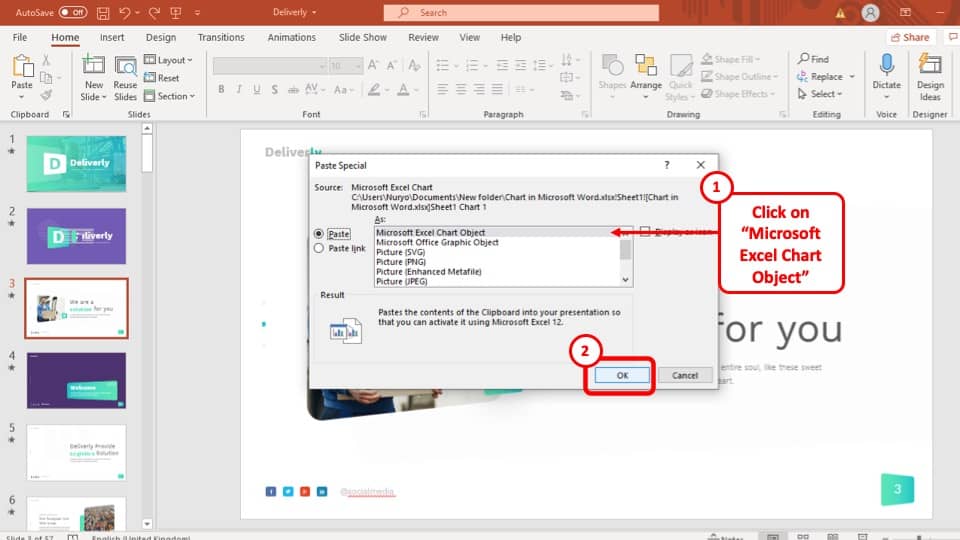
Once you have opened the “ Paste Special ” option, select “ Microsoft Office Graphic Object ” to past the chart in your PowerPoint presentation and then click on the “ Ok ” button.
Method 2 – Paste the Chart as an Image
Another solution to not being able to paste Excel Charts in your PowerPoint presentation can be to paste the chart as an image. That way, the chart will be saved to your presentation as an image instead of a chart.
The drawback to this method is that the edits that you make to your data in excel won’t automatically reflect in the chart in PowerPoint. That said, it is a temporary quick fix. If you don’t intend to update the source data for the chart, then this method will work just fine!
The process is described below.
Step-1: Save the chart as a picture from the Excel Workbook
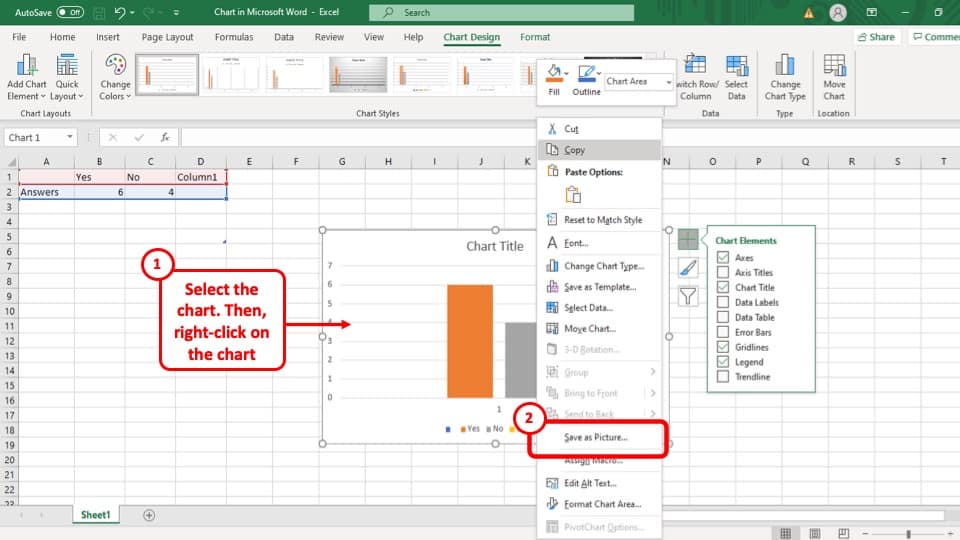
Go to the Excel Workbook with the chart that you want to add to your presentation, “ Right click ” on it and select the “ Save as Picture… ” option.
Step-2: Press “Save” on the pop-up window.
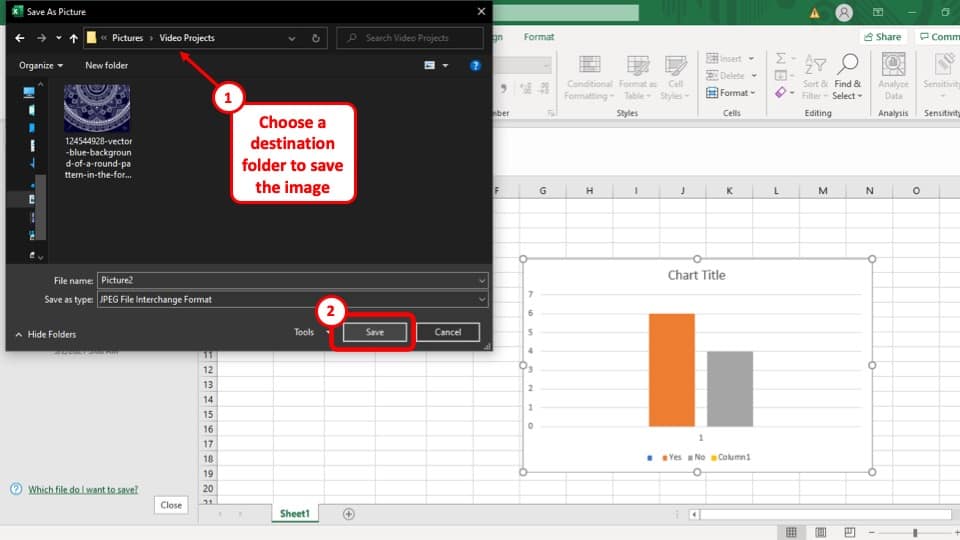
Once you have selected the “ Save as Picture… ” option, a pop-up window will appear on your screen. Save the image of the chart by clicking on the “ Save ” button at the bottom right corner of the pop-up window.
Step-3: Select the “This Device…” option
The next step is to select the “ This Device… ” option, under the “ Pictures ” drop-down menu which you can find in the “ Insert ” ribbon
Step-4: Select the chart and press “Insert”
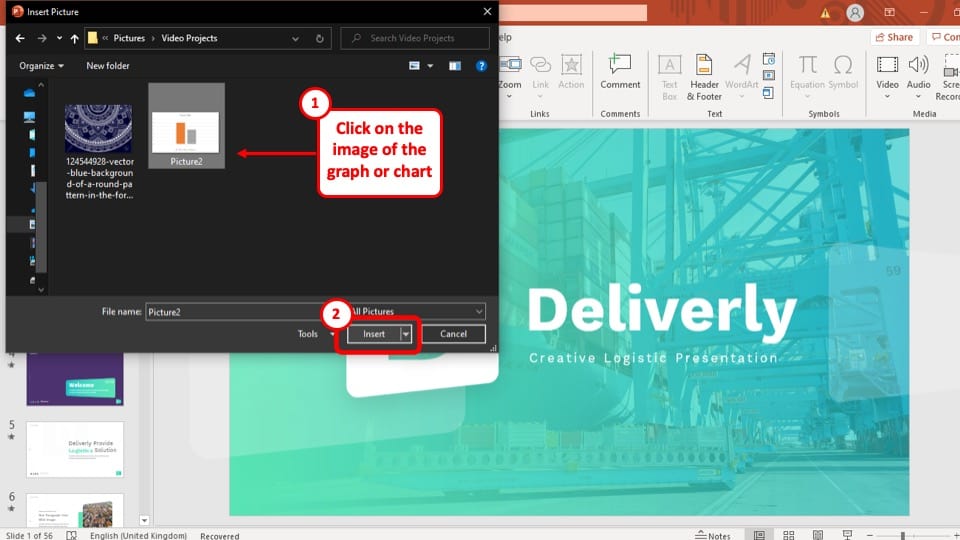
Finally, all you have to do is select the image of the chart and press the “ Insert ” button at the bottom right of the pop-up window.
Method 3 – Recreate the Chart in PowerPoint
If all else fails, you can still copy all the chart data from the Excel Workbook and create a new chart in your PowerPoint slide using those data. You can recreate an identical chart on your PowerPoint.
However, this may method may take time to recreate the chart exactly depending on how many customizations were done to the chart in Excel. Nevertheless, it is also an option that will work for you.
More PowerPoint Related Topics
- How to Crop a Picture in PowerPoint? [Complete Step-by-Step Tutorial!]
- How to Give a Presentation on Zoom? A Helpful Resource!
- What is a Presentation Clicker? [And How to Use it!]
- How to Convert a PowerPoint to PDF? [A Simple Guide!]
- PowerPoint vs Google Slides: Which is Better? [ULTIMATE Test!]
- How to Change Bullet Style in PowerPoint? A Complete Guide
Credit to diana.grytsku (via Freepik) for the featured image of this article
How to combine PowerPoints into one PDF
Combine multiple PowerPoint presentations into a single PDF with these easy and efficient steps.
Combining PowerPoints into One PDF (Step-by-Step Guide):
Step 1: open powerpoint and create a new presentation.

Step 2: Copy Slides from Each Presentation

Step 3: Paste Slides into the New Presentation

Step 4: Save the Combined Presentation
Step 5: convert the combined presentation to pdf.

Step 6: Upload the PowerPoint File

Step 7: Convert and Download the PDF

Frequently Asked Questions:
Can i maintain the original formatting of slides when combining multiple powerpoint presentations, is there a limit to the number of slides i can combine into one pdf, can i add slides from different versions of powerpoint to the same combined presentation, what should i do if the pdf conversion process fails or the output is incorrect.
- Ensure that your PowerPoint file is saved correctly and is not corrupted.
- Check for any complex elements or large media files in your presentation that might be causing the issue and consider simplifying them.
- As a last resort, print the PowerPoint presentation to PDF using the "Print" function in PowerPoint and selecting "Save as PDF" or a similar option.
Create PPT using AI
Just Enter Topic, Youtube URL, PDF, or Text to get a beautiful PPT in seconds. Use the bulb for AI suggestions.
character count: 0 / 6000 (we can fetch data from google)
upload pdf, docx, .png
less than 2 min
Sanskar Tiwari
Founder at MagicSlides
How to create a dos and donts slide in PowerPoint
1 August 2024
How do I enable design ideas in PowerPoint?
How to delete a PowerPoint presentation completely
How to Create a QR Code for a PowerPoint Presentation
How to share a PowerPoint presentation as a link
How are additional slides added to a PowerPoint Presentation
How to Create an Agenda Slide in PowerPoint
How to Make a Comparison Slide in PowerPoint
How to apply a template to an existing presentation in PowerPoint
Stunning presentations in seconds with AI
Install MagicSlides app now and start creating beautiful presentations. It's free!

Get AI-Generated Presentations Ready in Seconds
Free AI PPT Tools

Copy and paste a slide master from one presentation to another
You can copy a slide master (and all its associated layouts) you like from one presentation into another.
Copy the slide master from the first presentation
Open both presentations: the one you want to copy a slide master from, and the one you want to paste the slide master into.
In the presentation that has the slide master you want to copy, on the View tab, select Slide Master .

In the slide thumbnail pane, right-click the slide master, and then select Copy .

In the thumbnail pane, the slide master is represented by the larger slide image with a numeral next to it, and the related layout masters are the smaller items subordinate to it (as illustrated above).
Many presentations contain more than one slide master, so you may have to scroll to find the one that you want.
Paste the slide master into the new presentation
On the View tab, select Switch Windows , and then select the presentation that you want to paste the slide master to.
On the View tab, select Slide Master .
In the thumbnail pane, right-click the slide master, and then, under Paste , do one of the following;

When you're finished, select Close Master View .

Need more help?
Want more options.
Explore subscription benefits, browse training courses, learn how to secure your device, and more.

Microsoft 365 subscription benefits

Microsoft 365 training

Microsoft security

Accessibility center
Communities help you ask and answer questions, give feedback, and hear from experts with rich knowledge.

Ask the Microsoft Community

Microsoft Tech Community

Windows Insiders
Microsoft 365 Insiders
Was this information helpful?
Thank you for your feedback.
IMAGES
VIDEO
COMMENTS
Select the slide or slides you want to copy, and then on the. To select multiple sequential slides, click the first slide, press Shift, and then click the last slide that you want. Still in the thumbnail pane, right-click where you want the copied slide to be pasted, and then click. If you are prompted for access to the Clipboard, click.
Click and Drag Method in PowerPoint. If you'd rather use the mouse to copy slides from one presentation to another, follow these steps: In the Slides pane of the original presentation, select the thumbnail of the desired slide. Drag the thumbnail to the Slides pane of the destination presentation in the preferred location for the slide.
On the Home tab, in the Clipboard group, click the Copy button (or press Ctrl+C): Right-click on the selection and choose the Copy command from the popup menu: 5. In the working (destination) presentation, do one of the following: Select the thumbnail after which you want to insert the copied slide (s) or click the empty area after the thumbnail.
To copy slide formatting: Select the slide with the desired formatting. Click on Format Painter. Click on the slides to which you want to apply the formatting. For copying entire slides from another presentation, open both presentations in the PowerPoint desktop app. In the source presentation, right-click on the slide thumbnail and select Copy ...
On the Home tab of the ribbon, in the Slides group, click the arrow below New Slide, and then select Reuse Slides. In the Reuse Slides pane, click Open a PowerPoint File. In the Browse dialog box, locate and click the presentation file that contains the slide that you want, and then click Open. If you want the slide that you are adding to the ...
Open the new presentation and select the slide you want the copied slides to follow. Go to the "Home" tab and click the bottom half of "New Slide.". Choose "Reuse Slides" at the bottom of the drop-down menu. Locate and select the PowerPoint file with the slides you want to reuse. Pick the slides you want and click the "Insert ...
In this Microsoft PowerPoint tutorial I show you how to copy slides between presentations without having both presentations open. This Microsoft PowerPoint f...
You can use the shortcuts Ctrl + C to copy and Ctrl + V to paste slides. Open the PowerPoint from which you can want to copy the slides. On the Left panel, you will see a list of slides serially. Right-click on the slide you want to copy and click Copy. To copy multiple sequential slides, click on the first slide.
In the source presentation, select the slides you want to copy. Right-click a selected slide and choose "Copy" or press CTRL+C. Switch to the target PowerPoint presentation. Right-click on a slide and select "Paste" or press CTRL+V. The copied slides will now appear in the target presentation. Tip: You can choose different paste options ...
Step 2: Save the Presentation with a New Name. Go to 'File' > 'Save As' and choose a new name and location for your copied presentation. Saving the original presentation with a new name creates a separate file, allowing you to maintain the original while working on the new copy.
2. Right-click on a slide in the left sidebar to copy it. You can also press Command + C or Ctrl + C on your keyboard. If you hold down Command or Ctrl, you can click multiple slides to select ...
Executing the Copy Command. Right-Click Method: Simply right-click the highlighted slide or slides and select "Copy". Shortcut: As a shortcut, press Ctrl+C after selecting the slides. Pasting into the New Presentation. Navigate to the Destination: Shift to your second presentation - this is your destination presentation.
Then press command+C (on a mac) or right click to copy those slides. STEP 2. Now open the presentation you wish to copy the slides into. Click on the slide in that presentation which you want the new slides to follow. Now in the top ribbon find the paste button and click the arrow to see the dropdown menu. Then select 'Keep source formatting'.
Once selected, right-click the slide and a menu will appear. Select "Duplicate Slide" from the menu. The slide will now be duplicated. It will appear immediately after the source slide. If you want the duplicated slide to appear somewhere else, you can simply click and drag the slide to the desired location. Another method is to copy and ...
Step 2: Select the Slides You Want to Move. In the presentation with the slides you want to move, click on the slide you wish to transfer. If you're moving multiple slides, hold down the Ctrl key (Command on Mac) and click each slide. Make sure you select every slide you want to move before you start dragging.
Open both presentations: the one you want to copy a slide master from, and the one you want to paste the slide master into. In the presentation that has the slide master you want to copy, on the View tab, select Slide Master. In the slide thumbnail pane, right-click the slide master, and then select Copy. Notes: In the thumbnail pane, the slide ...
Select View, then click Presentation Views group and Normal. From the slide thumbnail on the left-hand side, select the slide you want to copy: To choose multiple slides, select the first slide, hold SHIFT, and then select the final slide you want. If you don't like that mother, you can select the first slide, hold SHIFT and click the CURSOR ...
I have been making up new powerpoint presentations at work recently and to do so we use lots of material from old presentations and in some cases can simply copy/paste a bunch of old slides into a new presentation. We don't want to change those slides at all, they are fine as they are.
On the Home tab of the ribbon, in the Slides group, click the arrow below New Slide, and then select Reuse Slides. In the Reuse Slides pane, click Open a PowerPoint File. In the Browse dialog box, locate and click the presentation file that contains the slide that you want, and then click Open. If you want the slide that you are adding to the ...
In the Slide pane, right-click the Slide Master and select Copy. Go to View > Switch Windows and choose the second presentation. Go to View > Slide Master. Right-click the Slide pane and select Paste. Choose Use Destination Theme (keeps colors, fonts, and effects) or Keep Source Formatting (copies the source's colors, fonts, effects).
Step to reproduce: 1- Open a presentation, set a background for the first slide. 2- Open another presentation. 3- Copy the slide created in step one from the presentation to the other one. Expected result: the slide background is copied. Actual result: the background is white.
This will make a copy of the slide to your clipboard. Alternatively, you can skip ' Step-1 ' by just selecting the slide and pressing ' Ctrl + C '. Step-3: Right-click between the two slides and Paste the Copied Slide. Finally, position your cursor on the slide bar where you want to paste the copied slide.
Switch to the new blank presentation you created in Step 1. In the Slide Pane, right-click where you want to insert the copied slides and choose "Paste." Repeat this process for each PowerPoint presentation you want to combine, copying and pasting slides until all desired content is in the new presentation.
Open both presentations: the one you want to copy a slide master from, and the one you want to paste the slide master into. In the presentation that has the slide master you want to copy, on the View tab, select Slide Master. In the slide thumbnail pane, right-click the slide master, and then select Copy. Notes: In the thumbnail pane, the slide ...