
How to Give a Presentation on Zoom? [A Step-by-Step Guide!]
By: Author Shrot Katewa
![How to Give a Presentation on Zoom? [A Step-by-Step Guide!]](https://artofpresentations.com/wp-content/uploads/2021/03/Featured-Image-How-to-Give-a-Presentation-on-Zoom.jpg "how to upload presentation in zoom")
If you’ve never used Zoom, giving a presentation on it might seem a bit challenging. But, that’s a challenge we will have to learn to overcome as the world moves digital more and more day by day. The key question really is how to give a presentation on Zoom!
To give a presentation on Zoom, first, start by joining a meeting. Now open the presentation file on your computer and share the slides on Zoom using its “Share Screen” feature. You should test your camera, mic, speaker, and internet connection before you start with your presentation.
As easy as it may seem, some of you may need further detailed instructions. So, in this article, I will provide a step-by-step guide on things that you need to do in order to deliver a presentation on Zoom successfully! Plus, I will also share some tips that can help you ace your presentation on Zoom!
So, without any further delay, let’s get started!
Understanding the Zoom Application Interface
Before we understand the steps to give a presentation using Zoom, it is perhaps a good idea to acquaint yourself with the Zoom user interface first. If you are well-versed with it, then perhaps you may want to skip this section and click here instead.
Logging into Zoom
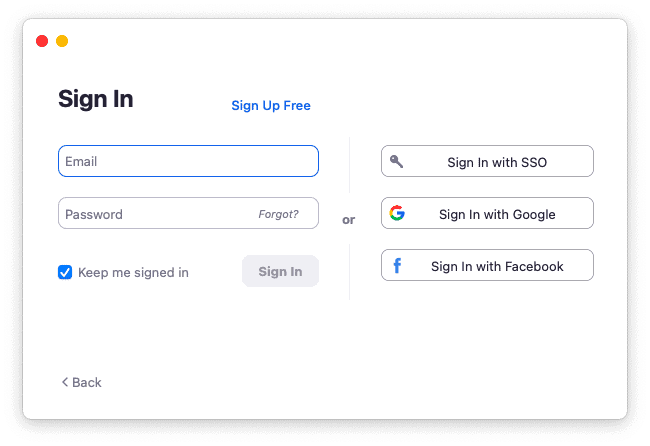
Although you can login to your account using zoom website too, but it is best to download and use the zoom app .
Once you have download the app, you will be prompted to login to your account. If you don’t have an existing account, you can either sign up or even login using your social account such as Google or Facebook. It’s actually quite simple.
If you feel that you don’t want to sign up or even use the social accounts for your meeting, you can choose to use “Sign In with SSO” option. SSO stands for single sign on and this allows you to sign in even when you don’t have an account with Zoom just once.
Zoom Home Screen
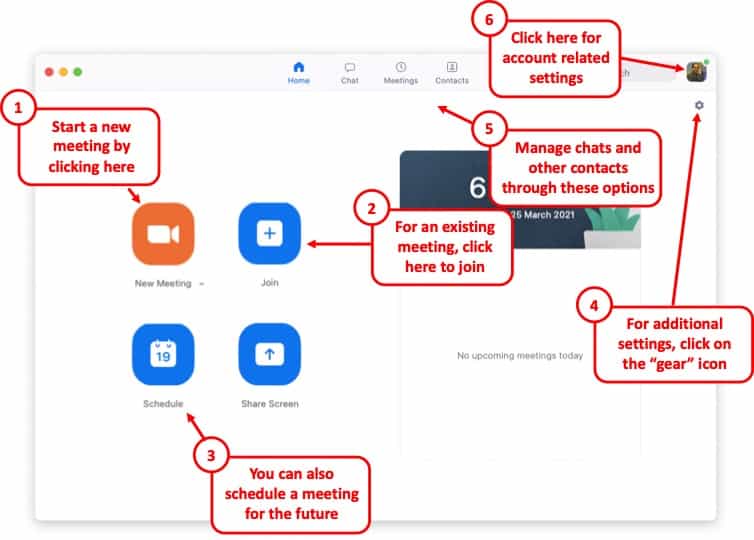
Once you’ve logged in, you will be taken to the home screen on Zoom.
There are a bunch of different things that you ca do with the home screen on Zoom. If you have been invited for a meeting, you will need to click on “ Join “. However, you will also need the meeting ID and the password for the meeting. If you don’t have the details, you will perhaps need to contact the person hosting the meeting.
You can also host the meeting yourself by using the “ New Meeting ” button. You can set a new meeting and invite others to join using this option.
Likewise, you can also schedule a meeting in the future using the “ Schedule ” option.
Furthermore, for changing the account related information, just click on your profile picture in the top-right corner of your window.
Lastly, there are several other detailed settings that you can tweak for your Zoom application. Almost all the other settings can be found in the “ Settings ” section by clicking on the “ Gear Icon “.
Zoom Virtual Meeting Window Interface
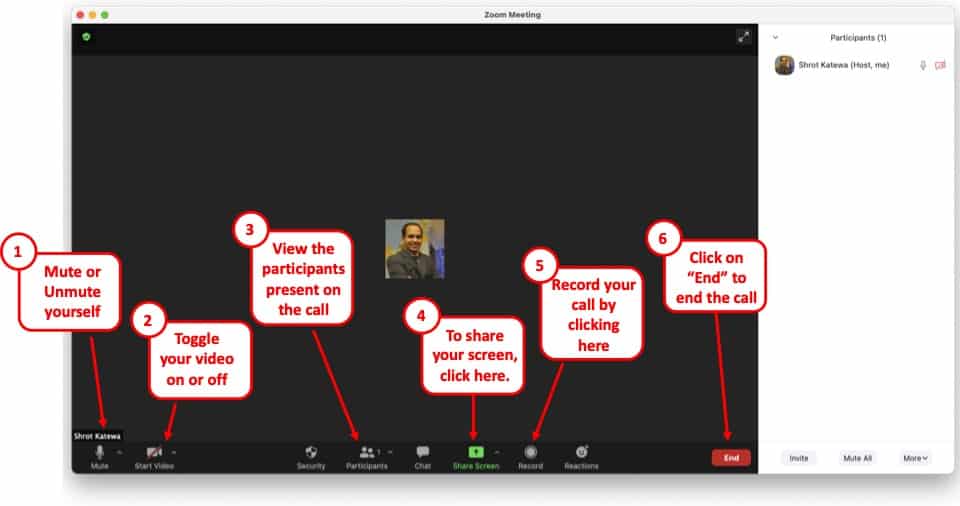
Once you are a participant in a virtual meeting, either by joining an existing meeting or by starting a new meeting, you will be greeted with an image similar to the one mentioned above.
On this screen, you will be presented with several different options. Some of the key functions that you will need to be aware of are as follows –
- Mute – Turning on the Mute or Unmute
- Video – Toggling between your Video
- Participants – Checking the names of the Participants
- Share Screen – to deliver a presentation (more on this later)
- Record – To record a meeting session
- End – Knowing how to end a meeting and exiting a call.
All the above functions will be visible on a small bar at the bottom of the window. If you are not able to see this option bar at the bottom, just hover over at the bottom part of your screen and all the options will appear .
Although there are other features that are also available for a zoom user or a participant, however, the aforementioned features should be good enough to deliver a presentation. These 6 features are at the very least something that you should be aware of.
How to Give a Presentation on Zoom (Step-by-Step)
Zoom has become a common tool for giving virtual presentations today. It is a widely used tool at conferences, meetings, and other events! If you are giving a presentation on Zoom for the first time, then perhaps you should be aware of a few things –
Here is a quick step-by-step guide on how you can give a presentation on Zoom:
Step 1: Install Zoom
Download and install the Zoom application to your desktop. To download the application, visit https://zoom.us/download and download the Zoom Client to your computer.
Step 2: Login to your Zoom Account
After installing the application, open it and log into your Zoom account. If you don’t have one, you can sign up for free using your email account.
Zoom also has options to sign in using SSO (Single Sign-On) or with your Facebook or Google account.
Step 3: Test Audio and Video Settings
Before you start or join a meeting, you will need to configure and test your audio and video settings.
To do that click on the gear icon on the Zoom application’s home screen. This will open the settings menu.
Now click on the “Audio” tab and select the microphone you are going to use. Try our different audio settings. After the microphone, select the speaker for audio output. If you can’t hear anything, try out another speaker source.
After configuring audio, click on the “Video” tab. From there, select the camera that is connected to your desktop. Tweak different video settings and find out what works best for you.
Step 4: Join or Schedule a Meeting
Now start a meeting by clicking on “New meeting”. You can also schedule a meeting on Zoom. To do that, click on “Schedule” and set up when you want to start the meeting. After completing the set-up, Zoom will give you a URL. Share it with the team members to join the meeting.
Or you can join a meeting by clicking “Join” on the Zoom client’s home screen. You can use a meeting ID or URL to join a meeting in Zoom.
Step 5: Open the Presentation
Once you have everything setup, you then need to prepare to show your presentation with your audience. To do that, open the presentation slides on your computer.
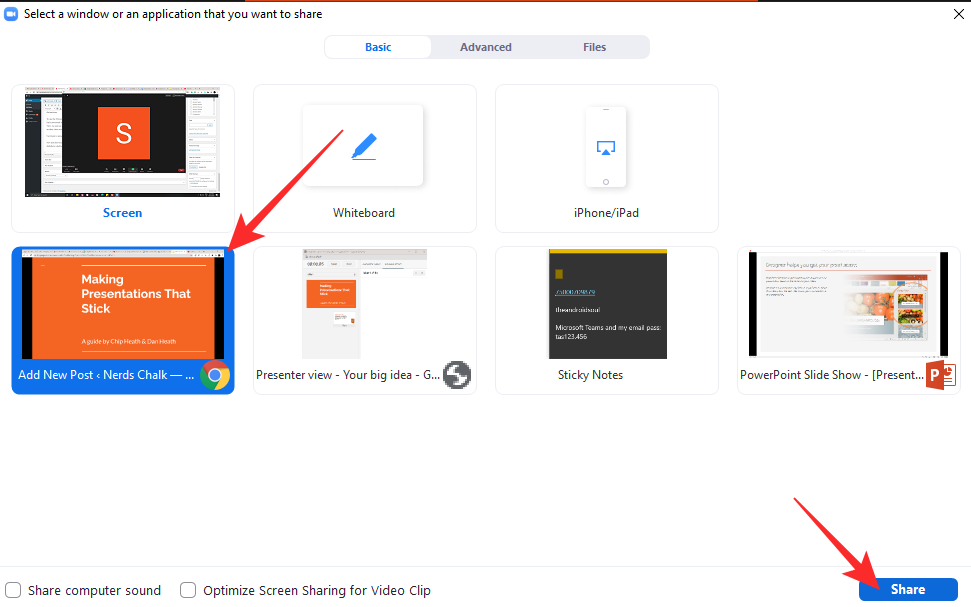
Step 6: Share Your Presentation
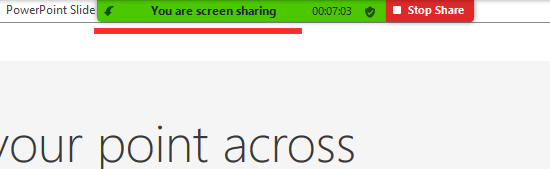
The last step in giving your presentation is to make sure that you share your presentation with your audience. To do that, click on “Share Screen” from the Zoom clients meeting window , select the screen where your presentation slides are open, and click “Share”. Now start presenting your slides to the audience.
Step 7: Stop Sharing to end the Presentation
One thing to know is how to end the presentation. To stop screen sharing, simply click on “Stop Share” located at the top of the screen . This option will only appear when you start sharing your screen.
How to Share a PowerPoint with Presenter View on Zoom?
To share your PowerPoint presentation slides with presenter view on Zoom, follow the steps given below:
Step 1: Open the Zoom App and Login
The first step really is to open the zoom app and login to your account.
Step 2: Join or Setup a Virtual Meeting on Zoom
Next, join the meeting. Remember, you need the meeting ID and password to join a meeting. Make sure you have requested for the details beforehand.
Step 3: Open Your PowerPoint Presentation
First step is really to open your presentation file that you want to present on the PowerPoint application.
Step 4: Put the Presentation in Presenter View
Now select the “Slide Show” tab from the top of the screen and click on either “From Beginning” or “From Current Slide” depending on your preference. This will open the slides in the “Presenter” view.
Step 5: Switch to the Zoom Application
Now, go to the Zoom application, start or join a meeting. While you are in the “Presenter” view on PowerPoint, press “ Alt+Tab ” to switch between applications in Microsoft Windows-powered computers. For iMac, use “Command+Tab” to move through open apps.
Step 6: Share Screen on Zoom’s Meeting Window
Once you are in Zoom’s meeting window, click on “Share Screen”, select the window where your PowerPoint slides are open in the presenter’s view, and click “Share”.
And that’s all you have to do in order to share PowerPoint with the presenter’s view in your Zoom meetings.
How to Share PowerPoint on Zoom Without Showing Notes?
There are two methods that you can use to share PowerPoint slides on Zoom without sharing your presenter notes. For the first method, you will need to have two monitors connected to your computer.
As for the second one, you can still share your PowerPoint slides on Zoom without sharing your notes (and you won’t need two monitors either). I’ve briefly explained both methods below.
Method 1 – Dual Monitor Method
In this method, you will be presenting your PowerPoint file on one monitor while looking at your presenter’s notes on the other one. Here’s how you can do that:
Step 1: First of all, open your slides on PowerPoint.
Step 2: Now join or start a Zoom meeting.
Step 3: Now click on “Share Screen” and select “Screen 1”. Then click “Share”. Here, “Screen 1” is your primary monitor.
Note: If you are not sure which one is your primary monitor, select where the PowerPoint file opened in.
Step 4: Now go to the PowerPoint application, click on the “Slide Show” tab, and from there click on “Monitor” and select “Primary Monitor”.
Step 5: Open the presentation file in the presenter’s view by clicking on the “Slide Show” tab and selecting “From Beginning” or “From Current Slide”.
If you have done everything correctly, participants will only be able to see the presentation slides while you have your presenter’s notes open on the second monitor.
In case you shared the wrong monitor on Zoom, click on “Screen Share” on Zoom’s meeting window, select “Screen 2” and click on share. This should fix your problem.
When you are sharing a screen on Zoom, you will notice a green border around that screen. This indicates which monitor you are currently sharing.
Method 2 – Sharing Portion of Your Screen
Follow the steps below if you have only a single monitor connected to your computer.
Step 1: Join or start a meeting on Zoom.
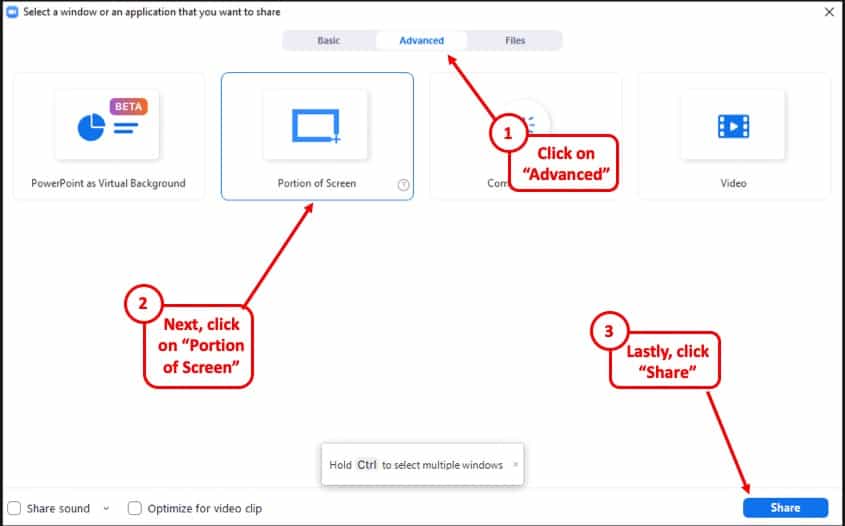
Step 2: Click on “Share Screen” and from the pop-up window select “Advanced”. From there select “Portion of Screen” and click on “Share”. This will give you a green border on your screen that you can adjust. Only the things that are inside this border will be shared on Zoom.
Step 3: Now open the presentation file in PowerPoint, and go to the presenter’s view by selecting “Slide Show> From Current Slide or From Beginning”.
Step 4: Adjust the size of the green border so that it only shows the presentation slides in the presenter’s view.
And that’s all you have to do. By doing so, your audience will only see the slides that you are presenting, but not your notes.
How to Show Yourself During a Zoom Presentation?
Ensuring that you are visible from time to time during a presentation can make it slightly more engaging and much more interactive. Here is how you can do that-
Step 1: First, start or join a Zoom meeting.
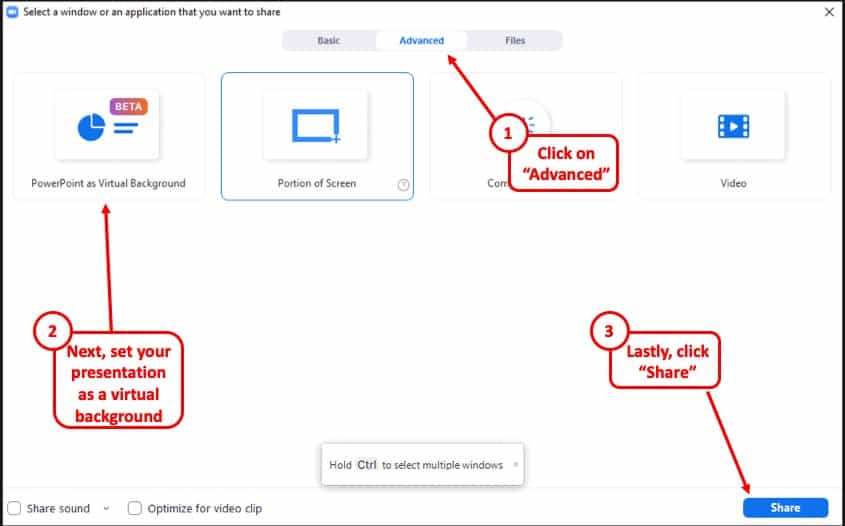
Step 2: Click on “ Share Screen ” and select the “ Advanced ” option. From there, select “ PowerPoint as Virtual Background ” and select the file you want for your presentation. Then click on “ Share ”.
Step 3: Make sure your video is switched on so that you are also visible to your audience. You can do that by clicking on “ Start Video ” on the Zoom Virtual Meeting Interface.
It will take some time for your slides to appear on the Zoom client. When it is done, participants will be able to see your face in front of the slides in Zoom. Make sure that your camera is connected to your computer and configured correctly.
This feature works best if you have a green screen behind you . If you have one, go to Zoom’s settings menu, select the “Background and Filter” tab and check “I have a green screen”. If you want to stop showing yourself during a zoom presentation, click on “Stop Video” on the meeting window and that will do the job.
Furthermore, you may sometimes want to show just yourself to the audience and not show the presentation at all. For that, all you need to do is simply click on “Start Video” in the Zoom Virtual Meeting Interface.
How to Record a Presentation on Zoom?
If you want to record your presentation on Zoom, you can do it easily. After joining or starting a meeting on Zoom, click on the “Record” icon located at the bottom of the meeting window. Once the recording starts, you can pause the recording or stop it whenever you like.
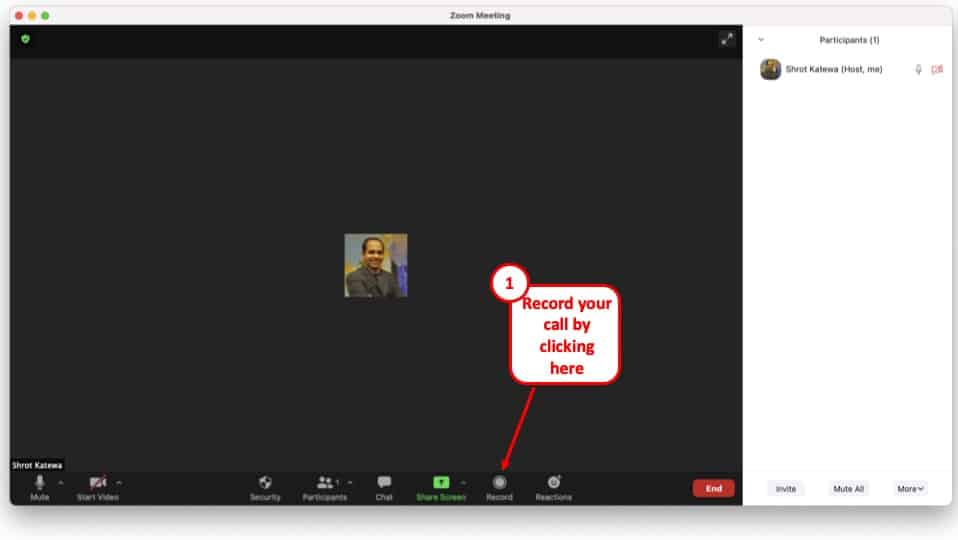
After the end of the meeting, the recorded video will be automatically converted into “.mp4” format and stored on your computer.
Tips for Giving an Awesome Presentation on Zoom
Giving a presentation in front of an audience is always a challenging task. Especially if it is online, many things can go wrong during your presentation. This is why I’m sharing some tips that can help you deliver an awesome presentation on Zoom. These are as follows –
1. Make a Professional Looking Presentation
There are several ways to make your presentation look really professional and high quality. One obvious method is to outsource your presentation to a specialised design agency! But, that can become really expensive depending on your budget.
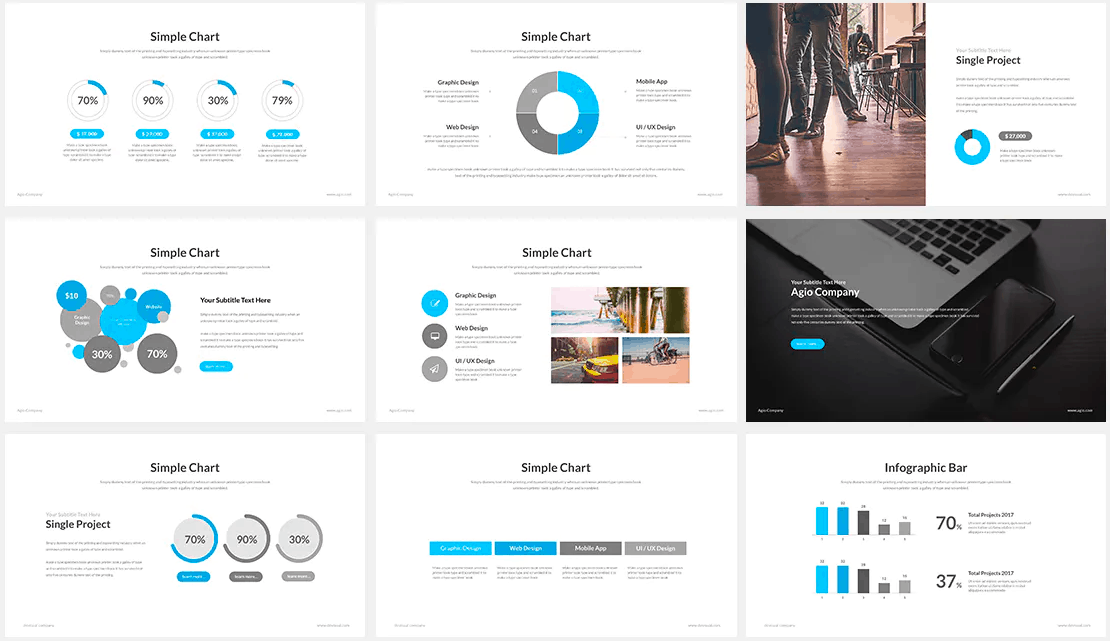
Another (non-obvious) option is to use a PowerPoint Presentation Template! There are several high-quality and professional templates that you can get quite easily! In fact, using these Presentation Designs is quite inexpensive! You can download as many presentation templates as you want for as little as $16.5/month!
My favorite one is Agio PowerPoint Presentation template. It is perfectly suited to give a professional look to your presentation and yet it is quite quick and easy to use. Check out some of the images below –
Agio PowerPoint Presentation Template
Furthermore, make the presentation as simple and straightforward as possible. Do not confuse your audience with a network of colorful texts, graphs, or other contents.
Only use data and graphs that are relevant to your presentation. Also, the clever use of transition animations can make the slide appear much more engaging.
2. Check Your Equipment Beforehand
Whenever you are giving your presentation online, many things can go wrong. For example, your camera or mic may not function properly. Such interruptions will only make you a laughing stock in front of the participants.
Check your mic, camera, and speakers to find out whether they are working properly or not. Also, check your internet connection and your laptop’s battery level. If everything is ok, then you are good to go on with your presentation.
More Related Topics
- Change the Style of Your Bullet Points and Stand-out from the Crowd!
- 7 EASY Tips to Always Make your Presentations Attractive! (Even if You are a Beginner)
- How to Reduce the Size of Your PowerPoint File? The Perfect Method!
- Auto Create Your PowerPoint Slides using Design Ideas Feature!
- Main Features of PowerPoint! [I bet You DIDN’T Know These]
Credit to Cookie_Studio for the featured image of this article
How-To Geek
How to screen share a powerpoint presentation in zoom.

Your changes have been saved
Email is sent
Email has already been sent
Please verify your email address.
You’ve reached your account maximum for followed topics.
Why It Feels Like Ads Are Listening To Your Conversations (When They Aren't)
Chrome is top dog, but firefox is still my favorite browser, the internet is not forever, so it's time to preserve what you can, quick links, grant access to share screens in zoom, screen share a powerpoint presentation in zoom.
No matter where you work, meetings all have one thing in common: PowerPoint presentations. If you use Zoom, you can easily present your slideshow to the participants by sharing your screen . Here's how it's done.
If you're the host of the Zoom meeting , you'll be able to share your screen without issue. However, if you're joining a meeting that you aren't the host of, you may need to request permission from the host to be able to share your screen.
As a general rule, we recommend that hosts disable the screen-share feature for participants by default for security reasons . If you aren't the host of the meeting, be sure to reach out to the host in advance to request permission to share your screen during the Zoom call. Hosts can always enable the feature during the call, but it's always good to be a step ahead.
If you're the host of the meeting and someone is requesting permission to share their screen during the meeting, click the up arrow next to "Share Screen" at the bottom of the window.
In the menu that appears, click "Advanced Sharing Options."

The "Advanced Sharing Options" window will appear. In the "Who Can Share" section, click the bubble next to "All Participants."

All participants in the meeting can now share their screen.
To screen share your PowerPoint presentation, go ahead and open the PowerPoint presentation that you would like to present. However, before you put the presentation in Slide Show view, you'll want to share your screen. At the bottom of the Zoom meeting window, click "Share Screen."

If you're using a single monitor, you will immediately start sharing your screen. If you're using dual monitors , you'll need to click the screen that your presentation will be shared on. In our case, that will be "Screen 2."

To begin sharing that screen, click "Share" at the bottom-right corner of the screen select window.

You're now sharing your screen. Now, in Microsoft PowerPoint, select the "Slide Show View" icon in the bottom-right corner of the application.
From here, deliver your presentation as though you were standing in front of a live audience.
If you are giving a big presentation through Zoom, you're not going to just jump straight into it. You may need to speak to the audience a bit before sharing your screen. If so, here are a few tips on how to look better on your Zoom call .
- Shopping for TVs: 4K vs. 8K
- The Best Mechanical Keyboards to Buy
How to Share a PowerPoint on Zoom
Share your screen, whether or not you're the presenter
:max_bytes(150000):strip_icc():format(webp)/DanSeitz-212239-b7461a6af1964919a88b89c04d193d8c.jpg "how to upload presentation in zoom")
- University of Vermont, Emerson College
:max_bytes(150000):strip_icc():format(webp)/headshot-00415ba557444a8a9b6bb139498b97c5.jpg "how to upload presentation in zoom")
- The Ultimate Guide to Shopping Online
- The Ultimate Guide to Online Learning at Home
- Two-Factor Authentication
- The Ultimate Guide to Skype
What to Know
- Anybody can share a PowerPoint on a Zoom call but may need permission from the call’s organizer.
- To see notes, you’ll need a second screen to divide the view or have your notes on a separate device.
In this article, we’ll discuss how to share a PowerPoint, or any presentation, on Zoom. You can do this in a few clicks for more straightforward presentations, but for more complex presentations, you may want some more tools.
How Do You Share a PowerPoint in a Zoom Meeting?
For a presentation where you don’t need to see your notes, sharing a PowerPoint is a quick process.
Open your presentation, and close any windows you won't need. This will limit clutter and distractions.
Log into your Zoom call and when you’re ready to present, click Share Screen at the bottom. Choose your presentation from the menu.
When using a single screen, you should always pick the specific program you want to share. Doing this will protect your data and prevent pop-ups and other interruptions.
Go to the Slide Show tab in PowerPoint and click From Beginning . For the smoothest presentation, do this before anyone else joins the call, where possible.
Use the controls in the lower left-hand corner or keyboard controls to move through your presentation as usual.
Be sure to click on the Presentation window if you’re going to use keyboard controls. PowerPoint won’t acknowledge inputs from the keyboard unless you’ve deliberately clicked on the window.
How Do You Share a PowerPoint With Zoom and Still See Notes?
The best way to see your notes is to use a second monitor and PowerPoint’s Presenter View tools. Then your notes and controls are on one screen, visible only to you, and your presentation is on the other.
Open your PowerPoint and go to Presenter View to see your notes . This mode opens two windows: The presentation and the control panel.
Drag the control panel to your primary screen and the presentation window to your second screen. You’ll be able to see and control your presentation while looking directly into your webcam if you’re using it, and you won’t have to hold your neck at an angle to use the controls.
Log into the Zoom call and click Share Screen at the bottom. Choose your presentation window.
If you’ll need to present other documents or materials in addition to your presentation, have them open and minimized on your screen and share your second monitor instead. Then you can quickly bring those materials up without disrupting your flow.
Tips for a Better Zoom Presentation
If you're not the call organizer, contact them and ask what permissions they've set up and whether you'll need permission to share your screen.
For meetings with multiple people sharing the same presentation, book a call a day before and practice "handing off" control of the slides in Zoom. Alternately, the person sharing their screen should prepare to move to the next slide when cued. Everyone should also have an up-to-date copy of the presentation, so it can continue if somebody drops out of the meeting.
Keeping Murphy's Law in mind, having your notes in one or two other places is a good idea. Consider using your phone and a printed copy to ensure that you can rely on one of the two additional sources for your notes if everything goes wrong.
To record yourself giving a PowerPoint presentation on Zoom, launch Zoom and PowerPoint; be sure to close all other applications. Create a new Zoom meeting, select Share Screen , select your PowerPoint presentation, and click Share . Launch your PowerPoint slideshow. In Zoom, choose Record > Record on This Computer . Your computer is now recording.
Join the Zoom meeting from your iPad using Zoom's mobile app for iOS. Open your PowerPoint presentation and tap Share Content from the meeting controls. You can use PowerPoint's annotation and drawing tools to make notations on your slides if you like.
Get the Latest Tech News Delivered Every Day
- Zoom: What It Is, History, and How It Works
- How to Use Dual Displays When Working With Microsoft Office
- How to Make Someone Else a Presenter in a Microsoft Teams Meeting
- How to Create a Loomie 3D Avatar For All Your Zoom Meetings
- How to Fix It When a Zoom Microphone Is Not Working
- 7 Benefits of Video Conferencing
- How to Change the Host on Zoom
- Top 5 Free Web Conferencing Tools
- How to Share a Digital Business Card
- How to Connect Two Home Computers Through a Network
- How to Connect an iPhone to a Projector
- The 10 Best Working From Home Tips in 2024
- Wi-Fi Tutorial: How to Connect to a Wireless Network
- What Is a Digital Business Card?
- Google Meet Screen Sharing Not Working? How to Fix the Problem
- What Is a LAN (Local Area Network)?
Unsupported browser
This site was designed for modern browsers and tested with Internet Explorer version 10 and later.
It may not look or work correctly on your browser.
- Communication
How to Share PowerPoint Presentations in Zoom Webinar Meetings in 2024 (+Video)
If you're one of the millions of new users, you might be wondering how to share PowerPoint presentations on Zoom. With the help of this tutorial, you'll learn how to create a Zoom PowerPoint presentation and share it with your audience.

This tutorial has all the essentials. First, you'll see resources to create great presentations that work perfectly as Zoom webinar PowerPoints . Then, you'll see tips to use PowerPoint share screen features to show your presentation.
Your Quick Start Guide to Sharing PowerPoint Presentations in Zoom (Video)
Are you ready to learn more about sharing PowerPoints in Zoom? Watch this quick screencast to learn all about Word Headers and footers.

Or study the complete written tutorial below.
Why to Host a Successful PowerPoint Zoom Presentation Online
New ways of working require re-thinking collaboration. Zoom presentations are a great way to pull everyone together, even while working remotely.
When you're hosting a teleconference, you need an excellent way to share content. Only talking through your points might bore the audience. Package your information into a PowerPoint Zoom for a more engaging way to explain your ideas.
Here are three critical reasons that PowerPoint and Zoom are the perfect pair:
- Data comes to life . Can you imagine simply explaining statistics? Data rules the world, but it needs visuals to come to life. Giving a Zoom presentation online is better with charts in PowerPoint.
- Teams can collaborate in real-time . Thanks to Zoom's audio and video features, presentations are collaborative. Work together in real-time instead of sending the deck back-and-forth.
- Ideal for training . Thanks to the record feature, your PowerPoint presentation can become a helpful training resource. Just record your Zoom webinar PowerPoint and re-use it for those who couldn't attend.
Learn more about the essential parts of creating professional slide decks that work well as Zoom PowerPoint presentations below:

How to Share PowerPoint on Zoom
Every setup differs. We're going to cover two of the most popular arrangements. First, you'll learn how to use PowerPoint share screen features in a window. Then, we'll tackle full-screen shares with Zoom PowerPoint presenter view.
In this tutorial, you'll see screenshots that use the Cubix Professional PowerPoint template . It's polished and ideal for a Zoom meeting with PowerPoint. It's got all the essentials you need for a professional presentation.

How to Configure for Successful Zoom PowerPoint Presentations
No matter how you want to share your screen, there are a few Zoom settings you'll want to configure and confirm. There's nothing worse than wasting time when you start your meeting changing settings.
Let's get started:
Open Zoom and PowerPoint. You'll need both apps running to share the presentation software on a Zoom screen.
Now, let's walk through a few Zoom settings to ensure that your PowerPoint share screen works perfectly. Click on the Settings icon (gear icon) on the presentation software Zoom screen.
If you plan to use your webcam, start on the Video section. Make sure that your webcam is working and selected. Mainly if you use an external webcam, checking this is essential. You don't have to turn it on for every call, but it helps to know your hardware is working.

Now, let's switch to the Audio pane. For the best results, I highly recommend using a source other than your built-in microphone and speakers. Using even your Bluetooth earbuds or a headset is typically much better than integrated hardware for a presentation software Zoom screen.
An important step on how to present PowerPoint on Zoom is to check your speakers and microphone. Make sure to set your speakers and microphone using the drop-down options. Then, click on Test Speaker and Test Mic to confirm the options. This is sure to make your Zoom presentation online more professional.
1. How to Share Your PowerPoint Presentation on Zoom
Let's learn how to share PowerPoint on Zoom on a single screen setup. This is helpful if you're working on a laptop, for example. This setup works if you want to run PowerPoint in a window or full screen.
To share PowerPoint on Zoom, you'll need to start a Zoom meeting (or join one that's already in progress.) Then, click Share Screen at the bottom of the window.
This next screen is an important one. It shows all the windows you've got open on your computer. Notice that there are two options to show your PowerPoint window. You could show the entire screen using the Desktop 1 option. But it's best to select the PowerPoint window instead.

In the screenshot above, I've selected the Microsoft PowerPoint window. The advantage of this approach is that even if you drag and move your PowerPoint window around, it'll remain as the presentation software Zoom screen focus.
Also, sharing only your PowerPoint window avoids sharing too much of your screen. Many of us work with information that's at least somewhat confidential, and it's best not to share the entire screen. Use the rest of the screen to keep your notes or speaking cues in view.
That's it! Your screen share is live, and your audience can see it in real-time. Start the presentation on the Slide Show tab to kick off your Zoom presentation online.
2. How to Share Your Presentation On Multiple Displays
One of PowerPoint's most powerful features is Presenter View, which is ideal to use on multi-monitor setups. When you use this feature, you can show your notes and slide previews on one screen. Let's learn how to use a Zoom webinar PowerPoint with this setup.
Use Zoom meetings and Presenter View as the perfect match. It's all about keeping your notes and cues in view so that you can present confidently.

Presenter View is full screen on both displays, so you'll want to start sharing in Zoom before you turn it on. Again, return to the Share Screen option in Zoom. This time, choose Desktop 1 or Desktop 2, depending on which screen you want to share on your Zoom presentation.
In PowerPoint for macOS, start Presenter view from the Slide Show > Presenter View button. On Windows, make sure the Use Presenter View box is ticked on the Slide Show tab. Then start the presentation.
Once your presentation starts, you might need to Swap Displays. Make sure that you show your presentation screen and not the notes view. Click Swap Displays at the top of the notes view to switch the screen you're sharing.

PowerPoint on Zoom is better with this view. You've got everything you need to prompt your speaking, plus you can see upcoming slides.

Presenter View is more powerful for a Zoom presentation online when you use features like speaker notes. Learn how to create notes that stay in view with the help of this quick video:

For more tips on how to use the Zoom meeting Presenter View to its full potential, make sure to check out our guide below:

No matter which setup you prefer, Zoom and PowerPoint are a great combination. It's more effective than merely explaining the information while staring into the webcam, trying to remember all your details on the fly.
6 Design Slides for Great Zoom Presentations in PowerPoint
To lead a successful Zoom webinar PowerPoint, you need great-looking slide designs. The same principles for professional presentations apply to Zoom PowerPoint presentations, too.
Let's learn to design slides for your Zoom meeting with PowerPoint. We're going to continue working with Cubix in this section to create a fitting Zoom webinar PowerPoint.

Let's build three slides that would work well for a Zoom webinar PowerPoint. Build slides like these and pair them with our tips that show you how to share PowerPoint on Zoom.
1. The Data-Driven Slide

Your audience is sure to appreciate showing data in your Zoom meeting with PowerPoint. But you'll lose attention during a Zoom webinar PowerPoint if you recite data and expect them to understand!
Instead, let's use slide 167 for a PowerPoint on Zoom that shows data visually. This stacked bar chart is the best option for a PowerPoint share screen session. Here's what to do:
- Update data . Sync your chart for your PowerPoint Zoom presentation. Right-click on the chart and choose Edit Data in Excel to update your data for your Zoom presentation online.
- Update the text . A simpler headline and supporting points are better for a Zoom presentation. Just type over the text box placeholders to match your content to prep for the Zoom presentation online.
- Simplify the takeaway. A Zoom PowerPoint presentation needs to be decisive to keep your audience's attention. Simplify the takeaway at the bottom of the slide.

2. The Agenda Slide

Want to cut to the chase for a Zoom video presentation? Share the agenda from the get-go! It helps your audience know exactly where the Zoom presentation online is going and wastes no one's time. That commands attention.
Slide 425 is a great start, but the slide will really shine with a few customizations to match your purpose:
- Update the slide title. Be clear that this is the slide for your Zoom webinar PowerPoint where you show the agenda. A simple title update makes the slide's intentions clear.
- Use your branding . Click on any of the shapes or objects, then use the Shape Format > Shape Fill drop-down option to change the shape color.
- Update the text . Use each of the key points on the timeline to set a key milestone in the Zoom webinar PowerPoint you're giving.

3. The Device Slide

Rounding out slides for our Zoom meeting with PowerPoint, let's create a device mockup that shows an app in action. Skip the high-cost photoshoot and use a device mockup for a Zoom presentation online instead!
Slide 66 already has a smartphone image that works perfectly for a Zoom video presentation. Here are three updates to bring it to life:
- Add a device image . Grab a screenshot of your app, then add it to the placeholder. Right-click on the placeholder and choose Format Background, then point it to your screenshot image.
- Simplify the text . Busy slides never work well for Zoom presentation online events. Remove the text at the bottom, then move the key points to the space that's left.
- Type over placeholders . The text is already perfectly formatted, just type over the boxes to make it your own.

4. Title Slide

The title slide of your Zoom PowerPoint presentation is important because it will give your audience a little preview of your presentation. The title slide should include important details such as:
- company name
- presenter name
- presenter job title
- presentation date
Slide one works well for a title slide. Here’s how to make it a customized title slide:
Replace the title . There's a placeholder title on it already, so you’ll need to replace that one. Just highlight the placeholder text and press Delete on your keyboard. Next, click inside the text box and add your text.
Add your logo . To add your logo, you need to click on the Insert tab. Next, click on the Pictures button in the toolbar. Then double-click on your file to add it to your slide. Adjust your logo.
Add your name, job title, and date . You’ll need to create a new text box to add this information. To add a new textbox, click on the Insert tab. Next, in the toolbar, click on the Text box button. Use your mouse to draw the text box. Click inside the text box and start typing.

5. Team Slide

The team slide would typically come shortly after the title slide in your Zoom PowerPoint presentation. This slide showcases the employees who worked on the project you’re sharing on PPT on Zoom. This slide should include the following:
- each team member's headshot
- team member's name,
- team member’s title
- what they did for the project
Slide 49 can be used as a team slide. If you've got more than three members in the team, slides 46, 47, 48, and 50 can also be used for team slides. Here are some customizations you can make to create your PowerPoint on Zoom:
Add the team member’s pictures . First, right-click on the image placeholder to add your team member's image. Then, after right-clicking, choose the Change Picture option. Next, locate your image file and double-click on your image file.
Add their title and description . To add the team member's title and team contribution, highlight the placeholder text that's already there and press Delete on your keyboard. Next, click inside the text box and add your text. You can also add a text box by clicking on the Insert tab and then clicking on the Text Box button.
Change the graph on the screen . To change the percentages in the graph, click on them until you see green handles. Then, drag the green handles to the percentage that you want. Of course, you’ll need to change the percentage text yourself manually.

6. Q&A Slide

If your Zoom PowerPoint covers a complicated subject or a new product, consider having a Q&A slide. This slide gives you the option to answer any questions your audience may have. You can also use this opportunity to recap your presentation. Slide 511 can be used as a Q&A slide. Here are the customizations you’ll need to make:
Delete the placeholder text . Get rid of the text that comes on the slide. Highlight the text and press Delete on your keyboard. Also, remove the placeholder text in the background.
Add a textbox . Go to the Insert tab and click the toolbar's text box button. Next, draw a textbox in the middle of the screen and click inside to add your text.
Make the text larger . After adding your text, highlight it and click on the Home tab. The font size is in the toolbar, Next to your current font. Click on the arrow next to the current font size and choose the font size that you want.

Where to Find Top PowerPoint Templates for Your Next Zoom Presentation
Let's check out a resource to help you give an excellent Zoom webinar PowerPoint. With the help of pro designs from Envato Elements, you can source designs that are perfect for Zoom presentations online .

Envato Elements has an incredible offer. One subscription gives you unlimited access to PowerPoint templates and so much more. That's sure to help your Zoom video presentation look its best and succeed in reaching your audience.
Start Sharing on Your Zoom Meeting With PowerPoint Today
Zoom and PowerPoint are two top tools, and they're better when you pair them together. Now that you've learned how to share a PPT on Zoom try using Zoom next time you need to present.
Before you start your online meeting, don't forget that your Zoom video presentation is better when you work with professional PowerPoint templates. It's better with unlimited downloads.
Before we go, here's one more reason to use a Zoom PowerPoint presentation: you can skip webcam footage of yourself ! That's sure to convince you to use PowerPoint on Zoom.
Why not download your favorite Zoom PowerPoint presentation template now? Start building your next Zoom presentation.
Editorial Note : This tutorial was last published in November of 2020. It's been reviewed and updated for accuracy by Sarah Joy . It's also been revised to include a video—with special help from Andrew Childress .

How to Present PowerPoint Slides in Zoom

Your changes have been saved
Email is sent
Email has already been sent
Please verify your email address.
You’ve reached your account maximum for followed topics.
Preparing to present PowerPoint slides in Zoom for the first time can feel overwhelming. It's a different experience than face-to-face presentations, and naturally, you want to get it right. But don't worry, we've all been there, and we're here to help.
In this article, we’ll guide you through the process step-by-step, so you can deliver your presentation with confidence and avoid awkward pitfalls. Let’s dive in.
Present PowerPoint Slides in Zoom by Sharing Your Entire Screen
One of the easiest ways to share your PowerPoint slide deck is by sharing your entire screen. Here’s how to go about it.
- Open your PowerPoint presentation.
- Start or Join a Zoom meeting . Knowing how to use Zoom like an expert makes this step easy.

When you hide the toolbar, it may appear as a minimized window in your taskbar. Click the window icon to reveal it when you’re ready to stop sharing.

- Press the Esc key on your keyboard to exit the slideshow after your presentation.
- Click Stop sharing .
Sharing your entire screen lets you seamlessly switch between your PowerPoint window and other windows while bringing your audience along. However, it has a downside—your audience will see sensitive details or notifications if they pop up.
Present PowerPoint Slides in Zoom by Sharing a Window
With this method, you share only your PowerPoint window, so your audience won't see other areas of your desktop, including popup notifications. Here’s how to get it done.

- Join the Zoom meeting.

Ensure your PowerPoint window is maximized and running in the background, or it won't appear under the Window tab.

- Click Stop sharing or Stop share when you’re done presenting.
This method is perfect for multi-tasking—that is, sharing your PowerPoint window while viewing your notes (in a separate document) or seeing what’s happening in Zoom.
Rock Your PowerPoint Presentation in Zoom Like a Pro
And that's a wrap! You now know all the key steps to present PowerPoint slides effectively in Zoom. Remember, you have two main options: share your entire screen when you need to switch between different windows during the presentation or share a specific PowerPoint window if you're multitasking and want to keep the rest of your desktop private.
Practice using these features before your next presentation, so you're comfortable and ready. Alongside this, using a whiteboard in Zoom can make your presentations more interesting.
- Productivity
- Microsoft PowerPoint
- PC & Mobile
How to Share a PowerPoint Presentation on Zoom
Jordan Read more March 7, 2021
PowerPoint presentations are a handy, practical tool in any corporate environment. When you present a problem or a plan visually, people often find it easier to remember or assimilate it. And when you combine a PowerPoint presentation with Zoom, you make business meetings even better.
But how do PowerPoint and Zoom work together exactly? Well, you can do it in three different ways. All of which we’ll cover in detail in this article.
Method 1 – Dual Monitors
One of the great things about Zoom is that the hardware equipment isn’t overpriced. Depending on the size and needs of your company, your Zoom meetings can stay as small or as big as you need them to be.
For example, if your Zoom meeting room has a dual monitor system, one screen can show the entire PowerPoint presentation full screen. While the other monitor can contain presenter’s notes or anything else that can contribute to the meeting.

Here’s how you share a PowerPoint presentation on dual monitors in Zoom:

That’s all there is to it. However, if it turns out that the monitor you’re sharing isn’t the correct one, go to Display Settings, and click “Swap Presenter View and Slide Show”. Therefore, you don’t have to start the whole process from the beginning.

Method 2 – Single Monitor in a Window
The first method is very practical and gives you a clear view of the presentation and the presenter. But not every Zoom meeting room has dual monitors, nor does it need them. A smaller meeting room works just fine with a single monitor, and fortunately, you can share a PowerPoint slide show with just a single monitor.
Either in a window or with a full screen. The window option is very useful when it comes to multitasking while sharing a presentation. Here’s how you share a PowerPoint presentation in a window:

That should do it. Now you have a PowerPoint presentation in a single window, and you can still access the in-meeting chats or any other application or file that you need for the meeting.

Method 3 – Single Monitor in Full Screen
If you’re dealing with a single-monitor situation in your Zoom meeting, and a very important PowerPoint presentation is on its way, the full-screen option is a great idea. The full screen slide show means that there’ll be no onscreen distractions. With no chatting, or opening other files, your focus stays on the presentation itself. Here’s how you make the full screen PowerPoint slide show in Zoom:

And now your presentation is in full screen, and everyone can see it clearly.
Sharing Sound with Zoom
Did you know that the Zoom screen sharing feature lets you share the audio as well? That’s right. People who attend the meetings remotely can now receive both the video and audio. But the one pre-requisite is that you have to use Zoom for Desktop for Windows or Mac.

Therefore, if you want to share a YouTube clip, for example, you just have to click “Share sound”. However, there is one disadvantage. You can’t share the computer sound when the meeting is shared on multiple screens at the same time. It only works when one screen at a time is being shared. Still, it’s a pretty useful feature.

Present Your Work More Efficiently with Zoom
PowerPoint slide shows have been around forever. Once you figure out how to make the most of them, the sky is the limit. It’s one of the most creative software options from Microsoft Office. In comparison, Zoom is new. But it’s taken the corporate world by the storm. The company emphasized that it “just works”, and what more can you ask from a tool that is designed to make work meetings run smoothly? Time is the most precious commodity, and PowerPoint, together with Zoom helps you make significant savings in this regard.
Let us know what you think about PowerPoint and Zoom in the comments section below.
Related Posts

Disclaimer: Some pages on this site may include an affiliate link. This does not effect our editorial in any way.

Ronald Rajan February 25, 2024

Aman Kumar February 12, 2024

Evan Gower September 19, 2023
Send To Someone
Missing device.
Please enable JavaScript to submit this form.
How to Present on Zoom: Google Slides and Powerpoint Presentation Guide & Tips

Presenting in front of your peers and superiors has to be one of the most daunting tasks ever. You’re never quite sure about the feedback you’d be getting, which only adds to the tension. However, in this pandemic season, the task of presenting has somehow gotten even more challenging. There are a lot of technical hurdles to overcome, which can seriously take the winds out of someone’s sail — especially if they are not very experienced on the matter.
Zoom, of course, has been the most popular video conferencing application over the last few months and offers a plethora of tools to put our minds at ease. Today, we’ll take you through all of them and even give you a couple of pointers to improve your presentation in Zoom.
Related: Awesome Halloween Zoom Backgrounds To Download
What is Zoom Screen Share and why is it important?
Screen Share is one of the most used and most important features of Zoom. It allows you to demonstrate your thoughts, give your peers a glimpse of your ideas. You can either share an application window, your entire desktop, or even a whiteboard — the possibilities are limitless here.
You can also start a screen sharing session without jumping through hoops of creating a separate meeting. Simply click/tap on the ‘Share Screen’ button in the Zoom client — both PC and mobile — and you’re good to go.
Related: How to use Zoom Filters
Remember you’ll need a sharing key or meeting key for this to work. If you don’t have access to either, you must share your screen while you’re in a meeting.

To share your screen during a meeting, first, log in with the appropriate credentials and start a meeting. Then, hit the ‘Share Screen’ — ‘Share’ while on mobile — button right in the middle of the meeting options panel and what you want to share with the class.

We’ve covered the topic of screen sharing on Zoom quite extensively in a separate article. So, be sure to check that out .
Related: What Does Pin Video on Zoom Mean? Do They Know If You Pin a Video?
How to present a Powerpoint PPT in Zoom?
Microsoft Office suite is, without a doubt, the most widely-used presentation applications on the planet. It’s been on our computers for ages and it’s likely to stay put for a considerable amount of time.
With that said, Zoom doesn’t straight up give you the option to load the Microsoft Office component in the application. Still, there’s a pretty straightforward method of presenting in front of the class.
Related: 50+ Best Zoom Games
You can achieve the desired results with the help of Zoom’s Screen Sharing feature — yes, the bit we covered in the previous section. It simply allows you to pick a window of your choice and share it with the class.
What’s even more awesome is that the participants could even pitch in and share their thoughts if they see fit. Alternatively, you can also share your entire desktop screen, which is the best way to get more screen real estate.
With the basics out of the way, let’s see how you can present a slide on Zoom.
Related: Zoom Error Code 3113 Fix
1. Create a separate slideshow window
If you have a traditional single-screen setup, this is the only guide you need to concern yourself with. The methodology is split into two bits — one: PowerPoint and two: Zoom.
First, open up Microsoft PowerPoint and pick the slide you want to share. Now, click on the ‘Slide show’ tab and hit ‘Set Up Slide Show.’
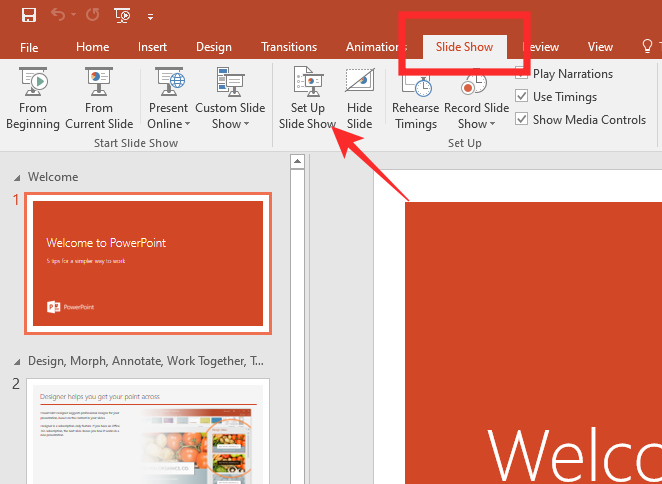
Then, select ‘Browsed by an individual (window)’ under ‘Show type.’ Hit ‘Ok’ to confirm.
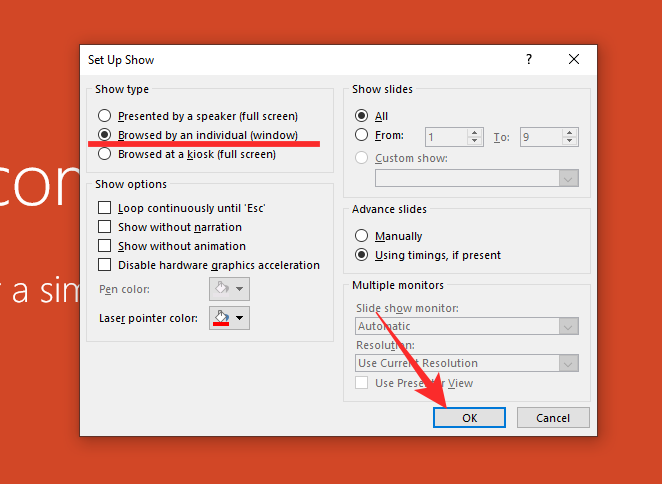
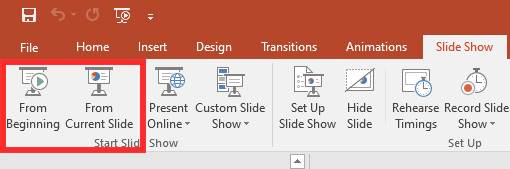
Finally, switch to slide show mode by clicking on the ‘Slide Show’ tab and selecting either ‘From Beginning’ or ‘From Next Slide.’
This would open a slide show window, separately. If you do not want to show the slideshow in a separate window, all you have to do is skip the previous step — ‘Browsed by an individual (window)’
2. Present PPT on Zoom
Now, go back to your Zoom meeting and click on the ‘Share Screen’ option.

Now that the PPT has been launched in a separate window, you can easily select that window on the next screen and commence the slideshow. Click on ‘Share’ to begin.
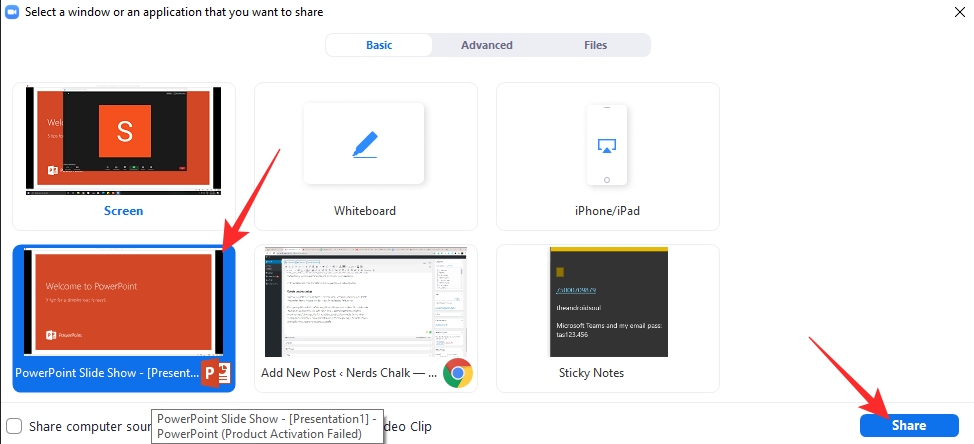
Here’s how it’d look:
How to present using Google Slides on Zoom?
If Microsoft PowerPoint is a little too heavy for you, you could always opt for Google’s adequately powerful alternative called Slides. It allows you to create interesting yet simple presentations and share as you see fit. Of course, it also needs Zoom’s Screen Share feature to work as intended, which, at this point, should feel pretty natural to you.
Related: How to Mute on Zoom
1. Use Presenter View
Now, if you want a more immersive experience and also keep track of the notes you might have, we recommend using the ‘Presenter View.’ With the View enabled, Google Slides would create a separate window for all your notes, which only you’d be able to see. The main presentation window, on the other hand, would remain clutter-free and free from distractions.
To use the ‘Presenter View,’ first, you simply need to go to your presentation page, click on the little downward arrow right next to the ‘Present’ button at the top-right.
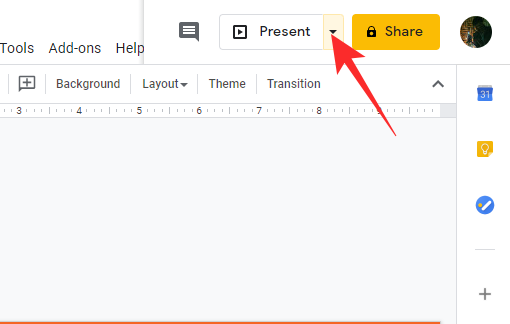
Now, hit ‘Presenter View.’
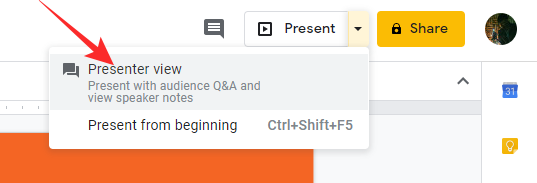
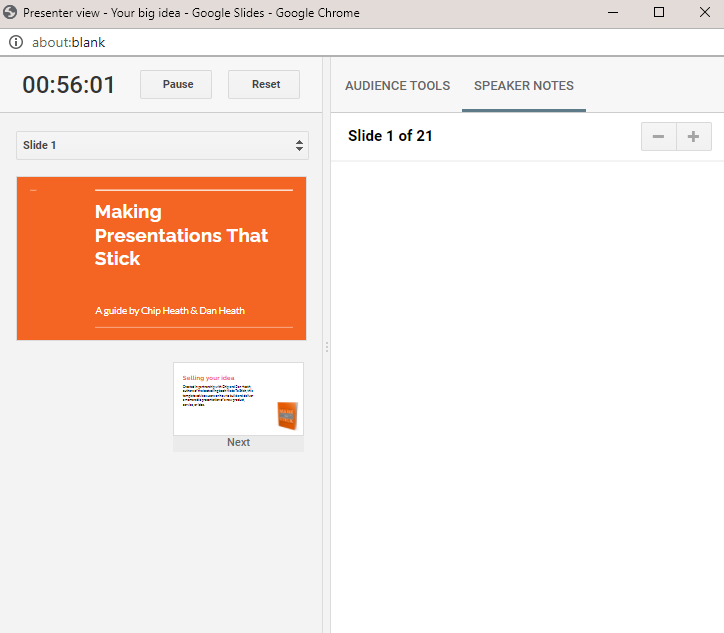
As soon as you click that button, you’ll get a separate space for all your notes, while another clean window would appear for slideshows.
2. Use Zoom to present
Now that the windows have been separated, you can easily use Zoom to present the slideshow window. While in a meeting, click on the ‘Share Screen’ button and select the browser window with Google Slides on top.
Finally, hit ‘Share’ to start the screen-sharing session.
Some tips for a successful presentation
As we’ve discussed, presenting is one of the most daunting tasks in the world for most, even virtually. The techy jargon often only adds to the tension, making many people dread the sessions, even when they are completely prepared. Below are some basic handy tips for your next presentation.
Related: How to annotate on Zoom
1. Master your craft
Knowing the material is always the best way to prepare for a hectic presentation. If you know what you’re presenting and have complete faith in the report, you’re ought to do exceptionally well. However, when it comes to Zoom presentations, knowing just the material isn’t enough. You also need to make sure all your components are in order and you’re presenting with confidence.
Try a couple of dry runs, see if your presentation is working just as it’s supposed to. Practice the pitch if you have to. Checking all of these boxes would improve your chances of success, remarkably.
2. Dress for the occasion
When you’re not forced to present in a swanky conference room, it’s not difficult to lose track of the dressing etiquette. However, you must remember the scale of your presentation and try your best to look the part. Wearing a perfectly ironed shirt and fitted trousers would not only impress your peers and superiors, but it’ll also instill a sense of confidence in you.
Related: How to see everyone on Zoom
3. Create a quiet environment
Zoom is quite capable of filtering some noise out of video chats. However, it doesn’t have the quality to cancel out everything you throw at it. So, before you start a video conferencing session and go about your presentation, make sure you’re in a relatively quiet environment. There can be a bit of noise, here and there, but make sure your subtle points aren’t drowned by some rogue barks from the street below.
- How to Watch Netflix on Zoom With Your SO and Friends
- How to blur your background on Zoom
- Change Your Name on Zoom
- Zoom virtual background not working problem fixes
- How to record a Zoom meeting without host permission
- What Does Pin Video on Zoom Mean? Do They Know If You Pin a Video?
- How to Change Zoom Background on Chromebook: Step-By-Step Guide
- How to download poll reports during a Zoom meeting

A mediocre engineer hoping to do something extraordinary with his pen (well, keyboard). Loves Pink Floyd, lives football, and is always up for a cup of Americano.
You may also like
How to Transfer Google Photos to iCloud

How to Search Your Calls in iPhone in iOS 18
How to Run Microsoft Phi-3 AI on Windows Locally
YouTube Premium Users Can Now Skip Sponsored Segments Using ‘Jump Ahead’
This is scary
Comments are closed.
The Ultimate Guide to Giving Virtual Presentations on Zoom
Part 1: an introduction to giving virtual presentations on zoom.
PART I Introduction 1 – Cool Zoom Features 2 – Virtual Presentation Do’s 3 – Virtual Presentation Don’ts PART II 4 – Presentation Purpose 5 – Structure & Flow 6 – Slide Design PART III 7 – Connect with the audience 8 – Audience Participation 9 – Sharing Content PART IV 10 – Video & Audio Recordings 11 – Post-production 12 – Your Phone as a Webcam PART V 13 – When Things Go Wrong 14 – How to Ground Yourself PART VI 15 – Advanced Techniques 16 – Zoom Webinars vs Meetings 17 – 23 Essential Settings
There are three things I hate about Zoom…
#1 the super awkward must-click-two-buttons-to-leave-the-meeting debacle.
You say goodbye, search the bottom-right corner of the screen for the red button, click the red button, continue to stare awkwardly at the corner of the screen because the call is still open and you need to click a second red button.

Never fear, this can be turned off. In General Preferences simply uncheck the “Ask me to confirm when I leave a meeting” setting and poof! One-click exits. You’re welcome.

#2 Inviting someone and never knowing what the difference is between these two options: “Copy invite link” and “Copy invitation”.
I can sense you nodding along with me.

Just remember that it’s “invite link” you want 99% of the time vs “invitation”, and you can set an option that copies the link to your clipboard as soon as you start a meeting.
#3 The dropdown to change video settings is part of the “Stop Video” button. What the actual?!
Are you trying to make me screw up my presentation?

I also love Zoom.
Why? Because it works.
A year into our forced isolation, Zoom fatigue has set in. We’re avoiding calls and talking about concepts like Zoom holidays, just to get a break.
But the answer isn’t fewer Zoom calls, it’s better Zoom calls. Almost every Zoom presentation is boring, ugly, terribly structured, poorly executed, and designed to make you fall asleep.
In this guide I’ll show you
- How to create beautiful slides that communicate with clarity and class
- Unknown and awesome features of Zoom that you can use to your advantage
- How to overcome your nerves and survive technical problems
- And how to look like a total pro every time you give a presentation—or run a meeting—on the platform we all love to hate.
Note: for the sake of brevity, unless I’m talking about Zoom-specific functionality, these tips are applicable to any platform that offers meeting and presentation software such as GotoMeeting, Google Meet, Webinar Jam etc.
There are instructional videos throughout the guide to demonstrate the best parts in more depth. You can binge watch the videos on the “Presenting on Zoom” video channel here , or read on for the word and pictures.
If you want to stand out from your peers it’s good to understand the full power of the platform and know the features most people don’t know about.
#1 Set up your own configurable ‘personal meeting room’
It can be really distracting to hear a bunch of people talking over one another when you kick off a meeting. A good solution is to use what’s called a Personal Meeting ID (PID) which gives you control of the Zoom environment right from the start.

Features of your PID include:
- Using the same invite ID and URL whenever you start a meeting, bypassing the need to repeatedly check the settings. Note: because it’s a permanent URL,you should uncheck the “Allow participants to join anytime” setting to prevent randoms dropping in unannounced.
- Placing participants into a “waiting room” which lets them in when you are ready to begin– either individually or all at once.
- Automatically recording your meetings on your computer. Having a video of your presentation is always a good idea so you can re-use your content.
#2 Press the ‘spacebar to temporarily un-mute yourself’
You can help to ensure a quality audio recording by placing everyone on mute by default. And while this feature is more appropriate for meetings vs. presentations, it’s a great thing to know about – and to tell your audience about. It’s easy to use, hold down the spacebar to un-mute yourself and let it go to turn your audio off again. It prevents people from forgetting to re-mute when they walk off to do something else forcing you to listen to their snoring dog or screaming baby.

Even if it doesn’t get used during your presentation (unless it’s a workshop you won’t want people to randomly chime in), many of your audience will thank you for learning this tip.
Note: You may need to enable it in your Zoom Preferences.
#3 Record ‘separate audio files’ for each speaker, host, or panelist in the presentation
If you have a host or a co-presenter there will be content in the session that’s not yours. Having separate audio recordings lets you use only the audio that was from your part of the presentation.
You can enable this in Preferences > Recording.

#4 Enable the ‘non-verbal feedback’ feature to allow audience interactions
Cool zoom feature #4 – enable non-verbal feedback.
To make your presentations interactive you can enable the non-verbal feedback feature. This allows participants to express reactions to your presentation.
This is not to be confused with ‘meeting reaction emojis’ which are temporary reactions that disappear after 5 seconds. To be honest, it’s hard not to be confused when there are two sets of interactions with different names.
Non-verbal feedback is for direct feedback to the speaker or host that others can agree with by clicking the same icon. The result is that the speaker can see how many people are expressing the feedback.
The options for non-verbal feedback are shown in the image below:

An example of how this would be used in a presentation is to ask the speaker to speed up or slow down. This might seem like a weird thing to be told during your talk, and if it’s just one person asking you’d most likely ignore it. But if 50 people are saying to slow down, that’s a pretty good indication that your current presentation style isn’t working for them.
It provides a pretty amazing insight – something I wish I’d had that feedback during an on-stage talk.
You can also use it to ask binary questions to the audience that they can respond yes or no to – a great way to segment the audience so you can tailor your content based on their responses.
Combine this feature with a QTINTA audience participation question for a really engaging experience. You’ll have to watch the video to know what QTINTA means.
#5 Use the Zoom ‘beauty mode’ to soften your appearance
Zoom includes a “Touch up my appearance” filter in the “Preferences > Video” settings, which gives your skin a softer appearance. There’s a slider that lets you control how much it applies the effect. It can look weird if you crank it too much, but having just a little can really help – especially if you’re looking a big bedraggled.
Settings are maintained when you quit so you can expect to look the same way every time.
#6 Use Zoom ‘video filters’ to add a cinematic high-contrast appearance
We’re all familiar with Zoom backgrounds, but a more impressive feature in my mind are the video filters. You can access them via the “Stop Video” dropdown arrow. Yes, there are some silly ones which can be funny when in a meeting, but for presenting stick to the non-silly ones. They can help improve the quality of your on-camera look. I particularly like the first option “Boost” which kicks your contrast up a notch removing any bland washed out lighting, it also removed some warmer tones which I like as it reduces the redness I often have in my skin.

You can see that it increases the contrast but also cuts down on the redness in my face.
Unlike the “Touch up my appearance” feature, your video filter settings are not maintained between sessions, which is a frustrating extra step each time if you found a setting you like.
#7 Encourage attendees to use ‘side-by-side mode’ to view you and your slides
This can be a good setting if you want to make your talk feel more personal. It shows your camera video beside your slides, and viewers can resize the videos as they see fit.

It can be a good idea to point this out as not everyone will know.
E.g. “You should be viewing this presentation in side by side mode so you see me and the slides. If you want to make the slides bigger (or smaller) you can resize them by dragging the slider between my video and the slides.”
#8 Use Zoom ‘annotations’ to mark up your slides live, or a ‘whiteboard’ for a blank canvas
A really cool feature of Zoom is Annotations. This lets you write or draw on top of the screen you are sharing. Once the feature is activated , you can access it from the menu at the top when you are sharing your screen.

This is really helpful when you have a complex slide and you want to focus people’s attention on different areas of the screen as you talk. When presenting live on a stage you can gesture towards a particular area, but it’s not as easy in a virtual presentation which is why it’s handy.
There is also a Whiteboard feature that gives you, well, a whiteboard. This could be useful if you find that you need to dig into a point you’re making in a more detailed way or discover during your talk that you need a different way to explain it.
You might want to take a quick screenshot when you’re done if you happened to get some interesting ideas marked up.

Rock open a whiteboard and sketch a diagram. Having a tablet and pen would be very helpful for this, versus trying to draw with a mouse. It might be wise to use the non-verbal feedback feature to get folks to say “Yes” to a “Let me know if you’re ready to move on” question.
Note, this is a screen sharing feature, so in order to get to the whiteboard, you need to stop sharing your screen, then share once more but choose Whiteboard as the option. Then you’ll have to stop sharing and share your slides again. Make sure you’ve practiced this if you think you’ll be using it.
#9 Use ‘closed captions’ to increase the accessibility of your virtual presentation and video recording
Zoom has transcription features that let you add closed captions to your session. You can do it manually for free, but that means someone will have to type them live, which is a pretty specific skill to have, and requires someone to do it for you.
If you have a paid Zoom account (roughly $20/month) live transcriptions are included. An alternative is to integrate with a platform like Otter.ai, to add closed captions in real time. You can also use Otter for transcribing any other audio or video files you have which makes it a much better value.
There are several reasons why closed captions are a good thing to do.
- No headphones: if an attendee doesn’t have or forgot their headphones and they’re in an environment where they can’t have the volume on, closed captions are a life saver that could be the difference between them staying or leaving.
- Accessibility: Captions allow meetings to be accessible to all. For the deaf, hard of hearing, or non-native speakers, they are an absolute necessity to understand what’s going on.
- Attention and recall: closed captioning can increase the amount of your content that an attendee comprehends and remembers. This is because they are getting it using two senses, and you have to focus more intently when you are reading.
You can check out Otter here to set up live captions.
#10 Use Zoom ‘breakout rooms’ to split workshop participants into groups
Without question, one of the most popular Zoom features is Breakout Rooms. They are exactly as they sound, allowing you to break out attendees into separate rooms. This could be for hosting a multi-track event where there is a speaker in each breakout room, or more commonly it is to allow groups to work together away from the “Main Room” and then come back in to rejoin you as the speaker.
This is a wonderful feature if you are running workshops that require groups to work through some of your worksheets or tasks for example.
There’s a good demo of how to use Zoom breakout rooms here.
#11 Use a Zoom ‘waiting room’ to hold attendees before you let them in at the same time
Nobody shows up at the same time to a presentation, and you don’t always want to start until an acceptable threshold of attendees have arrived. Particularly if the beginning of your talk is fundamental to your big idea.
The waiting room is basically a holding area where attendees are listed as they show up. They get to see a simple welcome screen (annoyingly simple really – I’d much prefer to have the options to have a fully custom slide in there), and you can admit them one by one, or all at once, when you are ready to begin.
It also allows you to block people from entering, although for the most part there’s not much reason to do this when you are presenting to a large audience. Useful if someone becomes disruptive for any reason.
Caution: it’s very easy to forget about the waiting room and have people sitting around unable to get in after you’ve started. I recommend assigning this task to your co-host.
Cool Zoom Feature to Avoid – ‘Present with your PowerPoint or Keynote slides as a virtual background’.
This is an interesting feature that’s worth discussing both for why it’s cool and why it’s uncool.
What it does
Instead of a regular screen share, it takes your slide deck and sets it as the background much like any other Zoom background. As such it places a ‘mini you’ floating on top of the slides in cutout mode which is kinda fun. Kinda.
To access the feature (beta at time of writing) click the “Advanced” tab in the “Share Screen” popup, and select “Slides as Virtual Background”.
This is what it looks like from the attendee’s perspective. And yes, you appear twice on the screen. Once on top of your slides, and again beside them. Silly.

Note: you must download a local copy of your slide deck to your computer as it doesn’t connect to cloud-based slides.
If you have audio and video in your slides, checking the “Share Sound” option at the bottom-left of the share popup should make that transmit to the audience. However, it doesn’t. In fact I couldn’t get any video or audio to play at all.
There’s also a second “Split Video from Slides” option which kinda defeats the purpose. As you can see below, you are back with your regular background in a separate window, and you are only on the screen once.
With the split setting in place, it would be a fair to wonder why you’d use this feature as it looks just the same as the regular view.
There are however, a few key differences.
The major difference is that you don’t need to have your slides in fullscreen mode on your computer. In the screenshot below you’ll see that I’m looking at a Zoom window with my slides inside it. I can now move through my slides while having other windows open such as the chat and participant windows. This is actually pretty great as the audience doesn’t see your layout, they see what they would normally see.
A nice side effect of this setting is the audience won’t see the awkward moment at the start of your talk where your whole screen is visible until you start the slides.

Looking at the main window, you can clean up the view a bit by having attendee video off by un-checking “More > Allow Participants to Start Video” in the Participants panel, and then selecting “Hide non-video participants” from the “…” menu on one of the participant video boxes.
You can take it a step further if you select “Hide self view” from the … on your video thumbnail. This will give you a view of just your slides. As much as the layout annoys me (I’d rather pop the self view out to the side with the chat), it can be important to see yourself to make sure you’re not moving out of frame – particularly if you are speaking standing up.
However, at this point in the beta it’s just not usable enough to be a serious and professional solution because of a few technical failings:
- It’s buggy like most beta features are
- It doesn’t show any animations or slide transitions
- If you are recording the screen, the merge view while fun, is a little unprofessional looking
- Audio and video didn’t work at all for me, despite there being a setting to allow slide audio to work. I think this might be because the videos didn’t play.
- When you start the share it has to process the slides before it starts which causes a delay if you aren’t expecting it.
Overall, it’s a feature with some exciting elements, although to be perfectly honest, the good aspects are nothing to do with the feature itself, but are side effects. I’d prefer to see a new feature that allows you to avoid presenting in fullscreen to allow a much greater degree of presenter screen setup.
The chapter title says it all. Do these things and your virtual presentations will be better. If you don’t, your presentation won’t be better than the last one you did, missing an important opportunity grow your skills as a virtual presenter.
Seriously. Do these things.
#1 Test your slides from the ‘attendee perspective’ using another laptop or tablet
Your slides might look amazing on your retina laptop or 5K monitor, but not all screens are alike, and your super-detailed tiny-text “revolutionary new marketing method” process diagram might look more like a dot-matrix printout to someone with a lesser screen.
Viewing your slides on a smaller or alternative screen isn’t enough. You also need to view them on Zoom on that screen, because virtual presentation software tends to change things you wouldn’t expect.
The golden rule of presentation QA is to run through every slide on the platform you’re going to be delivering on (Zoom, GotoWebinar, etc.) watching out for the things below:
- Any virtual presentation platform will add small visual artifacts to the video stream—they’re imperfect degenerative medium where some quality will be lost in transmission. As a result, your slides will never be quite as sharp as directly viewing your slides.
- If you have audio in your slides, check that the audio levels are balanced and not too loud or quiet. Remember to also test it with headphones on as that’s a common listening scenario for your audience.
- If you have video in your slides it may not come across well when presenting virtually. There’s usually some lag or choppiness that makes it skip frames. This can make the audio look out of sync.
- If you have multiple slides with audio, set them at the exact same level so people don’t get deafened. A common problem in that scenario is that the attendees will turn down their audio if you blast them, and then the next time you have audio it’s too quiet to hear properly. Your presentation software will have a setting for the audio or video volume. The best way to make sure they are the same is to move your slides to be one after the other (you can reorder them afterwards), then step through them to gauge the balance.
- If you have complex animations or transitions, they may render more slowly or less smoothly when piped through Zoom and a wifi connection. If they don’t work the way you want them to, consider simplifying them (fewer animations) or removing them altogether – replacing them with static slides. You can still use a technique like the Progressive Reveal to create a pseudo animation effect.
To prevent an audio feedback loop when testing your audio and video slides, have your partner/friend/colleague be on the viewer/attendee side in another room.
Whatever your specific case is, there’s a good chance that on the viewer’s side it’s not as perfect. So double, triple, and quadruple check.
I guess you should also single check. Why does nobody say that?
“You should single check your work to make sure it’s awesome.”
The best way to QA is to record some video of it from the viewer’s perspective. Have your QA buddy record their screen (with audio). If you don’t have anyone to help you, just set up your extra laptop (hopefully you have one somewhere) in another room and record the screen from there. If you’re using a Mac, Quicktime is an easy way to get a recording. On a PC, you can use PowerPoint to do a screen recording (more on that later), or find some free screen recording software for a test.
If you do have a helper, you can also reverse roles where they present and you observe on their machine. This will give you the truest sense of what might need to be fixed. It’ll no doubt be quite hilarious to watch, unless they turn out to be better at it than you.
#2 Remove all hashtags from your slides
My typical advice regarding hashtags is to make sure you update them to use the current event’s hashtag if you’ve used this slide deck before. If you don’t it looks awful to the audience and makes them feel like you didn’t put in the effort to make a presentation just for them.
However, the main goal of this entire guide —primarily covered in chapters 10 and 11— is to ensure you create a professional-grade recording of your virtual presentation that you can repurpose over and over for multiple virtual events.
If you leave event hashtags in your slides they will be forever embedded in your recording, rendering it useless for re-use. And trust me, once you’ve created a high-resolution awesomely edited recording of your talk, you will feel amazing about it.
It may feel counterintuitive, but you should delete all the hashtags from your slides.
If the event mentions it and asks you why or asks you to include them, just politely let them know your rationale. I’ve found that many virtual events have interactive chat in the interface they use which tends to dilute the number of people hanging out on a Twitter hashtag anyway.
#3 Have a wired Internet connection
If attendees have a poor connection they can always leave and download the video and slides later on.
But the presenter is the one person who absolutely must have a great Internet connection, and the best way to do that is to have directly wired Ethernet.
A side benefit of this is that it will help you end the endless debate over who’s connection is causing the problem. I’m sure you’ve been in a meeting where someone suggests your Internet is slow, and you say yours is fine, and they say that theirs has been working brilliantly all week.
Just say “Yeah, but I have a hardwired Ethernet connection.” End of conversation.
If you don’t have a wired connection, work on getting one set up, and in the meantime tell your eager tech wannabe roommates NOT to reset the ******* wifi while you’re presenting.
#4 Have a backup audio input device
“Is this mic on? Can you hear me at the back?”
Sometimes your mic will stop working, and it’s one of the most uncomfortable panic-ridden things that can happen to a speaker (see When Things Go Wrong ). It could be a dead battery issue, or your headphone cable could be old and the internal wiring failed.

Whatever the cause, you need to have a way to deal with the problem.
If you are using a posh external mic that stops working, ditching it for the internal microphone of your laptop will likely degrade the audio quality significantly, but it’s better than nothing.
In a later chapter I do a deep dive comparison video about microphone options for virtual presenting .
Probably the simplest backup is another set of headphones. The classic Apple headphones are only $25 now. Make sure you get the ones with the 3.5mm jack, and not the lightning cable, (especially if you’re not an Apple person) as that’s only useful for your iPhone. And if you aren’t an Apple person, there are a million other options on Amazon.
However, be warned that these headphones are rife with audio problems such as noisy cables (you’ll need to sit still which sucks), and they should only be used on Zoom. When using them with any other audio recording software they have a horrific background hiss that destroys your audio, but Zoom’s noise removal feature (on by default) actually does a fantastic job of removing it, making them a viable last minute solution. Hopefully, you’ll never need to use them.
#5 Have a slide dedicated to encouraging non-verbal feedback
The non-verbal feedback feature of Zoom is a great way to make your talk more dynamic. But you don’t want to try and explain it in the middle of your talk as it’ll break the flow and screw up the fluidity of your recording.
Instead, consider which aspects of the feature you want to use, and have a slide at the start of your presentation (slide 2 for example) that focuses on this. You can quickly walk people through how it works, and tell them how you’ll be using it throughout.
#6 Have everyone muted by default
It goes without saying, but I’ll say it anyway. You don’t want attendees, whether it’s 5 or 500, to be chatting before or during your presentation. So this one is simple. Make sure you mute everyone. If you’re using your Personal Meeting ID you might have this already set up.
You can mute everyone in the Participants sidebar, or as a global default setting in the web portal administration settings “Settings > Schedule Meeting > Mute all participants when they join a meeting”.

#7 Wear confidence clothes
Just because you can present in your PJs it doesn’t mean you should present in your PJs. Treat it like an on-stage talk and get ready in your mojo outfit. You’ll gain confidence and look more professional.
Something I like to do when I’m on the road presenting, is lay out my clothes the night before. It helps me get in the right mindset and also saves time the next day when you might be stressing out.
#8 Close all of your other software to prevent your machine slowing down
Take a look at your computer right now and count A) how many different apps are running, and B) how many tabs you have open in your browser.
Here’s a screenshot of mine, for reference.

Tabs open in Chrome? 39. Apps open? 20
You need to be concerned about two things, the amount of memory and processing power being hogged by all the apps you have open, and the number of ways you might receive a notification during your talk.
For PCs running Windows 10, there’s a built-in function to silence notifications when presenting . But if you’re a Mac user the settings for this are horrendous (slightly better in Big Sur). Fortunately there’s a free app called Muzzle that silences all of your notifications as soon as you share your screen.

#9 Have two pre-made slides ready for Q&A at the end of your virtual presentation
It’s common for your host to ask questions that the audience has submitted in the chat window (or the Q&A window for Zoom Webinars) at the end of your session. The best way to utilize this opportunity—if you’re still in control of the screen—is to have two slides prepared.
The first slide should simply have Q&A written on it, really big.
The second slide should be a promo slide with a special offer you have.
I like to leave up the Q&A slide until the questions start, then flip it to the promo slide so it can sit there for the next 5-10 minutes. It’s a great way to have it visible for a long period of time without actually having to be salesy in your presentation.
It’s fairly common that an event organizer will ask you if you have something to promote, but if they don’t, ask them if it’s okay that you use a slide at the end like this.
#10 Build a background set to make your virtual presentations look professional
If you spend a lot of time on Zoom, instead of using a Zoom background, start thinking about how you can built a bit of a set where you do your presentations. Not only will it look more professional, but it will fill you with confidence and make you feel like you’re in presentation mode when you’re there.
I’m fortunate to have a space for my office/studio, and I’ve seen and felt the difference a well-designed environment makes when I show up to work. It took me months to get it right, so don’t think you have to suddenly have something perfect. Just chip away at it over time, turning on your webcam every day and giving a little thought as to how you can make the space more special. Small shelves with plants or books can work great, and Pinterest is definitely your friend for this type of thing.
Many folks won’t have a dedicated workspace to claim as your “stage”, but I’m pretty sure your significant other won’t complain if you make your home that little bit nicer.
Speaking of “stages”, I actually built a stage in my studio—almost burning down the house in the process —but that’s a story for another time. Like I said, it took months to get to this stage. I keep saying stage.

#11 Reboot your computer the night before your virtual presentation
Restarting your computer can help speed it up a bit, especially if you haven’t done it in ages. Any little performance advantage you can get is valuable for a live presentation. It will help clear out any processes that are stuck or hogging the CPU.
However, it’s best not to do this right before your talk, as you risk it doing some weird software updates that take hours to complete.
#12 Do a test Zoom meeting to check your camera angles and lighting
As Springsteen said in Dancing in the Dark—”I check my look in the mirror, I wanna change my clothes, my hair, my face.”—you should always check how you look on camera before the presentation starts. Adjust the angle of the camera for your most flattering look and the best view of your background, which of course is a well-decorated wall, and not a zoom background of a beach or mountaintop.
Make sure to turn on the lights you’ll be using to light your lovely face, wick away any sweat using blotting wipes, and apply some simple makeup to remove shiny reflections from your head. More details on those techniques in the lighting section .
Here’s the smart part, record your test meeting and play it back to make sure there are no weird things in the background, it’s often easier to analyze a recording as opposed to your webcam view.
#13 Double-check your audio for background noise
At the same time as your camera check, watch your test recording and listen very carefully for any noise in the background. You’ll be surprised at how oblivious you can be to background noise when you’re busy and/or nervous.
Sounds to watch out for:
- Laundry sounds: Depending on where your washer/dryer are it may not be an issue, but the low hum can travel far. Start a Zoom recording, making sure to use which ever audio (mic) input you plan on using, go turn on your washer or dryer or dishwasher, then come back and replay the recording to see if it’s discernible. Crank the volume to make sure. There is NOTHING worse than doing a badass presentation then finding out the recording is ruined by a persistent hum in the background, or the sound of someone’s hoody zip clattering round and round in the dryer.
- Tube lights: If you have any tube lights where you are recording, or even in a nearby room, turn them off. They can be soooo noisy. Then put in the effort to replace them with silent LED tube bulbs when you have time. It does require some rewiring, but it’s not that hard—I did it recently and I made sure to choose bulbs with the same colour temperature as the lights I’ll be using to light me up in the video–more on that in the A/V chapter .
- Ceiling fans: Another subtle and repetitive sound. Turn ’em off unless the resulting heat will make you sweat to the point of scaring the audience.
- Heating: Not all heating is noisy, but many houses in North America use what’s called forced air. It’s noisy. A low hum, yes, but it’s an audio killer.
- Noisy clothes: Your clothes can cause bad scratching sounds—even if you use a shotgun microphone that’s not attached to your clothes—which is an audio killer. What happens is that any loose clothing rubs against you when you gesticulate with your arms. Tighter clothes like a t-shirt are the solution to this. I go into more depth including a comparison video in What to do When Noisy Clothes Ruin Your Audio .
- Noisy shoes: if you’re wearing any kind of heels, they will cause irritating sounds if you shuffle your feet (while presenting standing up, which you should do). The simplest solution is to take them off and present in your socks (or bare feet).
- Analog watches: I’m kidding.
And make sure everyone in the house knows not to bother you while you’re presenting. If you are in a room with a door, hang a sign on it with the time of your event, and say not to disturb you until you take the sign off the door.
Guess what? Not every thing you can do as a virtual presenter is something you should be doing—I’m talking about you, speaker who likes to take a bathroom break while mic’d up, two minutes before the session starts.
Similarly, not every feature of Zoom has a positive impact on the audience or speaker experience. In this short and not-so-sweet chapter I’ll give you some tips about things to avoid so your talks go more smoothly.
#1 Don’t use a free Zoom account for your presentation
If you’re running the show yourself this is an important one. The free Zoom plan allows up to 100 attendees which is great, and more than enough for a small event, however there is also a 40-minute time limit, which would be very embarrassing if you didn’t know that and all of a sudden everyone gets kicked out of your virtual event.
#2 Try to avoid saying “Can you hear me?”
This is a classic intro statement that nervous presenters ask, but it makes you sound unprofessional. Instead, make a subtle change to how you position it, like this:
“Thanks {host name}, let’s get started, and let us know in the chat window if you have any issues hearing my audio.”
#3 Don’t use your laptop’s microphone if your webcam is sitting on an external monitor
When you do this, the laptop will be off to one side and your audio will be really quiet and sound like you’re in a different room.
#4 Don’t use stock photos in your slides
Just as you shouldn’t use a stock photo as the header background on your website, you shouldn’t use them in your presentations. To illustrate my point, it’s way too common for software companies to think it’s cool to use an overhead shot of a laptop and a coffee cup. It’s actually hilarious how prevalent it is. I recommend entering the URL of any image you’re considering using into tineye.com which will tell you how many times it’s been used.

If you absolutely have to use one, try hard to find one that’s not so widely used. Unsplash.com is a good resource for free photography that’s typically got less of a stock feel to it.
But all in all, the best way to avoid using stock photos is to develop an original content mindset (in chapter 6) .
#5 Don’t use a Zoom background. You heard me.
Zoom backgrounds can be fun in meetings, but when you’re presenting it can look unprofessional and can be really distracting. It can also make some of your head/hair disappear and speaking for myself, I need all the hair I can get.
#6 Don’t record the call without permission
This is a big no-no on certain types of call. For a presentation you can make a statement that it’s being recorded, as this is always helpful information for attendees to know (no permission needed) but if it’s a meeting with a client, customer, or coworker, you should be explicit that you are recording and why: “If it’s okay with you I’d like to record the call so I don’t miss any of the details.” This is important when you are a guest in an interview too. Asking for permission will add a level of trust and respect in the eyes of who you are asking – and in the very rare occasion that they say no, be graceful and say okay no worries. Then follow up with,”I may be taking notes throughout so bare with me if I’m scribbling”.
Also be aware, that if you are recording the session, everyone on the other side will see a blinking “recording” signal in the top-left corner, so there’s no creeping allowed.
To recap, remember these rules when it comes to recordings:
- Meetings: Ask for permission, and don’t record if your guest is uncomfortable with it.
- Presentations: Let people know that it’s being recorded and that you will be making it available after. Ideally after some post-production enhancements in chapter 11.
#7 Don’t be the host if you might leave early
This is a nightmare as the other participants are suddenly without a meeting and they might not know why. Then they have to re-coordinate to set up a new meeting, which is always a chore and often involves Slack or text messages or even worse, emails.
Intro Introduction to Virtual Presentations on Zoom
Chapter 1 18 Cool Zoom Features You Should Know About
Chapter 2 12 Things You Should Do in Your Zoom Presentation
Chapter 3 8 Things You Shouldn’t Do in Your Zoom Presentation
Chapter 4 Defining Your Presentation’s Purpose
Chapter 5 How to Define Your Talk’s Structure, Story, & Flow
Chapter 6 41 Slide Design Tips for Virtual Presentations
Chapter 7 6 Ways to Make Eye Contact With an Invisible Audience
Chapter 8 How to do Audience Participation in a Virtual Presentation
Chapter 9 How to Share Content during a Zoom Presentation
Chapter 10 How to Create a Stunning Video and Audio Recording
Chapter 11 Using Post-Production to Add Value to Your Zoom Recording
Chapter 12 How to Use Your Phone as a Beautiful Webcam
Chapter 13 What to Do When Things go Wrong in Your Presentation
Chapter 14 How to Ground Yourself and Get Ready to Present
Chapter 15 Advanced & Creative Zoom Presentation Techniques
Chapter 16 The Difference Between Zoom Meetings and Zoom Webinars
Chapter 17 23 Zoom Settings to Enable or Disable for a Smooth Presentation
How To Present Powerpoint On Zoom

- How-To Guides
- Software Tutorials

Choosing the Right Presentation Format
When it comes to presenting your PowerPoint on Zoom, choosing the right format is crucial to ensure that your audience can view and interact with your slides effectively. Whether you’re conducting a business meeting, delivering a training session, or giving a presentation, consider the following factors when deciding on the best format for your presentation:
- Full Screen: This format allows you to occupy the entire Zoom window with your slides. It’s ideal for presentations that heavily rely on visuals or require your audience to focus solely on the content.
- Presenter View: If you need to access your notes, manage your slides, or view upcoming slides while presenting, the Presenter View format is your best bet. It gives you a separate window with additional tools and features.
- Side-by-Side: This format enables you to display your PowerPoint slides alongside other applications or materials, such as a video conferencing window or a shared document. It’s useful if you need to refer to external resources during your presentation.
- Custom Layout: Zoom allows you to customize the layout of your presentation, allowing you to combine multiple formats or adjust the size and position of your slides and other elements on the screen.
Consider the nature of your presentation, your objectives, and the visual elements you plan to incorporate when selecting the presentation format. Additionally, take into account the size of your audience, the devices they’ll be using, and the level of interactivity you wish to achieve.
Remember, a well-chosen presentation format can enhance your delivery and engage your audience more effectively. Spend some time experimenting with different formats in Zoom’s settings before your presentation to determine the layout that works best for your needs.
Preparing Your PowerPoint Slides
Before presenting your PowerPoint on Zoom, it’s important to ensure that your slides are well-prepared and optimized for the virtual environment. Here are some essential tips to consider:
- Simplify Your Content: Keep your slides concise and focused. Use bullet points, short sentences, and key phrases to convey your message effectively. Avoid overcrowding slides with excessive text or complex images.
- Use High-Quality Visuals: Choose high-resolution images and graphics that align with your topic and enhance understanding. Avoid pixelated or distorted visuals that may hinder audience comprehension.
- Consider Font Size and Typeface: Use a clear and legible font size, typically around 24-32 points, to ensure readability on different screen sizes. Stick to standard fonts like Arial or Calibri to avoid technical issues.
- Contrast Colors: Opt for high contrast between the background and text colors to ensure visibility. Dark text on a light background or vice versa works best. Avoid using color combinations that strain the eyes or make text illegible.
- Include Engaging Multimedia: Incorporate videos, animations, or interactive elements to enhance audience engagement. However, ensure that the multimedia elements are relevant, purposeful, and do not distract from your main points.
- Consistent Design: Maintain a consistent design across your slides for a professional and cohesive look. Use the same font styles, colors, and layout throughout your presentation to create a visually appealing and easily navigable experience for your audience.
- Proofread and Edit: Check for spelling, grammar, and content errors in your slides. Ensure that all text is grammatically correct and appropriate for your target audience. Consider seeking feedback from colleagues or friends to validate the clarity and effectiveness of your slides.
By following these tips, you can create visually appealing and well-structured PowerPoint slides for your Zoom presentations. Investing time and effort in the preparation phase will translate into a more engaging and impactful virtual presentation experience.
Optimizing Your Zoom Settings
Before you start presenting your PowerPoint on Zoom, it’s essential to optimize your Zoom settings to ensure a smooth and hassle-free experience for both you and your audience. Consider the following settings to enhance the quality and functionality of your presentation:
- Audio Settings: Test your microphone and speakers to ensure clear audio. Adjust the microphone sensitivity and speaker volume as needed. Consider using an external microphone for better sound quality.
- Video Settings: Check your camera settings and ensure that you’re well-lit and in focus. Adjust the video resolution based on your internet connection to maintain a stable presentation stream.
- Screen Sharing: Familiarize yourself with the screen sharing options in Zoom. Choose the appropriate settings to optimize the display of your PowerPoint slides. Select the “Optimize for full screen video” option for a smoother playback experience.
- Virtual Background: If desired, experiment with Zoom’s virtual background feature to create a professional and distraction-free backdrop. Choose a background image that aligns with your presentation topic and enhances your visual presence.
- Chat and Q&A: Decide whether you want to enable the chat or Q&A feature during your presentation. This allows your audience to ask questions or provide feedback. Determine how you want to manage and address these interactions during your presentation.
- Recording: If you plan to record your presentation, ensure that you have sufficient storage space and that you’ve enabled the recording function in Zoom. Inform your audience in advance if you intend to record the session.
- Mute and Unmute: Familiarize yourself with the mute and unmute controls in Zoom. During your presentation, be mindful of muting yourself when not speaking to minimize background noise and distractions.
- Practice and Test: Before your actual presentation, conduct a practice session to test your Zoom settings. Ensure that everything is working as expected, including audio, video, screen sharing, and any interactive features you plan to use.
By optimizing your Zoom settings in advance, you can ensure a seamless and professional presentation experience. Paying attention to audio, video, screen sharing, and other essential settings will help you deliver a high-quality presentation that engages your audience effectively.
Sharing Your Screen on Zoom
One of the key features of Zoom is the ability to share your screen, allowing you to display your PowerPoint slides to your audience. Follow these steps to successfully share your screen during a Zoom presentation:
- Start a Zoom Meeting: Open Zoom and start a meeting. You can choose to start a new meeting or join an existing one.
- Open Your PowerPoint Presentation: Open the PowerPoint file that contains your presentation. Make sure it’s ready to be displayed.
- Click the “Share Screen” Button: In the Zoom meeting window, locate the green “Share Screen” button at the bottom of the screen and click on it.
- Select Your PowerPoint Window: A dialog box will appear with a list of available screens and windows to share. Choose the window that has your PowerPoint presentation open.
- Ensure “Share Computer Sound” is Checked: If your PowerPoint presentation includes audio or video, make sure to check the “Share computer sound” checkbox in the dialog box. This will transmit the audio along with your slides.
- Click “Share”: Once you have selected the appropriate window, click on the “Share” button in the bottom right corner of the dialog box.
- Start Presenting: Your PowerPoint presentation will now be visible to your audience in the Zoom meeting. Begin presenting your slides as you normally would.
- Stop Sharing: To stop sharing your screen, locate the “Stop Share” button at the top of your screen or in the Zoom meeting controls and click on it.
Remember to ensure that your PowerPoint slides are visible and legible to your audience. Check the Zoom meeting preview window to verify the quality of your shared screen. Adjust the size and position of your slides if necessary to optimize visibility.
Sharing your screen on Zoom allows your audience to view your PowerPoint presentation in real-time, enhancing their engagement and understanding of your content. Practice this process before your actual presentation to become familiar with the steps and ensure a smooth screen sharing experience.
Using Presenter View
Presenter View is a powerful feature in PowerPoint that allows you to view your speaker notes, manage your slides, and have better control over your presentation while presenting on Zoom. Follow these steps to use Presenter View effectively:
- Enable Presenter View: Before you start your presentation, click on the “Slide Show” tab in PowerPoint and check the “Use Presenter View” box. This will activate Presenter View on your screen.
- Start the Slide Show: Begin your presentation by selecting the “From Beginning” or “From Current Slide” option under the “Slide Show” tab, depending on where you want to start.
- Access Presenter View: Once your presentation starts, you’ll see two different windows. The main window displays the current slide that your audience sees, while the Presenter View window contains your speaker notes, thumbnails of upcoming slides, and slide navigation controls.
- View Speaker Notes: In the Presenter View window, you can see your speaker notes for each slide, allowing you to stay on track with your talking points and key information.
- Preview Upcoming Slides: Take advantage of the thumbnail view in Presenter View to preview the next few slides. This helps you anticipate and smoothly transition to the next topic without losing your flow.
- Annotate Slides: Use the annotation tools available in Presenter View to highlight important points or draw attention to specific areas of your slides. This can enhance your audience’s understanding and engagement during your presentation.
- Manage Slides: In Presenter View, you can easily navigate between slides using the arrow keys or the slide navigation controls. This allows you to jump back and forth between slides or quickly go to a specific slide as needed.
- End the Presentation: Once you’ve completed your presentation, press the Esc key or click on the “End Slide Show” button in the Presenter View window to exit the presentation mode.
Presenter View in PowerPoint and Zoom provides you with the tools and flexibility to deliver a seamless and professional presentation. Take advantage of its features to stay organized, deliver your content effectively, and engage your audience during your Zoom presentation.
Navigating Slide Show Controls
When presenting your PowerPoint on Zoom, it’s important to familiarize yourself with the slide show controls to navigate through your slides smoothly and deliver an engaging presentation. Here are the key controls you can use while in slide show mode:
- Advance to Next Slide: To proceed to the next slide, simply press the right arrow key on your keyboard, click the mouse, or use a presenter remote if available. This allows you to progress through your presentation at your desired pace.
- Go Back to Previous Slide: If you need to revisit a previous slide, press the left arrow key on your keyboard or click the mouse’s left button. This enables you to go back and address questions or clarify information for your audience.
- Jump to a Specific Slide: If you want to navigate to a specific slide in your presentation, press the slide number on your keyboard followed by the Enter key. Alternatively, you can right-click on the slide and choose the desired slide from the context menu.
- Access Slide Thumbnails: In PowerPoint’s slide show mode, you can access a thumbnail view of your slides by pressing the Ctrl key and clicking on any slide. This enables you to quickly navigate to a specific slide without disrupting the flow of your presentation.
- Zoom In and Out: If you need to highlight specific details or make text more readable to your audience, use the Ctrl key and the plus (+) or minus (-) keys to zoom in and out, respectively. This feature is especially useful when showing complex diagrams or small texts.
- End the Slide Show: To exit the slide show mode, press the Esc key on your keyboard or right-click anywhere on the screen and select “End Show” from the context menu. This will bring you back to the normal editing view in PowerPoint.
- Use Presenter View: If you have enabled Presenter View, you can access additional controls and features to manage your presentation more effectively. Refer to the “Using Presenter View” section for more details on how to utilize this feature.
By familiarizing yourself with these slide show controls, you can navigate through your PowerPoint presentation confidently and deliver a more dynamic and interactive experience for your audience on Zoom.
Engaging Your Audience in a Zoom Presentation
Engaging your audience is crucial when presenting on Zoom to maintain their attention and ensure the effectiveness of your message. Here are some strategies to actively involve your audience and make your Zoom presentation interactive:
- Ask Questions: Pose questions to your audience throughout your presentation to encourage participation. You can use the chat feature in Zoom or ask attendees to unmute themselves and speak up.
- Use Polls: Take advantage of Zoom’s polling feature to gather instant feedback or opinions from your audience. Create engaging poll questions related to your presentation topic to encourage active participation.
- Encourage Chat Participation: Remind your audience to use the chat feature to ask questions, share insights, or provide feedback. Monitor the chat regularly and respond to messages to make attendees feel heard and valued.
- Incorporate Interactive Activities: Break up your presentation with interactive activities to keep your audience engaged. This could include case studies, brainstorming sessions, group discussions, or virtual simulations.
- Share Relevant Resources: Provide links to additional resources related to your topic in the chat or through screen sharing. This encourages further exploration and engagement even after the presentation ends.
- Use Visual Aid: Utilize visual aids such as charts, graphs, and images to enhance understanding and engagement. Visuals can help convey complex information in a more digestible and memorable way.
- Tell Stories: Incorporate relevant stories or anecdotes to make your content more relatable and captivating. Personal experiences are powerful tools for capturing your audience’s attention and keeping them engaged.
- Interact with Body Language: Use appropriate facial expressions, gestures, and body language to convey enthusiasm and connect with your audience. Non-verbal cues can enhance engagement and create a more memorable experience.
- Pause for Questions: Give your audience regular opportunities to ask questions or seek clarification. Pause after key points or at designated breaks to allow for interaction and address any queries.
- Display Empathy: Be attentive and empathetic towards your audience’s needs and emotions. Show genuine interest in their thoughts and perspectives, and create a safe and inclusive environment for discussion and interaction.
By incorporating these strategies, you can create a more interactive and engaging Zoom presentation that captivates your audience’s attention and encourages their active participation throughout the session.
Troubleshooting Audio and Video Issues
Technical difficulties with audio and video can disrupt the flow of your Zoom presentation. To ensure a smooth experience, it’s important to be familiar with troubleshooting common issues that may arise. Here are some troubleshooting tips for audio and video problems during your Zoom presentation:
- Check Your Internet Connection: A stable and reliable internet connection is crucial for smooth audio and video. Ensure that you have a strong connection and consider connecting via an Ethernet cable for a more stable connection.
- Test Your Audio and Video Devices: Before your presentation, test your microphone and camera to ensure they are functioning properly. Use the Zoom audio and video settings to select the correct devices and adjust their settings if needed.
- Adjust Your Audio Settings: If your audio is distorted, low, or inconsistent, check the audio settings in Zoom. Increase the volume, adjust the microphone sensitivity, and ensure that the correct audio device is selected.
- Restart Your Devices: If you experience audio or video issues during your presentation, try restarting your computer and reopening the Zoom application. This can resolve any temporary glitches that may be affecting your devices.
- Close Unnecessary Applications: Close any unnecessary applications or software running in the background during your presentation. This can free up system resources and prevent audio or video lag or interference.
- Use Headphones or External Microphones: If you are experiencing audio issues, consider using headphones or an external microphone. This can help eliminate background noise, improve audio quality, and minimize the chance of audio feedback.
- Optimize Camera Placement: Ensure that your camera is positioned correctly and at eye level. Avoid backlighting or excessive lighting that may affect the quality of your video. Adjust the camera angle and lighting as needed for the best visual appearance.
- Update Your Software: Keep your Zoom application and other relevant software up to date. Updates often include bug fixes and performance enhancements that can solve audio and video issues.
- Seek Technical Support: If you encounter persistent audio or video issues that you cannot resolve, consider contacting Zoom technical support or consulting with a technical expert for assistance.
By following these troubleshooting tips, you can minimize audio and video issues during your Zoom presentation and deliver a seamless and professional experience for your audience.
Tips for a Successful PowerPoint Presentation on Zoom
When delivering a PowerPoint presentation on Zoom, it’s essential to adapt your approach to the virtual environment. Here are some valuable tips to help you create a successful and impactful presentation:
- Practice and Rehearse: Familiarize yourself with your presentation and practice it multiple times before your actual Zoom presentation. This will boost your confidence, help you refine your delivery, and ensure a smoother flow.
- Create a Engaging Opening: Capture your audience’s attention with a strong opening that introduces the topic and highlights its relevance. Use a compelling anecdote, surprising statistic, or thought-provoking question to hook your audience from the start.
- Use Visuals Wisely: Leverage the power of visuals to support your message. Incorporate impactful images, charts, and graphs that enhance understanding and engagement. Avoid overwhelming your slides with excessive text or cluttered visuals.
- Speak Clearly and Slowly: Pay attention to your diction and pace of speech. Enunciate your words clearly and speak slowly and deliberately to ensure that every participant can follow along easily.
- Engage with Eye Contact: Look directly into the camera to establish eye contact with your virtual audience. This creates a stronger connection and helps maintain engagement throughout your presentation.
- Use Gestures and Body Language: Incorporate appropriate gestures and body language to enhance your presentation. It adds dynamism and visual interest, making your delivery more engaging and authentic.
- Encourage Interaction: Foster audience engagement by inviting questions, encouraging comments, or conducting interactive activities. This promotes a two-way communication and keeps participants actively involved.
- Time Management: Keep track of time and pace yourself accordingly. Avoid rushing through slides or going over time. Practice beforehand to ensure your presentation fits within the allocated timeframe.
- Use Breaks Strategically: Incorporate short breaks throughout your presentation to give your audience a chance to process information, ask questions, or engage in discussions. This helps maintain energy and prevents Zoom fatigue.
- Be Mindful of Your Background: Choose a clean and uncluttered background for your video. Consider using a virtual background or a well-organized physical setting that is visually appealing and free from distractions.
- Technical Backup: Have a backup plan in case of technical issues. Keep a secondary device ready, ensure you have a stable internet connection, and have a contact person to help troubleshoot any unforeseen problems.
By implementing these tips, you can maximize the impact of your PowerPoint presentation on Zoom. Remember to adapt to the virtual medium while maintaining your confidence, engaging your audience, and delivering a compelling presentation.
Leave a Reply Cancel reply
Your email address will not be published. Required fields are marked *
Save my name, email, and website in this browser for the next time I comment.
- Crowdfunding
- Cryptocurrency
- Digital Banking
- Digital Payments
- Investments
- Console Gaming
- Mobile Gaming
- VR/AR Gaming
- Gadget Usage
- Gaming Tips
- Online Safety
- Tech Setup & Troubleshooting
- Buyer’s Guides
- Comparative Analysis
- Gadget Reviews
- Service Reviews
- Software Reviews
- Mobile Devices
- PCs & Laptops
- Smart Home Gadgets
- Content Creation Tools
- Digital Photography
- Video & Music Streaming
- Online Security
- Online Services
- Web Hosting
- WiFi & Ethernet
- Browsers & Extensions
- Communication Platforms
- Operating Systems
- Productivity Tools
- AI & Machine Learning
- Cybersecurity
- Emerging Tech
- IoT & Smart Devices
- Virtual & Augmented Reality
- Latest News
- AI Developments
- Fintech Updates
- Gaming News
- New Product Launches
- 12 Best Free AI Image Sharpeners in 2024 WebPCMobile
Sanjuksha Nirgude Soaring High with Robotics
Related post, unveiling the secrets of sls printing and its role in robotics, unleashing efficiency: the role of robotic process automation in industry 4.0, advancing cybersecurity: the integration of robotics with emerging sms phishing alert tools – innovations, challenges, and future perspectives, robotics redefining long-term investment horizons, bridging software development and robotics for enhanced automation, the role of robotics in cnc machining for large part production, related posts.

How To Make A Zoom Background

How To Share A Document On Zoom

How To Make A Powerpoint On A Tablet

How To Zoom Out On A PC

How To Zoom In With Keyboard

How To Download Images From Powerpoint

How To Zoom Out On Dell Laptop

How To Connect Powerpoint To Projector
Recent stories.

12 Best Free AI Image Sharpeners in 2024 (Web/PC/Mobile)

OpenStack Backup and Recovery Software

Apple Wallet Availability in the PocketGuard App: Sync your Apple Card, Apple Cash, and Savings from Apple Card Accounts

5 Ways to Improve IT Automation

What is Building Information Modelling?

How to Use Email Blasts Marketing To Take Control of Your Market

Learn To Convert Scanned Documents Into Editable Text With OCR
- Privacy Overview
- Strictly Necessary Cookies
This website uses cookies so that we can provide you with the best user experience possible. Cookie information is stored in your browser and performs functions such as recognising you when you return to our website and helping our team to understand which sections of the website you find most interesting and useful.
Strictly Necessary Cookie should be enabled at all times so that we can save your preferences for cookie settings.
If you disable this cookie, we will not be able to save your preferences. This means that every time you visit this website you will need to enable or disable cookies again.
- Presentations
- Most Recent
- Infographics
- Data Visualizations
- Forms and Surveys
- Video & Animation
- Case Studies
- Design for Business
- Digital Marketing
- Design Inspiration
- Visual Thinking
- Product Updates
- Visme Webinars
- Artificial Intelligence
13 Zoom Presentation Tips to Ace Your Next Online Meeting

Written by: Mahnoor Sheikh
Now that more people are working from home, online presentations using tools like Zoom have started to become the norm.
But giving a Zoom presentation is very different from presenting in person. The lack of physical presence and body language can make it difficult to engage and inspire your audience.
If you’re still getting used to presenting on Zoom, this article has some great tips to help you succeed and make an impact in your next meeting.
Preparing Your Zoom Presentation
Getting ready for your Zoom presentation is just as important as giving the actual presentation. There are tons of potential issues you can face, like a faulty microphone or your dog walking in right in the middle of an important slide.
By preparing well, you ensure your presentation is as smooth and error-free as possible. After all, you only get one chance to make a great first impression and get a great ROI .
Here are some tips to help you get ready to deliver a powerful Zoom presentation.
1 Design a Great Online Presentation
The first thing you need to do is make sure your presentation is designed to look its best on your audiences’ tiny computer screens.
Follow these three rules to create an effective Zoom presentation.

Keep it simple.
The best online presentations are simple and straightforward.
You don’t want your audience to be squinting at their screens trying to navigate through a tangled web of text, colors, graphs and other content.
You need them to look at a slide and get the point at a single glance.
Use a plain background for your slides, preferably white, and focus each slide on only one point or idea. Don’t stuff too many bullet points or text into your slides.
Also, make sure you center your text in case the edges of the slides are cut off for some of the participants.
Lastly, use a large and bold font that doesn’t require participants to strain their eyes, even if they’re viewing your slides on their phone.
Use relevant visuals.
Visuals make information much easier to digest and retain than plain text. And let’s face it—they keep things entertaining.
Here are some types of visuals you can use to make your Zoom presentation more engaging:
- Charts and graphs. Visualizing data can bring the most boring numbers and statistics to life. If you’re using research findings to show a trend or back up your point, consider presenting them in the form of a bar graph or pie chart. Not only will it add some color to your slides, it will make it easier for your audience to interpret the data.
- Maps. If you're presenting geographic data, you can easily visualize it in the form of maps. In Visme, you can add interactive maps for a single country or the world.
- Icons and illustrations. Adding creative graphics like icons and illustrations can break up walls of text, make your information look more visual and interesting, and help explain your point better.
- Videos. Adding videos into your slides is a great way to make your presentation more engaging. Videos can help you explain a point more clearly, show a product in action or give some background information on your subject. You can embed YouTube or Vimeo videos into your slides or upload them directly.
- Stock photos. If used intelligently, stock photos can add value to your slides by helping you set the tone, tell a story or visualize an idea. You can also use relevant stock photos in the background with text overlay to add some color to your slides.
- GIFs and Memes. Make your online presentations fun and engaging by adding relevant memes and GIFs into slides that would otherwise look quite dry. Be careful not to overdo it, and only use humor if appropriate. You don’t want to risk looking unprofessional.
Here's a presentation template from Visme with just the right balance of visuals and text to help you get started. Simply customize it to use for your next Zoom presentation.

Using visuals in your online presentation is great, but this doesn’t mean you should stuff all your slides with images. Make sure the visuals you’re using add value to your content and emphasize your point instead of taking attention away from it.
Make it interactive.
It can be tough to keep your audience engaged when you’re not interacting with them face-to-face.
So, why not do the next best thing? Make your slides interactive!
If you’re creating your presentation in Visme, you can access a bunch of interactivity tools to spice up your slides:
- Animation. Add beautiful slide transitions, or animate objects separately. A good tip is to animate bullet points to appear one at a time to draw focus to each one. You can also choose from pre-animated illustrations, icons and characters to make your Zoom presentation more engaging.
- Links. In Visme, you can link any text or graphic element to a web page, or a slide or object inside your presentation. Get creative with this tool to add interactive quizzes, slides and more to your Zoom presentation. For example, you can link two text boxes together so when you click on the question, the answer appears.
- Hover effects. If you’re linking one object in your slide to another, you can enable it to show up on either click or hover. If you’re creating a quiz, for example, you can link two text boxes together so when you hover on the question, the answer appears.
A healthy dose of interactivity can make your audience feel more involved with your Zoom presentation.
2 Tidy Up Your Background
If you want your audience to take you seriously, clean up any clutter behind you.
A messy background can make you look unprofessional and distract people from focusing on your presentation. Ideally, your background should be a plain wall.
If you can’t manage to find a clean, empty background, consider using a virtual Zoom background. There are tons of different styles out there, so make sure to pick one that looks realistic and professional.
3 Draw Attention to Your Face
An online presentation can quickly start to feel distant and impersonal, like watching a pre-recorded video.
To remind your audience that they’re interacting with a real human, you need to draw focus to your face and expressions as you present.
Make sure you’re presenting in a well-lit room, where the source of light is in front of you. If the light source is directly behind you, you might end up looking like a dark blob.
4 Check Your Equipment
Make sure you check all your technical equipment to see if everything is working properly. This will help minimize issues like awkward camera angles or a malfunctioning microphone.
Here are a few things you should take care of before your presentation:
- Check internet connection. No one wants to listen to a presenter with laggy audio and video. Use a reliable, high-speed internet connection to ensure a smooth Zoom presentation.
- Test audio and video. Check if your camera and microphone are working properly by joining a Zoom test meeting . You can also test out your equipment from inside the Zoom app by clicking on Settings → Audio or Settings → Video .
- Ensure your laptop is plugged in. Imagine if your laptop dies out in the middle of your presentation just because you didn’t plug it in properly. Don’t let that happen.
- Adjust your camera level. Make sure your audience is looking at your face instead of the top of your head. Decide whether you want to sit or stand during your presentation, and adjust the webcam so it’s at eye level.
Keep in mind that technical issues can arise unexpectedly, even if you do everything right. Doing tech prep beforehand, though, keeps the chances at a minimum.
5 Minimize Potential Interruptions
Whether you’re giving your Zoom presentation at home or in a nearby cafe, there are tons of potential interruptions that can disrupt your flow and make you look unprofessional.
During your prep, your goal should be to minimize these interruptions as much as possible.
Find a quiet area to begin with, and lock the door so no one comes in unexpectedly. It’s a good idea to inform your family members or roommates that you’re going to be busy prior to the presentation.
Another tip is to close all other open applications and windows on your computer. Notifications and sounds can interrupt your meeting and distract you. You can also use the “Do Not Disturb” mode on MacOS or “Focus Assist” on Windows 10 to mute notifications.
6 Stick Your Notes in the Right Place
Just like when you’re presenting in person, you’d likely want to keep notes or pointers nearby in case you forget something important.
During a Zoom presentation, though, you need to be careful about where you place your notes. It can look very unprofessional and awkward if your eyes keep moving away from the camera when everyone is staring at your face.
Avoid keeping a notepad next to you or pasting them on the side of your monitor. A better alternative is to stick a post-it right below or next to your webcam. So, even if you take a peek, you will still be looking somewhat directly at your audience.
If you’re using Visme to create your Zoom presentation, you can simply use the presenter notes feature and skip all the hassle of keeping physical notes.

While you’re presenting, your presenter notes will open up in another window, so you can look at them while presenting without even letting your audience know.
7 Ditch the Pajamas
We get it. Nobody wants to get dressed when they’re at home.
But really, if you’re giving a professional presentation, it’s a good idea to ditch your PJs and wear something presentable .
Even if everyone knows you’re at home, you don’t want to look sloppy while sharing important information. This can prevent your audience from taking you seriously.
Plus, dressing up can help you feel more confident and motivated. Wear something that not only looks smart, but also makes you feel good about yourself.
8 Rehearse Before the Presentation
Never walk into a presentation unprepared. This is especially important for Zoom presentations, as it can be even more difficult to wing it when you’re not interacting in person.
Plus, rehearsing is a good idea if you want to overcome the fear of being on camera. Do a demo Zoom meeting with a friend or family member, or just practice alone before the presentation.
Delivering Your Zoom Presentation
Now that you’re all prepped up to give your Zoom presentation, here are some tips to help you make the most of your time while you’re presenting.
9 Start With a Bang
Did you know that people take as little as five seconds to judge how charismatic a speaker is?
Figuring out how to start your presentation is one of the most important parts of your Zoom presentation. It can either get your audience to sit up in their seats or prepare to doze off.
Here's an infographic on some tried-and-true ways to start a presentation that keeps your audience hooked . Keep reading for an explanation of all seven points below.

- Reveal a shocking statistic. A relevant and powerful statistic can set the tone for your presentation and show your audience the importance of your message.
- Tell a relevant joke. Humor is a great way to break the ice and keep your audience engaged. A boring presentation can quickly cause the listener to zone out.
- Ask a question. Get your audience involved by asking them a question relevant to your presentation topic. The more you interact with them, the more likely they’ll be to listen to what you’re saying.
- Quote an influential person. A powerful quote can often motivate or inspire your audience to sit up and listen to what you have to say.
- Tell a short story. Stories are personal and can evoke emotions. Telling a relatable story that also gets the audience curious to know more is a great way to start your presentation.
- Use an interesting prop. Using a prop can break the monotony of your presentation. Using motion and a visual object can also help attract your audience’s gaze.
- Show a captivating visual. Pictures speak louder than words, which is why using a powerful image that tells a story or shows the importance of your topic is an effective way to start your presentation.
Along with starting impressively, you should also try to end your presentation in a way that it drives your audience to take action or think about your message. A good idea is to end with a powerful statement or a thought-provoking question.
10 Make Eye Contact With the Audience
While you’re speaking, it’s just as important to make eye contact with your audience as it is during a face-to-face presentation.
The problem with Zoom presentations, though, is that you often end up looking at your own video or at the video of your audience.
To make eye contact online, however, you need to look directly at your camera. To make things easier, you can place the video boxes of your audience at the top of your screen, directly under your webcam.
11 Regularly Pause to Engage
Online presentations can get monotonous really quickly, and it’s common for people to zone out in the middle of it.
If you want to ensure your message hits home, take regular breaks throughout your Zoom presentation and engage your audience in conversation.
You could pause to ask them questions, or simply ask what they think about a certain topic. You could also try switching up the pace of your presentation, show a short video clip or tell an interesting or humorous story that helps bring wandering minds back.

12 Use the Chat Feature to Your Benefit
Zoom’s chat feature is a great way to get your audience involved without disrupting the flow of your presentation.
You can use Zoom chat to your advantage in several different ways:
- Questions. Ask your audience questions and let them answer through chat, or get them to ask you questions in the chat.
- Feedback. Let your audience know beforehand that they can leave their feedback and comments related to your presentation or topic in the chat. For example, if someone comments that they can’t hear you properly you can try fixing your mic or raising your voice.
Get creative with your use of the chat feature to keep your audience engaged. Ask them to send a hand emoji if they can relate to something, or ask what they want to see first in your presentation.
13 Record Your Presentation
The best way to improve your Zoom presentation skills is to learn from your past mistakes. Thankfully, Zoom lets you record your presentations so you can revisit them later and analyze your performance.

Are you using too many hand gestures? Are you walking around too much? Are you speaking at a reasonable pace? Understanding how you did can help you do even better in the future.
You can also send your Zoom presentation recordings to a friend or family member so they can review it for you. It always helps to get the opinion of someone you trust.
How to Share Your Visme Presentation on Zoom
Thinking of creating your Zoom presentation in Visme? Great choice!
The best part is that you can easily share your Visme slides with your audience without needing to download the presentation on your computer.
Of course, you can still download your presentation in PowerPoint or PDF format if you need to.
Follow the steps below to share your Visme presentation on Zoom without downloading anything.
Step 1: Publish your presentation.
When you’re finished designing your presentation in Visme, navigate over to the top right corner of your screen, and click on “Share”.
Next, click on “Publish for Web” on your left, type in a title and description for your presentation, and click on “Publish and get my link”.
Step 2: Click on the Present button.
Once you’ve published your presentation, you can go back and click on the “Present” button at the top right of your screen. This will open up the Presenter view.
If you want to access your presenter notes, click on the video camera icon at the bottom right corner of your screen, and your notes will appear in a new window.
Step 3: Share your screen on Zoom.
From your Zoom meeting window, click on “Share Screen” and select the window with the Presenter view of your presentation.

That’s it! You’ll now be able to look at the presenter notes on your screen while your audience views the slide open in your Presenter view window.
Alternatively, you can also download your presentation as a PowerPoint or PDF file, and share your screen in Zoom to present your slides.
Ready to Give a Memorable Zoom Presentation?
If you’re still getting used to the idea of presenting on Zoom, this article will help you prepare well and deliver an impactful presentation that people won’t be able to forget any time soon.
Remember, while Zoom presentations are different from presenting in person, you still need to be just as confident, dress to impress and make eye contact.
The only difference is that you need to put more effort into engaging your audience and keep them from dozing off in front of their computers.
Design a beautiful Zoom presentation and present online using Visme’s presentation maker. Sign up now for free and take it for a test drive!
Create beautiful presentations faster with Visme.

Trusted by leading brands
Recommended content for you:

Create Stunning Content!
Design visual brand experiences for your business whether you are a seasoned designer or a total novice.
About the Author
Mahnoor Sheikh is the content marketing manager at Visme. She has years of experience in content strategy and execution, SEO copywriting and graphic design. She is also the founder of MASH Content and is passionate about tea, kittens and traveling with her husband. Get in touch with her on LinkedIn .
How to Make Your Presentations More Engaging Through Visual Communication
Updated on March 29, 2023
Published on November 10, 2021
- 01 The art of an engaging presentation - Jumplink to The art of an engaging presentation
- 02 Using a visual decoder - Jumplink to Using a visual decoder
- 03 Get more out of your meetings - Jumplink to Get more out of your meetings

Over 50% of the cortex , the surface of the brain, is dedicated to processing visual information, occupying more space than anything else we do.
In fact, according to bestselling author Dan Roam, using visuals to tell stories is one of the most powerful ways to get a message across. With drawings and images, you can clarify what's in your own mind and confirm if someone sees it the same way, fostering mutual understanding and better connections.
In the latest entry in our Building Forward webinar series , Roam shared his key insights on using simple yet dynamic visuals to clarify ideas, plans, and messages.
The art of an engaging presentation
When we see the sun shining outside, it helps us decide what to wear. We see traffic ahead on the road, so we decide to take another route. We make decisions based on visuals every day, so it stands to reason they can also help inform the way we work, learn, and present information.
When we build presentations, we have to keep in mind our audience’s visual system. If there isn’t anything interesting to look at, the human mind will likely check out in a few minutes. That’s why many presentations are not effective — there’s not enough to look at.
If you can attract people's eyes, the mind will follow. By leveraging visuals, imagery, and real-time markup tools, you can draw people’s attention, create engaging presentations, and directly impact learning. This can help combat Zoom fatigue and engage people with your presentation right from the start.
Using a visual decoder
Think of your presentation as a story you’re trying to tell — one that visuals bring to life. You don’t have to be a talented artist to apply Roam’s visual methodology to how you tell that story. As Roam displayed via a mechanism he calls the “visual decoder,” simpler is usually better. A visual decoder is a four-part structure for presenting visual information — often in the form of folding a piece of paper into squares — designed to easily display a story.
These are the four components:
- Title : Write the title of your story out, keep it short and sweet, and make sure it's direct and reflects what you’re trying to convey.
- The who and what : Draw yourself, 2-3 people who are involved in your story, and a symbol or icon representing an object or thing that’s in your story.
- Impact and outcome : Determine how you would measure the success and impact of your story. Draw a simple chart displaying what you’ll measure and what results you’ll aim to achieve over time. Think big — give yourself a target worth aiming for.
- Plan and timing : Think about how you plan to execute your story and draw a simple timeline or calendar of milestones showing the steps you’ll take to achieve your outcome. End with the date by which you’re going to achieve your objective.
Get more out of your meetings
Visual storytelling helps us communicate clearly in a complex world. Whether it’s a drawing, photo, diagram, or even animated text, take advantage of modern-day visualization tools and applications to make the most of your meetings. By conveying information in a more compelling way, you can increase engagement, productivity, and mutual understanding, resulting in better connections.
Learn about visual storytelling by visiting Roam’s website or check out his upcoming book, The Pop Up Pitch . And stay up to date on the latest thought leadership on the hybrid workforce — join us for upcoming events in our Building Forward webinar series and read our blog on motivating teams with insights from Lindsay McGregor.
You might also like

Insights into AI, leadership, and fostering a culture of trust in the workplace
Learn about the impact of AI, the importance of trust, and the mindset of a great leader in our Q&A with Toni Cusumano, a leader in PwC’s Workforce Transformation practice.

3 things we learned from the UK Hybrid Work Commission - and what it could mean for your business
The future of work is hybrid. That much has been clear for some time, and nowhere more so than in the United Kingdom. In May 2023, 83% of UK organizations

7 ways leaders can use AI to improve the digital employee experience
The best companies are laser-focused on providing exceptional experiences for their customers to differentiate themselves in competitive markets. But to provide that experience externally, they need to look inward first. To attract and retain the best talent, organizations...
Subscribe to the Zoom Blog
Get the latest Zoom posts directly in your email
By entering your email, you agree to our Privacy Policy .
Related Resources

Meet Zoom AI Companion, your new AI assistant!
Boost productivity and team collaboration with Zoom AI Companion, available at no additional cost with eligible paid Zoom plans.

How to build your best hybrid work environment
If you’re facing the challenges of setting up a successful hybrid workplace, here are some tips and strategies you can incorporate.

How to transform your CX
New study shows integrated UCaaS and contact center platforms are among top trends to transform the customer experience.
Our customers love us

Zoom - One Platform to Connect
How to Record a Zoom Meeting and Use Recordings to Add Value
Senior Marketing Manager at Loom

An important Zoom meeting just ended, packed with insights and action items. There’s only one problem: a week later, team members are scrambling to recall key points and decisions—and there’s no recording of the session. Sound familiar?
Information is priceless, and capturing the information shared in Zoom meetings can mean the difference between your team thriving and merely surviving.
Zoom recordings help you onboard new employees quickly, close more deals by gaining insights from past client interactions, and even improve your products by revealing new details from customer feedback. But recording Zoom meetings isn’t always a straightforward process.
Learn how to record a Zoom meeting to improve collaboration and performance, plus get tips for streamlining efficiency by using Loom, one of the best screen recorder tools , to record your Zoom calls.
How to record a Zoom meeting
There are two ways to record your Zoom meetings: local and cloud. All Zoom plans, including free ones, have access to the local recording option, which saves video and audio files to your device. But only paid plans can save Zoom cloud recordings.
Hosting Privilege
To record meetings, you'll need hosting privileges. If your account already has hosting control or you are the main host, you can skip this section. Otherwise, the account admin can enable the co-host feature by following the steps in this video:
Once the Co-host option has been turned on, your current meeting host can grant hosting privilege to you by following these steps on the desktop, web, or mobile app:
Open your meeting controls and tap “Participants.”
Hover over the name of the person you want to make co-host, then click “More” or the ellipsis icon (...).
Tap “Make Co-Host.”

Once you have the host or co-host title, here’s how to create Zoom cloud and local recordings.
Cloud recordings
You can create Zoom cloud recordings on the Mac and Windows desktop app, mobile app, and Zoom web app.
Step 1: Enable cloud recording
To enable cloud recording, you need to be the account owner or have admin privileges. Here’s how to enable this option as a user:
Sign into your Zoom web portal and click “Settings” in the top navigation menu.
Tap the Recording tab, then tap “Cloud Recording” to toggle it on.
Another pop-up window may appear asking you to approve this change. Tap “Enable” to approve it.

Quick note: If the Enable option is grayed out, you may not have the correct permissions to turn on cloud recording. Message your team’s Zoom account admin for help.
Step 2: Adjust your recording settings
You can change your recording settings in the same spot where you enable recording. Some potentially helpful features include:
Record active speaker with shared screen: This records both the view of the active speaker and any content on the shared screen.
Record audio-only files: This records the audio of your meeting separately from the video.
Record the interpretation: If you have an interpreter on your call, you can record their audio and video for both sign language and foreign languages.
Create audio transcript: This automatically transcribes your recordings.
You can also choose to optimize your recording for a third-party video editor in the settings if you plan to use meeting clips in other video content.
Step 3: Start recording
Once you have host or co-host controls, you can start cloud recording your meeting using these steps:
Click the “Record button” at the bottom of your screen and choose “Record to the Cloud” to start recording.
When you’re ready to stop recording, tap “Stop Recording” or “End Meeting.” Alternatively, you can tap “Pause” to temporarily stop recording.

Local recordings
Using the free Zoom app or prefer to save your recording to your device? You can create a local recording as long as you’re using the Zoom desktop client on Windows, macOS, or Linux. Here’s how to do it:
Step 1: Enable local recording

Sign into your Zoom web account, then choose “Settings” under the Personal section of the left-hand navigation menu.
Select the Recording tab in the top menu, then tap to turn on the toggle next to “Record to computer files.”
You may see another window pop up asking you to verify this change. Click “Turn On” to approve.
Step 2: Update your recording settings
This is also where you can turn on local recording features, like notifying participants that recording has started.

In your Zoom app, start or join your meeting as a host or co-host.
Tap “Record” in the bottom menu. If you don’t see this option at the bottom of your screen, click “More” and choose “Record” from the pop-up menu.
If a new menu pops up with additional options, click “Record on this Computer.”
Recording stops once your meeting is over, or you can click “Pause” or “Stop Recording” at the bottom of your Zoom window.
Once your meeting is over, Zoom converts your recording and saves the files on your device using the following naming conventions:
Audio and video file: video[random number].mp4
Audio only file: audio[random number].m4a
Look for your local recordings in your Documents > Zoom and in a folder labeled with the date of your recorded meeting.

You can also find them by clicking the “Open Recordings” button in the bottom-left corner of your Zoom window and selecting the Local Recordings tab.
How to record a Zoom meeting on your phone
While you can’t save a local recording on your mobile device, you can create a cloud recording as long as you have a paid Zoom account. The steps are the same whether you use an iOS or Android phone:
Record a Zoom meeting on your Android or iPhone
Start or join a Zoom meeting as a host or co-host.
Tap “More” at the bottom of your screen—you may need to scroll to the right to find this option.
Tap “Host tools,” then choose “Record to the Cloud” if you’re on iOS, or “Record” for Android.
You should now see a recording indicator in the top-left corner of your screen.

Pro tip: You can also record your Zoom meetings using free, built-in tools on Mac and PC. Learn how to screen record on Windows and how to screen record on a Mac in these easy guides.
When to record Zoom meetings
Avoid new hire anxiety by recording feedback that captures tone of voice and non-verbal cues.
There are multiple reasons why you might want to record a Zoom call, such as logging feedback for coworkers to revisit or sharing updates with teammates who couldn’t attend a meeting.
Recording a Loom or Zoom call for these situations adds helpful context for viewers, such as a friendly tone of voice when sharing praise and constructive criticism or what items were considered before a final decision was made for a project—and they can re-watch Loom and Zoom recordings if they need a refresher.
Recordings also let team members watch the video when they’re able to rather than tearing them away from their focus time. Microsoft’s 2023 State of Work report found that 68% of workers report a lack of uninterrupted focus time during their workdays, and meetings can quickly become an inconvenience that delays projects and reduces productivity.
Consider turning on Zoom recordings during these situations to benefit your team.
New hire orientation and training: Use recorded meetings as tutorials for new team members so they can see processes in action.
Project and decision documentation: Record your Zoom meetings to document what decisions were made and why, the latest status updates, the next steps and their assignees, and retrospectives.
Knowledge sharing : Share recordings of your design brainstorming session in Figma or a pair programming session to help teammates gain new skills.
Performance reviews and feedback: Record one-on-one meetings between managers and direct reports, plus feedback from peers to document current statuses, areas of improvement, and goals.
Client chats: Get consent and record your client meetings so you can review and share important details.
Accessible content: Create recording transcripts to help coworkers who are hard of hearing, speak English as a second language, and so those who couldn’t attend gain value and stay in the loop.
Recording your Zoom meetings also gives certain employees a chance to access the content at a time that’s best for them. This can help them avoid Zoom fatigue on meeting-heavy days or maintain their focus if they have a project deadline on the horizon.
How to share your Zoom meeting recordings
Already recorded your Zoom call? Here’s how to share it with others:
Step 1: Find your Zoom recordings
Depending on whether you created a cloud or local recording, you can find your recorded Zoom meetings in the following locations:
In your Zoom web account:
Log into your Zoom web account.
Click “My Account” in the top-right corner, and then select Recordings from the left-hand navigation.
Choose the “Computer recordings” tab to find your local recordings, or choose “Cloud recordings.”
In the Zoom desktop app:
Open your Zoom app and log in.
In the bottom right-hand corner of your Home dashboard, click “Open Recordings.”
This opens a new window where you can select the “Cloud Recordings” or “Local Recordings” tab.
Find local recordings on your device:
Find your Documents folder and open it.
Next, look for the Zoom folder, then open it and look for a meeting recording folder labeled with the date and time of your recorded meeting.
Step 2: Share your recording
For cloud recordings:
Once you’ve located your recordings, click “Share” next to the recording you want to share.
A window with a shareable link should appear. Copy the link.
Adjust any viewing permissions and set a recording password if you like.
For local recordings:
If you’ve located your recording by clicking “Open Recordings” in the Zoom desktop app, click “View Local Recording” under the meeting you want to share. This opens a new window with your recording files inside.
Upload your recording to a cloud storage service like Dropbox or Google Drive. If your recording is split into separate audio and video files, you may need to use a third-party video editor to combine them into one file.
Use your cloud storage service to create a shareable link.
Alternatively, you can upload your local recordings to an email, YouTube, or messaging service—though the file size may be too large. This is why sharing a link is often more ideal.
Alternative: Connect Zoom to Loom for ready-to-share recording links

Here’s the tea: Sharing Zoom meeting recordings can be frustrating. Depending on your Zoom plan, you’ve got limited room for cloud recordings—and local recordings create large files that can take a while to upload to a cloud storage site or email draft.
Thankfully, you can simplify the sharing process. As long as you have the Loom Enterprise plan, you can connect Loom to your Zoom account and import any Zoom cloud recordings.
You can do this manually for all existing Zoom recordings, then set Loom to auto-import any future Zoom cloud recordings. Once your Zoom recordings are uploaded to your Loom account, you can quickly create a shareable link to send in an email, over Slack, or wherever makes sense.
Not sure Zoom is right for you? Discover seven Zoom alternatives that boost team collaboration with their unique, remote-friendly features.
How to use Zoom recordings to extract the most value from your meetings
Why record your Zoom meetings? It’s simple: Zoom recordings offer a lot of benefits beyond real-time video conference calls. Here’s how to get the most value out of your recorded meetings.
Keep it organized: Organize, name, and label your recordings in a consistent way that helps colleagues easily find the right meeting to rewatch.
Share knowledge: Share recordings with teammates who couldn’t attend the meeting or those marked as “optional” who could still benefit from updates.
Create accessible recordings: Transcribe your meeting recordings to make them more accessible to those with hearing difficulties or who speak English as a second language. You may also want to adopt additional accessibility strategies— CultureAlly suggests having each speaker announce who they are and describing presentational visuals.
Make it easy to find information: Highlight, timestamp, and add notes to key moments in your recordings to call out important topics and action items.
Always get consent: Set clear guidelines for gaining consent to record meetings while maintaining trust with the team and any external clients or stakeholders.
Optimize your recording settings: Adjust your recording settings to capture essential elements like shared screens, the current speaker’s video, and the interpreter's view.
Share an agenda beforehand: Create and share a meeting agenda before hopping on Zoom to ensure the discussion stays focused and your recording is short and sweet. You can even record a quick Loom video to share these key insights. As employee engagement software Assembly notes, agendas keep attendees focused , productive, and informed enough to make decisions within the allotted time.
These tips can help remote teams collaborate more effectively and create a valuable archive of information that everyone can continuously reference.
How to stack Loom and Zoom for streamlined workflows

Loom vs. Zoom : it’s not a question of whether you should use one or the other but how to boost productivity with both tools. Together, Loom and Zoom can reduce unnecessary meetings, build a strong knowledge-sharing culture, and better accommodate diverse and distributed teams .
Here’s how to use these two video communication platforms to help your team collaborate in the most efficient and flexible way possible.
Use Loom before and after Zoom meetings: Record a Loom video to share an agenda with teammates before your Zoom meeting starts, then send follow-up video messaging to clarify discussion points and clear up any confusion.
Import Zoom recordings to Loom: Automatically import your recorded Zoom meetings to Loom and share them on the spot with an auto-generated link. Adding your Zoom recordings to Loom also creates a single source of truth for documented processes, decisions, and updates while giving coworkers a chance to leave emoji reactions and comments directly on your video.
Summarize Zoom meetings with Loom: Create Loom videos to summarize key takeaways from your meeting and share them with teammates who couldn’t attend. You can also include a link to the full Zoom recording if they want to watch the whole thing or stitch a Loom video to the beginning or end of your Zoom recording to add additional context.
Include Loom as a sales prospecting tool: Connect with new leads by sending them a Loom greeting that includes an embedded CTA link. This allows prospects to view your messaging on their own time—and then follow up by requesting a Zoom call.
Document bugs and issues with Loom: Record a short Loom walkthrough explaining and showing the bug you’ve encountered, then send it to your dev team instead of hopping on an impromptu Zoom call. Plus, Loom AI converts your video into a Jira or Linear bug report.
Save and share Zoom recordings using Loom: Upload your Zoom recordings to Loom and create helpful onboarding and training videos. Now participants can pay more attention and worry less during meetings knowing there’s a recording they can watch afterward.
Ready to give it a try and see how Loom can enhance your real-time Zoom meetings?
Sep 5, 2024
Featured In:
Share this article:.
Jeong Lee works in Marketing at Loom.
How to Zoom In on a Video Windows 10: Step-by-Step Guide for Beginners
If you’re looking to zoom in on a video using Windows 10, you’re in luck! Whether you’re tweaking a video for a school project or just trying to see a detail more clearly, Windows 10 has the tools you need. In short, you’ll be using the built-in Photos app, which isn’t just for photos—it’s also a decent video editor.
How to Zoom In On a Video Windows 10
Following these steps, you’ll learn how to zoom in on a video using the Photos app in Windows 10. This method will allow you to focus on a specific part of your video, making it larger and easier to see.
Step 1: Open the Photos App
Start by launching the Photos app on your Windows 10 device.
The Photos app is more versatile than its name suggests. Not only does it handle your pictures, but it also has basic video editing features that come in handy for simple tasks like zooming in. If you don’t see it on your taskbar, you can find it by typing "Photos" into the search bar.
Step 2: Import Your Video
Next, import the video you want to edit by clicking on the ‘Import’ button and selecting your file.
Once you click on ‘Import,’ a file explorer window will pop up, allowing you to navigate to the location of your video file. Select the video and click ‘Open.’ Your video will now be available in the Photos app for editing.
Step 3: Click on ‘Edit & Create’
Select your video and then click on the ‘Edit & Create’ button at the top of the screen.
This button opens a menu with various editing options. From trimming your video to adding filters, the ‘Edit & Create’ button is your gateway to all the editing tools you need.
Step 4: Choose ‘Create a Video with Text’
From the dropdown menu, choose the ‘Create a video with text’ option.
While the option mentions text, don’t worry—this is the step that gets you into the video editor where you can zoom in. It will open up the video editor interface, which is where the magic happens.
Step 5: Add Video to the Storyboard
Drag your video down to the storyboard at the bottom of the editor.
The storyboard is where you can manage different parts of your video. Dragging your video here makes it easier to apply zoom effects and other edits.
Step 6: Apply the Zoom Effect
Click on the video in the storyboard, then select the ‘Zoom’ button from the toolbar.
Now you can choose the area you want to zoom in on. You can adjust the zoom level and the specific area of the video you want to focus on. This feature allows you to highlight the part of the video that matters most to you.
Step 7: Save Your Edited Video
Once satisfied with your zoom effect, click ‘Finish Video’ to save your edited video.
You’ll be prompted to choose the quality of the output video. Pick an option that fits your needs and click ‘Export.’ Your zoomed-in video will now be saved on your computer.
After completing these steps, you’ll have a zoomed-in version of your video, making it easier to focus on the details that matter most to you.
Tips for Zooming In On a Video Windows 10
- Quality Matters : Higher quality settings will give you a clearer zoomed-in video, but will also take up more space.
- Practice Makes Perfect : Don’t be afraid to experiment with different zoom levels and areas to find the best result.
- Save Copies : Always keep an original copy of your video before making edits, just in case you want to start over.
- Use Keyboard Shortcuts : Familiarize yourself with keyboard shortcuts in the Photos app for quicker editing.
- Explore Other Features : While you’re at it, explore other features in the Photos app like adding text, filters, and background music.
Frequently Asked Questions
Can i zoom in on just a portion of the video.
Yes, you can select a specific portion of the video to zoom in on, focusing on the most important details.
Is the Photos app free?
Yes, the Photos app is pre-installed and free to use on Windows 10.
Will zooming in affect the video quality?
Zooming in can affect the video quality, especially if done excessively. It’s best to zoom moderately to maintain clarity.
Can I undo my edits?
Yes, you can always revert to the original video before saving the final edited version.
Are there alternatives to the Photos app?
Yes, there are other video editing programs like Adobe Premiere Pro and Filmora, but they may require a purchase.
- Step 1: Open the Photos App.
- Step 2: Import Your Video.
- Step 3: Click on ‘Edit & Create.’
- Step 4: Choose ‘Create a Video with Text.’
- Step 5: Add Video to the Storyboard.
- Step 6: Apply the Zoom Effect.
- Step 7: Save Your Edited Video.
Zooming in on a video in Windows 10 is a breeze with the built-in Photos app. This simple yet effective tool allows you to highlight specific areas of your video, making details clearer and more focused. While the Photos app offers a range of editing features, mastering the zoom function can significantly improve your video projects.
Whether you’re a student working on a class presentation or just someone who loves tweaking home videos, understanding how to zoom in on a video can be incredibly useful. And remember, practice makes perfect. So, go ahead and play around with the different features until you get the hang of it. Happy editing!

Kermit Matthews is a freelance writer based in Philadelphia, Pennsylvania with more than a decade of experience writing technology guides. He has a Bachelor’s and Master’s degree in Computer Science and has spent much of his professional career in IT management.
He specializes in writing content about iPhones, Android devices, Microsoft Office, and many other popular applications and devices.
Read his full bio here .
Share this:
- Click to share on Twitter (Opens in new window)
- Click to share on Facebook (Opens in new window)
- Click to email a link to a friend (Opens in new window)
- Click to share on LinkedIn (Opens in new window)
- Click to share on Reddit (Opens in new window)
- Click to share on Pinterest (Opens in new window)
- Click to share on Tumblr (Opens in new window)
Related posts:
- How to Zoom In or Out on an iPhone or iPod Touch: A Step-by-Step Guide
- How to Zoom Out on Apple Watch
- How to Zoom Out on iPhone 14
- How to Zoom In or Out of a Microsoft Word Document: A Step-by-Step Guide
- How to Unzoom Your Apple Watch or Turn off Zoom Completely
- How to Install Zoom on an iPad: A Step-by-Step Guide
- How to Zoom in on Google Slides: A Step-by-Step Guide
- How to Zoom in Google: A Step-by-Step Guide for Beginners
- How to Zoom in Google Docs: A Step-by-Step Guide
- How to Zoom Out in Google Docs: A Step-by-Step Guide
- How to Embed Video in Powerpoint 2013
- How to Add a Zoom Link to Your Google Calendar Invite: A Step-by-Step Guide
- How to Install Zoom on Windows 11: A Step-by-Step Guide for Beginners
- How to Upload to Google Photos on iPhone or iPad: A Step-by-Step Guide
- How to Install Zoom on Windows 10: A Step-by-Step Guide
- How to Put Zoom Icon on Desktop Windows 11: A Step-by-Step Guide
- How to Zoom Out in Google Chrome: A Step-by-Step Guide
- How to Zoom in on Windows 10: A Comprehensive Step-by-Step Guide
- How to Crop a Video Windows 10: A Step-by-Step Guide for Beginners
- How to Transfer iCloud Photos to Google Photos: A Step-by-Step Guide

Use zoom for PowerPoint to bring your presentation to life
If you would like to make your presentations more dynamic and exciting, try using zoom for PowerPoint .

To add a zoom, go to Insert > Zoom .
To summarize the entire presentation on one slide, choose Summary Zoom
To show selected slides only, choose Slide Zoom
To show a single section only, choose Section Zoom

When you create a zoom in PowerPoint, you can jump to and from specific slides, sections, and portions of your presentation in an order you decide while you're presenting.
Note: See the Requirements table below regarding which versions of PowerPoint support the features described in this article.
Summary zoom
A summary zoom is like a landing page where you can see the pieces of your presentation all at once. When you're presenting, you can use the zoom to go from one place in your presentation to another in any order you like. You can get creative, skip ahead, or revisit pieces of your slide show without interrupting the flow of your presentation.
Create a summary zoom
Go to Insert > Zoom .

Select Summary Zoom .
The Insert Summary Zoom dialog box opens.
Select slides you want to include in your summary zoom. These become the first slides of your summary zoom sections . To learn more about using sections in PowerPoint, see Organize your PowerPoint slides into sections .

If you already have sections in your presentation, the first slide of each section is preselected by default. If you don't want to include certain sections in your zoom, deselect them. Then, if you want PowerPoint to get rid of any sections you didn't include in your summary zoom, clear the check box next to Keep unused sections in your presentation . Don't worry—the slides in the sections you're discarding will still be part of your presentation.

Once you've selected all the slides you want to use for your summary zoom, select Insert . Your summary zoom is created, and it appears as a new slide just before the first slide you included in your summary zoom.

Add or remove sections from your summary zoom
Once you've created a summary zoom, you might still want to add or remove sections of your presentation. If you've made changes since first making your summary zoom that you want to capture, you don't have to start from scratch—just update your summary zoom.
Select your zoom, and then select the Format tab on the ribbon.

Select Edit Summary , choose the sections you want to have in your summary zoom, and then select Update .
Note: You won't be able to add or remove sections from your presentation in this view, just from your summary zoom.
A slide zoom can help you make your presentation more dynamic, allowing you to navigate freely between slides in any order you choose without interrupting the flow of your presentation. They're a good option for shorter presentations without lots of sections, but you can use slide zooms for lots of different presentation scenarios.
Slide zooms help you drill down into multiple pieces of information while feeling as though you're staying on the same canvas.
Create a slide zoom
Select Slide Zoom .
The Slide Zoom dialog box opens. Select the slides you want to use in your slide zoom.
Once you've selected all the slides you want to use, select Insert .
An item for each slide you selected in step 3 is added to the slide. Select each item in turn and drag to arrange them on the slide.
Tip: If you want to, you can create a slide zoom quickly by simply selecting the slide you want from the thumbnail pane and dragging it onto the slide you'd like to have your slide zoom on. This way, you can create slide zooms and change them quickly, and arrange them however you like simply by clicking and dragging.
Change the preview image of your slide zoom
Your slide zoom by default will be a preview thumbnail image of the slide, but you can choose a new image from your PC or the web to represent the section or slide you'll be going to.

Select Change Image to choose a new picture from the web or your PC to use instead of the thumbnail.

Choose or search the web for the image you want. When you've selected the image you want, select Insert .

You can also choose various looks for your zooms from Zoom Styles —you can change the border, add visual effects, or pick from any of the border and effect combinations in the gallery.

Section zoom
A section zoom is a link to a section already in your presentation. You can use them to go back to sections you want to really emphasize, or to highlight how certain pieces of your presentation connect. To learn more about using sections in PowerPoint, see Organize your PowerPoint slides into sections .
Create a section zoom
Select Section Zoom .
Select the section you want to use as a section zoom.
Select Insert . Your section zoom will be created.
Tip: If you want to, you can create a section zoom quickly by simply selecting the section name you want in the thumbnail pane and dragging it onto the slide you'd like to have a section zoom on.
Change the preview image of your section zoom
Your section zoom by default will be a preview thumbnail image of the slide, but you can choose a new image from your PC or the web to represent the section or slide you'll be going to.
More zoom options
Zoom for PowerPoint truly lights up when you make it your own. Select the Format tab of the ribbon to get to the Zoom Tools , which you can choose to create just the look and feel you're going for when you present.
Choose to return to the home page or continue through your presentation
If you want to return to the zoom slide after viewing sections or slides in your summary, slide, or section zoom, make sure the Return to Zoom check box is selected. If you want to move on to the next slide after viewing part of your zoom, uncheck it.
(If you're working with a summary zoom or a section zoom, you'll return to the zoom slide by default when you're presenting after going to the section. If you're using a slide zoom, you'll move on to the next slide by default after viewing your slide zoom.)
Make the background of your zoom transparent
Another way you can change the look of your zoom is by choosing to adopt the background of the slide where your zoom lives to make the zoom almost indistinguishable from the main canvas while you present. Select Zoom Background to make your summary, section, or slide zooms blend in to their home slide.
In the Zoom Styles group, select Zoom Background . The zoom will adopt the background of the home slide.
Change the transition options of your zoom
By default, your zooms will use the zoom transition when you present, which is what helps make the zooms feel so lively. However, if you don't want to use the zoom transition, or if you want to change the duration of the transition, you can do so.
In the Zoom Options group, make sure the box next to Zoom Transition is checked if you want to use the zoom transition when presenting your zoom.
If you don't want to use the zoom transition when presenting, uncheck the box next to Zoom Transition .
To change the timing of the zoom transition, use the up and down arrows next to the Duration indicator to change how long the zoom transition lasts.
Requirements
See the following table for details on the minimum version numbers required in PowerPoint to create or play zoom links.
| PowerPoint version | What you can do with Zoom |
|---|---|
| or newer PowerPoint 2019 | Create and play zoom |
| or newer | Play zoom |
| PowerPoint 2016 | Play zoom as hyperlinks with no zooming transition. |
| PowerPoint for the web PowerPoint Live in Teams | None None |
| PowerPoint for Android PowerPoint for iOS PowerPoint Mobile for Windows | Play zoom |

Need more help?
Want more options.
Explore subscription benefits, browse training courses, learn how to secure your device, and more.

Microsoft 365 subscription benefits

Microsoft 365 training

Microsoft security

Accessibility center
Communities help you ask and answer questions, give feedback, and hear from experts with rich knowledge.

Ask the Microsoft Community

Microsoft Tech Community

Windows Insiders
Microsoft 365 Insiders
Was this information helpful?
Thank you for your feedback.
IMAGES
VIDEO
COMMENTS
Switch back to Powerpoint and click the Slide Show tab. Begin the presentation by selecting the Play from Start or Play from Current Slide options. PowerPoint will display the slide show in a window. In Zoom, start or join a meeting. Click Share Screen in the meeting controls. Select the PowerPoint window and then click Share.
Here is how you can do that-. Step 1: First, start or join a Zoom meeting. Step 2: Click on " Share Screen " and select the " Advanced " option. From there, select " PowerPoint as Virtual Background " and select the file you want for your presentation. Then click on " Share ".
In this article I am using the Zoom app in Windows 10. The six options are: Share your entire screen/desktop. Share the Slide Show window. Share the editing window with a clean look. Run the Slide Show in a window and share that window. Use Presenter View to show the audience your slides while you see Presenter View.
In this step-by-step tutorial, learn how to best present Microsoft PowerPoint slides in Zoom Video Conferencing.⌚ Timestamps0:00 Introduction1:19 Share entir...
At the bottom of the Zoom meeting window, click "Share Screen." If you're using a single monitor, you will immediately start sharing your screen. If you're using dual monitors, you'll need to click the screen that your presentation will be shared on. In our case, that will be "Screen 2." To begin sharing that screen, click "Share" at the bottom ...
A presentation can really help you get your point across during a meeting, and thankfully, Zoom does offer support for displaying presentations while speakin...
This video shows you how to share Powerpoint slides in Zoom, including dual-monitor scenarios and the new "Powerpoint as virtual background" feature. You can...
To record yourself giving a PowerPoint presentation on Zoom, launch Zoom and PowerPoint; be sure to close all other applications. Create a new Zoom meeting, select Share Screen, select your PowerPoint presentation, and click Share. Launch your PowerPoint slideshow. In Zoom, choose Record > Record on This Computer.
This time, choose Desktop 1 or Desktop 2, depending on which screen you want to share on your Zoom presentation. In PowerPoint for macOS, start Presenter view from the Slide Show > Presenter View button. On Windows, make sure the Use Presenter View box is ticked on the Slide Show tab. Then start the presentation.
Here's how to get it done. Open your PowerPoint presentation. Launch the slideshow in a window—navigate to the Slide Show tab and click Set Up Slide Show. In the dialog box that appears, select Browsed by an individual (window) and click OK. Navigate to the Slide Show tab and select From Beginning or From Current Slide.
Here's how you share a PowerPoint presentation on dual monitors in Zoom: Select the PowerPoint file that's on the agenda. Now either Start or Join a Zoom meeting. On the meetings controls ...
2. Use Zoom to present. Now that the windows have been separated, you can easily use Zoom to present the slideshow window. While in a meeting, click on the 'Share Screen' button and select the browser window with Google Slides on top. Finally, hit 'Share' to start the screen-sharing session.
Kinda. To access the feature (beta at time of writing) click the "Advanced" tab in the "Share Screen" popup, and select "Slides as Virtual Background". This is what it looks like from the attendee's perspective. And yes, you appear twice on the screen. Once on top of your slides, and again beside them.
Start Presenter View Preview by pressing Alt+F5. In Zoom, share a portion of the screen from the Advanced sharing options. Make the current slide larger in Presenter View and adjust the sharing rectangle so you just share the current slide portion of the screen in Zoom. Deliver your presentation. Full detailed article.
updated April 2020. This guide is designed for virtual presenters, trainers and facilitators who use Zoom Meetings. It includes some of the most commonly used features of Zoom for interactive virtual meetings, presentations and other live online learning sessions. This guide is not a complete comprehensive guide to what Zoom can do.
This video shows you how to share your screen and present a PowerPoint presentation over Zoom. This series is aimed at helping folks figure out easy methods ...
Click the "Share Screen" Button: In the Zoom meeting window, locate the green "Share Screen" button at the bottom of the screen and click on it. Select Your PowerPoint Window: A dialog box will appear with a list of available screens and windows to share. Choose the window that has your PowerPoint presentation open.
Step 3: Share your screen on Zoom. From your Zoom meeting window, click on "Share Screen" and select the window with the Presenter view of your presentation. That's it! You'll now be able to look at the presenter notes on your screen while your audience views the slide open in your Presenter view window.
Video files can be opened within Zoom's built-in video player and shared, without other participants viewing the playback controls. Sharing your video with the built-in player, instead of as part of a shared screen or application, improves the quality of shared videos, providing a smoother and more stable viewing experience for your viewers.
This can help combat Zoom fatigue and engage people with your presentation right from the start. Using a visual decoder. Think of your presentation as a story you're trying to tell — one that visuals bring to life. You don't have to be a talented artist to apply Roam's visual methodology to how you tell that story. As Roam displayed via ...
If you would like to make your presentations more dynamic and exciting, try using zoom for PowerPoint. To add a zoom, go to Insert > Zoom. To summarize the entire presentation on one slide, choose Summary Zoom. To show selected slides only, choose Slide Zoom. To show a single section only, choose Section Zoom.
This video shows how can you use or share a PPT (powerpoint presentation) while using zoom meeting app. Watch this to know how you can show slides to other ...
In your Zoom web account: Log into your Zoom web account. Click "My Account" in the top-right corner, and then select Recordings from the left-hand navigation. Choose the "Computer recordings" tab to find your local recordings, or choose "Cloud recordings." In the Zoom desktop app: Open your Zoom app and log in.
Dragging your video here makes it easier to apply zoom effects and other edits. Step 6: Apply the Zoom Effect. Click on the video in the storyboard, then select the 'Zoom' button from the toolbar. Now you can choose the area you want to zoom in on. You can adjust the zoom level and the specific area of the video you want to focus on.
If you would like to make your presentations more dynamic and exciting, try using zoom for PowerPoint . To add a zoom, go to Insert > Zoom. To summarize the entire presentation on one slide, choose Summary Zoom. To show selected slides only, choose Slide Zoom. To show a single section only, choose Section Zoom.