Online GCSE Art Course
About this course
Be inspired and explore your creativity! This online IGCSE Art Course is perfect for students looking to further their art and design skills. The course is run by an energetic and enthusiastic qualified art teacher in her weekly live interactive lessons. If you can’t make our timetabled lessons then you can study independently with dedicated teacher support, and you can also view all weekly lessons in our archive.
You will also have access to our specialist tutor team who are practising artists and freelance commercial designers with a passion for teaching and inspiring the next generation of artists. Whether you’re a beginner or an experienced artist or designer, our online Art Course gives you the opportunity to extend your technical skills and build confidence in your creative ability. You will be encouraged to explore materials, approaches and techniques towards final outcomes.
The IGCSE Art Course is run over two years as standard, and can be completed in one year through our intensive GCSE art course (see below). In year one (starting at any time) you will gain confidence in drawing, painting and sculpture. You will also make connections between your own work and the work of other artists and designers. In year two you will use your new skills, knowledge and understanding to express yourself in a themed project in preparation for the exam later in the year. You will also be asked to write (Component 3) an essay of 1500 – 2000 words about an artwork or art movement. For students wishing to gain an art GCSE equivalent without exams or essays, try our Level 2 Certificate in Art & Design.
The final grade for the qualification is a summation of two components, a critical and historical assignment (component 3) and a final exam project (component 1). Preparation for these is a key aim of your tuition and a key role of your tutor. Lessons and tuition can be arranged with your tutor at mutually convenient times. Our tutors main goal is to support your art education, so they will work with you to realistically schedule your art study around other courses you may be taking.
Our examination centres will provide you with an exam timetable with the key dates for sending paperwork and information about the exam weekend. They will also send you and your tutor a copy of your GCSE art exam paper. The exam paper will ask you to build an art project around a particular theme over a period of 6 weeks. At the end of the six weeks preparation period you will have 8 hours (4 hours a day x 2 days) to make a final piece that relates to your project. Upon completion your work will be graded, and you will receive your Art IGCSE.
Graduates will have created a specialist portfolio that expresses their personal brand of Art and Design. The completion of the Art IGCSE along with your portfolio enables access to our Foundation Diploma in Art & Design, which will fast track you to top universities and employment as a professional qualified artist or designer.

Work produced on this course
Course overview
Entry Requirements
In order to study our online iGSCE Art course, you must meet the following requirements:
- Be age 14 years or older
- No previous art or design qualifications required.
Please note that this is an online GCSE art course. You must have a computer with broadband connection and basic art materials in order to participate in the course.
Study options
Study online Art and obtain your GCSE in a way that suits you. With a variety of study options to match your lifestyle and time commitments:
- Part-time programmes: available all year around – enrolling now
- Full-time programmes: start December to January and September to October. Exceptions may apply.
- Standard 2 year programme
- Intensive 1 year programme
Accreditation and progression
Our online Art IGCSE is fully accredited and leaves graduates with a recognised art qualification. Upon completion, students are perfectly positioned to continue their art education. See the details below:
- Accreditation : Cambridge International Examinations Board (CIE) 0400 syllabus. OCAD is not affiliated in any way with CIE - we simply support students with the 0400 syllabus.
- Progression : Completing our IGCSE Art gives students everything they need to progress to our Foundation Diploma in Art & Design. The level 3 / 4 course prepares students to study art at degree level.
Additional Course Information
Progression : To Foundation Diploma in Art & Design
Tuition: Face to face, one to one – unlimited
How it works
Our online art students receive access to their own online studio where they can work through their course. Units and assignments are listed along with supporting resources, video tutorials for skills development, step-by-step guides and more helpful tools to ensure progress. Photographs of students’ completed art projects and coursework pieces are uploaded to their college e-portfolio for assessment and constructive, friendly written feedback on how to progress.
Additionally, students are invited to LIVE interactive online lessons at timetabled times, where they will learn from qualified teachers and industry professionals. If students can’t make the lessons they can watch them in their own time, so they won’t miss any of the course content. The fully qualified and experienced school art teacher is available for feedback via email and messenger. Students are invited to discuss their progress and receive face to face verbal feedback, encouragement, and support. Students may also benefit from relationships with their fellow online students as they can view profiles and comment on each other's art work if they wish.
Optional LIVE enrichment classes are offered most weeks during term times. These fun classes are enjoyed by students but are not required to complete the course. When purchasing this course you are not paying for these FREE classes – they are a GIFT! The teacher has to strike a balance between providing enrichment and fun for students and supporting them through essential units on their course. This may mean live lessons are postponed from time to time. The teacher reserves the right not to run these optional free lessons.
You will be continually assessed throughout the IGCSE Art Course and tutors will provide constant feedback and help with improvements.
Students’ timed test / final major project and written assignment will be assessed externally by the exam board and this will decide the final grade. You will be kept informed every step of the way on how to improve your work.
Structure of the course
This exciting course has been designed to ensure you produce a stimulating and rewarding art & design project (s) which allow you to develop your knowledge, skills, understanding and confidence in developing your interests and ideas in an artistic way.
The first part of the course takes you through a programme of developing skills in drawing, painting, mixed media (collage), digital art and 3d (sculpture).
In the second part of the course you will be asked to make an art project that is related to a theme which is of personal interest to you. Previous themes have included:
- “Identity”
- “Natural Forms”
- “My Manga World”
- “I Me & Mine”
- ‘Bully’
- “Success’
- “Acceptance’
- “Delicate”
- “Overhead and Underneath’
- “Surfaces’
- “Precious”
- “Through The Keyhole’
- “My Dream World”
- “Taken”
Your artwork in two components will be assessed by the examination board to determine your final grade:
- Component 1 Timed test – 8 Hour Practical Exam at an Exam Centre
- Component 3 Critical and Historical Assignment – 1500 – 2000 word Assignment / Essay
Download Syllabus ➝
Standard 2 year course: £2000 GBP ($2600 USD)
Intensive 1 year course: £3000 GBP ($3800 USD)
Join our network of international agents – contact us
Outside Europe
Standard 2 year course only £2,999 GBP
Plus an additional surcharge of £2,999 GBP may apply for students with a low level of English speaking and writing. For students with learning difficulties, please apply for our SEND courses. It is considerably more difficult and time consuming to teach these students.
Standard 2 year course: £999 GBP
Intensive 1 year course: £1,999 GBP
Concessions are available for recipients of state benefits.
Our accreditations

Fill in our short form ➝
Visit the contact page ➝
Check our 5 Star independent Student/Parent Reviews ➝
Find a Centre
Find an OCAD Centre Near You ➝
OCAD is part of the Cambridge Online Education Group - Company number 06594953
Registered UK Learning Provider 10033485
Cambridge Online Education Ltd
Terms of use | Privacy policy
Website by Cotswold Web.
Scope & Sequence June 2021
Topic outline.
June 2021 Notes and concepts:
- Here we have an online version of the existing SOW
- In this model, it is split into accordions
- Concept is that teacher will access the site, and be able to download the default version without any changes
- By default you get the SOW
- If you change anything, you get your custom version
Feedback: Change the titles around Include introduction - clarity about each section Essential to be editable
- Cambridge IGCSE™ Art & Design 0400
Ideally a short, overview, visual item. The 'map' worked well, but that did focus on delivery models. Might a diagram be better, making use of the existing SOW data?

Map vs Pie chart vs other graphic? Even user choice?

Dynamic option here - it has quick list of what you're exporting:

- Scheme of Work
Shows topics within the scheme of work - headings that reveal the content
Existing Scheme of Work

Additional text and detail go here

Additional depth

Additional depth - version 1

Additional depth - version 2
BUT - are the wider pedagogical references even needed here? How do they actually differ from what is in the existing SOW? Where do they add value?
OR might we simply include the wider 'pedagogical theory in practice' as an option to tick?

- Pedagogical focus
I think this needs to be integrated with the above - having it separate now makes no sense at all.

- Broader pedagogical links with reference to the subject - Subject specific examples (taken from the reference book materials). - Examples shown here, linking onto the textbook? - If selected, they appear within the relevant topic in the SOW? Feels cumbersome.

Further thoughts - might we also make the entire thing selectable? We have a nicely presented ticklist offering. What do you want to include in your Scope & Sequence?

- Further resources


Mr.Jason's room
IGCSE Art: Year 1
The first two terms of year one in the course will be focused on developing skills in drawing, painting, mixed media (collage), digital art and 3d (sculpture). Students will explore a range of dry and wet media while researching key art movements that have impacted the art world over time. Term 3 is typically split between a unit on Figures & Portraits and beginning the Component 1: Coursework .

Below is a predicted layout for the first year of the IGCSE program.
3 (1st half)
3 (2nd half)
Topics / Skills Covered
Still-life :
Students will learn to draw still-life objects from direct observation. They will explore the visual elements of art- line, tone, shape and form whilst studying natural and organic forms. They will learn to use a variety of media such as pens, pencils, graphite and charcoal. They will learn about the history and characteristics of Cubism and make a final painting in a Cubist style using mixed media and collage.
Spaces and Places :
Students will start to explore the theme in a personal and individual way through direct observation and photographs. They will create paintings in watercolours, acrylics, pastels and other media. They will use colour theory to create colour schemes and use colour in an expressive manner. Students will create a final piece of the project in 8 hours as an assessment.
Figures and Portraits :
Students will learn how to draw portraits and figures with accuracy. They will use rules of proportion and create a series of sketches involving figurative elements.
IGCSE Coursework Project :
Students start the coursework project for IGCSE Art & Design. They start by choosing a theme and gathering and recording images from direct observation. This is worth 50% of their IGCSE grade.
Within this project students will experiment with a variety of images, media and techniques and demonstrate the development of an idea from start to a final resolved piece.
How Artists Capture Environments:

How Artists Explore Identity:

At the beginning of the coursework you will be asked to select a theme which will be the focus of your work for the next year. Consider your theme carefully and aim to choose one that is of personal interest to you.
Choosing a theme may be more difficult than it sounds. You might begin with this simple 3 step process:
Brainstorm Evaluate Narrow it down
For additional resources on theme development and a comprehensive list of artist's by themes click here

Full list of themes
Here are examples for Component 1. There is no order nor have marks been assigned; just a variety of prior student work.
example 7
example 8
It is important that both Component 1 and 2 progress thematically with unity between each sheet. Although there is no set format for how this is to be done, I instruct my students to follow idea progress based on the Elements of Art . Use this document here to add structure and maintain organization between sheets.
Use these links for an in depth view on how to develop a final work:
A* Coursework
Compositional layout
Top Marks in the World
If you are interested in a Surrealistic approach, look into the following links:
Intro to Surrealism
Surrealism ppt
Speed drawing in pencil
My Surreal Room
Speed painting
Simple box figure
Citing Sources
PDF File Download
Silhouettes and Landscapes: IGCSE Art Coursework (A*)
Last Updated on April 2, 2023
This article features Enrico Giori’s CIE IGCSE Art Coursework project (Component 4) completed in 2014 while studying at St. Louis High School , Milan, Italy. Enrico was awarded 97% (A*) overall for IGCSE Art (see also Enrico’s IGCSE Art exam ). Enrico’s project is a very interesting example: although it draws upon first-hand observation, it does not have have a large emphasis upon realism. Enrico demonstrates a stunning understanding of composition, coupled with mature, in-depth investigation of a wide range of mediums and processes, such as linoleum prints, plastic-plate etchings, sewing, digital manipulation and mixed media collage.
Two of Enrico’s sketchbook pages are included in our new book: Outstanding High School Sketchbooks . This book has high-resolution images so that fine details and annotation are clear, making it an excellent resource for students and schools. Learn more !
READ NEXT: How to make an artist website (and why you need one)

I have always been fascinated by surrealist artists such as Magritte and I decided, as I started my IGCSE Art qualification in Year 10 to explore the concepts that lie behind surreal images. I started looking at the use of color and objects in art and I decided to focus on still life at first, not the human figure, which I saw as too complex to draw or paint. I then understood, by looking at some pieces by Magritte, such as Golconda or The Son of Man that the human figure was the starting point and the most important features of the surreal current. I therefore decided to analyze the human figure, reducing it to silhouettes, such as the one filled with a moonlit landscape in ‘The Happy Donor’, which I looked at with passion and admiration for a whole month. I discovered, almost by mistake, the wonderful world of printmaking and have experimented with linoleum prints and plastic-plate etchings. I decided to make a series of etchings for my IGCSE final outcome piece, and I am very proud of the result I have achieved. I experimented with a varied range of techniques: acrylic, pencil, charcoal and chalk, colored pencils, watercolors and watercolor pencils, oil paint, lino printing, etching, collage, pen and ink (one of my personal favorites), sewing and digital image manipulation (I have experimented overlapping images with Photoshop and photocopiers, achieving interesting results). I am also passionate about photography, and I have also tried to show that through my project.
The descriptions of my work below are derived from the annotations that are glued on the pages themselves, listing materials, processes, strengths, weaknesses and areas of improvement.

This page has crossed many stages of development, and the original drawing which I based my page on was done in a courtyard that we went to once with our Art teacher to draw from direct observation. For this page I combined various techniques and materials: acrylic, 2B, 4B and 6B pencil, water soluble graphite, watercolor pencils, watercolor, pen and ink and coffee. This page started from the drawing on the left, which I drew from direct observation on my sketchbook. I then decided to place it on my page and extend it with another drawing from direct observation. The left part of the page is mainly done with pencil, watercolor and acrylic for the wall decoration on the bottom. I believe the watercolor is perfect for the wall because it creates an interesting texture that almost looks like a brittle and old wall. The acrylic decoration is interesting because it stands out on the page and makes it more expressive and eye-catching. The right side of the page is personally my favorite, because I worked a lot on it and I find the final outcome pleasing and quite well done.
I decided to combine a few techniques to make the outcome more attractive and realistic, because different techniques are better for different purposes. For example, I found the pen and ink useful to give a sense of the three dimensions through cross-hatching because I find it an interesting and unusual way to give dimension to the page. I then filled in the drawing with watercolor and I used some white acrylic to paint the highlights of the step near the girl. I kept the girl in 4B pencil and I highlighted the areas of shadow using cross-hatching with pen and ink, so that it looked like a silhouette. I then painted the rightmost wall using coffee and a stiff brush so that the wall looked old and wet by water. The right part does not continue the scene on the left and this choice is intentional, because I wanted to overlap images and create a study of the same place seen by two different perspectives.
One of the strengths I can see in this piece is the evident use of cross-hatching, which I feel is easier with pen and ink than with a handwriting pen. One of the elements that was hard to draw and paint was the girl on the steps, because I wanted to keep her minimal (so she didn’t affect the scene of the door) and because I didn’t know how to make her look three dimensional. To improve this page I would make the details more accurate and I would focus more on the shadows and highlights.

I started developing this page by looking at people and especially their shadows and silhouettes from different perspectives. I decided to combine photos and drawings on this page to give a more interesting effect to the whole composition. For this page I have used: graphite pencils (2B, 4B, 5B, 6B, 7B, 8B, 9B), watercolor graphite, putty rubber, watercolors, calligraphy pen, white chalk, charcoal, photography film, acetate, tracing paper, newspaper, acrylic paints, glue stick and PVA glue to combine all the elements on the page.
I drew the silhouette on the bottom left of the page first from primary observation, and from there I developed all the other pieces. I have taken all the pictures on the page and have used the figure of the small girl dancing in water to create the two pencil drawings on the right. I decided to make a larger one and a smaller one to show movement and a dynamic scene compared to the profile drawing, which looks quite static. I added on the smaller girl a dress made out of newspaper and, to replicate the effect of the fabric folding around her body, I glued a newspaper by folding it in specific points and layering on top a fine wash of turquoise watercolor. I then used the pictures of the Statue of Liberty and the street in Manhattan to continuously give the idea of people’s silhouettes in different situations of the day. I then decided to overlap the little girl’s photo printed on acetate over these photos to give an effect of depth and perspective, and I also feel that it offers a creative contrast between color and black and white. I have included a montage of the same photos I created on my computer where I compared the movement of the girl’s arm together with the position of the Statue of Liberty. I then painted the background of the page in a bright tone of acrylic blue to illuminate the work and, especially because blue is the complementary color of orange, I have an orange ochre element, which is the background of the Statue of Liberty photo. To make the composition more pleasing, I also used an odd number of elements (7) on my page.
I believe the final effect of my page is very interesting because I managed to include various pieces, even if done with different techniques, that are all connected one with the other. I think a strength of my piece is the use of color and the combination of mediums on the page. I could obviously improve something, and that would be making the rightmost silhouette of the girl a bit lighter, so that it looks less dark and oppressive on the page.

This page has been quite complex to put together, because I had many ideas and themes I wanted to include and I had to work out which ones could be combined together effectively to create a pleasing composition. The main focus of this page is the artwork of Gary Hume , an English artist that gave me the idea that lead to the fabric and felt silhouette on the left and the acrylic painted silhouettes on the right, that I drew from some photos I took in Cinque Terre for the grey woman and in New York for the green building top.
This page shows clearly the use of many materials and techniques. These include acrylic paint, graphite pencil (2B, 4B and 6B), colored metal wire, tissue paper and PVA glue, colored felt, colored fabric, colored cotton and needles for sewing, a glass bead for the bird’s eye and montage cardboard for the lamp.
I started the page with the sewed silhouette on the right, which was inspired by two paintings of the artist Gary Hume, Begging For It (the man praying) and The Mother (the bird on top). This work took a really long time to complete because I had never sewn before. I then painted the hands on the felt with glossy black acrylic, because I thought it looked a lot like the texture of Hume’s original painting. I made the two silhouettes on the bottom with colored wire, tissue paper and PVA glue. These were quite easy to make but I found the technique very interesting. The last ‘big’ piece of work I created for this page was a pencil drawing from direct observation of the Tolomeo lamp of the famous Italian designer Artemide.
I then started to put the page together, using even some interesting pictures of silhouettes that I took the weeks before, but I didn’t like the effect, so I decided to draw two of them using Hume’s style, keeping them simple and as line drawings. I used mounting board under the lamp to make it look like it had its own real shadow, and I like the effect of this. I then colored them with acrylic.
I decided to include one of my pictures, so I cut out the small black woman and I glued her on the bottom of the page, so that it looked like she was popping out from behind the big, grey woman’s legs.
One of the main strengths I can identify in this piece is the use of different materials and the experimentation with new techniques, such as sewing and wire drawing. I think that these two techniques are really difficult to learn at first, but that when you learn how to apply them correctly, you can create some strong pieces of work. This piece of work seems to connect many of my pages, some for the bright colors, some for the silhouettes and some for the techniques. If I had the opportunity to improve something I would work on the shape of the hands on the blue silhouette and especially on the pencil drawing, so that it could look even more realistic. One of the elements I feel I have to work on is how to show light on my drawings, as sometimes the direction of the light source isn’t clear.

To develop this page I used some photos of people that I found after searching on the Internet. I chose to look closely at a woman with a container of water on her head and a ‘surreal’ silhouette of a man with a park on his head. To work on this page I used many materials: fabric, batik wax, batik dye, Image Maker, Brusho®, acrylic, watercolor, wax crayons and photocopies.I combined many materials on this page and I explored some different techniques. For the silhouette on the top left I colored the paper with Brusho® (an intense, water-based paint powder) and then I painted the edge of the silhouette with white acrylic. After that I laid several layers of red watercolor to highlight the shape of the person. For the silhouette of the same person on the right I used a different technique. I drew the silhouette with wax crayons and then I painted the outside of it with Brusho®. At the beginning I didn’t like the effect, because I used too much color, but after I played around a bit with the leftovers of paper, I decided to use some small pieces of the paper to make the silhouette more interesting, and then filled the gap in the middle with white acrylic.
The big piece of fabric on the left is a combination of a photocopy and a batik piece, on which I used Image Maker for the first time. I applied the photocopy of the silhouette on the fabric with Image Maker and then did a mirror image with batik wax. I didn’t like this because the effect was messy and not what I imagined before doing my batik. I then used the photocopy that I colored by accident with fabric ink to cover the mistake and I find the effect interesting and creative. Meanwhile, the batik on the right is done with the standard batik technique and then I colored the fabric with batik dye.
I think the effect the page is interesting, because the four sections are clearly separated, but they seem to blend together because of the strong and vivid colors. I think the page is made up by a ‘series of mistakes’ and that I have used the work in a creative and innovative way because I blended pieces that I thought would have never looked good together. I believe that the use of color is one of my strengths in this piece because I managed to use many tints and still have a pleasant composition. I found it hard to blend the fabric and the paper because they were materials that couldn’t be united together, so I decided to make the background grey and make the pieces look like they were part of a puzzle or sequence. If I could improve this piece of work I would try to create some more interesting effects with the batik on the big piece of fabric, so that the colors would look more precise and intentional.

This page is a composition of lino prints that I made looking at people and how they may be compared with landscapes. To create this page I used the traditional tools that are used for lino printing (linoleum board, lino cutter, cutting block, opaque lino printing ink, ink rollers). I used paper and fabric as printing supports and I completed my page with a layer of pale grey acrylic.
The page started with the lino prints I designed. I used silhouettes of different people and experimented with them, blending them together to create an interesting and investigative effect. I decided to use various colours such as red, green, yellow, blue and black, because I felt that mixing more colors on the same print gave an idea of three-dimensions and perspective. After I created the lino prints, I worked on one of them with pieces of collage paper, to see how this would affect the print. I found the outcome interesting, so I decided to include this in my page.
The composition of the page was hard to design, because I wanted to get a new and creative effect, not a dull puzzle of images, that seems quite traditional and antique. I therefore played around with the images for a while and decided to place them so that they could tell a story to the observer, and especially so that they could give an idea of development and experimentation.
I liked creating the silhouettes with the lino printing technique and I didn’t find this task difficult, especially because it allows you to complete last minute edits on your work. In the end I decided to include one of the printing blocks I used during the first part of the page creation, but to make it look more interesting I painted the leftover lino silhouette in black acrylic and then I decorated the surroundings with some light touches of white acrylic.
One of the strengths I can identify in this piece is the interesting mix of different materials, such as different papers, fabric and linoleum. I feel that this gives a unique effect to the page because it shows that the same image can be replicated successfully onto other materials. One of the areas of improvement I would consider is the composition of the page, as I would care more the layout of the prints, so that they could look even better and acquire more importance on the page. One of the strengths I can see in this piece is the interesting mix of different materials, such as different papers, fabric and linoleum.

The development of this page started looking at people’s contours and how human figures can be simplified to an ordered set of lines showing dimensions but also tone, texture and features. To develop the composition on the page I used many materials: cotton, Image Maker, tracing paper, photocopies, acetate, magazine pages, sewing cotton and a needle, acrylic paint, fine brushes, a black calligraphy pen, 6B and 2B pencils for the contours on tracing paper and felt tip pens.
I first created the geisha face that I have transferred onto fabric from a color photocopy with Image Maker. I decided to show how the figure could be simplified to basic lines that showed the contours of the face, as Henry Moore and Barbara Hepworth do in their drawings, so I drew these using graphite pencils onto tracing paper, that I then glued on the fabric and Image Maker. I then developed the same idea of contours on an Arab woman wearing a burqa. I first did the rightmost drawing with calligraphy pen on tracing paper and I then photocopied it and colored it using red felt tip pens, as in the original image I found the garment was of a bright scarlet red. For the last of the three women wearing the burqa I decided to sew some of the contours using primary colored threads. I then developed the three faces of a model from a magazine to complete my page. I sewed some of the contours of the face on one as I did for the Arab woman and then I created a negative image of the sewing on the one at the top by coloring with felt tip pens the spaces created by the threads I sewed.
I have done the last face by cutting curved shapes into the photocopy and then layering below it an image cut from a magazine of a field with defined lines in it. The contours of the landscape remind me of the creases of clothing that I have been looking at with the photo that portrays the woman in a burqa.
The last piece I included is a photocopy printed onto acetate of the rear of the sewed model’s face, taken against a light source and then processed on the computer to increase contrast and saturation. I finalized my page by painting a pale turquoise background and by adding thin white lines around the work to emphasize the idea of movement and to make the faces more interesting.
I think the effect of the page is curious because all the work seems to blend well together and creates a composition that is pleasing to the eye of who looks at my work, as the composition seems to guide the eye throughout the whole page in a certain direction. A strength of this page is the use of color and texture that create a unique collage of patterns and all the effort and creativity I have put into it, as it took me a lot of time to develop all the pieces on the page. If I could improve my work further, I would make the contours on the geisha even more precise and I would try top find a way to make them stand out more, so that it would acquire more importance on the page.

I started developing this page by looking at a photo of a model with a butterfly on her mouth and some lithographs by Barnett Newman , especially Untitled (The Cry) , that I decided to actually include on my page to show my starting point and the influences I have had to make this project come to life. I saw some lithographs by Barnett Newman at the Pollock and the Irascibles Exhibition in Milan and they interested me particularly. To complete this page I used a plastic sheet, an etching tool, screen printing ink, an etching press, heavyweight rough paper, and prints of the original photo, photocopier, and glue sticks and hot glue. I first looked at Barnett Newman’s lithographs and they interested me and their texture and they arose an eternal doubt in me: “Which line came first, and which followed second?” I etched upon a sheet of plastic with an etching tool the photo of the model and I afterwards printed some images under the etching press on heavyweight paper using screen printing ink. At the beginning I was not pleased with the effect, because I expected the lines of the face to be more defined, whereas on the majority of the prints they were quite abstract. The prints done with screen printing ink are the first total black and white on the top right of the page and the bottom left face.
I decided to overlap some etchings onto some photocopies of the original image using a photocopier. I have been very pleased with this effect, as it shows through some transparencies the original idea behind all of my work. I also included on the page some pieces torn out from a photo of the lithograph Untitled (The Cry) by Barnett Newman, in order to show where I got my inspiration. I finally decided to mount the original etching plate on the page overlapping it with a print to show where all of this started from, and also to introduce again this theme of transparencies that I have developed in this and other pages.
One strength I can see in this page is the interesting use of color, especially in the opposition between black and white and color and also the constant use of overlapping that aims to show a page composed by many layers, connecting myself to the work process applied by Newman. If I could improve this page I would try and use more types of surfaces to print on and also different colors of ink, in order to achieve a furthermore interesting effect.
The fold-out section of the page contains details of three collages that I created in A2 size with torn pieces of the etchings I made and famous paintings by Georges Seurat and Sigmar Polke . I selected details of the collages for this section and have explored them in a tactile way, focusing on textures, shapes and colors. I used details from the collages mentioned, fabric, image maker, photocopies, needle and colored thread, copper embossing foil, a biro pen, zippers, fibre mesh, watercolors, acrylics, hot glue, PVA glue and a glue stick. On the outside I included details in the tones of blue and yellow-green. I embossed a detail of the collages using embossing foil (as I also did inside the sheet) and I have included three image-maker details, which I inserted both in black and white color. Near the image maker on the bottom left, there is a detail of the original collage cut up and sewed back together with colored thread.
The other side of the fold-out section follows a more complex development. I inserted fibre mesh, embossings and painted fabric to add a sense of texture to the page. On some parts I used 3D acrylic to create three-dimensional lines and dots. I also included two zippers that I believe represent well the idea of ‘tearing things apart and putting them back together’ that I have embraced in the whole page.
I believe a strength of this section is the creative use of mixed media and the experimentation that I have carried out, which shows also the same idea in different perspectives. If I could improve this page even further I would consider inserting a wider variety of details and textures.

I started the development of this page by looking at a photo I took of a statue in Rome. A bird casually sat on its head, allowing me to capture the moment and to use this as a source of inspiration and a link with the page I made using Gary Hume’s work Beggin For It and The Bird. To develop this page I used a plastic sheet, an etching tool, screen printing ink, an etching press, heavyweight rough paper, textured materials, watercolors, a print of the original photo, glue sticks and hot glue. I also used fabric as a printing surface and acrylic and the back of a brush for the dots I have included to complete the page where it looked too “empty”.
I started etching the figure of the statue in in the plastic sheet, and, as I printed it for the first time, I was very pleased with the result because the lines were very defined and made a clear picture. As I felt more confident, I decided to print on many surfaces, such as fabric, felt, wallpaper, fibre mesh and sugar paper, but in the end I decided that the results on fabric were the best and that these were the strongest ones to include. Another experiment I did was to print using textured surfaces, and these allowed me to obtain the print on the right of the black and white photo on the bottom left. I then colored the etchings with watercolors both on fabric and paper.
I looked at two artists to complete this project, and I have included photos of their work on the page to show a direct comparison (Perry is on the bottom-right corner, while Lichtenstein is torn on the top-left corner of the sheet): Grayson Perry and Roy Lichtenstein . I have grasped the traits of the person, the lines and the shapes from Perry (in fact I also shaped a print like a vase, as the artist is an excellent ceramist), and I kept Lichtenstein’s flat and vibrant colors, the brushstrokes and the iconic dots, that I recreated using acrylic and the back of a brush.
I am extremely pleased with this page, especially because of the references I made to the artists and for the use of overlapping and color, which are surely the fulcrum of the work. I found it challenging though to compose the page, as I had many elements to choose from and I wanted to arrange them harmonically on the space available. If I could improve this page furthermore, I would include more care in the watercolor layers and I would also try to blend more the artist work into mine.
IGCSE Final Outcome Etchings
As Sigmar Polke said:
There has to be an element of risk-taking for me in my work.
For my IGCSE final outcome I decided to produce a series of etchings to emphasize and highlight once again two main aspects that I have considered throughout my Coursework portfolio: repetition (as my intention was always to produce pieces that were either related or worked into in different ways) and experimentation (as I tried to combine many techniques and I followed a ‘trial and error’ process to complete my etchings).

I decided to arrange my etchings in pairs. The first, Surreal Dream, aims to show a distorted and surreal reality where people and landscapes blend together and compare their shapes, colours and lines, creating the interesting effect of movement and depth.

The second pair, Dotted Reclining Woman, has a more mathematical and rational approach, where shapes and outlines become the decorative elements of the pieces. The comparison of an etching done on fabric and one done on paper is also, in my opinion, a notable feature of the composition.

Third in sequence, Polke Dots in Wonderland, aims to establish a rather direct connection with Sigmar Polke’s 1971 piece named Alice in Wonderland, where white dots and a rather unusual background become the contrasting elements of the finely drawn white images that appear and disappear on their own.

The fourth composition, Brushstrokes, has a quite experimental approach that tries to apply color in a new and creative way, either by filling in with watercolors some lines created with excess ink on the etching plate or melting wax crayons directly on the work. Also, the line suddenly striking through the first print creates a very strong and powerful visual effect.

The Faces of Color is what can be considered the peak of the project, as the etchings acquire more importance as the amount of work done upon them increases. The multiple exposure of the sculptures on the first etching, created by myself, enriches the composition and continues the blue was done above on the fabric. The bottom etching instead has fabrics photocopied onto it, creating an appealing effect of transparencies.

Last in the final outcome, Layered Figures is a diptych of digitally created images that contains the etching of the second composition overlapping photos taken by me, which creates a high level of contrast between the colorful backgrounds and the dark figures added on the work.
Did you enjoy viewing this Enrico’s Coursework project? You may also wish to view Enrico’s A* IGCSE Art Examination .
This high school art project was shared with our audience so that other students may benefit from the ideas, techniques and approaches used. We celebrate the effort and achievement of high school students and Art Departments around the world. If you would like to share your own art project (or that of your students), please read our submission guidelines .
JOIN OVER 21,000 PEOPLE WHO RECEIVE OUR FREE NEWSLETTER
You will be notified first when free resources are available: Art project ideas, teaching handouts, printable lesson plans, tips and advice from experienced teachers. What are you waiting for?
Email Address*
We send emails monthly. And don’t worry, we hate spam too! Unsubscribe at any time.

- Articles >
The Moscow Metro Museum of Art: 10 Must-See Stations
There are few times one can claim having been on the subway all afternoon and loving it, but the Moscow Metro provides just that opportunity. While many cities boast famous public transport systems—New York’s subway, London’s underground, San Salvador’s chicken buses—few warrant hours of exploration. Moscow is different: Take one ride on the Metro, and you’ll find out that this network of railways can be so much more than point A to B drudgery.
The Metro began operating in 1935 with just thirteen stations, covering less than seven miles, but it has since grown into the world’s third busiest transit system ( Tokyo is first ), spanning about 200 miles and offering over 180 stops along the way. The construction of the Metro began under Joseph Stalin’s command, and being one of the USSR’s most ambitious building projects, the iron-fisted leader instructed designers to create a place full of svet (radiance) and svetloe budushchee (a radiant future), a palace for the people and a tribute to the Mother nation.
Consequently, the Metro is among the most memorable attractions in Moscow. The stations provide a unique collection of public art, comparable to anything the city’s galleries have to offer and providing a sense of the Soviet era, which is absent from the State National History Museum. Even better, touring the Metro delivers palpable, experiential moments, which many of us don’t get standing in front of painting or a case of coins.
Though tours are available , discovering the Moscow Metro on your own provides a much more comprehensive, truer experience, something much less sterile than following a guide. What better place is there to see the “real” Moscow than on mass transit: A few hours will expose you to characters and caricatures you’ll be hard-pressed to find dining near the Bolshoi Theater. You become part of the attraction, hear it in the screech of the train, feel it as hurried commuters brush by: The Metro sucks you beneath the city and churns you into the mix.
With the recommendations of our born-and-bred Muscovite students, my wife Emma and I have just taken a self-guided tour of what some locals consider the top ten stations of the Moscow Metro. What most satisfied me about our Metro tour was the sense of adventure . I loved following our route on the maps of the wagon walls as we circled the city, plotting out the course to the subsequent stops; having the weird sensation of being underground for nearly four hours; and discovering the next cavern of treasures, playing Indiana Jones for the afternoon, piecing together fragments of Russia’s mysterious history. It’s the ultimate interactive museum.
Top Ten Stations (In order of appearance)
Kievskaya station.
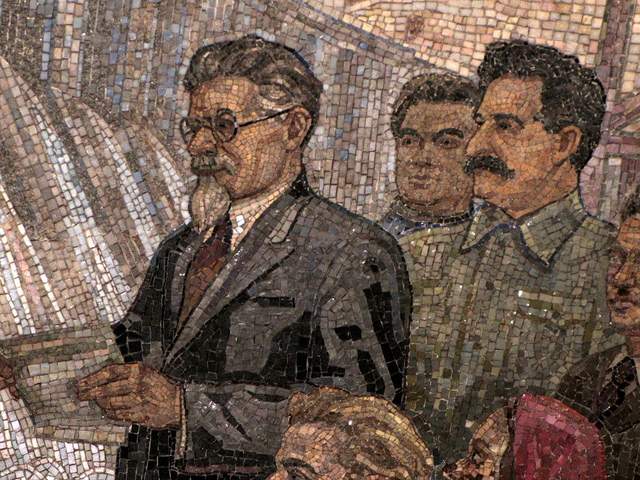
Kievskaya Station went public in March of 1937, the rails between it and Park Kultury Station being the first to cross the Moscow River. Kievskaya is full of mosaics depicting aristocratic scenes of Russian life, with great cameo appearances by Lenin, Trotsky, and Stalin. Each work has a Cyrillic title/explanation etched in the marble beneath it; however, if your Russian is rusty, you can just appreciate seeing familiar revolutionary dates like 1905 ( the Russian Revolution ) and 1917 ( the October Revolution ).
Mayakovskaya Station
Mayakovskaya Station ranks in my top three most notable Metro stations. Mayakovskaya just feels right, done Art Deco but no sense of gaudiness or pretention. The arches are adorned with rounded chrome piping and create feeling of being in a jukebox, but the roof’s expansive mosaics of the sky are the real showstopper. Subjects cleverly range from looking up at a high jumper, workers atop a building, spires of Orthodox cathedrals, to nimble aircraft humming by, a fleet of prop planes spelling out CCCP in the bluest of skies.
Novoslobodskaya Station
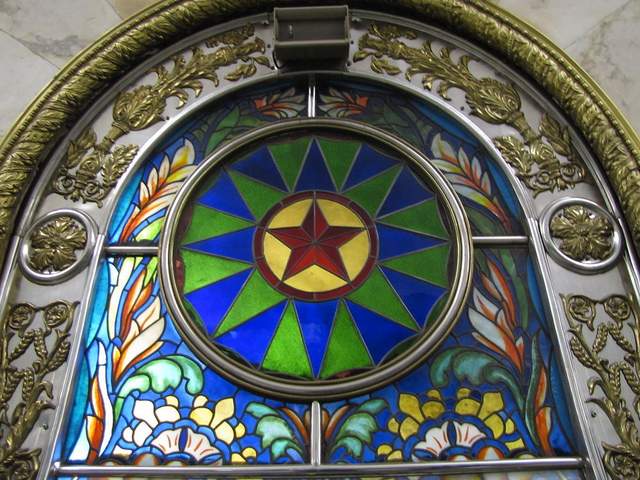
Novoslobodskaya is the Metro’s unique stained glass station. Each column has its own distinctive panels of colorful glass, most of them with a floral theme, some of them capturing the odd sailor, musician, artist, gardener, or stenographer in action. The glass is framed in Art Deco metalwork, and there is the lovely aspect of discovering panels in the less frequented haunches of the hall (on the trackside, between the incoming staircases). Novosblod is, I’ve been told, the favorite amongst out-of-town visitors.
Komsomolskaya Station
Komsomolskaya Station is one of palatial grandeur. It seems both magnificent and obligatory, like the presidential palace of a colonial city. The yellow ceiling has leafy, white concrete garland and a series of golden military mosaics accenting the tile mosaics of glorified Russian life. Switching lines here, the hallway has an Alice-in-Wonderland feel, impossibly long with decorative tile walls, culminating in a very old station left in a remarkable state of disrepair, offering a really tangible glimpse behind the palace walls.
Dostoevskaya Station
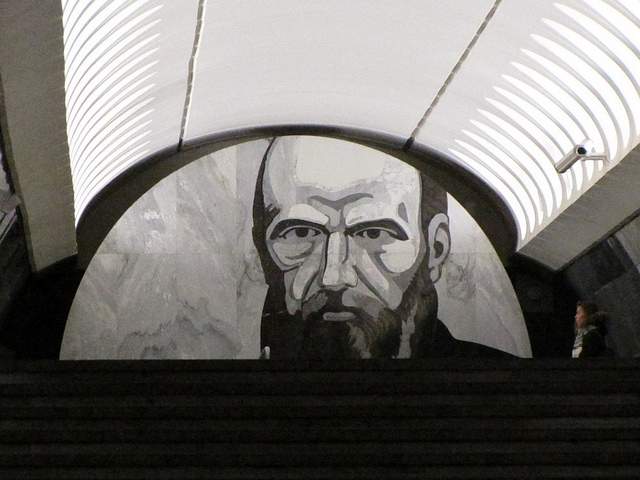
Dostoevskaya is a tribute to the late, great hero of Russian literature . The station at first glance seems bare and unimpressive, a stark marble platform without a whiff of reassembled chips of tile. However, two columns have eerie stone inlay collages of scenes from Dostoevsky’s work, including The Idiot , The Brothers Karamazov , and Crime and Punishment. Then, standing at the center of the platform, the marble creates a kaleidoscope of reflections. At the entrance, there is a large, inlay portrait of the author.
Chkalovskaya Station
Chkalovskaya does space Art Deco style (yet again). Chrome borders all. Passageways with curvy overhangs create the illusion of walking through the belly of a chic, new-age spacecraft. There are two (kos)mosaics, one at each end, with planetary subjects. Transferring here brings you above ground, where some rather elaborate metalwork is on display. By name similarity only, I’d expected Komsolskaya Station to deliver some kosmonaut décor; instead, it was Chkalovskaya that took us up to the space station.
Elektrozavodskaya Station
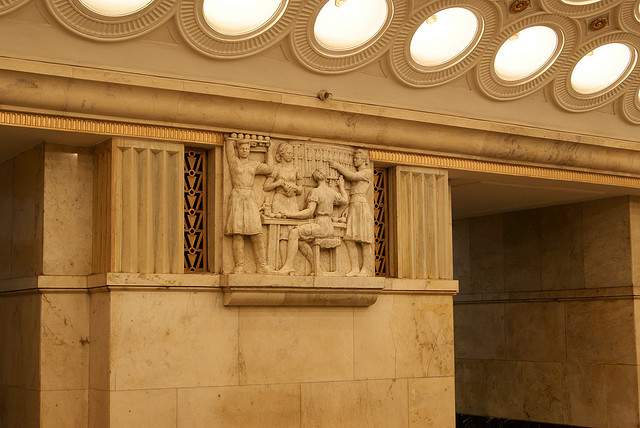
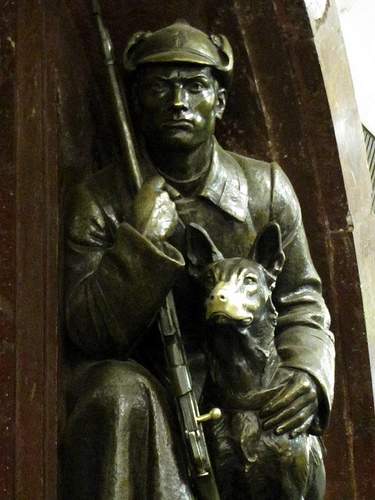
Elektrozavodskaya is full of marble reliefs of workers, men and women, laboring through the different stages of industry. The superhuman figures are round with muscles, Hollywood fit, and seemingly undeterred by each Herculean task they respectively perform. The station is chocked with brass, from hammer and sickle light fixtures to beautiful, angular framework up the innards of the columns. The station’s art pieces are less clever or extravagant than others, but identifying the different stages of industry is entertaining.
Baumanskaya Statio
Baumanskaya Station is the only stop that wasn’t suggested by the students. Pulling in, the network of statues was just too enticing: Out of half-circle depressions in the platform’s columns, the USSR’s proud and powerful labor force again flaunts its success. Pilots, blacksmiths, politicians, and artists have all congregated, posing amongst more Art Deco framing. At the far end, a massive Soviet flag dons the face of Lenin and banners for ’05, ’17, and ‘45. Standing in front of the flag, you can play with the echoing roof.
Ploshchad Revolutsii Station
Novokuznetskaya Station
Novokuznetskaya Station finishes off this tour, more or less, where it started: beautiful mosaics. This station recalls the skyward-facing pieces from Mayakovskaya (Station #2), only with a little larger pictures in a more cramped, very trafficked area. Due to a line of street lamps in the center of the platform, it has the atmosphere of a bustling market. The more inventive sky scenes include a man on a ladder, women picking fruit, and a tank-dozer being craned in. The station’s also has a handsome black-and-white stone mural.
Here is a map and a brief description of our route:
Start at (1)Kievskaya on the “ring line” (look for the squares at the bottom of the platform signs to help you navigate—the ring line is #5, brown line) and go north to Belorusskaya, make a quick switch to the Dark Green/#2 line, and go south one stop to (2)Mayakovskaya. Backtrack to the ring line—Brown/#5—and continue north, getting off at (3)Novosblodskaya and (4)Komsolskaya. At Komsolskaya Station, transfer to the Red/#1 line, go south for two stops to Chistye Prudy, and get on the Light Green/#10 line going north. Take a look at (5)Dostoevskaya Station on the northern segment of Light Green/#10 line then change directions and head south to (6)Chkalovskaya, which offers a transfer to the Dark Blue/#3 line, going west, away from the city center. Have a look (7)Elektroskaya Station before backtracking into the center of Moscow, stopping off at (8)Baumskaya, getting off the Dark Blue/#3 line at (9)Ploschad Revolyutsii. Change to the Dark Green/#2 line and go south one stop to see (10)Novokuznetskaya Station.
Check out our new Moscow Indie Travel Guide , book a flight to Moscow and read 10 Bars with Views Worth Blowing the Budget For
Jonathon Engels, formerly a patron saint of misadventure, has been stumbling his way across cultural borders since 2005 and is currently volunteering in the mountains outside of Antigua, Guatemala. For more of his work, visit his website and blog .

Photo credits: SergeyRod , all others courtesy of the author and may not be used without permission
30 Best universities for Mechanical Engineering in Moscow, Russia
Updated: February 29, 2024
- Art & Design
- Computer Science
- Engineering
- Environmental Science
- Liberal Arts & Social Sciences
- Mathematics
Below is a list of best universities in Moscow ranked based on their research performance in Mechanical Engineering. A graph of 269K citations received by 45.8K academic papers made by 30 universities in Moscow was used to calculate publications' ratings, which then were adjusted for release dates and added to final scores.
We don't distinguish between undergraduate and graduate programs nor do we adjust for current majors offered. You can find information about granted degrees on a university page but always double-check with the university website.
1. Moscow State University
For Mechanical Engineering
2. Bauman Moscow State Technical University
3. National Research University Higher School of Economics
4. Moscow Aviation Institute
5. N.R.U. Moscow Power Engineering Institute
6. National Research Nuclear University MEPI
7. National University of Science and Technology "MISIS"
8. Moscow Institute of Physics and Technology
9. Moscow State Technological University "Stankin"
10. RUDN University
11. Moscow Polytech
12. Moscow State University of Railway Engineering
13. Finance Academy under the Government of the Russian Federation
14. Moscow Medical Academy
15. Russian State University of Oil and Gas
16. mendeleev university of chemical technology of russia.
17. Russian National Research Medical University
18. Plekhanov Russian University of Economics
19. National Research University of Electronic Technology
20. Moscow State Pedagogical University
21. Russian Presidential Academy of National Economy and Public Administration
22. State University of Management
23. Moscow State Institute of International Relations
24. Russian State Geological Prospecting University
25. russian state agricultural university.
26. New Economic School
27. Moscow State Technical University of Civil Aviation
28. Russian State University for the Humanities
29. Russian State Social University
30. Moscow State Linguistic University
Universities for Mechanical Engineering near Moscow
Engineering subfields in moscow.
IMAGES
VIDEO
COMMENTS
Cambridge IGCSE Art & Design encourages a personal response by stimulating imagination, sensitivity, conceptual thinking, powers of observation and analytical ability. The syllabus allows learners to: develop confidence and enthusiasm as they practice technical skills in two- and three-dimensional form and composition.
100% IGCSE Art and Design: A comprehensive Coursework Project. This exceptional IGCSE Art Coursework Project is another from the high-achieving Art Department at ACG Strathallan College. Completed by the dedicated and conscientious Tarika Sabherwal, this sketchbook and final piece were awarded 100% and the highly sought after TOP IN THE WORLD ...
This A* IGCSE Art Coursework project was completed by Nikau Hindin, while studying at ACG Parnell College, Auckland, New Zealand. Awarded 98%, this Painting and Related Media project (CIE 0400) explores the theme of 'Trinkets, Treasures and Memories'. ... As is demonstrated in many of the IGCSE Art and Design Coursework examples featured on ...
Content overview. Cambridge IGCSE Art & Design has been designed to ofer a broad choice of media and approaches so that candidates can produce a personal response and schools can play to their strengths in terms of staf expertise and interests. The broad areas of study are: painting and related media.
4 Cambridge IGCSE and Cambridge IGCSE (9-1) Art and Design 0400 / 0989 . Section 1: About this guide . This guide explains what you need to know about your Cambridge IGCSE or Cambridge IGCSE (9-1) Art and Design course and examinations. It will help you to understand: • what skills you should develop by taking this IGCSE course
Teaching resources can be found on the School Support Hub page for your syllabus. For syllabuses, specimen papers, past papers, mark schemes and examiner reports look under the Syllabus Materials tab. For support materials, including the Coursework Handbook, Guide to Administering Art & Design, Schemes of Work and Example Candidate Responses ...
The examination allows candidates to respond in either an observational or interpretative manner or a combination of both. Students are required to submit: 1 x final artwork - a two or three-dimensional artwork, maximum weight 4.5kgs and maximum dimension in any direction of 750mm, completed within the 8 hour Art Exam.
Cambridge IGCSE Art & Design 0400 . Prototype note: Here a table + dynamic chart appears based on the suggested teaching time for this syllabus. Visual demonstration of how the syllabus is divided up. ... Coursework. As the user has selected to see misconceptions, starter questions, keywords, and links the addition information would appear here.
Cambridge IGCSE™ Art & Design (0400/0989/6090) This title is endorsed by Cambridge Assessment International Education to support the full syllabus for examination from 2020. Authors: Garry Whitehead
In order to study our online iGSCE Art course, you must meet the following requirements: Be age 14 years or older; No previous art or design qualifications required. Please note that this is an online GCSE art course. You must have a computer with broadband connection and basic art materials in order to participate in the course. Study options
Cambridge IGCSE™ Art & Design 0400. Ideally a short, overview, visual item. The 'map' worked well, but that did focus on delivery models. Might a diagram be better, making use of the existing SOW data? ... + Component 1 - Coursework. Additional text and detail go here + Component 2 - Externally set assignment. Text or image goes here ...
IGCSE Coursework Project: Students start the coursework project for IGCSE Art & Design. They start by choosing a theme and gathering and recording images from direct observation. This is worth 50% of their IGCSE grade. Within this project students will experiment with a variety of images, media and techniques and demonstrate the development of ...
Enrico's complete IGCSE Art Coursework project: the top row is the 4 x A2 preparatory sheets (8 sides); the bottom row is the final outcome - a sequence of mixed media prints. ... The composition of the page was hard to design, because I wanted to get a new and creative effect, not a dull puzzle of images, that seems quite traditional and ...
Welcome to my channel!! This is my first video (well, I posted ages ago but those videos are wiped from the internet. As they should be).I realised when I wa...
The Cambridge IGCSE Art & Design syllabus aims to encourage a personal response by stimulating imagination, sensitivity, conceptual thinking, powers. ... Phase 3 - Coursework and Moderation; Phase 4 - Before the exam; Phase 5 - Exam day; Phase 6 - Results and certificates; Information for schools about Covid-19. June 2023; November 2023;
Content overview. Cambridge IGCSE Art & Design has been designed to offer a broad choice of media and approaches so that candidates can produce a personal response and schools can play to their strengths in terms of staff expertise and interests. The broad areas of study are: painting and related media. print making.
Have a look (7)Elektroskaya Station before backtracking into the center of Moscow, stopping off at (8)Baumskaya, getting off the Dark Blue/#3 line at (9)Ploschad Revolyutsii. Change to the Dark Green/#2 line and go south one stop to see (10)Novokuznetskaya Station. Check out our new Moscow Indie Travel Guide, book a flight to Moscow and read 10 ...
Sitting. on the tarmac at the Zhukovsky flight-test center about 30. miles southeast of Moscow, the Sukhoi Design Bureau's most power-. ful and capable fighter, the stunning Su-35, gives every impression. of a coiled cobra. Prepared to strike at the slightest warning, it hun-. kers down, nose low, poised on its rough-field landing gear, peering.
This syllabus is graded from 9 to 1 but is otherwise the same as Cambridge IGCSE Art & Design (0400). Cambridge IGCSE Art & Design encourages a personal response by stimulating imagination, sensitivity, conceptual thinking, powers of observation and analytical ability. The syllabus allows learners to: develop confidence and enthusiasm as they ...
EduRank.org is an independent metric-based ranking of 14,131 universities from 183 countries. We utilize the world's largest scholarly papers database with 98,302,198 scientific publications and 2,149,512,106 citations to rank universities across 246 research topics.
Cambridge IGCSE Art & Design encourages a range of skills, stimulates aesthetic awareness, knowledge and critical understanding of art, and provides opportunities for learners to develop a range of skills. Crucially, a personal and independent perspective is encouraged at all times. The syllabus is designed to accommodate a wide range of
Along with the journey through the Golden Ring of Russia, every travel guide includes a trip to another interesting ring. The ring of Moscow metro stations. We have collected for you the best metro stations of Moscow. Just look for yourself at what amazing art is presented in underground area.
Version 1 For examination in June and November 2020, 2021 and 2022. Also available for examination in March 2020, 2021 and 2022 for India only. Guide to Administering