
Want to create or adapt books like this? Learn more about how Pressbooks supports open publishing practices.
Working with Video (Kaltura, Canvas, Zoom, and PowerPoint)

Recording an individual or group presentation with PowerPoint 365 or 2019
These instructions are for Office 365 or Office 2019 for Windows . You can download Office 365 from IUWare for free . Office 2019 is available on all computer lab Windows computers and via IUAnyWare . (See instructions on setting up and using IUAnyWare .)
If you are using a Mac
If you are using the latest version of Office 365, you can export a presentation narrated in Slide Show as a video file which can then be submitted as a previously recorded video . Note that when you export your presentation as a video, any narrated audio that was recorded in Slide Show will play, but other embedded media files will not play .
You can also record audio onto slides in Keynote and export them to a QuickTime .mov file which can then be submitted as a previously recorded video .
Video Walkthrough
Instructions.
The following steps presume you have Office 365 or 2019 on a Windows computer.
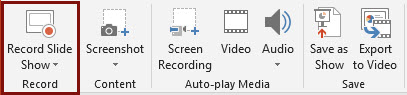
- The Recording tab does not appear on the Ribbon in PowerPoint 365 or 2019 by default so you may need to enable it. Go to File > Options and choose “Customize Ribbon.”
- On the right side list of Main Tabs scroll down to Recording, check the box next to it, and click “OK.”
- Check and make sure your microphone and webcam (if using) are recording properly by clicking the small microphone and video camera icons at the bottom right of the recording screen.
- Click the red “Record” button at the top left to start. You can stop after each slide and review your recording or you can continue through the whole presentation. If you continue, make sure to pause between slides. The 1-2 seconds of silence allow PowerPoint to tell what audio goes with what slide.
- When you are done, click the “X” at the top right to finish.
- Select the quality you would like the video to be. Normally 1080p (the default) is fine and leave “Use Recorded Timings and Narrations ” selected.
- Click “Create video” and tell PowerPoint where to save your video file. The small black status bar at the bottom of PowerPoint will show you the progress of your export. Do not do anything else in PowerPoint while a video is processing or it will cancel the job.
- Once the video has been processed, you are ready to upload your video to Kaltura and submit. See submitting a previously recorded video for instructions.
Group Recording with PowerPoint
If your group prefers to record the individual sections independently and at least one person has Office 365 or 2019 or can access it at a computer lab, you can compile your separate recordings in PowerPoint. Each person in the group would
- begin with a copy of the master PowerPoint file,
- delete the slides that they are not responsible for recording,
- record their audio and/or video on their slides only, and
- send the file with their recorded slides to the group member responsible for putting together the slide deck.
The person putting the slides together would add the other members’ slides into their PowerPoint file and export it to video.
Recording tips
- Team members using Powerpoint for Mac or an older version of PowerPoint for Windows can record audio onto their slides by using the “Audio” option on the “Add” tab on the Ribbon. To do this,
- open your PowerPoint file in the version of PowerPoint that you have
- go to the Insert tab,
- click the Audio button and choose “Record audio”
- Starting from the same PowerPoint file is very helpful for the person who is compiling the recorded slides.
- After your video is created, the person who will submit the assignment for the group will upload the video file to their Kaltura account.
Submit Your Assignment
See Upload a previously recorded video for instructions on adding your video to Kaltura. Then, based on your instructor’s instructions, submit your video in one of the two following ways.
- Submit your video by embedding it in a text box in an Assignment or Discussion .
- Submit your video by adding it to the Kaltura: Media Gallery for your course
Verify the Automatic Captions on Your Video
All video uploaded to Kaltura is automatically mechanically captioned using speech-to-text technology. If you’ve ever used speech-to-text, you know it’s never 100% accurate so you need to check your captions and edit as needed to make sure they are correct and not saying anything embarrassing. The mechanical captions appear fairly quickly on short videos once they’re uploaded. You can check them either in Kaltura: My Media if it is available in your course, or at Kaltura Mediaspace. Instructions on checking and editing your captions are at Accessible Videos in this book.
Note on Video Processing
When a video is first uploaded to Kaltura you will see a “media is being processed” animation where you expect your video to be.
Please be patient. Processing time depends on the length of the video and the number of other videos Kaltura is processing. It will appear once it has completed processing, though you may need to refresh your page to see it. You can embed a video that is still processing in Kaltura .
A Canvas Semester Checklist Copyright © by Trustees of Indiana University is licensed under a Creative Commons Attribution-NonCommercial-ShareAlike 4.0 International License , except where otherwise noted.
How to Record A PowerPoint Presentation [2022 User Guide]
- Share on Facebook
- Share on Twitter
By Nikolay Kaloyanov
in How-To Tutorials
2 years ago
Viewed 601 times
Spread the word about this article:

If knowing how to record a PowerPoint presentation wasn’t necessary a decade ago, this isn’t how things stand today. The pandemic taught us a valuable lesson – if we don’t catch up with technology, we will fall short.
Fortunately, Microsoft’s app is the global leader in presentation software and provides you with all the required tools to create an excellent presentation you can show in front of your audience. But how to record a presentation on PowerPoint, and is it easy to do so?
Article overview: 1. What are the benefits of recording PowerPoint presentations? 2. How to record a PowerPoint presentation? 3. How to live stream a PowerPoint presentation? 4. Frequently asked questions
1. What are the benefits of recording PowerPoint presentations?
I am are pretty sure that if recording presentations weren’t helpful, PowerPoint wouldn’t offer it to its users. Well, we all know that’s not the case. Recording your PowerPoint slides can bring a ton of benefits. Let’s see which they are:
- Save time – regardless if you’re a lecturer or present in front of colleagues, having a video of your recording will save you many hours. Imagine speaking in front of your marketing team, but 2 members are on summer holidays. It’s fine. They’ll catch up later when they watch your PowerPoint recording.
- Focus on the presentation – usually, if you’re presenting in front of an audience, it’s typical to get asked many questions that you need to answer promptly. But that is a good reason to get distracted from your core information. Thus, it makes sense to record your presentation beforehand.
- Practice before presenting – the best way to carry out a great presentation is to spend some time at home, focusing on key details. When you record your PowerPoint slides, you can find areas of improvement and work on them.
2. How to record a PowerPoint presentation?
There are many tools that you can use to record a PowerPoint presentation. From Loom and Panopto, and even Apple’s basic Quicktime and Windows’ own recording tool. But here we will discuss none of the other options. Why? The answer is simple: PowerPoint has its own in-built, robust recording tool.
Unlike other options, PowerPoint’s recording feature enables you to record slide by slide. This effectively means you can create as many recordings as you like, until you like the playback version, and move on to the next slide.
Pro tip : PowerPoint doesn’t record slide transitions. You need to start recording each slide when it is opened and finish the recording before you move on to the next one.
Let’s see how to record a PowerPoint presentation with video and audio in just a few steps.
Step #1: Open your PowerPoint presentation
The first step is to open the PowerPoint presentation you wish to record. Ensure you have all the necessary slides and information on them. While this seems logical, there aren’t one or two cases when presenters have recorded wrong or unfinished slides, which leads to a disappointing outcome.
Step #2: Prepare your video and audio devices
Before you start the recording, you should check your camera and microphone. Try to make a sound check and see if your camera works properly.
Step #3: Select the slides you wish to record
PowerPoint gives you the option to record a presentation right from the beginning, or from a specifically selected slide.
- Pick “ From Beginning ” (1) from the Record tab of the Ribbon if you wish to start from the first slide.
- Pick “ From Current Slide ” (2) from the same tab in case you would like to start from a selected slide (which isn’t the first one).
- Click the Record button (3) which is positioned in the top right corner, between the Comments and Share buttons. It starts the recording from the slide you have currently selected.

Step #4: Start the recording
Once you click on one of the options, you are ready to start narrating your PowerPoint presentation. You will see a countdown timer, after which you can start narrating slides.

Step #5: Manage your PowerPoint recording
You have probably seen a couple of other options aside from the recording one. Let’s see which they are:
- Timer with a grey/red light – if you are recording your narration, you will see a timer and a small circle with a red light that indicates you are recording. If you pause, the small circle indicator will become grey again and the timer will stop counting.
- Refresh icon – right next to the timer there is a refresh-like icon but it serves a different purpose – to re-take the recording. You have the option to record again the current slide or all slides.
- Start/Stop button – the big red button serves as a start/stop button for your recordings. Only stop the recording when you want to move on to the next slide.
- Pause button – if you would like to stop the slide recording, in order to drink some water or read your speaker notes, you can use the Pause button, and then resume the recording. Bear in mind you cannot pause and move to the next slide. You have to stop the recording, to indicate you have finished with the current slide.
- Camera button – clicking the camera button will work as a toggle on/off.
- Microphone Button – clicking the microphone button will work as a toggle on/off.
- Ellipsis – this is the place where you can select camera and microphone settings, as well as erase recordings from the current slide or all slides.

Step #6: Export your PowerPoint video recording
The last button from the menu is the Export setting. You can export your narration as an mp4 file in Full HD size by default. However, you can customize your export and get your narration in 4 sizes – 480p, 720p (HD), 1080p (Full HD – standard), and 4K. We don’t recommend Ultra HD exports.
Pro Tip : Exporting 4K PowerPoint presentation recordings doesn’t necessarily mean you will get better quality (unless you have 4K resources within your presentation) but it does guarantee a significantly larger file size – up to 4 times more than on standard Full HD recordings.

3. How to live stream a PowerPoint presentation?
If you have already honed your skills and would like to stream your PowerPoint slides directly to your audience, there are many ways to do so. We are going to cover two of them.
3.1. How to stream a PowerPoint presentation from OneDrive?
Microsoft has invested a lot of resources to make OneDrive a powerful cloud service, and so far they have been quite successful. Let’s see how to record a PowerPoint presentation in front of live audiences.
Step 1 – save your PowerPoint presentation in OneDrive.

Step 2 – open your PowerPoint slides from PowerPoint online.

Step 3 – go to Present Live from the Slideshow Ribbon tab.

Step 4 – share a live link with your audience.

3.2. Stream your PowerPoint presentation in Zoom

Zoom is one of the most popular conference call apps which has plenty of tools, including live streaming presentations. Since PowerPoint is the leading presentation program in the world, Zoom developers have created some amazing things, like PowerPoint presentation recording with a web camera on a transparent background. If you’re interested, you can check our guide on how to record a Zoom presentation .
Does PowerPoint have a screen recording?
PowerPoint has a screen recording window and you can select the area you would like to be recorded. Go to Record (from the Ribbon), then select Screen Recording , choose the area and start recording.
Can I view speaker notes while recording narration?
You are able to access your speaker notes if you have created them beforehand. To insert speaker notes, you have to go to View -> Notes Page and you will have a text box that you can utilize for speaker notes.
What format does PowerPoint use for video?
PowerPoint records videos in mp4 format. The default resolution is 1080p (Full HD).
Recording your PowerPoint presentations can make the difference between a successful and smooth speech and a bad narration. Being able to record each slide means you can get the best narration possible for your whole presentation.
And if you would like to stream your presentation live, there are more than enough options to do so – both via the online version of PowerPoint or via third-party apps like Zoom.
If you found this article helpful, you can also check some of our other PowerPoint tutorials:
- Add Audio to PowerPoint: The Quick Step-by-Step Guide
- Insert GIFs into PowerPoint – a 2022 Pocket Guide
- How to Convert Your PowerPoint Presentation into Google Slides ?

Add some character to your visuals
Cartoon Characters, Design Bundles, Illustrations, Backgrounds and more...
Like us on Facebook
Subscribe to our newsletter
Be the first to know what’s new in the world of graphic design and illustrations.
- [email protected]
Browse High Quality Vector Graphics
E.g.: businessman, lion, girl…
Related Articles
Adobe character animator: everything you need to know + free puppets, how to create a character profile for your brand mascot [+ free character design template], how to do a hanging indent in google slides in a few steps, character animator tutorials part 1: introduction, how to get started with powerpoint + guide and resources, enjoyed this article.
Don’t forget to share!
- Comments (0)
Nikolay Kaloyanov
Nikolay is a copywriter with vast experience in Technology, Marketing, and Design. When he isn't playing with words and crafting texts, he watches sports and asks questions. He is a funny person...until you put him on a diet.

Thousands of vector graphics for your projects.
Hey! You made it all the way to the bottom!
Here are some other articles we think you may like:
How-To Tutorials
How to add, duplicate, move, hide, and delete slides in google slides.
by Nikolay Kaloyanov

How to Draw on Google Slides and Make a Great Impression?

How to Convert PDF to PowerPoint? [Easy Guide]
Looking for design bundles or cartoon characters.
A source of high-quality vector graphics offering a huge variety of premade character designs, graphic design bundles, Adobe Character Animator puppets, and more.
Home Blog PowerPoint Tutorials How to Record a Presentation in PowerPoint
How to Record a Presentation in PowerPoint

Recording PowerPoint presentations can have several benefits. They can serve as recordings of a session that can be uploaded online, shared with participants who might not be able to attend a presentation session, or used as tutorials for passing on instructions.
How to Record a PowerPoint Presentation
PowerPoint provides multiple options for initiating recording for a presentation. You can also choose to record audio and yourself presenting the slides using your camera. When recording your presentations, you can choose PowerPoint templates or something minimalist made by you to record the session. Just be mindful of the graphics to ensure the video does not appear overpowering to the viewer.
How do I Record a PowerPoint Presentation as a Video?
You can start recording your presentation using the following method.
- Record Tab: To record a PowerPoint presentation, go to the Record tab and select whether you wish to record from the beginning, from the current slide, a specific area on the screen, or record audio.
- Slide Show Tab: you can also initiate recording a PPT via Slide Show -> Record to initiate recording from the current slide or the beginning of your presentation.
Record Button: If you’re using the latest version of PowerPoint, you can start Recording your presentation from the current slide via the Record button in the top right corner.

Record from the Current Slide or Beginning of the Presentation
Starting your recording from the beginning of the current slide will open your presentation in recording mode. Hit Record to start the recording.

Screen Recording in PowerPoint
If you initiate screen recording in PowerPoint, you can start recording a screencast by selecting the area you wish to record. This is similar to recording a PowerPoint presentation as a video, with the added advantage of recording other parts of your desktop. This method can also be used for recording a screencast, even if you’re not using a PowerPoint presentation in your video recording.
To start the recording, click Record or use the Windows+SHIFT+R hotkey. To stop the screen recording, click Pause to temporarily halt the recording to resume later or Stop or the Windows+SHIFT+Q hotkey to end the recording session.

The recorded video will be instantly added to your slide once you click Stop .

Record Audio
Another option in the Record tab in PowerPoint is to record audio narrations for your PowerPoint presentation. Simply click Record to start, Pause to temporarily halt, and Stop to stop the recording process.

Once the recording stops, the audio will be added to your PowerPoint presentation.

How can I Annotate Slides in PowerPoint During a Recording?
Once you enter recording mode, you can start annotating your slides using the Pen or Highlighter tool. Other tools in the menu include a Laser pointer and Eraser.

How can I Record a PowerPoint Presentation with Audio?
To enable audio for your Powerpoint recording, unmute the mic from the audio icon on top, CTRL+M hotkey, or click the three dots ( More options for recording menu), followed by the Microphone to select the audio device for recording. You can only record audio if an audio device is connected to your computer. This is a fairly simple process, unlike other presentation platforms. For example, in an earlier article, we showed you how to do a voiceover on Google Slides , which entails a slightly more elaborate process.

How to Record Yourself Presenting a PowerPoint?
Enable the camera during a recording session.
Like turning on audio, you can toggle the camera on or off using the icon on top. The camera input device can also be selected via the Camera option or CTRL+K hotkey, which can be revealed via the three dots from the top menu.

Insert Video Recording in a Slide using Cameo
PowerPoint’s Cameo feature enables recording a video to insert in a slide. You can use the feature to quickly insert a video message in your slides that can be played during a presentation session. This option might also be relevant if you intend to convert PowerPoint to video . If you are looking how to video record yourself presenting a PowerPoint, then follow the steps below.

Once Cameo is turned on, you can also choose to stylize the camera shape, style, border, and add effects. Cameo is quite a unique feature in PowerPoint that currently does not have alternatives in rival presentation apps. For example, you cannot use a similar feature if you wish to convert Google Slides to video .

How to Save Recording for a PowerPoint Presentation?
After you have completed your recording, click Export to save the presentation recording.

You can customize your recording settings via Customize Export or continue the process via Export Video .

Using the Customize Export option, you can choose between a desired output quality for your video, including Ultra HD (4K), Full HD (1080p), HD (720p), and Standard (480p).

Other options in the menu include the ability to choose and preview timings and narrations.

After you are satisfied with your recording settings, you can export your presentation to video.

The video recording of your PowerPoint presentation can be played using any standard video player. The video can also be embedded in PowerPoint slides, uploaded online, such as to a YouTube channel, or shared via cloud storage apps like Dropbox, Box, OneDrive, etc.

Final Words
Recording a PowerPoint presentation can provide a record of a session that might be required for further sharing. The best way to record a presentation is to ensure that your slides aren’t visually overpowering, your audio is clear and audible, and if using a camera, the cam input isn’t hazy, grainy, or too dark.
Once you are familiar with how to record a presentation on PowerPoint, it might take a bit of practice to make your video recording look professional and crisp. It’s best to practice your sessions before recording them until you can seamlessly record presentation decks.

Like this article? Please share
PowerPoint Addins, PowerPoint Tips, Presentation Tips, Presentations, Screencasts Filed under PowerPoint Tutorials
Related Articles

Filed under Design • April 23rd, 2024
How to Create the Perfect Handouts for a Presentation
Learn how to create effective handouts for presentations and the recommended structure for handouts with this guide.

Filed under Google Slides Tutorials • April 19th, 2024
How to Find Trash on Google Slides
Don’t worry if you accidently delete a presentation file. Learn how to find trash on Google Slides with this guide.

Filed under Business • April 10th, 2024
Discovering Coaching Presentation Tools
Discover the best PPT templates to use as coaching presentation tools with this article. Tools explained + examples.
One Response to “How to Record a Presentation in PowerPoint”
How do I generate webcam option in PowerPoint 2016 ?
Leave a Reply
How-To Geek
How to record your screen with microsoft powerpoint.
You don't need expensive software to record your screen--do it with PowerPoint!
Quick Links
Using powerpoint’s screen recorder, customizing your recording.
If you need to record your screen to demonstrate a process as part of your PowerPoint presentation, you can use the built-in tools to do so. Here’s how to record your screen using PowerPoint.
PowerPoint comes with a built-in, no-nonsense screen recorder. There are a lot of things that PowerPoint’s screen recorder can’t do that more full-featured screen recording software can, but that’s the beauty of it—it’s great for a quick, no-fuss recording.
Related: How to Embed a YouTube Video in PowerPoint
First, open PowerPoint, head to the “Insert” tab, and then click “Screen Recording.”
PowerPoint will minimize, and the screen recording dock will appear at the top of your screen. Here’s where the “simplicity” of PowerPoint’s screen recording feature comes in—you only have five options. By default, PowerPoint will record audio and your cursor. Toggle these options to disable them if you want. When you’re ready to move on, click “Select Area.”
Your pointer will turn into a crosshair. Click and drag to select the area of your screen you want to record.
Next, click the “Record” button in the screen recorder dock.
A three-second countdown will begin. Once it reaches zero, your recording will begin. When you’ve finished recording everything, move your cursor back to the top of the screen where the dock was, and the dock will reappear. Click “Stop.”
Your screen recording will now appear in your PowerPoint slide.
Now that you’ve successfully embedded the recording in your presentation, you might want to adjust a few of the settings. There are a few things you can do here, including trimming the video, setting how the video plays during the presentation, or applying a style to the video’s frame.
Trimming Your Video
There may be a few seconds of your video that you’d like to remove. You can trim these parts out directly in PowerPoint. Right-click the video and select “Trim.”
The “Trim Video” window will appear. Here, click and drag the green and red bars to adjust the start and stop time, respectively. Once you’ve set this up, click “OK.”
Your video will now be trimmed.
Setting Video Playback Rules
You can tell PowerPoint how to play your video during the presentation. To do this, right-click the video and select “Start” from the menu.
A sub-menu will appear, presenting three different playback options:
- In Click Sequence: The video will play in the appropriate order you’ve set in terms of actionable sequences (such as animations).
- Automatically: The video will automatically play when it appears.
- When Clicked On: The video will play when you click on it.
Select the one that works best for you.
Applying Frame Styles
If you want to make your video more visually appealing, you can apply a frame to it. To do so, right-click the video and select “Style” from the menu.
A sub-menu will appear, presenting a large library of frames for your video. Hovering over each one will show a live preview of how the frame will look.
Select the one you like, and it will be applied to your video.
That’s all there is to it!

How to Record Customized Camera Feeds With Cameo in PowerPoint
T he widespread adoption of remote work and virtual meetings has led many people and organizations to realize they don't have to be physically present in the same conference room to make presentations. In fact, you don't even need to conduct them live.
However, recording your PowerPoint slides with your face on them requires technical know-how and third-party apps like OBS. This makes recording presentations a bit difficult and discourages people from doing it.
Thankfully, Microsoft has addressed this issue in PowerPoint 365 with the Cameo feature. Here's what it is and how to use it.
What Is Cameo in PowerPoint?
Cameo is a PowerPoint feature that lets you add your webcam or any other camera feed into your presentation. This makes it easier to present virtually, as your audience can see you from within your slides.
Previously, you needed a third-party app like OBS to overlay yourself on your presentation. You can also use a green screen overlay in Capcut or other similar apps to achieve the same effect. However, this takes a lot of effort and know-how.
But with this feature, you can do it from inside PowerPoint with just a few clicks. Here's how to insert a cameo into your slides.
- Go to Insert > Cameo .
- After clicking on Cameo, PowerPoint will insert a placeholder object on your current slide and open the Camera Format tab.
- You can edit the object as you wish, much like any other shape on PowerPoint. You can also click on the options in the Designer pane on the right side of the screen to help you work faster.
- Once you're happy with its placement on your slide, click on the Preview button to see your live video.
With that, you can start presenting your PowerPoint slides via screen sharing while still keeping yourself on the screen.
How to Record Your PowerPoint Presentation With Cameo
You can also insert a cameo from Record > Cameo . Clicking on this will bring you to the same menu tab and insert a placeholder object for your video. However, even if you didn't set up Cameo beforehand, you can insert it directly while recording your presentation. Here's how:
- Go to Record > From Beginning or Record > From Current Slide .
- In the recording screen, click on the Camera icon at the top. This will insert a round object containing your video in your slides' lower-right-hand section.
- Click on the Red icon to start recording your presentation.
- Go through your presentation as usual. For more information, check out our guide on turning your presentations into videos .
- Once you've finished, click the Red icon again to stop recording.
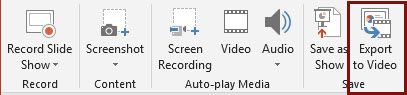
- Click Export to go to the Export to video screen .
- Change the File Name as needed, then click Browse to select the location where you will save your recorded video.
- Once done, click Export Video .
With that, you don't have to spend much effort to add your video feed to your PowerPoint presentation recording. However, the app only places your video at one location across every slide; it might cover some of your content. That's why it's better to use the Cameo feature when you're building or editing your PowerPoint presentation.
If you're unhappy with your recording, press the Retake Video on the left of the record icon. You can pick between On Current Slide or On All Slides .
What You Need to Record Customized Camera Feeds
You need a webcam and a Microsoft 365 account to record your customized camera feed. Furthermore, you cannot use Cameo or record presentations in the PowerPoint web app. You need to download and install it on your computer to use these features.
The Cameo feature is already available on Microsoft PowerPoint 365 in Windows and Mac. However, recording your presentation with Cameo is only available on Windows. As of the time of writing, this feature isn't available for the main PowerPoint 365 for Mac version.
If you're running macOS, you must be a Microsoft 365 Insider to get this feature. However, since the Cameo recording feature is already announced in the Microsoft 365 Insider blog , we hope it will be available in the mainstream PowerPoint for Mac version in a few months.
Recording Your Presentations Is Now Much Easier
The Cameo feature has made presenting PowerPoint slides in video calls easier. And with the recording function, you no longer need a third-party app to put your video over your presentation.
You can integrate it into each slide, allowing you to control where you are on your screen. And you also save a lot of time and effort, as you can record and save your presentation as a video from within Microsoft PowerPoint.

- Add animation Video
- Add transitions between slides Video
- Add, format, and record video Video
- Add and record audio Video

Add and record audio

Add and record audio, such as music, narration, or sound bites, to your PowerPoint presentation and select the playback options.
Add audio from your PC
Select Insert > Media > Audio .
Select Audio on My PC .
In the Insert Audio dialog box, select the audio file you want to add.
Select Insert .
Record audio
Select Insert > Media > Audio .
Select Record Audio .
Type in a name for your audio file, select Record , and then speak.
Important: Your device must have a microphone enabled in order to record audio.
To review your recording, select Stop and then select Play .
Select Record to re-record your clip, or select OK if you’re satisfied.
To move your clip, select and drag the audio icon to where you want it on the slide.
Note: If you’re using more than one audio file per slide, it’s advisable to put the audio icon in the same spot on a slide to find it easily.
Select Play .
Change playback options
Select the audio icon and then select the Playback tab. Then select which options you'd like to use:
To trim the audio, select Trim and then use the red and green sliders to trim the audio file accordingly.
To fade in or fade out audio, change the number in the Fade Duration boxes.
To adjust volume, select Volume and select the setting you prefer.
To choose how the audio file starts, select the dropdown arrow and select an option:
In Click Sequence – Plays the audio file automatically with a click.
Automatically – Plays automatically once you advance to the slide that the audio file is on.
When Clicked On – Plays audio only when the icon is clicked on.
To choose how the audio plays in your presentation, select an option:
Play Across Slides – Plays one audio file across all slides.
Loop until Stopped – Plays an audio file on loop until it’s stopped manually by clicking the Play/Pause button.
To have the audio play continuously across all slides in the background, select Play in Background .
Delete audio
To delete audio, select the audio icon on the slide and press Delete.
Add audio to your PowerPoint presentation
Play music for the duration of your slide show

Need more help?
Want more options.
Explore subscription benefits, browse training courses, learn how to secure your device, and more.

Microsoft 365 subscription benefits

Microsoft 365 training

Microsoft security

Accessibility center
Communities help you ask and answer questions, give feedback, and hear from experts with rich knowledge.

Ask the Microsoft Community

Microsoft Tech Community

Windows Insiders
Microsoft 365 Insiders
Was this information helpful?
Thank you for your feedback.
How to Record a Presentation on Google Slides
Do you want an easy way to record a Google Slides Presentation as a video to share later with your teammates? Once you have the Zight screen recorder, the process is easy and fast.
Article Last Updated: April 23, 2024

What Is a Google Slides Presentation?
What do you need to record google slides presentations, how to record a presentation on google slides with zight: step-by-step guide, faqs on how to record a presentation on google slides.
Here’s an interesting statistic: 91% of people believe a well-designed slide deck can increase your confidence as a presenter. The first step to creating a good presentation is to choose the best software, and then record the presentation in HD.
Tell you what? You can create slides with Google Slides, then use the Zight screen recording software to present and narrate your slides to your audience. This has many benefits, including saving your presentation for future collaboration or asynchronous communication , which, in many ways, has more benefits than synchronous communication in a digital and remote workspace.
Read on as we tell you how to create this presentation from scratch, in just a few steps!
Google Slides is a free web-based presentation software provided by Google as part of the Google Drive suite. You can use it on any device with an internet connection, offering various features like an easy-to-use presenter view, speaker notes, live captions, and the ability to present to Google Meet video calls. Plus, your slides can contain text, images, videos, animations, and more to create dynamic content.
While you can present live in a meeting, today’s work landscape teams need to improve communication and productivity with asynchronous video communication . So, when you can’t gather everyone in a Google meeting, you need a way to create and share a presentation with your teams. Your options include recording a Google Slides presentation with narration, just like you create a PowerPoint presentation with Zight .
Here’s what you need:
To record a presentation on Google Slides, you will need a few things:
- A device with an internet connection: It’s best to have a computer to make it easy to create and present Google Slides
- A screen recording software like Zight: While Google Slides allows you to present live in a meeting, it won’t record audio or video files to send later. That’s where Zight comes in, allowing you to record and narrate your slides as you present so you can share with attendees at a later time
- An external microphone (optional) to record audio for your presentation. However, you can still use your native microphone on your computer
- A webcam (optional): If you want to show yourself presenting alongside the slides, a webcam will be necessary for recording. To make things easy, you can just use the Zight webcam recorder which will use your native webcam app
- A Google account: You can only access Google Slides with a Google account, so make sure to sign in to be able to create slides
- Google Slides: Before using the screen recording tool , you want to create and add content to the Google slides you will be narrating. More on this below!
Before you start recording, search for Google Slides on your browser, log in to your account and open an untitled presentation.
Alternatively, click File on a current Google Slides presentation page, then New, and Presentation (or from the template gallery to pick a presentation template).
Add content to your slides, using the (+) sign on the upper left-hand side of your Google Slides presentation page (or Ctrl+M) to add new slides. You can also click the dropdown menu next to the (+) sign and choose slides with your ideal layout. Add content to the slides by typing in text, inserting images, videos, shapes, or charts, and customize them with a unique theme and background color.
Once your Google slides are ready, here’s how to start recording:
1. Download Zight
If you don’t have Zight, click the red button below to download.
- Record your screen with audio and webcam
- Annotate with arrows, lines, and blur
- Instantly share with a link or upload to YouTube or Vimeo
Alternatively, search for “Zight” on your web browser and create an account. Then, download the app that’s compatible with your computer. Zight is available for Mac , Windows , and even as a Google Chrome extension .
2. Choose your Screen Recording Preferences
Open your presentation on Google Slides and ensure you can easily navigate to the slides once you’re ready to record.
On the Zight App
Launch the Zight app and click Record.
You’ll find recording options like Full Screen and Select Region, plus the Screen Only or Screen & Cam options. Screen Only is good when you don’t want to use your webcam, while the latter allows you to incorporate your webcam for a personal touch.
Then, select your audio/mic and webcam options, move your webcam overlay to a good space on your screen, and click Start Recording. Wait for the 3-second timer to count down before you go to the Google Slides presentation.
On the Google Chrome Extension
Click on the Zight icon on the upper left of your Google Chrome browser, click Record, and select either Screen Only or Screen & Cam. Then, turn on your microphone and webcam camera.
Next, click Start Recording and choose Entire Screen. After that, select the screen you want to record, and click Share. Click your mouse on any part of the screen to start recording and wait out the 3-second countdown.
The Zight screen recorder software will now be recording your entire screen.
3. Start Narrating Your Google Slides Presentation
On the Google Slides presentation page, click on the dropdown menu next to Slideshow.
Click Presenter View if you are viewing the first Google slide. Alternatively, click Start from the beginning if you are not on the first slide. This will turn your presentation into a full-screen view and you will see that Zight is sharing your screen.
Then, start narrating your Google slides in high video and audio quality.
You can pause and resume your screen recording and restart it to capture moments you may have missed in the beginning. You can also cancel the recording and delete the file to avoid uploading it to the cloud.
4. Annotate Your Presentation
One of the best things about presenting your Google Slides with Zight is that you can annotate the video just as easily as you narrate it.
If you are recording from the Zight app, you can pause the recording and then click the annotations button on the recording menu (the icon looks like a pen).
Once you do, you will see the different annotations you can add to the slides, including a pen, highlighter, arrow, line, ellipse, and rectangle. You can choose a different color for your annotations, even how long the annotation lasts on the final recorded video.
After annotating, resume the recording, rinse and repeat!
5. Finish Recording and Edit Your Video
Once you narrate all your Google slides, click the Finish recording button and wait for the file to upload to the cloud. Zight will also open the file on your default browser where you can edit the video file further.
When the video link opens, click the Edit button, and continue to split and merge sections, trim, crop, filter, and finetune different sections until the presentation is faultless. Click Done to save those settings.
On top of the recording, annotating, and editing of your Google Slides presentation, Zight will also transcribe your video and send the text to your email so you can go through the notes in case you missed something.
You can also add custom branding, and use AI features to generate a video summary and video titles. If you want to share the presentation with global teams, you will also love that you can translate the video file into 50 different languages for seamless communication.
6. Share the Presentation for Asynchronous Communication
To share the presentation, you can send the shareable link to your teams via Slack , Asana , Trello , and other chat boards and productivity software you use at work.
Alternatively, you can embed the video file in an email, or even download it on your computer then upload it on a platform like YouTube to reach a global audience.
7. Collaborate and Track Analytics
The best part about recording your presentation in superior video footage with Zight is how you can save it for collaboration later.
Firstly, you can save the video to a Collection on your Zight dashboard or add it to a Favorites list. This way, the video will be readily available and you can track how many people interact with it, either through comments or reactions to finetune your collaboration and communication strategy.
In addition, this video presentation will always be available on your Zight cloud account, and, as long as you keep it, even your colleagues or recipients can always retrieve it for future reference.
There you have it, an easy way to record your Google Slides presentation using Zight! With this method, you can easily create and share professional-looking recordings of your presentations to a global audience.
If you want to feel more confident before your audience with a well-designed and narrated deck, ensure you have a reliable internet connection before starting the recording. In addition, close any unnecessary tabs or programs on your computer to avoid interruptions. Finally, while Zight may use the native mic on your computer, you can prefer to use a high-quality microphone for better audio clarity.
Most importantly, don’t forget to rehearse and practice your presentation beforehand to ensure a smooth delivery and minimize any mistakes during the recording. With these tips in mind, you can confidently create engaging presentations that will impress your audience.
So why wait? Get Zight today and take your presentations to the next level!
I) Can I Record My Screen in Google Slides?
No. Google Slides does not have a built-in screen recording feature. However, you can use third-party apps like Zight to record your presentation.
II) How do you turn a Google slide into a video?
Since Google Slides does not record the screen and audio (apart from when you’re presenting in a Google meeting), you will need a third-party app to record your screen and turn your slides into a video. Follow the steps mentioned above to record and then export your presentation as a video.
When you record your Google Slides presentation with Zight, you’ll also be able to explain the contents of your slides in high-quality audio for an even better personal touch to what would be a boring presentation without narration.
III) How Do You Create a Presentation on Google Slides?
To create Google slides, follow these steps:
- Go to Google Drive and sign in.
- Click on the “New” button, then select “Google Slides.”
- Choose a template or start with a blank slide.
- Add your content by typing in text, and inserting images, videos, shapes, or charts.
- Customize your slides by changing the theme, background-color
Create & share screenshots, screen recordings, and GIFs with Zight
Get Zight for iOS.
Contribute to the Microsoft 365 and Office forum! Click here to learn more 💡
April 9, 2024
Contribute to the Microsoft 365 and Office forum!
Click here to learn more 💡
PowerPoint Top Forum Contributors: Steve Rindsberg - John Korchok 👍✅
April 17, 2024
PowerPoint Top Forum Contributors:
Steve Rindsberg - John Korchok 👍✅
- Search the community and support articles
- Microsoft 365 and Office
- Search Community member
Ask a new question
How do I record my presentation on powerpoint?
I finished my presentation and I have to record it for my final project. It says to click the record button on the top right but there is no option for me to click. How do I add this feature to my powerpoint?
- Subscribe to RSS feed
Report abuse
Replies (1) .
- Microsoft Agent |
Dear respected,
Good day! Welcome to Microsoft Community.
We went through your post carefully and do understand your demand to record in PowerPoint for your study but there shows no Record button on the top-right side. In this situation, we would like to confirm if you are using the latest version of PowerPoint for Mac 16.82 Update history for Office for Mac - Office release notes | Microsoft Learn
If so, you can try if you use the Record feature from these places: (click screenshots to zoom in)
1. Slide Show tab

2. Record tab (if possible)

3. Slide Show tool bar on the top

Appreciate your understanding that sometimes the initial reply may not resolve the situation very soon. However, we can work together to narrow down and resolve the situation. Please kindly post back and provide the more information, then we can focus on your specific scenario and provide specific suggestions.
1. What is the current version of your PowerPoint application.
About Office: What version of Office am I using? - Microsoft Support
2. If the same feature missing issue will happen when you create a brand-new presentation.
Feel free to come back with us and we will offer the further support as much as we can. Appreciate your patience and understanding and thanks for your time and cooperation. Hope you a nice day!
Mia | Microsoft Community Moderator
1 person found this reply helpful
Was this reply helpful? Yes No
Sorry this didn't help.
Great! Thanks for your feedback.
How satisfied are you with this reply?
Thanks for your feedback, it helps us improve the site.
Thanks for your feedback.
Question Info
- For education
- Norsk Bokmål
- Ελληνικά
- Русский
- עברית
- العربية
- ไทย
- 한국어
- 中文(简体)
- 中文(繁體)
- 日本語
IMAGES
VIDEO
COMMENTS
You can record your PowerPoint presentation—or just a single slide—and capture voice, ink gestures, and your video presence. The completed recording is like any other presentation. You can play it for your audience in Slide Show or you can export it as a video file. So instead of just handing the deck to someone, people can see your ...
Open the slide you want to start recording from. Near the upper right corner of the PowerPoint window, select Record. When you're ready, select the round, red Record button, wait for the countdown, then start speaking. To record from a specific slide, go to it, and then select Record. Note: Narration isn't recorded while the transition between ...
Record narration and timings for your presentation to give it a professional and polished feel.Record narration and timings:1. Select Slide Show -- Record Sl...
Learn how to add or record audio, such as music, narration, or sound bites, to your Microsoft PowerPoint presentation. Find out more at: https://msft.it/6008...
On the File menu, select Save to ensure all your recent work has been saved in PowerPoint presentation format (.pptx). Select File > Export > Create a Video. (Or, on the Recording tab of the ribbon, select Export to Video .) In the first drop-down box under the Create a Video heading, select the video quality you want, which pertains to the ...
Open your PowerPoint file, go to the Recording tab, and click the "Record Slide Show" button to start recording. Check and make sure your microphone and webcam (if using) are recording properly by clicking the small microphone and video camera icons at the bottom right of the recording screen. Click the red "Record" button at the top ...
Learn how to record presentation in MS powerpoint with a very easy to follow demonstration and get updated with the new features. Subscribe and like for more...
Let's see how to record a PowerPoint presentation in front of live audiences. Step 1 - save your PowerPoint presentation in OneDrive. Step 2 - open your PowerPoint slides from PowerPoint online. Step 3 - go to Present Live from the Slideshow Ribbon tab. Step 4 - share a live link with your audience.
This method can also be used for recording a screencast, even if you're not using a PowerPoint presentation in your video recording. To start the recording, click Record or use the Windows+SHIFT+R hotkey. To stop the screen recording, click Pause to temporarily halt the recording to resume later or Stop or the Windows+SHIFT+Q hotkey to end ...
If you can't see Record slide show button under Slide show tab, we would like to suggest you check whether you can see this option after checking Recording tab. On the File tab of the ribbon, click Options. In the Options dialog box, click the Customize Ribbon tab on the left. Then, in the right-hand box that lists the available ribbon tabs ...
1) Edit returns you to the main PowerPoint editing screen. 2) The red record button begins recording with a countdown. 3) The time indicators show how much recording time has elapsed. The number on the left indicates recording time for the current slide. The number on the right indicates total recording time for this presentation.
Click and drag to select the area of your screen you want to record. Next, click the "Record" button in the screen recorder dock. A three-second countdown will begin. Once it reaches zero, your recording will begin. When you've finished recording everything, move your cursor back to the top of the screen where the dock was, and the dock ...
NEW VIDEO N. 153. In this video tutorial, you'll learn how to record your presentation directly in Microsoft PowerPoint. If you are not able to make the presentation for some reason, or if you are planning to be the moderator of yourself answering questions and engaging with the audience, there is a brand feature available in Microsoft ...
In this micro-lesson you will learn how to:- Record a PresentationFull Course Description: In this course, students will take a deeper dive into Microsoft Po...
Open the slide that you want to put the screen recording on. On the Insert tab of the ribbon, select Screen Recording. On the Control Dock, choose Select Area (or if you want to select the entire screen for recording, press Windows logo key+Shift+F). You'll see the cross-haired cursor . Select and drag to select the area of the screen you want ...
A simple guide to recording a narrated Powerpoint Presentation as a video file, using in-built tools in PowerPoint Office365 for Windows. Basic editing of th...
Here's how: Go to Record > From Beginning or Record > From Current Slide. In the recording screen, click on the Camera icon at the top. This will insert a round object containing your video in ...
Select Record to re-record your clip, or select OK if you're satisfied. To move your clip, select and drag the audio icon to where you want it on the slide. Note: If you're using more than one audio file per slide, it's advisable to put the audio icon in the same spot on a slide to find it easily.
Report abuse. Hi Scott, You have an option to record your presentation with animations. PowerPoint automatically records the time you spend on each slide, including any animation steps that occur, and the use of any triggers on each slide. To isolate the issue, I would like to confirm some information. Please answer the following:
Cannot export powerpoint recordings. Hi, I tried to record a powerpoint video and was successful. However, I cannot download or share the video since the "export video" option does not appear. I am using a Mac. Pls help. Cheers! Chrishain. Labels:
After that, select the screen you want to record, and click Share. Click your mouse on any part of the screen to start recording and wait out the 3-second countdown. The Zight screen recorder software will now be recording your entire screen. 3. Start Narrating Your Google Slides Presentation.
If so, you can try if you use the Record feature from these places: (click screenshots to zoom in) 1. Slide Show tab. 2. Record tab (if possible) 3. Slide Show tool bar on the top. Appreciate your understanding that sometimes the initial reply may not resolve the situation very soon. However, we can work together to narrow down and resolve the ...