
A Guide to Using Images and Photos For Powerpoint

No matter what industry you’re in, you’ll likely be tasked with creating PowerPoint presentations to use in meetings, for marketing, or as a standalone piece of sales collateral to hand off to a client. Whatever the context, a PowerPoint presentation allows you to share information in an easily digestible, visual format that informs the reader and brings your story to life. Presenting images alongside your text is a surefire way to make your slides more eye-catching, but it takes some finesse to give your audience information without the overload.
Creating an aesthetically pleasing PowerPoint can be a make-or-break deal, and the photos you use – along with the the right combination of colors, fonts and other graphic elements – can either convey professional credibility and inspiration, or be a jumbled mess that your audience won’t know how to decipher. In this guide, we’ll go over the best practices for using images in PowerPoint (or the slide deck program of your choice).
Tips for Presenting Images
Text, colors, and icons can’t always do the heavy lifting of a presentation on their own — using photos in PowerPoint will make your ideas feel more immediate, human, and relatable. Think about your key messages and your brand identity before adding images to your presentation. What story are you trying to tell? What audience are you trying to speak to?

Visuals are essential to creating an engaging presentation. Audiences will tune out if they see nothing but text.
Generally, you should focus on adding photos to your PowerPoint that support and emphasize your key statements, rather than overshadow or distract from them. Selecting more muted background images for presentation slides can also maintain the look, feel, and texture you desire without attracting too much focus.
Here, we’ve compiled a handy guide to the Do’s and Don’ts of PowerPoint presentation design and selecting the right images:
1. Use High Quality Photos
Nothing can tarnish your professional credibility quicker than seeing a blurry, pixelated image in your presentation. This is why adding high-resolution stock photography to your presentation is a must, and drawing from the wealth of professional photos available on a site like Noun Project will lend your slides an immediate air of professionalism.
Go to NounProject.com/photos and search for keywords related to your main idea. You can view specific collections like Diversity in Tech , Empowered Women , Students , and Hiking , and explore additional images by photographer as well.
When you’ve found a stock photo you like, be sure to download it in the resolution you want. Noun Project offers many photos for free in a lower resolution, but depending on how large your final presentation will be, you’ll want the highest resolution that can be expanded to fit your screen without pixelation. Always double check to make sure that the picture still looks crisp at full screen size.

Tip: Standard screen resolutions are 1920 pixels wide by 1080 pixels high (and most default PowerPoint templates have these dimensions). Be sure your photo is at least the same dimension if you’re doing a full screen size to avoid pixelation.
2. Practice Consistency
Chances are, your entire presentation focuses on a single overarching idea and the photos you use should reflect that. In addition to finding the right subjects, pay attention to the other aesthetic qualities of the photos you bring in. Are they in a similar, complementary color scheme? Are they shot in similar environments for a consistent tone (e.g., sleek and corporate, rugged and outdoorsy, urban and gritty, or light and playful)?

Use images in PowerPoint that support and accentuate your theme and overall tone. The images you use throughout should complement each other without repeating or looking too dissimilar.
The most fail-proof way to ensure consistency is to draw from an individual photographer or a particular photo shoot. Stock photographers will often shoot several different angles, poses and variations from a single scene, so you can find just the right shot for each slide and remind your audience that this is all part of one cohesive message.
Noun Project organizes stock photos in collections from individual shoots, so almost any image you click on will have similar ones from the series available. Bear in mind, though, that you don’t want to use too many similar images — the more you can change scenes without shifting the tone, the better.

Adding photos to a presentation from the same photographer is the easiest way to keep it visually consistent. If you insert photos from the same shoot, just make sure you add enough variety so it doesn’t become repetitive. Pictured: Fitness photo collection by Jacob Lund.
Once you have your desired photos downloaded (and ideally put in the same folder in your hard drive), here’s how to add pictures to PowerPoint:
- Simply click and drag the picture file (as .JPG or .PNG) from your file finder window into the PowerPoint pane. You may see the “Design Ideas” toolbar pop up on the side of your pane, with different options you can try out to arrange visual elements.
- Alternatively, go to Insert > Pictures > Picture from file , and select the photo you want from your finder.

3. Avoid Photo Clutter
The photos you add to your PowerPoint should be presented one at a time, or minimally enough to maintain focus — too many photos can cause clutter and become distracting. You don’t want the photo to be the sole star of the show — you want it to support your statements and add emotional resonance to your messages.

There may, however, be occasions when you want to use multiple images that support a unifying topic: for example, steps in a process or different ways that customers can purchase your product.
If you ever want to add one or more smaller photos, rather than a large background image, here are a few rules of thumb:
- Crop the photos to the same size or shape: Having mixed dimensions makes the overall composition feel unbalanced. Whether you choose a square, rectangle, or circle shape for your photos, making them all the same size and shape will boost the scannability of your page.
- Group and align: Again, scannability is key. When you group the elements of your page together in an even and consistent way, people will visually register the pattern and can digest the content more quickly. For example, you may have three groupings that consist of an image, headline, and descriptive body text. Make sure that these elements are (1) clustered together so they form one unified thought, (2) grouped to match each other so they form a visual “rhythm” across the page with equal text sizes, line weights, and image dimensions, and (3) aligned and justified along the X or Y axis for legibility (in PowerPoint, select multiple objects and go to Arrange > Align to line them up along the same axis).
- If using different sized photos, fit them together into a cohesive shape . A binding element like a grid with solid lines will help the photos appear on the page like neatly fitted puzzle pieces. Again, keep overall alignment in mind — the more your content stays organized in tidy rows and columns, the more scannable it will be.

If you must use multiple photos, PowerPoint’s Design Ideas toolbar will give you options to array them in a neatly aligned grid. Focus on creating a tidy overarching shape to avoid the cluttered “collage” effect.
4. Choose Photos Over Clipart
Clipart has been nearly synonymous with PowerPoint and other programs since the ’90s, but unfortunately hasn’t evolved much with the times. While a piece of clipart from the web may encapsulate or accentuate your key themes, keep in mind these aesthetic considerations:
- Professional credibility is lost when your design looks “dated” or “cartoonish,” but gained when your presentation is sleek and modern.
- While aiming for visual consistency, also bear in mind that more muted and subtle visuals — from the photos you choose to the icons that illustrate your key points — help keep the focus on your words and ideas, rather than your visual aids
- If you want to add a more sleek, modernized look, browse Noun Project’s collection of over 3 million icons to find a corresponding set to include.

For a more polished and modern look, go for minimalist and visually consistent icons to accentuate key messages, rather than clipart.
Tip: The PowerPoint Add-In for Noun Project lets you search and pull in icons right there in the software without having to leave your workflow. Go to Insert > Add-Ins > Get Add-Ins and search for Noun Project. Once you open the Noun Project Add-In window and log in to your account, choose icons from the same collection to ensure that they’re visually consistent.

Find the Noun Project PowerPoint Add-In on NounProject.com or, from PowerPoint, go to Insert > Add-Ins > Get Add-Ins to search for Noun Project icons.
5. Don’t Use Watermarked Images
Even if it is small, a watermark can be distracting and, once spotted, can negatively impact your credibility. Be sure to use free photos and credit the photographer, or pay for the photos you use in your presentations to avoid the loss of credibility and trust that can occur when you use watermarked images.
Not sure what usage rights you have with an image? Let’s cover the basics of how to cite images in a presentation: Questions about fees, licenses, and usage rights are common, and citing images in a presentation is the standard expectation for free photos so that the photographer gets credit. Fortunately, Noun Project Photos provides a transparent model for photo usage and licensing — any free photo download is licensed under Creative Commons, which allows you to use the photo for noncommercial purposes, without creating derivatives, as long as you provide attribution to the photographer.
The “Basic Download” option will not only give you a free, CC-licensed image, but tell you exactly what attribution information you should include when you cite it. Once you click “Get This Photo,” you’ll see the image title and photographer name listed in a text box — simply copy the text and include it on your slide to properly cite the image.

Noun Project Photos provides a transparent licensing model in which photos are free to use with attribution under Creative Commons.
Your presentation may have a footer for notes, where such a citation could easily fit. If not, many presentations will have all the attributions listed on a final page. Under Creative Commons, both methods are acceptable.
6. Maintain Diversity in Photos
The truth is incontrovertible: representation matters. Stock photography — like much of the broader media and marketing landscape — has faced a chronic issue with only representing a particular sub-sect of the population, and more and more consumers have started to notice. At Noun Project, we’re dedicated to ensuring that the visual resources we share are inclusive, free from outdated stereotypes, and more accurately reflect the world we live in . Through initiatives like our Diversity in Tech and Empowered Women photo collections, we’re championing more equal and accurate representation in the world of stock photography.
Double-check the photos you’ve added to your presentation and ask yourself: Does this speak to the widest possible audience, or does it leave certain groups out of the picture?

Noun Project offers diverse, inclusive photos, so you can finally leave the stuffy corporate photo shoot in the past. Audiences want to see natural, non-posed, high-quality photos that better resemble day-to-day life.
7. Keep it Simple.
Finally, slides should be readable. The visual elements you choose should bolster the core message of each slide, rather than overshadowing it. Key things to watch out for are:
- Less text, more talk . Unless you’re handing off a comprehensive sales deck, you as the presenter should be doing the talking — not the words on the page. Focus on using short bullet points to extract main ideas and keywords, rather than numerous full sentences.
- Check your text size. Bigger is better (and with less text on the page, it should have more room to breathe). But don’t forget about hierarchy: there should be a clear distinction between headlines and supporting text.
- Check legibility . Are you using simple, legible text for body copy? Does the text appear clearly against the background? Up the contrast or find a more suitable background that doesn’t strain the eye.
Search for “Copy Space” photos to add to your presentation. The best background photos to add are those that have plenty of white space for you to add your own content. While bold, busy photographs might be the most visually striking, bear in mind that your text needs room to breathe. A quick Noun Project search for “Copy Space” will lead you to more minimal photographs that include this built-in space for text.

Search for photos with copy space to give your text legibility. Tip: If you need to set text against a more visually busy background, add a semi-transparent color block. Add a rectangle (Insert > Shapes > Rectangle) underneath your text, give it a black fill, but adjust the transparency until the text becomes clearer while leaving the photo visible.
Explore More Stock Photos for PowerPoint at Noun Project
Noun Project Photos features professionally-selected, inclusive, beautiful and affordable images created by a global community of photographers. We’ve curated our collection to put visual clichés and tired, outdated stereotypes to rest — so you can find stunning images for any project. With worry-free licenses, you’ll support photographers and have peace of mind with clear image usage rights, including model and property releases.
Explore the collection at thenounproject.com/photos/ and follow our blog for more tutorials about visual communication.

Marketing Communications Manager at Noun Project, Designer and Illustrator.
Related Articles

Graphic Design Principles: Balance and White Space
by Jeremy Elliott | Apr 12, 2024 | DIY , Featured , Graphic Design
Learn how to use balance and white space in your designs by distributing your elements to promote visual flow.

The Principle of Hierarchy in Graphic Design
by Jeremy Elliott | Mar 11, 2024 | Creative Inspiration , Graphic Design , Top Featured
Learn how to effectively use the principle of hierarchy to direct the viewer’s focus.

How to Use Icons in Notion: A Guide to Visually Organizing Your Life
by Jeremy Elliott | Feb 7, 2024 | Creative Inspiration , DIY , Featured , Graphic Design
Learn how to use icons in Notion to visually organize tasks, projects, and notes for everyday use.
- Frequently Asked Questions (FAQ)
Understanding PowerPoint File Formats
It’s possible to use PowerPoint for years without ever thinking about the various file formats that are available to you. By learning about PowerPoint’s file formats and options, however, you can do a much more effective job of creating presentations, backing them up, sharing them with colleagues, and protecting the information that they contain.
Ordinary PowerPoint Presentations
When you save a simple PowerPoint presentation, you give it a name, and PowerPoint adds the file extension .pptx. Your Sales Presentation file becomes Sales Presentation.pptx .
If your PowerPoint presentation contains one or more macros, PowerPoint will automatically detect their presence and save your presentation as a .pptm file. You can force PowerPoint to save a presentation that includes macros as a .pptx file, but PowerPoint won’t let you play the macros that you’ve included in your slide slow. So it’s best to let it save your file with the .pptm extension.

If you need to share your presentation with a colleague who is using an older version of PowerPoint, then save your slides as a .ppt file. PowerPoint 97 through 2003 cannot open and process .pptx or .pptm files.
If you’re using PowerPoint 2007 or newer, you should always save your work in .pptx format (or in .pptm format if you’ve used macros in your presentation). The options described below are additional ways to save your work. Be sure to save them first as ordinary .pptx or .pptm files before you save them in any of these other formats.
PowerPoint Shows
If you want to give your PowerPoint presentation to a friend or colleague, and you don’t want them to change anything, then save your presentation as a PowerPoint Show file. Your colleagues can display your slides, but they will be unable to change any part of your presentation.
There are three types of PowerPoint Shows: Save an ordinary presentation as a .ppsx file. If you’re using macros in your presentation, save it as a .ppsm file. If you’re sending your slide show to somebody who is using PowerPoint 97 through 2003, then create a .pps PowerPoint Show file.
Be sure to save your presentation as a plain vanilla (.pptx) file or as a macro-enabled (.pptm) file. If you’ve only saved the Show file, you won’t be able to make changes to your presentation.
PowerPoint Picture Presentations
Picture Presentations add an additional layer of protection to your work. To the casual observer, a PowerPoint Picture Presentation looks like an ordinary PowerPoint slideshow. But when you save your work as a Picture Presentation, each slide is converted to a simple image.
Slides contain text objects, image objects, animations, transitions, and many other special effects. By contrast, Picture Presentations contain only snapshots of your slides.
If somebody wants to copy your work, they can see each of the images and retype the text. They can even grab (and re-crop) the images. But they cannot capture any of the magic that is PowerPoint.
If you create a Picture Presentation, be sure to give it a unique name. If you only save the Picture Presentation .pptx file, you won’t be able to modify your presentation in the future.
Windows Media Videos
You can convert your PowerPoint presentation to an ordinary Windows Media Video (.wmv) file, and play it using the built-in Windows Media Player or any other video player. Your .wmv file can be enjoyed by any Windows or Mac user, even if they don’t have PowerPoint installed on their computer.
As always, don’t make your .wmv file the only version of your slideshow or you’ll be very disappointed when you want to make changes to the presentation.
Outline/RTF
PowerPoint lets you turn your slideshow into plain text. This is handy if you want to move some of the presentation’s text to your website or blog.
When you create a rich text format (.rtf) file, you save only the text. You lose all of the images, animations, slide-to-slide transitions, and other non-text objects.
It’s easy to save your presentation as a portable document format (.pdf) file. These .pdf files can be opened on any Windows, Mac, Unix/Linux, iOS, or Android device. The resulting file, however, is a static document. Don’t expect to see slides fade in and out. All of your animated objects will become static.
You can save your slides as an XML Paper Specification (.xps) file. That’s a fancy way to say that if you double-click your .xps file in Windows Explorer, the operating system will open your file using its built-in XPS Viewer.
The XPS format is ideal for sending your slideshow to users who have neither PowerPoint nor Adobe Acrobat Reader installed on their computers. As with the .pdf format above, .xps files have text and images, but no animation.
If you’re happy with this year’s Financial Results slideshow, and you want to create next year’s presentation using the same colors and fonts, then save your current presentation as a template, and use it over and over.
As you may have guessed, save your work as a .potx file for use in PowerPoint 2007 and newer, as a .potm file for a 2007 or newer macro-enabled presentation, and as a .pot file for use on PowerPoint 97 through 2003.
Office Themes and Backups
Because Microsoft PowerPoint is part of Microsoft Office, you can use two Office file types to make your PowerPoint work easier and safer.
You can save your presentation theme as an Office .thmx file. Future PowerPoint presentations, as well as Word documents and Excel spreadsheets, can use this Office theme to set their fonts and colors. This results in a consistent look and feel to all of the Office documents that you present to prospects and customers.
Autosave is built into most Office applications, including PowerPoint. If you experienced a power outage and hadn’t saved your PowerPoint presentation before you lost power, it’s possible that there’s a recent version of your slideshow in the Office Autosave library. If you click File , click Open , and click Recover Unsaved Presentation , you may be pleased by the information that PowerPoint saved for you.
The Bottom Line
There’s no need to memorize all of the PowerPoint file extensions and options that are available. But be sure that you’re including all of these files when you do your regular on-site and off-site backups. And bookmark this blog page so that you can return to it when you need to save or open a PowerPoint presentation in one of the less popular file formats.
- September 20, 2014
About ShapeChef

Blog Categories
- Slides and Objects
- Video and Audio
- Presentation Tips and Techniques
Copyright © 2024 Wulfsoft. All rights reserved.
- Terms of Service
- Legal Notice
- Tips Tricks
- Online Utilities
- Office Tips

- Privacy Policy
What is PowerPoint Picture Presentation
Take a scenario where you want your team mates to use your Slide Show but you don’t want them to edit any of existing slides. You cannot obviously send them as PowerPoint Show but Microsoft Office 2010 allows you to convert each of your slides in Presentation into an Image but still give you power to add slides and edit the new ones. These kind of Presentations are called as PowerPoint Picture Presentation.
All you have to do is Go to BackStage of your Presentation and select Save and Send, Next select Change File Type and save it as PowerPoint Picture Presentation. This will save your presentation in pptx format but when you open it, you will see each of your slides now is an image.

Related : How to convert PowerPoint Show into Images
LEAVE A REPLY
Save my name, email, and website in this browser for the next time I comment.
Recent Posts

Duplicate, Merge, and Detach Browser Tabs with Keyboard Shortcuts

Windows PC Boots After a Few Seconds of Pressing the Power Button

How to Mass Delete All Facebook Messages

Lesser Known Keyboard Shortcuts for Windows
")
How to Reduce Image Size in Batch (Free Tools)

Critical PowerPoint Shortcuts – Claim Your FREE Training Module and Get Your Time Back!
PowerPoint Pictures
- PowerPoint Tutorials
- Pictures, Icons, Videos, Etc.
- June 25, 2018
In this post you’ll learn all about how to use pictures in PowerPoint and where to find them online.
In short, using pictures in your presentations seems like a very basic skill, but there are a few key things that even the most advanced PowerPoint users don’t know..
Plus, there are a ton of cool advanced tricks for working with them. Learn all the cool things you can do with PowerPoint pictures here.
Why use pictures in PowerPoint
Images are almost considered a MUST in most presentation today, and rarely does a day go by where we don’t hear the old saw about a picture being worth a thousand… yeah, you know it.
And while it’s easy to roll our eyes at this, you can deny that a picture can greatly and instantly improve the look of most slides.
While pictures don’t replace good storytelling ( see our guide here ), they certainly can enhance it.
Examples of PowerPoint pictures (before and after)
Whether you just add one image, add many images, or turn your pictures into full screen visuals, the difference is clear.
Take a look at these before / after clippings of slides, and you’ll see that the ones on the right are much more engaging.

While adding a picture can make your slide more visually attractive, do keep in mind that the image has to match your content.
Don’t simply add in any old picture… keep it highly relevant and make sure it adds to (and doesn’t distract from) your message.
Where to go to get PowerPoint pictures
Here are a few places you can go to get free and copyright-free PowerPoint images onlines:
- Pixabay – Awesome site for 100% free and Creative Commons CC0 licensed images, illustrations, vectors, and videos.
- Pexels – We love this site. It’s a compilation of 100% copyright-free images from around the web. They also have a section of their site dedicated to videos . Note: They have a super-handy free unofficial add-in for PowerPoint and Word add-in that you can download and install here .
- Gratisography – All kinds of great photos that are anything but stock. Typically features conceptual images and funny images too!
- Negative Space – This is one of our favorite sites for 100% free and Creative Commons CC0 licensed images, with everything from landscapes, to conceptual images, to product images…all around great!
To learn about other PowerPoint resources we recommend, read out guide here .
How to insert pictures in PowerPoint
Pictures can be inserted onto your slide from two places: from within your computer or table, or from the web.
Method #1: From your computer
To insert a picture from your computer into PowerPoint, you have two options:
Option 1: Simply drag a picture file from wherever it is on your computer onto the slide, using your mouse.
Option 2: Go up to the Insert tab, and select Pictures, navigate to where your picture is in your system and then click on Insert.

Method #2: From the web
If you don’t already have a picture you want to use on your computer, you can find one on the web directly within PowerPoint. To insert a picture from the web into PowerPoint, simply:
- Go to the Insert tab
- Select Online Pictures
- Type in a keyword to search for an image in the Bing search engine

PowerPoint will download and insert the picture(s) you selected on your slide, along with any copyright information you might need.
Note: You have several search filter settings you can adjust in the Online Pictures dialog box:
- Size (small, medium, large and extra large)
- Type (photograph, clipart, line drawing, animated GIF, transparent)
- Color (color only, black & white, and 12 colors)
- Layout (square, wide, tall)
- Copyright (all, Creative Commons Only) – see section below about how to legally use pictures in your presentations.
These filters can help you more quickly sift through the hundreds – or even thousands – of images and graphics available to you.
PowerPoint Pictures Do’s and don’ts
Like with anything in PowerPoint, there is always the risk that you will overuse a feature and shoot yourself in the foot.
But beyond some of the obvious don’ts (like don’t crowd your slide with too many pictures, or don’t stretch and warp your images beyond recognition)… there are some other incredibly important rules to keep in mind with pictures in PowerPoint.
Do use pictures legally
Very few people actually stop and think about the images they’re inserting into their PowerPoint slides. Do you have the right to use those images?
Chances are that if you’ve simply Googled for an image and copy-pasted it into your presentation, that you don’t actually have the right to display and distribute that image without getting prior permission from its author.
So when you’re searching for images, whether in Bing through the Online Pictures tool in PowerPoint, or in Google or Flickr, make sure that you have the filters set for Creative Commons licensed images.
And double-check whether the license requires you to credit the author (and all other requirements that may be associated with the license).
You can learn more about legally using images in PowerPoint slides here .
Don’t use low quality or warped images
You’d be surprised at how often we see low quality and pixelated images being used in presentations. Not only do they look terrible to begin with, but they’ll likely look EVEN WORSE on a large overhead projector.

So make sure you’re always using the highest quality picture possible. If you need help compressing an image in PowerPoint, see our guide here .
Another design sin is to stretch and warp your pictures.

To avoid warping, make sure to hold the Shift key when you’re enlarging or shrinking your pictures.
You can also make sure that the picture is set not to warp (see image below), by:
- Right-click the picture and select Format Picture
- Go to the Size & Position tab
- Open up the Size options
- Tick the box next to Lock aspect ratio

Also, if your picture gets accidentally warped, you can reset its size and dimensions by:
- Go up to the Picture Tools Format tab
- Select the dropdown arrow for Reset Picture
- Click on Reset Picture & Size

Do crop your pictures to make them better fit your layout (or even go full screen)
If your image isn’t fitting nicely into your layout, you can crop it so that it fills in your slide space better.To see how to crop images in PowerPoint, click here
Do compress images to make your file size smaller
If you’re finding that your presentation is running slow, or if it’s too large to share with the people that need it, then you can reduce its size from within PowerPoint.
Depending on the number of photos in your presentation and how you compress them, you can reduce the size of your presentation by as much as 80%. For details, see our guide here .
Cool things you can do in PowerPoint with your pictures
There is an almost infinite number of things you can do with pictures in PowerPoint. Here are some of the articles we’ve written about a few of them:
- Make an image background transparent, click here
- Create a 3D pop-out picture effect, click here
- Create a color pop trick with your images, click here
- Learn how to make a fast photo collage, click here
- Turn a photo into a painting (without painting it), click here
- Turn a photo into a sketch (without sketching it), click here
The case for NOT using pictures in PowerPoint
At the risk of sounds like a contrarian… sometimes you’re better off not using pictures, and instead using storytelling through words.
This Inc.com article by Kindra Hall about when a picture isn’t worth a thousand words , makes a good case for avoiding using images and letting your audience’s imagination fill in the picture that you’re painting with words.
Of course, this storytelling method is more relevant for presentations that are delivered live (rather than ones that are printed and/or emailed).
Pictures are a critical element to a successful presentation.
That’s why it’s important to understand all of the options available to you and what to look out for.
While using a good image can dramatically improve your presentation, using a bad or warped image can make your presentation look tacky.
If you enjoyed this tutorial, you can learn more about our online training courses and free PowerPoint resources here .
What’s next?
Related articles, about the author.

Popular Tutorials
- How to Strikethrough Text (l̶i̶k̶e̶ ̶t̶h̶i̶s̶) in Word, Excel & PowerPoint
- How to Make Animated Fireworks in PowerPoint (Step-by-Step)
- Strikethrough Shortcut (l̶i̶k̶e̶ ̶t̶h̶i̶s̶) for Word, Excel & PowerPoint
- How to Create a Flash Card Memory Game in PowerPoint (Like Jeopardy)
- Keyboard Shortcuts Not Working: Solved
PowerPoint Tutorial Categories
- Strategies & Opinions
- Shortcuts & Hacks
- Presentation Design
- New Features
- Miscellaneous
- Charts & Data Viz
We help busy professionals save hours and gain peace of mind, with corporate workshops, self-paced courses and tutorials for PowerPoint and Word.
Work With Us
- Corporate Training
- Presentation & Template Design
- Courses & Downloads
- PowerPoint Articles
- Word Articles
- Productivity Resources
Find a Tutorial
- Free Training
- For Businesses
We help busy office workers save hours and gain peace of mind, with tips, training and tutorials for Microsoft PowerPoint and Word.
Master Critical PowerPoint Shortcuts – Secure Your FREE Training Module and Save Valuable Time!
⌛ Master time-saving expert techniques.
🔥 Create powerful presentations.
🚀 Propel your career to new heights.
We value your privacy – we keep your info safe.
Discover PowerPoint Hacks Loved by Industry Giants - KKR, AmEx, HSBC!
Over 114,880 professionals in finance, marketing and sales have revolutionized their PPT skills with our proven methods.
Gain FREE access to a full module of our premium PowerPoint training program – Get started today!
We hate spam too and promise to keep your information safe.
You are currently viewing a placeholder content from Facebook . To access the actual content, click the button below. Please note that doing so will share data with third-party providers.

- Get started with computers
- Learn Microsoft Office
- Apply for a job
- Improve my work skills
- Design nice-looking docs
- Getting Started
- Smartphones & Tablets
- Typing Tutorial
- Online Learning
- Basic Internet Skills
- Online Safety
- Social Media
- Zoom Basics
- Google Docs
- Google Sheets
- Career Planning
- Resume Writing
- Cover Letters
- Job Search and Networking
- Business Communication
- Entrepreneurship 101
- Careers without College
- Job Hunt for Today
- 3D Printing
- Freelancing 101
- Personal Finance
- Sharing Economy
- Decision-Making
- Graphic Design
- Photography
- Image Editing
- Learning WordPress
- Language Learning
- Critical Thinking
- For Educators
- Translations
- Staff Picks
- English expand_more expand_less
PowerPoint - Inserting Pictures
Powerpoint -, inserting pictures, powerpoint inserting pictures.

PowerPoint: Inserting Pictures
Lesson 15: inserting pictures.
/en/powerpoint/indents-and-line-spacing/content/
Introduction
Adding pictures can make your presentations more interesting and engaging. You can insert a picture from a file on your computer onto any slide. PowerPoint even includes tools for finding online pictures and adding screenshots to your presentation.
Optional: Download our practice presentation .
Watch the video below to learn more about inserting pictures in PowerPoint.
To insert a picture from a file:

You can also click the Pictures command in a placeholder to insert images.

Inserting online pictures
If you don't have the picture you want on your computer, you can find a picture online to add to your presentation. PowerPoint offers two options for finding online pictures.

To insert an online picture:

- The Insert Pictures dialog box will appear.

- Press the Enter key. Your search results will appear in the dialog box.
You can also click the Online Pictures command in a placeholder to insert online images.

When adding images, videos, and music to your own projects, it's important to make sure you have the legal right to use them. Most things you buy or download online are protected by copyright , which means you may not be allowed to use them. For more information, visit our Copyright and Fair Use lesson.
Moving and resizing pictures
Once you've inserted a picture, you may want to move it to a different location on the slide or change its size . PowerPoint makes it easy to arrange pictures in your presentation.
To select a picture:
Before you can modify a picture, you'll need to select it.

To resize a picture:

The corner sizing handles will resize a picture while preserving its original aspect ratio . If you use the side sizing handles, the image will become distorted .
To rotate a picture:

Hold the Shift key on your keyboard when rotating an image to snap it to angles in 15-degree increments.
To move a picture:

To delete a picture:
- Select the picture you want to delete, then press the Backspace or Delete key on your keyboard.
You can access even more picture formatting options from the Format tab. We'll talk more about these options in our lesson on Formatting Pictures .

Inserting screenshots
Screenshots are basically snapshots of your computer screen. You can take a screenshot of almost any program, website, or open window. PowerPoint makes it easy to insert a screenshot of an entire window or a screen clipping of part of a window in your presentation.
To insert screenshots of a window:
- Select the Insert tab, then click the Screenshot command in the Images group.

To insert a screen clipping:

- Open our practice presentation .
- Select the last slide.
- Use the Online Pictures command to insert a picture of your favorite form of exercise.
- Resize your picture so it takes up a majority of the slide without covering the title.

- Insert a new slide with a Title Only layout.
- In the Title placeholder, type Learn More at Fitness.gov.
- Open http://www.fitness.gov in your browser, then insert a screen clipping of the website onto the slide you just created.

/en/powerpoint/formatting-pictures/content/
- PRO Courses Guides New Tech Help Pro Expert Videos About wikiHow Pro Upgrade Sign In
- EDIT Edit this Article
- EXPLORE Tech Help Pro About Us Random Article Quizzes Request a New Article Community Dashboard This Or That Game Popular Categories Arts and Entertainment Artwork Books Movies Computers and Electronics Computers Phone Skills Technology Hacks Health Men's Health Mental Health Women's Health Relationships Dating Love Relationship Issues Hobbies and Crafts Crafts Drawing Games Education & Communication Communication Skills Personal Development Studying Personal Care and Style Fashion Hair Care Personal Hygiene Youth Personal Care School Stuff Dating All Categories Arts and Entertainment Finance and Business Home and Garden Relationship Quizzes Cars & Other Vehicles Food and Entertaining Personal Care and Style Sports and Fitness Computers and Electronics Health Pets and Animals Travel Education & Communication Hobbies and Crafts Philosophy and Religion Work World Family Life Holidays and Traditions Relationships Youth
- Browse Articles
- Learn Something New
- Quizzes Hot
- This Or That Game New
- Train Your Brain
- Explore More
- Support wikiHow
- About wikiHow
- Log in / Sign up
- Education and Communications
- Presentations
How to Create a Photo Slideshow with PowerPoint
Last Updated: February 6, 2023 Fact Checked
wikiHow is a “wiki,” similar to Wikipedia, which means that many of our articles are co-written by multiple authors. To create this article, 57 people, some anonymous, worked to edit and improve it over time. There are 12 references cited in this article, which can be found at the bottom of the page. This article has been fact-checked, ensuring the accuracy of any cited facts and confirming the authority of its sources. This article has been viewed 933,816 times. Learn more...
With so many fun and accessible ways to take photos, there is no wonder why everyone is so photo-happy these days. As easy as it may be to stock up on photos, it can be a challenge to keep them organized. One great way to keep your photos in a convenient place, that is easy to access when you want to reminisce on special memories, is by uploading them into PowerPoint. By doing this, you can create a slideshow that is a fun-filled way to back up the memories in your life.
Creating Photo Slideshows for PC Computers

- Remember to save your presentation after something that will help you to remember what pictures are in the file. This will help you to locate them later on.

- Select a layout that will accommodate your image, such as a slide with a title box and an image box, a slide with just an image box, or even a blank slide.

- Double-click inside the image box (or go to Insert > Picture > From File ), then browse to the desired image.
- Click "Okay" or "Insert" to add the image. If you don't like the way it looks, select the image and click on "Picture" to change it out for a different one. You can also select the image and hit "Delete" to remove the picture.

- Locate the "Slide Sorter" button near the bottom of the image pane. Then, click and drag the slides to the desired destinations.

- To add music, click on the movies and audio icon located under the "Insert" tab. First, go to "Audio from file", and then, click on "Music" to pull up your music. When you choose the song you want, click on the song, and press "Link to file" before pressing "Insert". [9] X Research source
- You can choose if the song plays for just one slide or the entire presentation by clicking on "Format Audio" next to the "Home" button, and then, clicking on "Play Across Slides" under "Audio Options". [10] X Research source

Creating Photo Slideshows for Mac Computers

- You can scroll through your photos and choose the ones you want to add to your slideshow by double-clicking on them.

- To add music, click on the movies and audio icon located at the top of the PowerPoint screen. Then, click on "Music" and all of your music should appear. When you choose the song you want, drag and drop the file onto one of your slides.
- You can choose if the song plays for just one slide or the entire presentation by clicking on "Format Audio" next to the "Home" button, and then, clicking on "Play Across Slides" under "Audio Options".

Sample Slideshow

Community Q&A
- Choose a theme for the photo slideshow. If the photos are from a summer vacation, choose a bright yellow background or upbeat music. Thanks Helpful 0 Not Helpful 0

You Might Also Like

- ↑ https://support.microsoft.com/en-us/office/create-a-presentation-in-powerpoint-422250f8-5721-4cea-92cc-202fa7b89617
- ↑ https://support.microsoft.com/en-us/office/save-your-presentation-file-34377c9c-a1e5-44e1-9c3f-e6e72ee6c541
- ↑ https://tsengcollege.csun.edu/sites/default/files/PDFs/forWindows/Slide_Titles_in_Microsoft_PowerPoint.pdf
- ↑ https://support.microsoft.com/en-us/office/add-rearrange-duplicate-and-delete-slides-in-powerpoint-e35a232d-3fd0-4ee1-abee-d7d4d6da92fc
- ↑ https://support.microsoft.com/en-us/office/insert-a-picture-in-powerpoint-5f7368d2-ee94-4b94-a6f2-a663646a07e1
- ↑ https://support.microsoft.com/en-us/office/add-transitions-between-slides-e89a076e-ed81-404e-9598-021a918fa1ba
- ↑ https://guides.lib.umich.edu/c.php?g=283149&p=1886370
- ↑ https://support.microsoft.com/en-us/office/play-music-across-multiple-slides-in-your-slide-show-b01ded6a-28c8-473a-971a-6dfa92cc9367
- ↑ http://answers.microsoft.com/en-us/office/forum/officeversion_other-powerpoint/powerpoint-how-to-add-music-throughout-the/10a366a4-9727-4f78-aa06-e9f76c8a5269
- ↑ https://support.microsoft.com/en-us/office/add-rearrange-duplicate-and-delete-slides-in-powerpoint-e35a232d-3fd0-4ee1-abee-d7d4d6da92fc#OfficeVersion=macOS
- ↑ https://support.microsoft.com/en-us/office/insert-a-picture-in-powerpoint-5f7368d2-ee94-4b94-a6f2-a663646a07e1#OfficeVersion=macOS
- ↑ https://support.microsoft.com/en-us/office/play-music-across-multiple-slides-in-your-slide-show-b01ded6a-28c8-473a-971a-6dfa92cc9367#OfficeVersion=macOS
About This Article
- Send fan mail to authors
Did this article help you?

Featured Articles

Trending Articles

Watch Articles

- Terms of Use
- Privacy Policy
- Do Not Sell or Share My Info
- Not Selling Info
Get all the best how-tos!
Sign up for wikiHow's weekly email newsletter
How to Format a Picture in PowerPoint for Maximum Impact

Table of Contents
An image carries immense communicative power, a timeless reality when dealing with presentations rich in visuals. Yet, the mere inclusion of an image in your slides falls short; you must also skillfully format it to elevate its visual appeal and captivate your audience’s attention.
In this blog, you’ll learn how to format a picture in PowerPoint with the tools and techniques it provides to manipulate and enhance your pictures, ensuring they grab attention and convey your message effectively.
We will share tips and tricks to make your images stand out — whether it’s a compelling chart, a breathtaking photograph, or a playful infographic — you can always ace your PPTs with these.

Formatting pictures in PowerPoint for maximum impact creates visually engaging and effective presentations. The goal here is not to overload your presentation with images but to use them strategically to complement your message and engage your audience effectively.
Here are the basics of formatting a picture in PowerPoint:
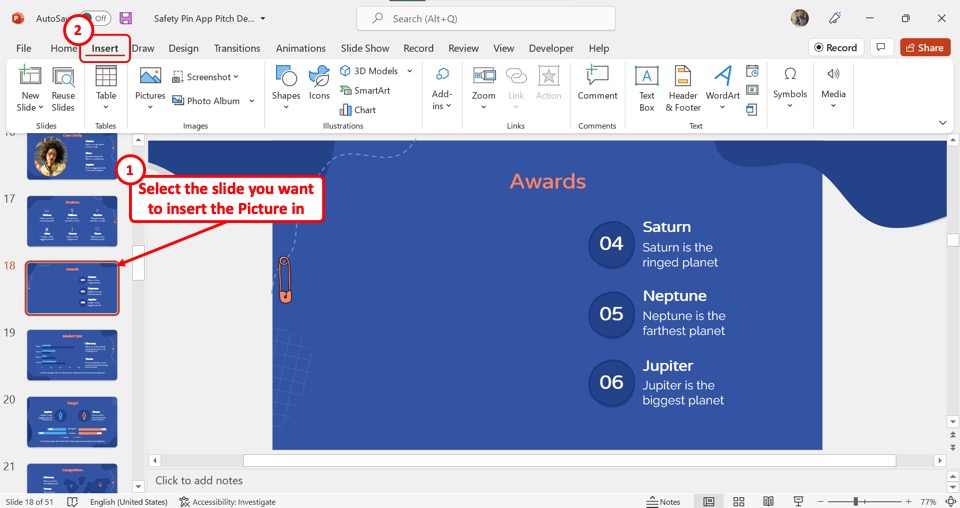
Step 1: Select the right image
Choose high-quality, relevant images that support your content and message. Ensure they are not pixelated or distorted when stretched.
Step 2: Insert the picture

Select the slide you want to insert the image in by clicking on it. Then, go to the ‘Insert’ tab, select ‘Picture,’ and choose the image from your computer.
Step 3: Resize and crop
Click on the image to reveal the Format tab. You can resize and crop the image to fit your slide correctly. Use cropping to focus on the key elements.
Step 4: Adjust brightness and contrast

Under the Format tab, click on the ‘Corrections’ button. Tweak brightness and contrast to enhance visibility and make the image pop.
Step 5: Apply styles
Explore various Picture Styles from the Format tab to add effects such as shadows, borders, or reflections for a more polished look.
Step 6: Compress images
If your presentation file size is a concern, use PowerPoint’s image compression feature to reduce the image size while maintaining quality.
Step 7: Arrange and layer

Use the ‘Arrange’ options to layer images, align them with other elements, or group them with other objects on the slide.
Step 8: Add alt text

For accessibility, don’t forget to add alternative text to describe the image.
Step 9: Animate (if needed)

If animation suits your presentation, use PowerPoint’s animation tools to introduce pictures in an engaging manner.
Step 10: Preview and test
Always preview your slides to ensure the images appear as intended, especially if you share your presentation on different devices.
Why Do You Need To Format Pictures and Not Just the Text?
While text is essential for conveying information, adequately formatted pictures are equally critical for enhancing your content’s visual appeal, clarity, engagement, and impact.
Several factors make it necessary to format pictures while creating visual materials, such as presentations, documents, or graphics:

- Visual Appeal: Properly formatted images enhance engagement and memorability.
- Complementary Visuals: Formatted images reinforce your message effectively.
- Clarity: Sizing, alignment, and cropping ensure clear understanding.
- Consistency: Uniform formatting maintains a professional look.
- Emphasis and Hierarchy: Visual formatting emphasizes key points.
- Accessibility: Alt text and captions aid those with disabilities.
- Impact: Striking images engage and evoke emotions.
- Brand Identity: Proper formatting aligns with your brand style.
How To Change the Format of a Picture in PowerPoint?
Formatting a picture in PowerPoint is a simple yet valuable skill for improving your presentations. Here’s how you can do it:

Insert & Select the Picture: Follow the instructions in this blog to insert your image into the slide you’re working on. Then, select the picture by clicking on it, and small white boxes or circles called ‘handles’ appear around the image.

Format Tab: A ‘Format’ tab will appear in the PowerPoint ribbon at the top once your picture is selected. Click on it. You can access the ‘Picture Styles’ group to apply preset picture formats here. For further customizations, explore the ‘Picture Effects Options’ and ‘Picture Border Options’ to tailor your image to your requirements.
Common Image Formatting Features in PowerPoint
PowerPoint provides various image formatting features to help you enhance the visual appeal of your presentations. These image formatting features in PowerPoint allow you to manipulate and enhance images within your presentations.
Here are the twenty most common image formatting features in PowerPoint:
- Crop: You can crop images to remove unwanted portions, focus on a specific area, or change the aspect ratio.
- Resize: Adjust the size of images to fit them within your slides or to create a specific visual impact.
- Rotate and Flip: Image rotation options include clockwise, counterclockwise, and horizontal or vertical flipping.
- Brightness and Contrast: Images’ brightness and contrast can be changed to enhance visibility or reflect a certain mood.
- Color Corrections: You can adjust the color temperature, saturation, and tone of images to correct or enhance their appearance.
- Artistic Effects: Apply artistic effects like watercolor, pencil sketch, or paint strokes to images to create unique visuals.
- Shadow and Reflection: Add shadows or reflections to images to make them appear three-dimensional and add depth.

- Glow and Soft Edges: Apply a soft glow or an edge effect to images for a softer, more highlighted appearance.
- Transparency: Adjust the transparency of an image, making it semi-opaque to overlay it with other elements or achieve a specific visual effect.

- Image Borders: Add borders to images, adjusting the color, thickness, and style of the border.
- Compress Images: Reduce the file size of your presentation by compressing images without significantly affecting their quality.
- Replace Image: Easily swap one image for another while retaining the same formatting applied to the original image.
- Remove Background: Remove the background of a picture using the ‘Remove Background’ tool, preserving only the main subject.
- Picture Styles: To polish your photographs, use pre-defined picture styles like bevels, gradients, or 3D effects.
- Image Alignment: Align images precisely on your slides using alignment and distribution tools.
- Image Order: Change the layering order of images to bring some forward or send them backward relative to other objects on the slide.
- Grouping: Group multiple images together to move or format them as a single unit, preserving their relative positions.
- Image Effects: Add various artistic and visual effects to images, like reflections, glows, and soft edges, to make them visually appealing.
- Image Compression: Reduce the file size of your presentation by compressing images while maintaining their quality.
- Image Cropping Aspect Ratio: Maintain the aspect ratio when cropping images to ensure they stay proportional.
How To Format a Picture as a Background in PowerPoint?
Formatting a picture as a background in PowerPoint can give your slides a unique and visually appealing look. This is especially useful for creating themed presentations or incorporating branding elements into your slides.
Unsure how to format the background of a slide in PowerPoint with a picture? Here’s how to do it:

Insert the Picture: Refer to the instructions provided earlier.
Position and Resize: You must adjust the image’s size and position once inserted. Click on the image, drag the corners to resize it, and use the center handle to move it around until it covers the entire slide.
Send to Back: To make the picture the background, it should be placed behind other slide elements (text, shapes, etc.). Select the picture and choose ‘Send Backwards’ or ‘Send to Back.’
Adjust Brightness and Contrast: If you want to make your slide’s text and other elements more visible, you might have to alter how bright or dark your picture is. Select your picture, click the ‘Format’ tab, and choose ‘Corrections’.
Set Transparency: Changing the image’s transparency can make it look understated. Select the image, go to the ‘Format’ tab, and move the ‘Transparency’ slider to get the desired effect.
Lock the Background: Right-click on the image and choose ‘Lock Anchor’ to avoid the background image being unintentionally moved or edited.
Apply to All Slides: If you want the same background image on all your slides, right-click on the image and select ‘Apply to All Slides’ to ensure it’s consistent throughout your presentation.
How To Cite a Picture in APA Format in a PowerPoint?
To cite a picture in APA format within a PowerPoint presentation, include an in-text citation and a corresponding reference in the slide notes or a separate reference slide.
- In-Text Citation: Add the photographer’s or designer’s last name and the year of publication in parentheses after using the image (e.g., Smith, 2022).
- Reference Slide or Notes: Create a slide titled ‘References.’ Here, make a bulleted list of the full citations for the images used, including titles, sources, publication dates, and URLs, if applicable.
Images are not just decorative elements; they play a pivotal role in engaging your audience with impactful presentations. Proper formatting ensures they align with your content, maintain visual appeal, and contribute to the overall professionalism of your presentation.
While formatting can take you only so far and with much extra effort, AI can do all the heavy lifting within seconds. So, if you need to make a presentation with stunning images and formatting, use SlidesAI to create AI presentations that win over your audience and leave them in awe.
SlidesAI is an add-on tool for Google Slides, leveraging the prowess of AI to deliver stunning presentations. Users can simply create compelling slides by adding text prompts to this tool and getting results; it is that easy.
Check out SlidesAI now to simplify your journey!
What is the best format for pictures in PowerPoint?
The best picture format in PowerPoint is typically JPEG (Joint Photographic Experts Group) or PNG (Portable Network Graphics) for high-quality images, as these formats balance quality and file size.
Where is the picture format tool in PowerPoint?
The picture format tool in PowerPoint is found in the ‘Format’ tab, which appears when you select an image on your slide.
How do I get picture format suggestions in PowerPoint?
To get picture format suggestions in PowerPoint, select the image, go to the ‘Format’ tab, and click ‘Design Ideas’ on the right-hand side of the ribbon to access a variety of formatting suggestions.
Frequently Asked Questions
The picture format tool in PowerPoint is found in the 'Format' tab, which appears when you select an image on your slide.
To get picture format suggestions in PowerPoint, select the image, go to the 'Format' tab, and click 'Design Ideas' on the right-hand side of the ribbon to access a variety of formatting suggestions.
Save Time and Effortlessly Create Presentations with SlidesAI

How To Insert Picture In PowerPoint [A Comprehensive Guide]
By: Author Shrot Katewa
![How To Insert Picture In PowerPoint [A Comprehensive Guide]](https://artofpresentations.com/wp-content/uploads/2022/11/Featured-Image-How-to-Insert-Picture-in-Powerpoint.webp "what is powerpoint picture presentation")
When I am in a conference hall, and the speaker is presenting a PowerPoint to the audience, the first thing that catches my eye is the pictures in the presentation. Pictures are a wonderful way of representing information in an engaging and creative manner. They bring life to an otherwise dull text-heavy presentation.
But, how do you insert pictures in PowerPoint?
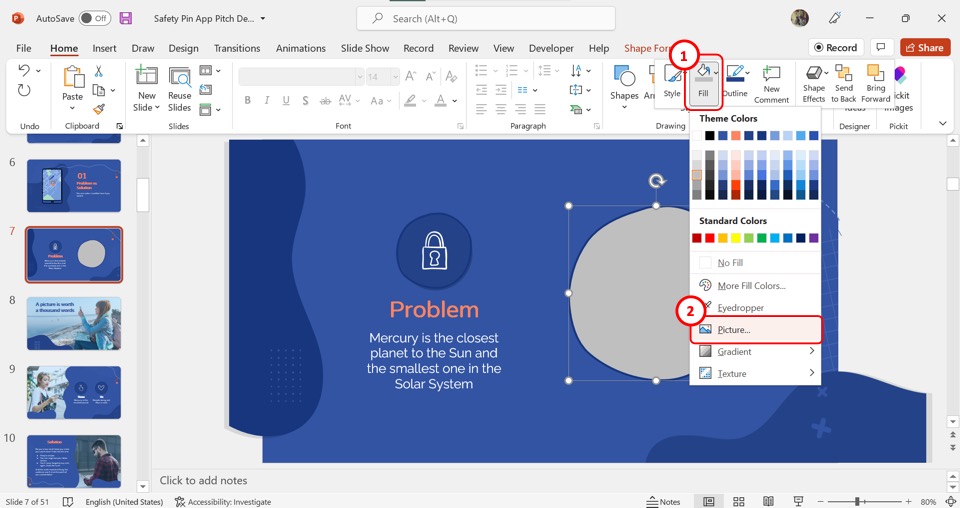
To insert a picture into a presentation, first go to the slide where the picture will be added. Then select the “Insert tab”, click on “Pictures”, and “Source of the picture”. Choose the picture you want, either from the Internet, Stock images, or from the computer. Finally, click Open (or OK), and the picture will be inserted.
There are many other ways to add in a picture into your presentation. In this article, we shall cover all the different ways to insert a picture in PowerPoint. Plus, I’ll also share a few pro-tips to help you add text with the picture to your slide.
So, let’s get started!
1. How to Add Pictures in PowerPoint?
In Microsoft PowerPoint, you can add pictures and any other object using the “Insert” tab. The “Insert” tab includes features that allow you to insert a picture from different sources like your device, a camera, a cloud drive, the internet, etc.
1.1 How to Insert Picture from Computer in PowerPoint?
To insert a picture into a PowerPoint slide, you have to use the “This Device” option in the “Insert Picture From” list. You can also use the keyboard shortcuts to quickly add a picture to a PowerPoint presentation.
1.1a Method 1 – Using the Insert Tab
The “Insert” tab is the third tab in the menu ribbon in Microsoft PowerPoint. To add a picture to a slide using the “Insert” tab, follow the 3 simple steps.
Step-1: Click on the “Insert” tab
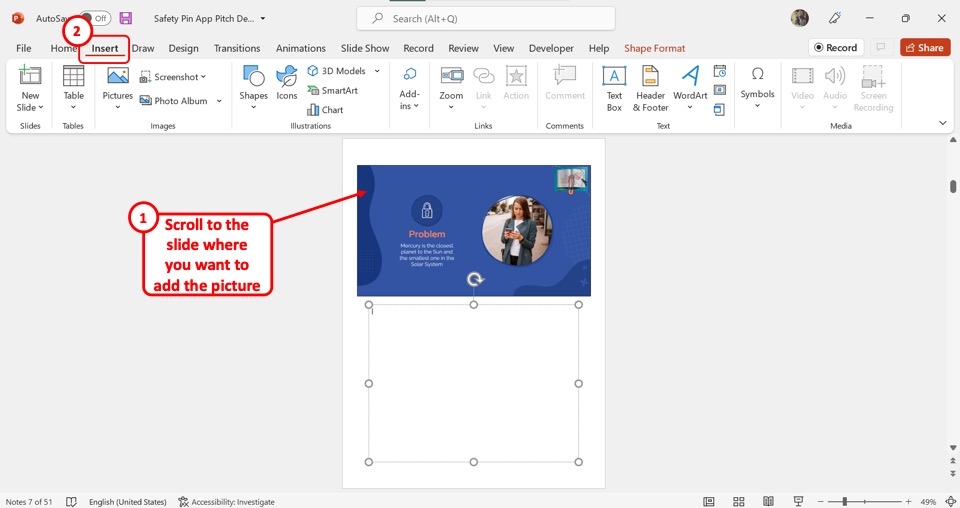
The first step is to open the slide where you want to add the picture. Then click on the “Insert” tab in the menu ribbon located at the top of the screen.
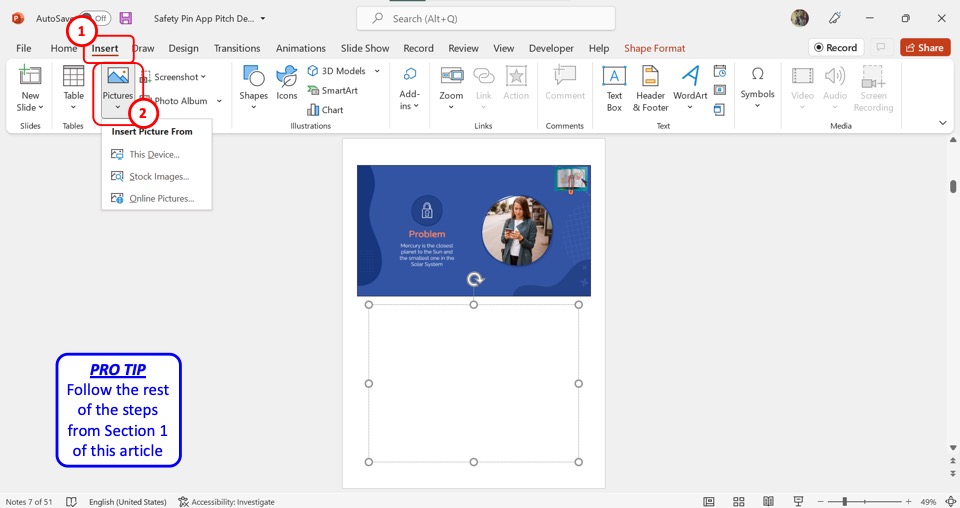
Step-2: Click on the “Pictures” option
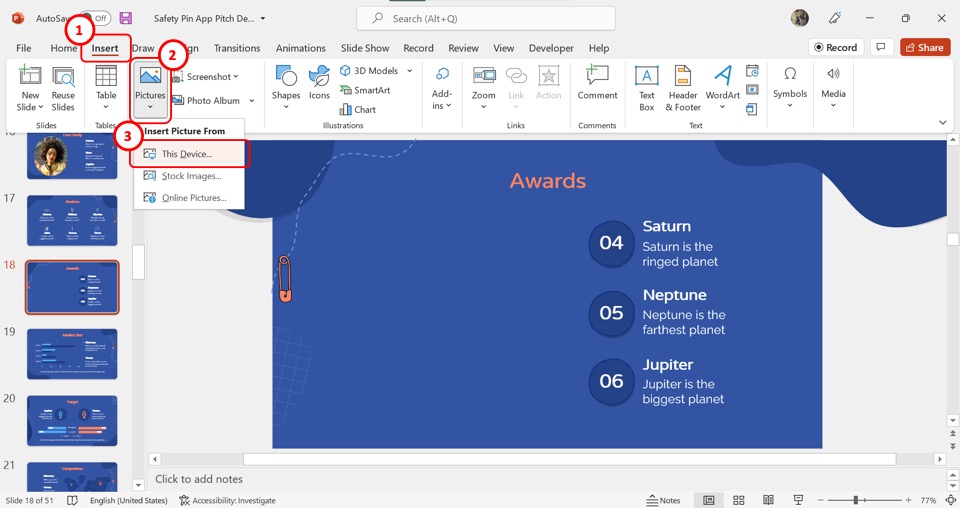
The next step is to click on the “Pictures” option in the “Images” group of the “Insert” menu. Then click on the “This Device” option from the dropdown menu under the “Pictures” option.
Step-3: Click on the “Open” button
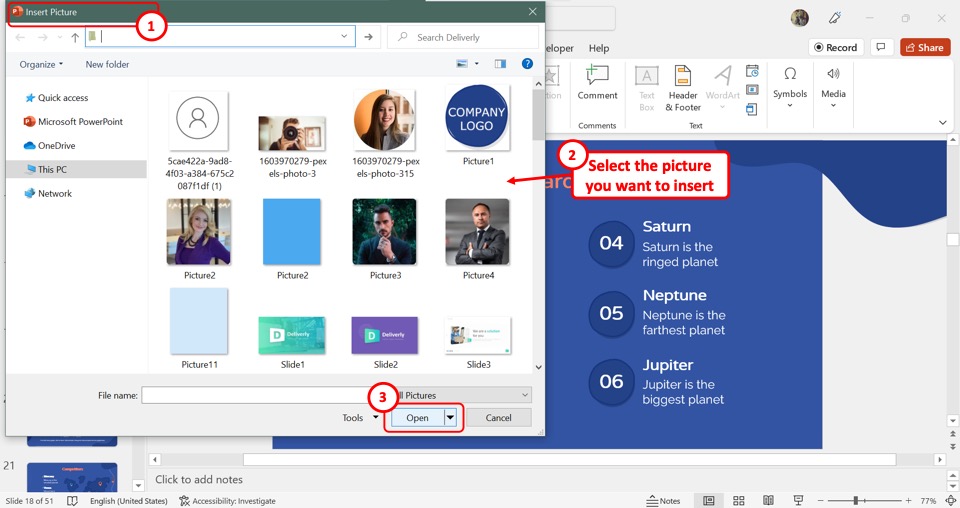
In the “Insert Picture” dialog, browse for the picture on your computer. Then select the picture and click on the “Open” button at the bottom of the dialog box to insert the picture into the open slide.
1.1b Method 2 – Using Drag and Drop
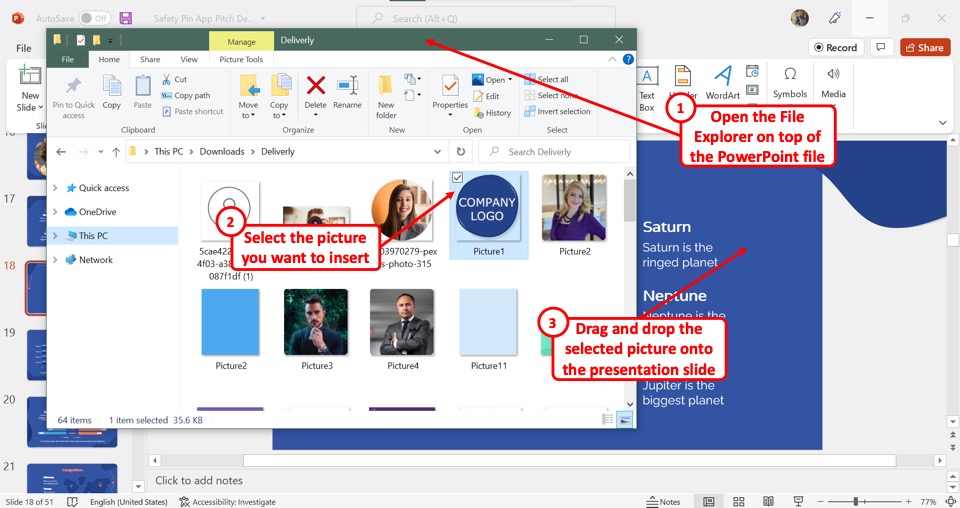
To use the “Drag and Drop” method, you have to open the “File Explorer” window over the PowerPoint file. In the window, look for the picture that you want to insert into the presentation slide. Then all you have to do is click on the picture in the “File Explorer” window and drag it to the presentation slide and drop it there.
1.2 Shortcut to Insert Picture in PowerPoint?
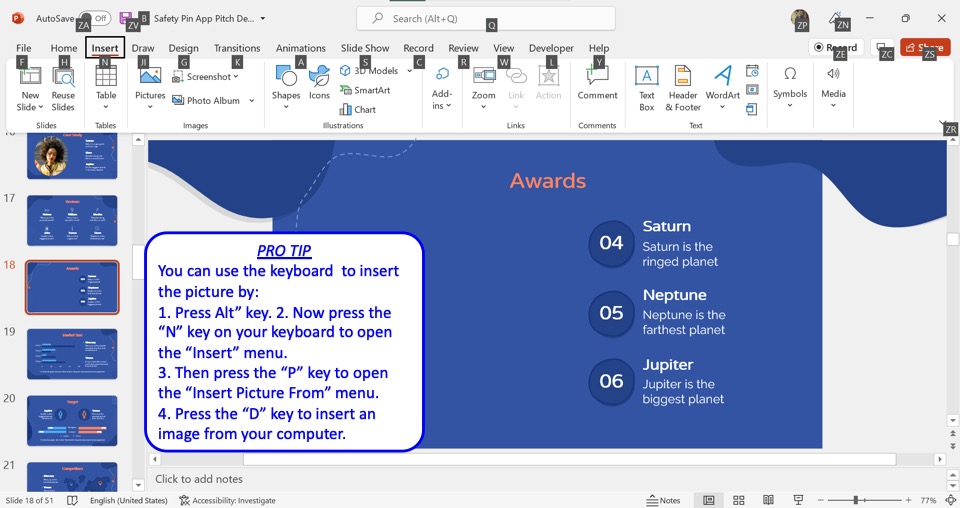
Microsoft PowerPoint allows you to insert a picture into your slide using only the keyboard. To use the keyboard shortcuts, you have to first press the “Alt” key.
The keyboard shortcut for each option in the menu ribbon will now be visible on the screen. Now press the “N” key on your keyboard to open the “Insert” menu. In the “Insert” menu, press the “P” key to open the “Insert Picture From” dropdown menu.
Press the “D” key to insert an image from your computer. You can also press the “S” key for stock images and the “O” key for online pictures.
1.3 How to Insert Online Pictures in PowerPoint?
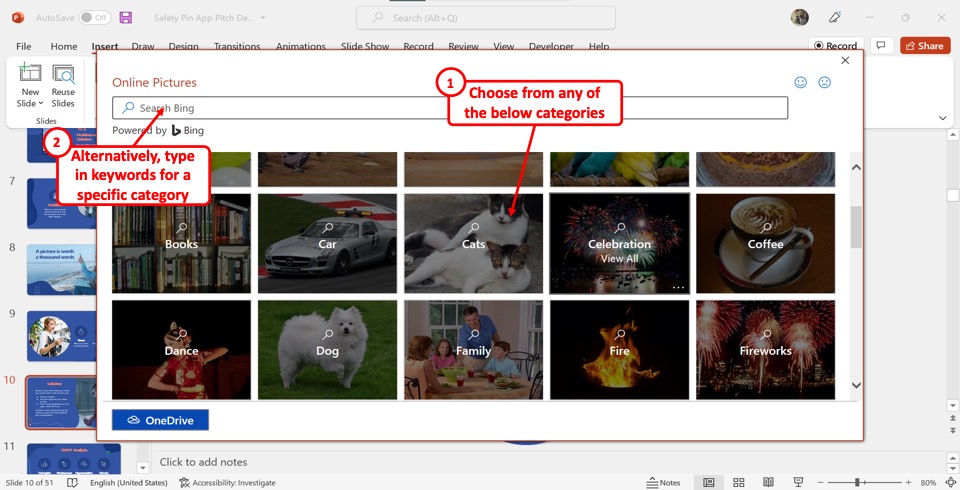
The “Online Pictures” option in PowerPoint allows you to insert a picture from the internet into your slide using the Bing search engine. To add a picture from the web to PowerPoint, follow the 5 easy steps.
You have to first open the “Insert” menu. To do so, click on the “Insert” tab in the menu ribbon located at the top of the screen.
Step-2: Click on the “Online Pictures” option
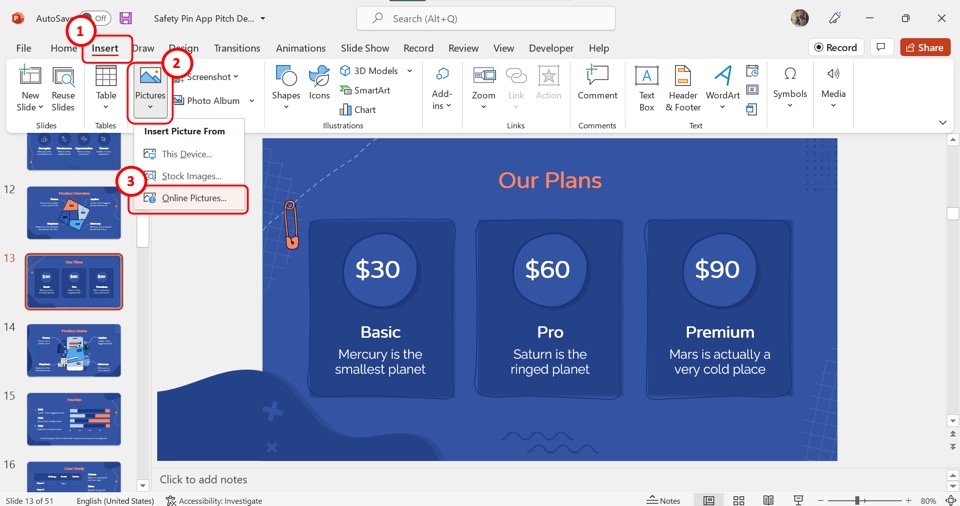
In the “Images” group of the “Insert” menu, click on the “Pictures” button. Then click on the “Online Pictures” option from the dropdown menu under the “Pictures” option.
Step-3: Click on the search bar

Now you have to click on the search bar at the top of the “Online Pictures” dialog box and type in what you are looking for. You can also select a preferred category from the dialog box.
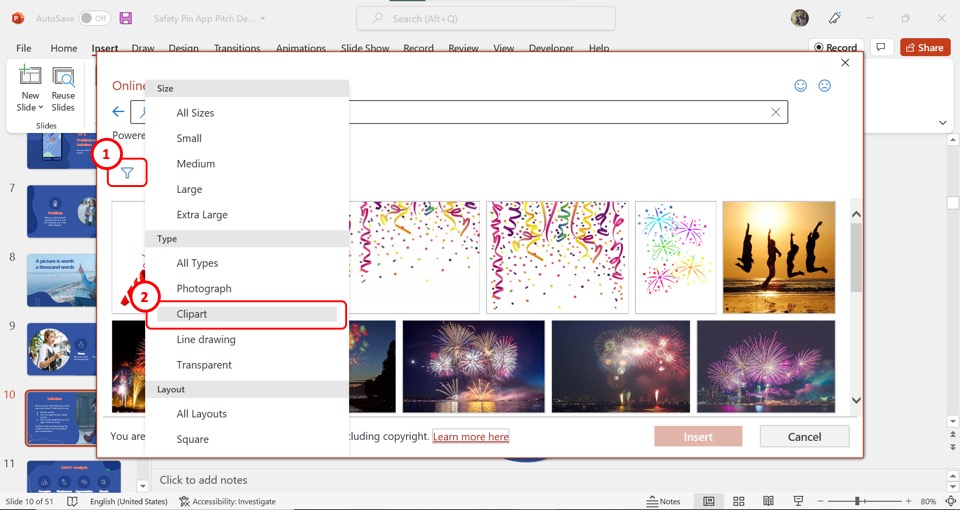
Step-4: Click on the “Filter” option
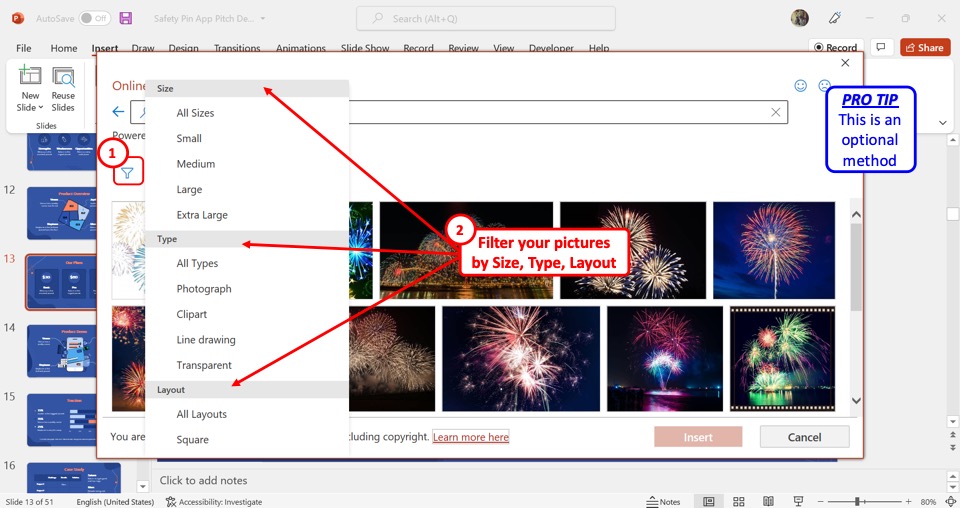
The next step is optional. You can click on the “Filter” icon which looks like a funnel under the search bar. In the “Filter” dropdown menu, you can select the size, type, and layout of the online picture.
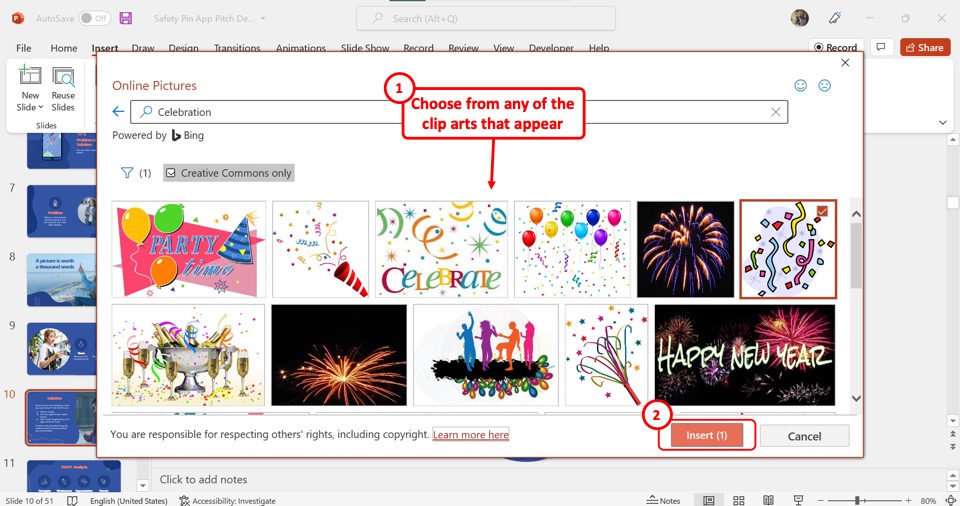
Step-5: Click on the “Insert” button
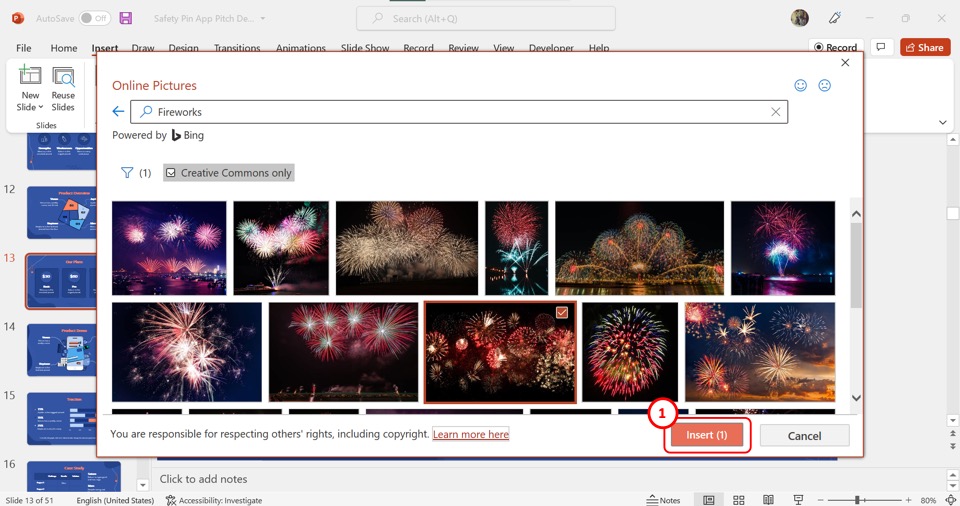
Finally, you have to click on one or more pictures that you want to add to the slide. Then click on the “Insert” button at the bottom of the dialog box.
1.4 How to Insert Image Using Photo Browser in PowerPoint?
The “Photo Browser” option in Office helps you browse through the photos on your Mac device. This option is only available in Microsoft PowerPoint for Mac. To insert an image from iPhoto or Photo Booth using the “Photo Browser” , follow the 2 quick steps.
Step-1: Click on the “Photo Browser” option
The first step is to open the slide where you want to add the picture. Then click on the “Picture” option in the “Insert” menu and select the “Photo Browser” option under the “Picture” option.
Step-2: Select your preferred image
In the dialog box, you have to now browse to the picture that you want to add to the PowerPoint slide. Then all you have to do is drag the picture onto the slide.
1.5 How to Add Image From Your Phone to Your PowerPoint Presentation?
When you take a photo on your iPhone, you can add it to your PowerPoint presentation using the PowerPoint for Mac. You have to first save the picture to iCloud Drive. Then follow the 2 simple steps.
Step-1: Click on the “Picture From File” option
The first step is to open the slide where you want to insert the image. In the “Insert” menu, hover your pointer over the “Picture” option. Then click on “Picture From File” .
Step-2: Click on the “Insert” button
In the dialog box, look for the picture in your iCloud that you want to insert and click on it. Then all you have to do is click on the “Insert” button to add it to the open PowerPoint slide.
1.6 How to Add Stock Images in PowerPoint?
Stock images are a gallery of free images available in PowerPoint. To insert a stock image into a PowerPoint slide, follow the 5 quick steps.
In the PowerPoint presentation, open the slide where you want to add the stock image. Then click on the “Insert” tab which is the third tab in the menu ribbon.
Step-2: Click on the “Stock Images” option
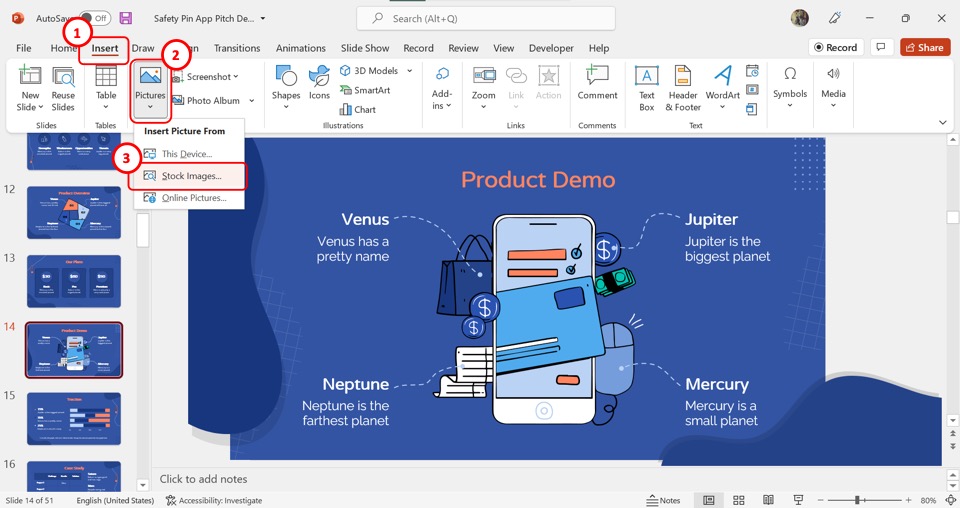
Now you have to click on the “Pictures” option in the “Images” group of the “Insert” menu. Then click on the “Stock Images” option from the dropdown menu. This will prompt a dialog box.
Step-3: Select your preferred category
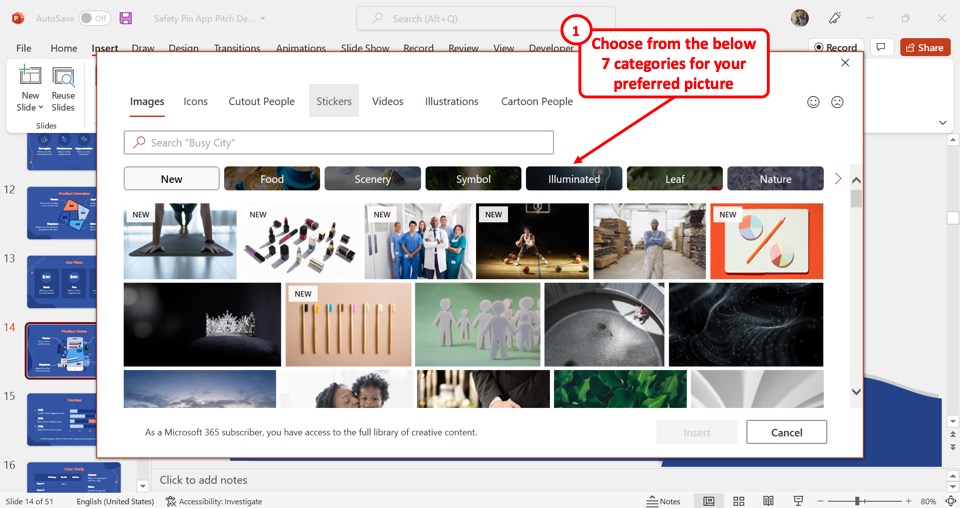
At the top of the dialog box, click on one of the seven categories of stock images available in PowerPoint.
Step-4: Click on the search bar
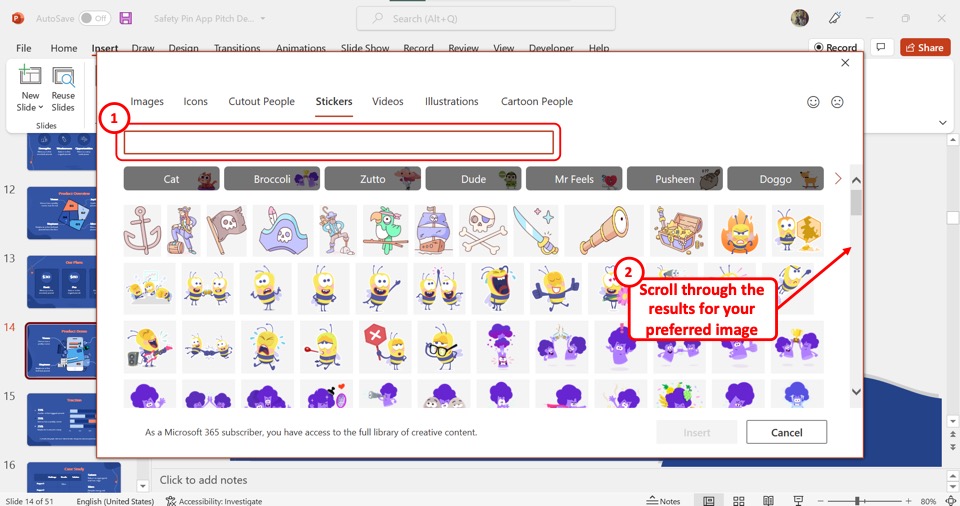
The next step is to click on the search bar and type in the keywords to search for a stock image. Then scroll through the images to select your preferred image.
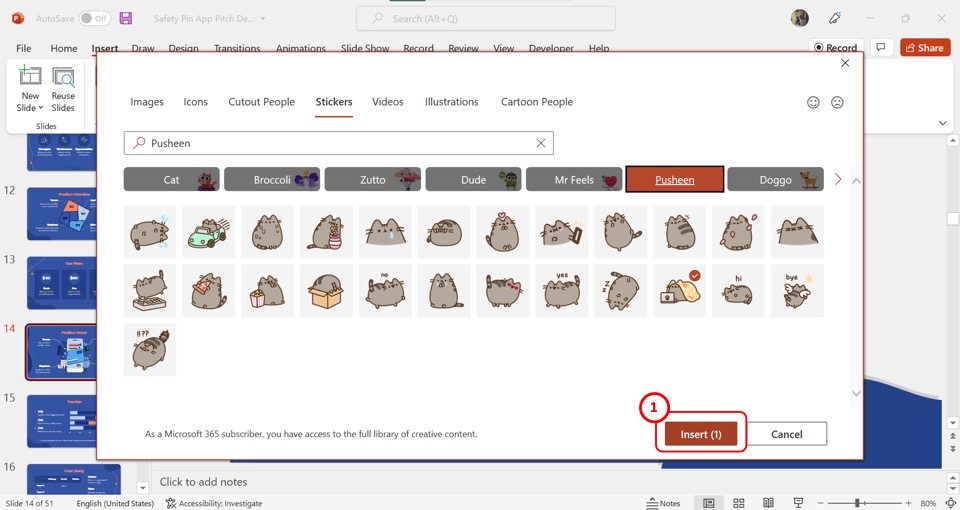
Now all you have to do is click on the “Insert” button at the bottom of the dialog box to add the selected stock image to the open slide.
1.7 How to Insert Picture in PowerPoint on Mobile?
In the PowerPoint app for Android devices, you can insert a picture directly from the camera on your mobile phone. All you have to do is follow the 3 easy steps.
Step-1: Tap on the “Insert” tab
You have to first open the slide where you want to add the picture. Then tap on the “Insert” tab in the floating ribbon on the bottom of the screen.
Step-2: Tap on the “Camera” option
In the “Insert” menu, tap on the “Pictures” option. Then tap on the “Camera” option under the “Pictures” option. This will open the camera app on your phone.
Step-3: Tap on the “Done” button
Now all you have to do is take a picture. If you are satisfied, tap the “Done” button at the bottom of the screen to insert the picture into the PowerPoint slide.
2. How to Insert Pictures On All Slides in PowerPoint?
Using the “Slide Master” feature in PowerPoint, you can insert a picture into all the slides of the presentation at once. To do so, follow the 5 simple steps.
Step-1: Click on the “Slide Master” option
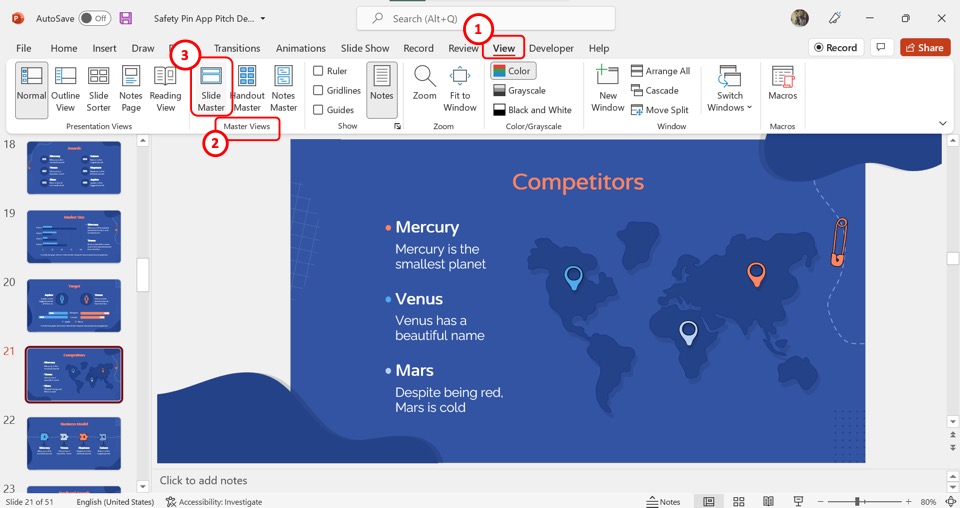
In the menu ribbon located at the top of the screen, click on the “View” tab. Then click on the “Slide Master” option in the “Master Views” group of the “View” menu.
Step-2: Click on the master slide
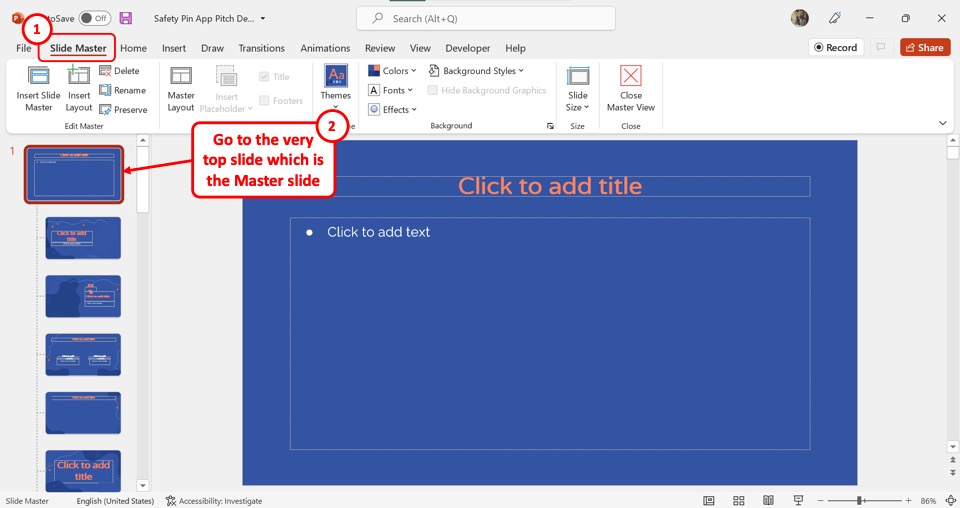
In the “Slide Master” view, you have to open the master slide. Scroll up in the slide layout pane on the left side of the screen and click on the slide at the very top. This is the master slide.
Step-3: Click on the “Pictures” option
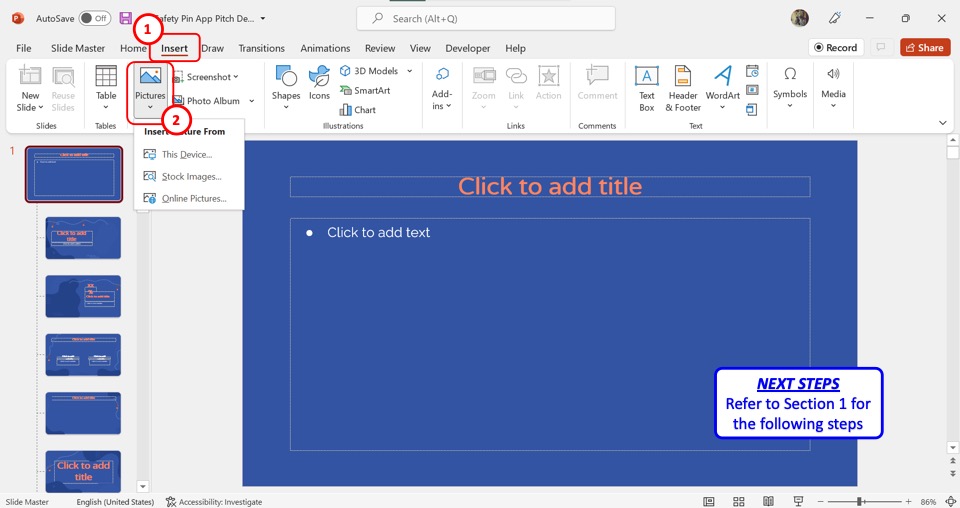
The next step is to insert the picture. Click on the “Insert” tab in the menu ribbon, and then click on the “Pictures” option in the “Insert” menu. Refer to section 1 for detailed steps on inserting images from different sources.
Step-4: Click on the “Picture Format” tab
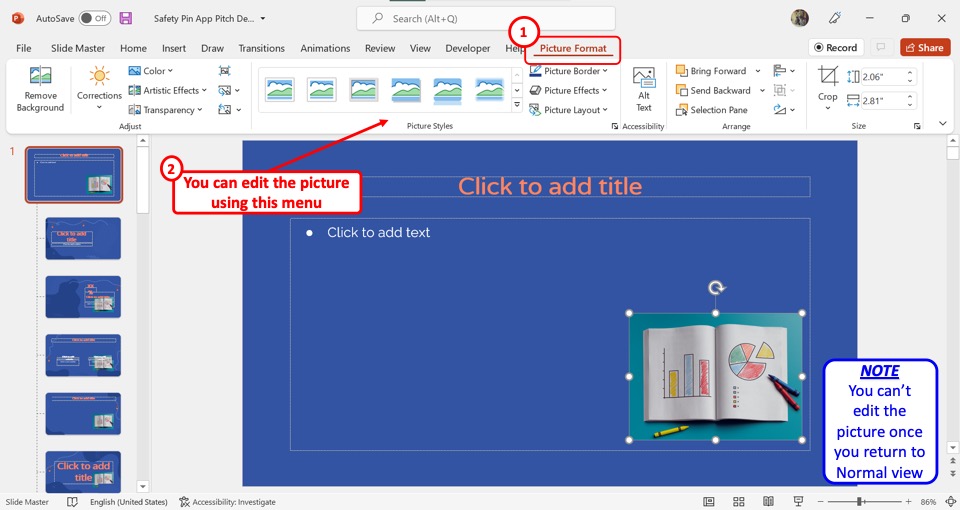
In the menu ribbon, you have to now click on the “Picture Format” tab. In the “Picture Format” menu, you can now edit, adjust, resize, and reposition the inserted picture. You cannot edit the picture in the master slide once you return to the “Normal” view.
Step-5: Click on the “Close Master View” button
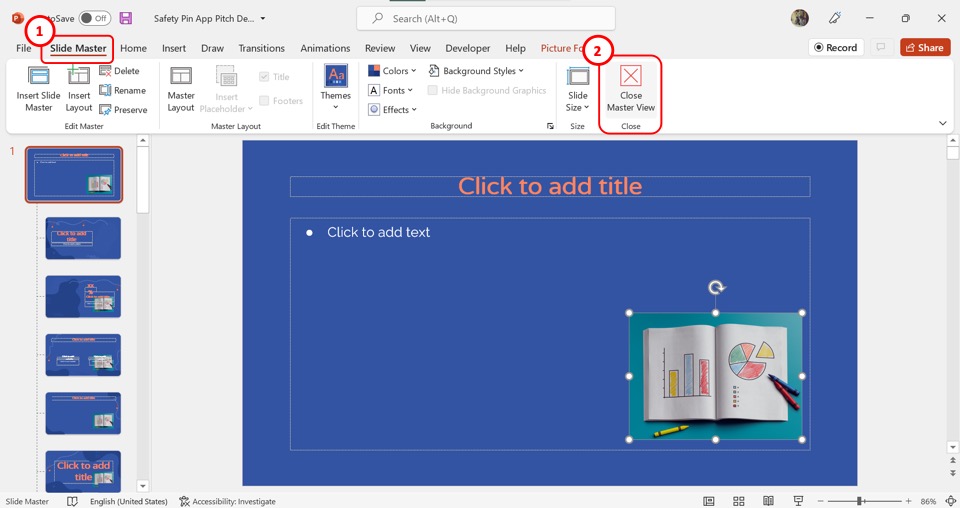
Once you have inserted and edited the picture, you can now return to the “Normal” view. All you have to do is click on the “Slide Master” tab. Then click on “Close Master View” in the “Slide Master” tab.
3. How to Insert Picture as Slide Background in PowerPoint?
In Microsoft PowerPoint, you can insert a picture into a slide as a background. All you have to do is follow the 4 easy steps.
Step-1: Click on the “Format Background” option
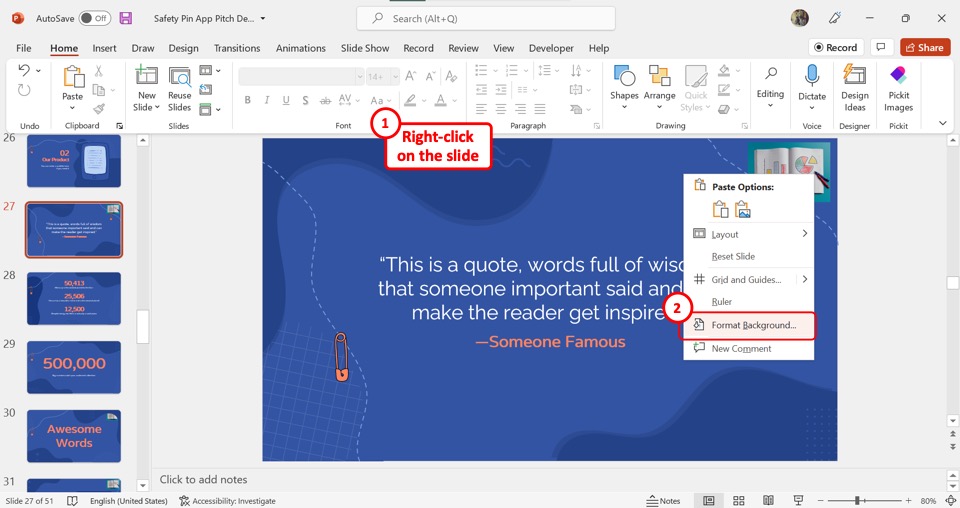
“Right Click” anywhere on the open slide. Then click on the “Format Background” option from the right-click menu.
Step-2: Click on the “Picture or texture fill” option

In the “Format Background” sidebar, click on the “Fill” option. Then click on the “Picture or texture fill” option under the “Fill” section.
Step-3: Click on the “Insert” button
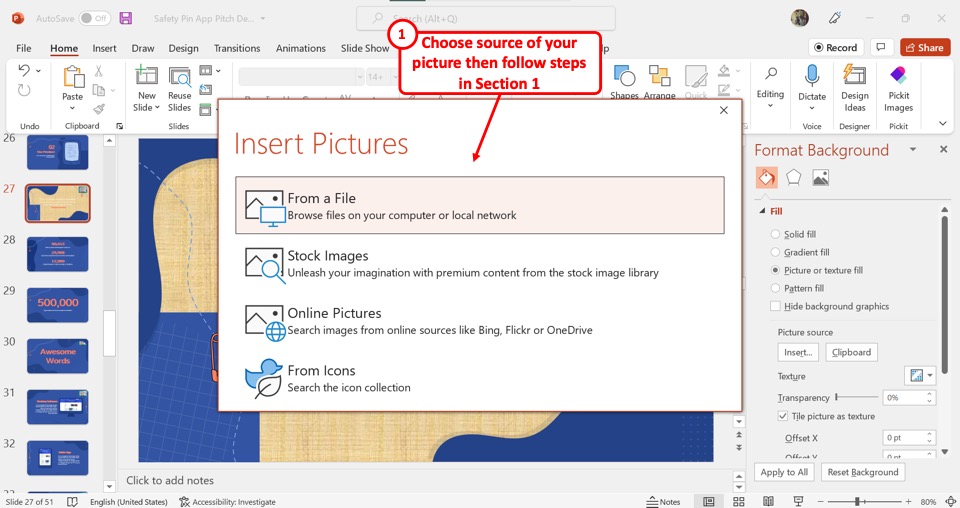
The next step is to click on the “Insert” button under the “Picture Source” option in the “Format Background” sidebar as shown in the previous picture. This will open the “Insert Pictures” dialog box.
Step-4: Insert a picture
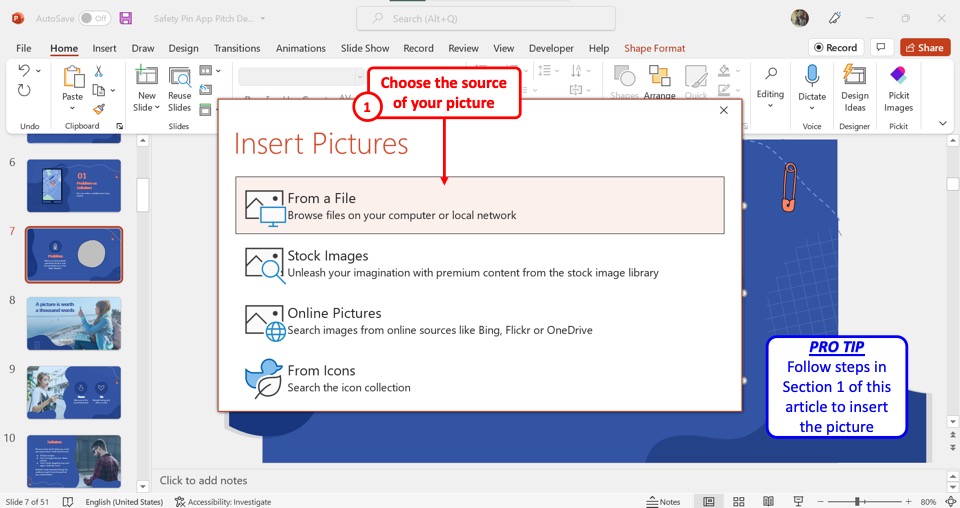
In the “Insert Pictures” dialog box, click on the source of the background picture. You can see the detailed steps for adding pictures from each source in section 1 .
4. How to Insert Image Placeholder in PowerPoint?
A picture placeholder in PowerPoint is a predesigned spot in a slide layout where you can add a picture. Check out my other article to learn more about placeholders in PowerPoint .
To insert an image placeholder, follow the 4 quick steps.

The first step is to click on the “View” tab in the menu ribbon. In the “View” menu, click on the “Slide Master” option.
Step-2: Click on the “Insert Placeholder” button
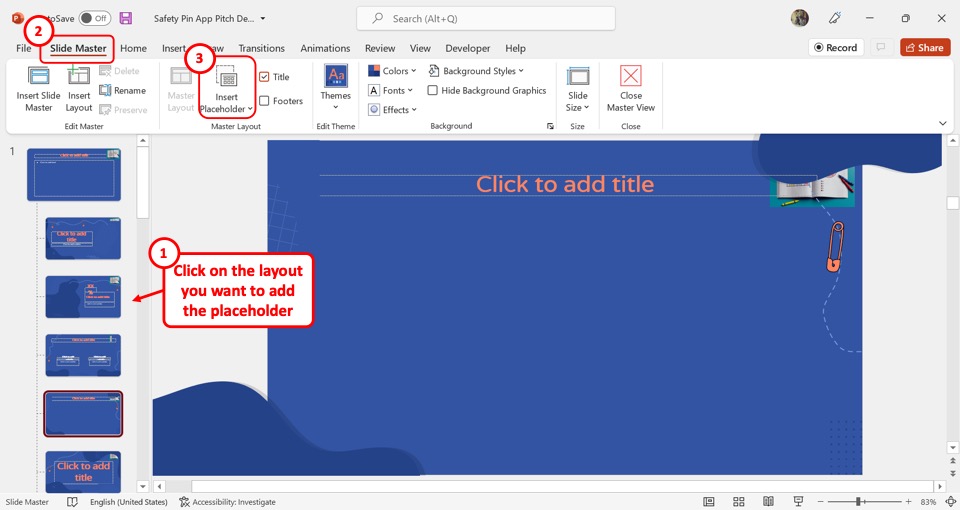
In the slide layout pane on the left side of the “Slide Master” screen, click on the layout where you want to add the placeholder. Then click on the “Insert Placeholder” option under the “Slide Master” tab.
Step-3: Click on the “Picture” option
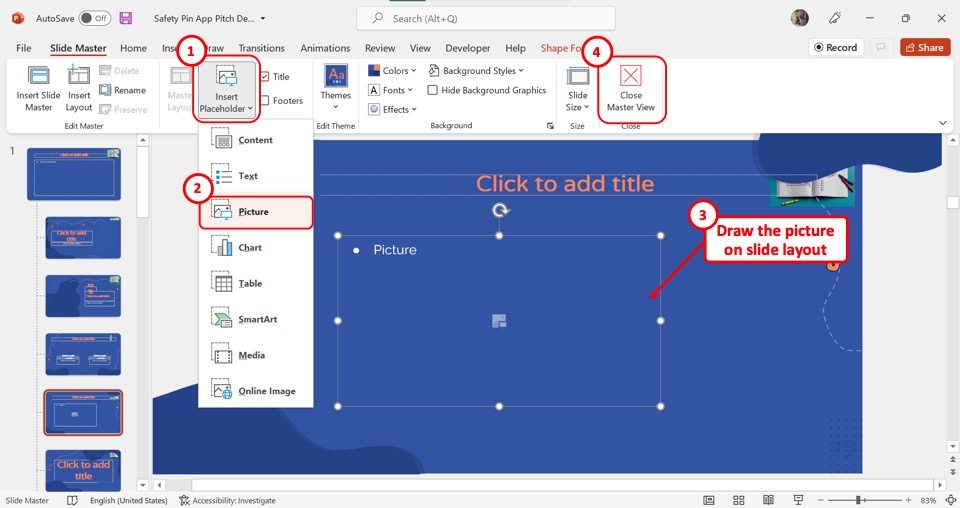
In the dropdown menu under the “Insert Placeholder” option, click on the “Picture” option. Then draw the picture placeholder on the slide layout
Step-4: Click on “Close Master View”
Finally, all you have to do is click on the “Close Master View” option to save the picture placeholder in the slide layout (as shown above).
5. How to Insert Picture in PowerPoint Without White Background?
When inserting a picture into a PowerPoint slide, you may want to remove the unnecessary white background in your picture. To learn about all the tools you can use to remove the background, you can read my article here . To remove the white background using the “Set Transparent Color” feature, follow the 4 simple steps.
Step-1: Insert a picture
The first step is to insert the picture with white background into the PowerPoint slide. Refer to section 1 for the detailed steps on inserting images from all sources.
Step-2: Click on the “Picture Format” tab
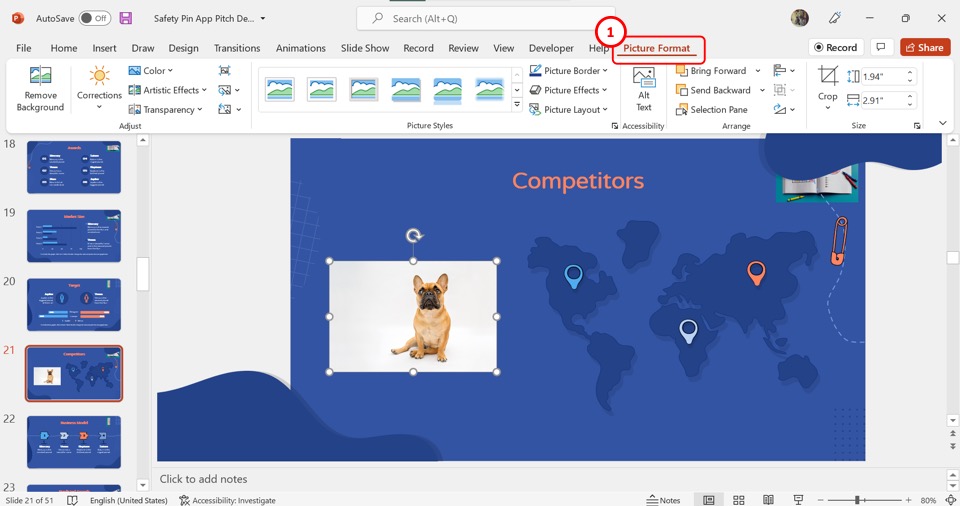
The next step is to click on the “Picture Format” tab in the menu ribbon located at the top of the screen.
Step-3: Click on the “Set Transparent Color” option
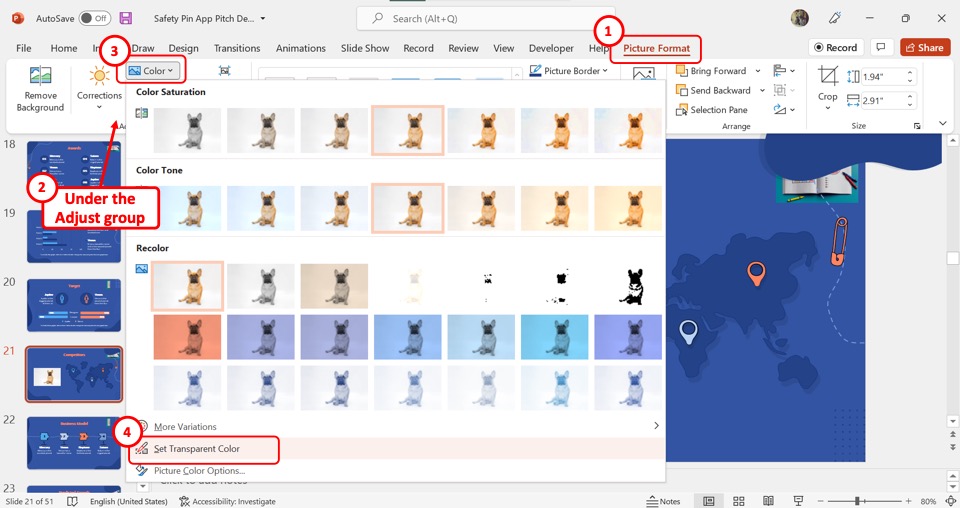
In the “Adjust” group of the “Picture Format” tab, click on the “Color” option. Then click on the “Set Transparent Color” option at the bottom of the dialog box under the “Color” option.
Step-4: Click on the white background
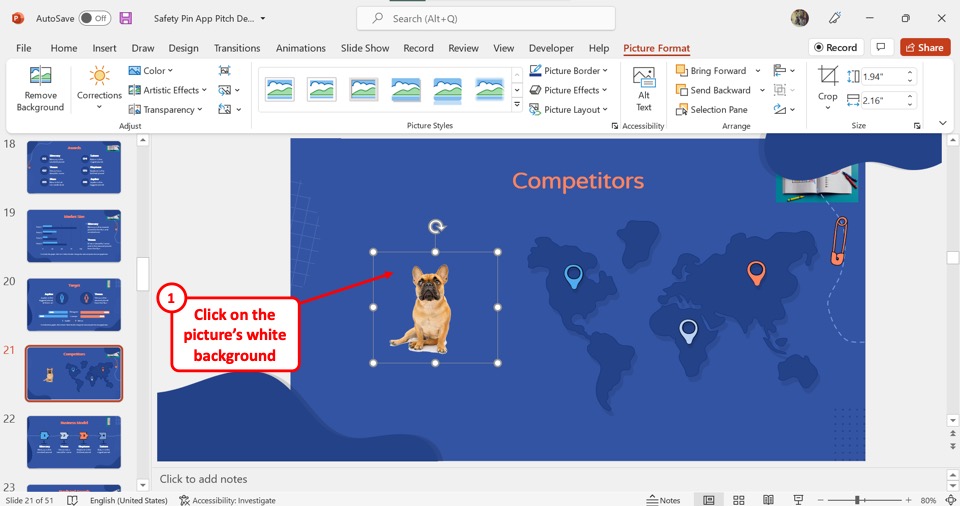
Now all you have to do is click on the white part of the selected image on the slide to remove the white background.
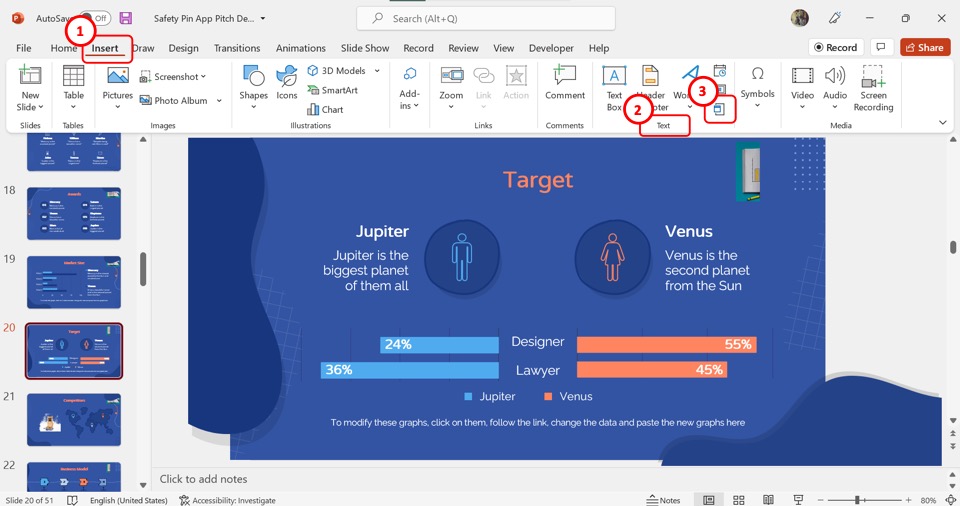
6. How to Insert Picture With Text in PowerPoint?
Once you have inserted a picture in PowerPoint, you can add text on top of it. To add text to an inserted picture, follow the 4 simple steps.
Step-1: Click on the “Text Box” option
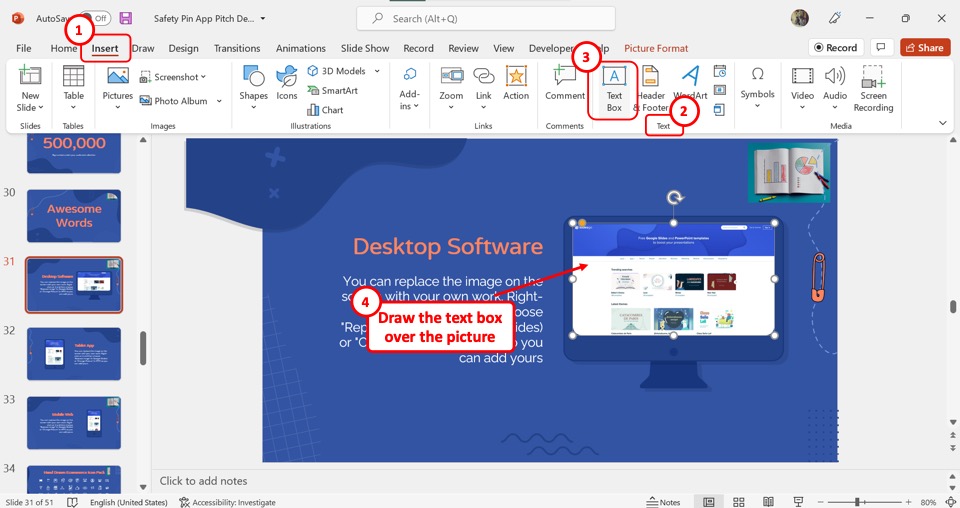
In the menu ribbon, click on the “Insert” tab. Then click on the “Text Box” option in the “Text” group of the “Insert” menu. Now you have to draw the text box over the inserted picture in the slide.
Step-2: Type in the text box
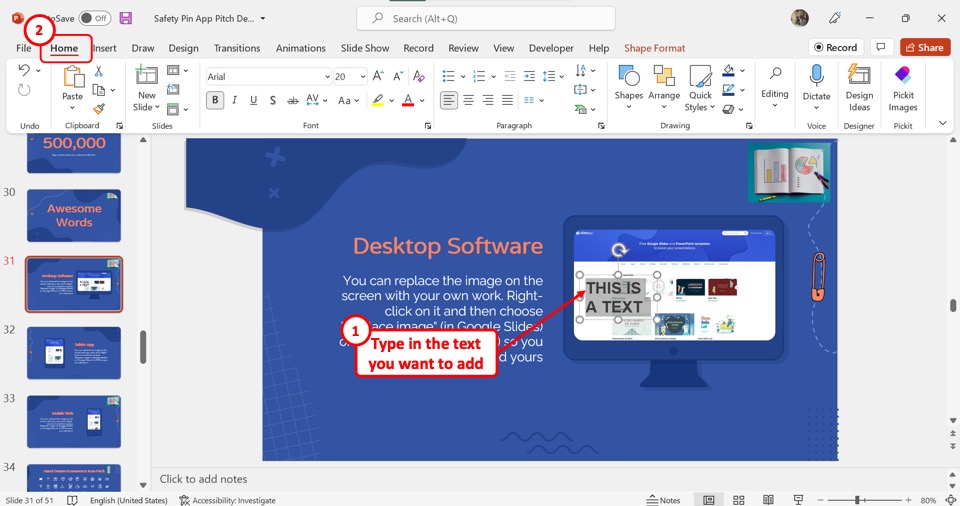
In the text box, you can now type in the text that you want to add to the picture. You can also edit the appearance of the text using the features available in the “Home” menu.
Step-3: Select the text box and the picture together
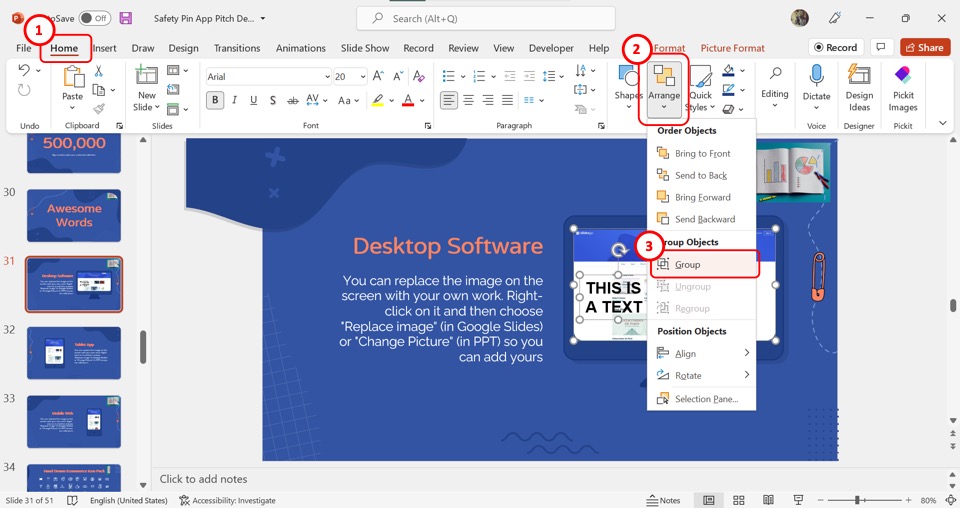
Now you have to select the text box and the picture together to group them. Press and hold the “Ctrl” key on your keyboard and click on the text box and then the picture to select them both.
Step-4: Click on the “Group” option
In the “Drawing” section of the “Home” tab, click on the “Arrange” button. Then click on the “Group” option in the dropdown menu to group the text with the inserted picture on the slide (as shown above).
7. How to Insert Picture in PowerPoint Notes?
In PowerPoint, you can add a picture to your speaker notes. All you have to do is follow the 3 quick steps.
Step-1: Click on the “Notes Page” option
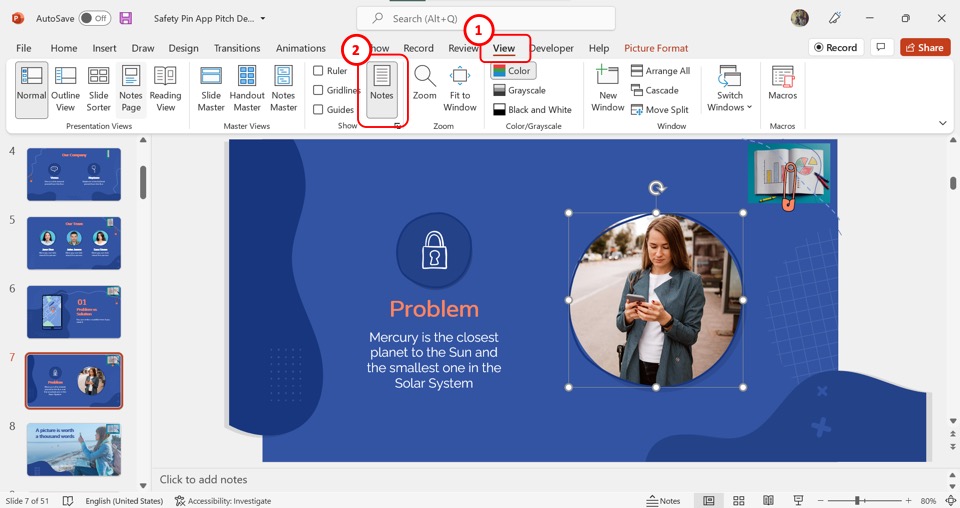
The first step is to click on the “View” tab in the menu ribbon. In the “View” menu, click on the “Notes Pages” option.
Step-2: Click on the “Insert” tab
In the “Notes Page” view, scroll through to open the slide note where you want to insert a picture. Then click on the “Insert” tab in the menu ribbon.
Step-3: Click on the “Pictures” option
In the “Images” section of the “Insert” tab, click on the “Pictures” option. Then select the picture source from the dropdown menu. You can find the detailed steps for inserting an image in section 1 .
8. How to Insert Clip Art in PowerPoint? [Link to Existing Article]
The clipart in PowerPoint is a collection of free images that you can use in your presentation slides. You can read about the detailed steps on inserting clipart in any version of PowerPoint in my article here.
To insert a clipart in PowerPoint using the “Online Pictures” option, follow the 5 simple steps.
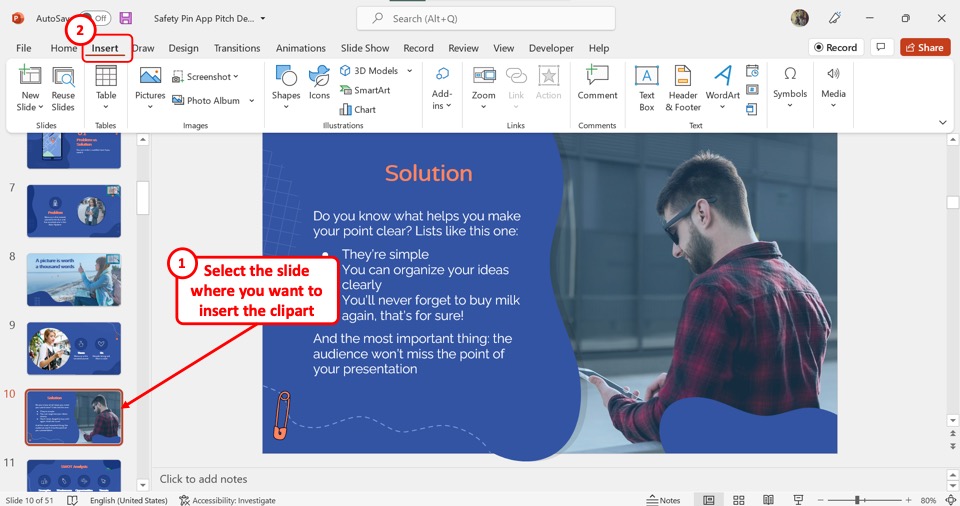
The first step is to open the slide where you want to insert the clipart. Then click on the “Insert” tab in the menu ribbon located at the top of the screen.
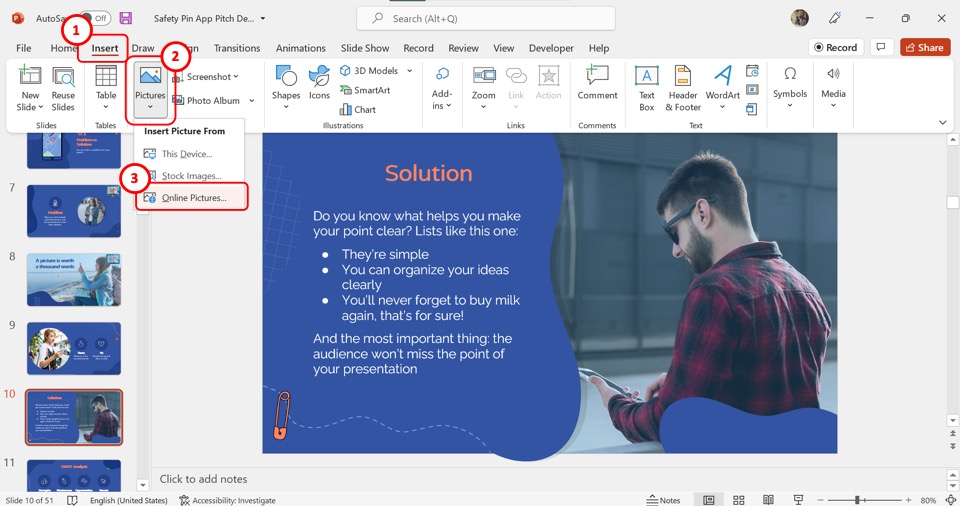
In the “Images” group of the “Insert” tab, click on the “Pictures” option. In the dropdown menu under the “Pictures” option, click on the “Online Pictures” option.
In the “Online Pictures” dialog box, you can now click on any of the available categories of the pictures. You can also click on the search bar at the top of the dialog box to search for a specific category.
Step-4: Click on the “Clipart” option
Now you have to click on the “Filter” option, which is the funnel icon under the search bar. In the “Filter” pop-up menu, click on the “Clipart” option under the “Types” section.
The final step is to select one or more cliparts from the “Online Pictures” dialog box to insert into the slide. Then all you have to do is click on the “Insert” button at the bottom of the dialog box.
9. How to Add Picture to a Shape in PowerPoint? [Link to Existing Article]
Microsoft PowerPoint allows you to add a picture to an existing shape inside a slide. You can read about the different methods for adding pictures to a shape in my other article. To insert a picture into a shape using the “Shape Fill” feature, follow the 3 easy steps.
Step-1: Click on the “Fill” option
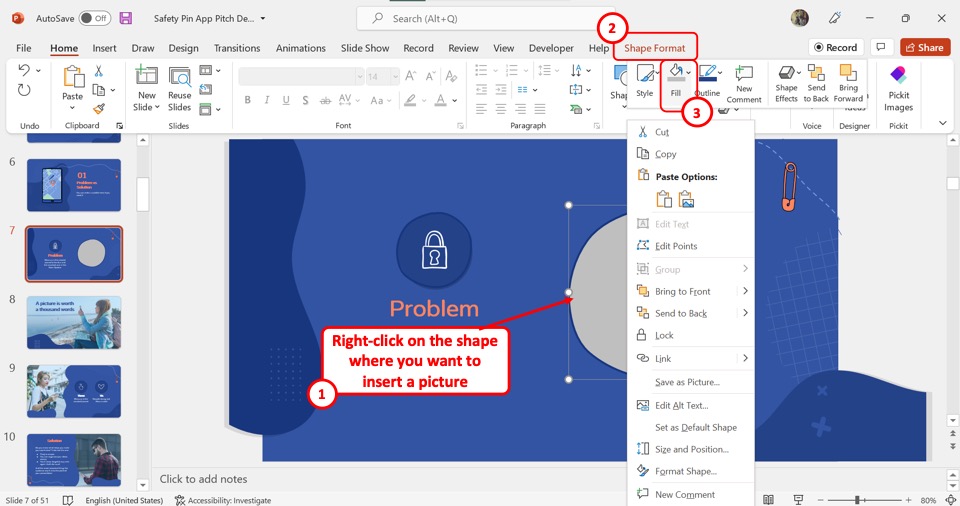
The first step is to “Right Click” on the shape where you want to insert the picture. From the Shape Format tab, in the pop-up menu, click on the “Fill” option.
Step-2: Click on the “Picture” option
In the dropdown menu under the “Fill” option, click on the “Pictures” option. This will open the “Insert Pictures” dialog box.
Step-3: Insert a picture
Now all you have to do is insert the picture into the selected shape. In the “Insert Pictures” dialog box, choose where you want to add the picture from. For the detailed steps for inserting pictures from any source, refer to section 1 .
10. How to Insert Round Picture in PowerPoint?
In Microsoft PowerPoint, you can add any shape to a picture. To insert a round picture, you have to first insert a picture following the steps detailed in section 1 . Then follow the 3 simple steps.
Step-1: Click on the “Picture Format” tab

Click on the picture that you want to add a round shape to. Then click on the “Picture Format” tab from the menu ribbon located at the top of the screen.
Step-2: Click on the “Crop to Shape” option
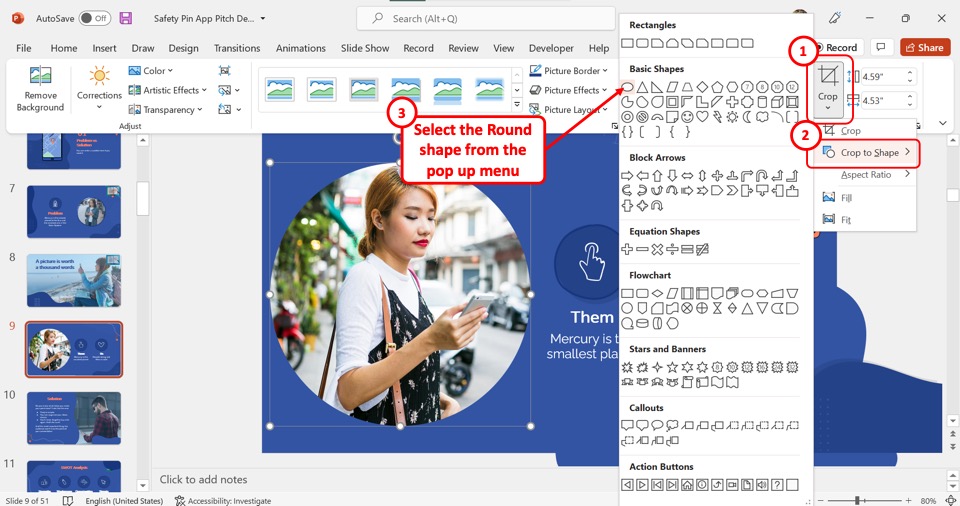
In the “Size” group of the “Picture Format” tab, click on the “Crop” option. In the dropdown menu under the “Crop” option, click on “Crop to Shape” . This will open a secondary menu containing a list of all the available shapes.
Step-3: Select the round shape
Finally, all you have to do is click on the round shape from the dropdown list to insert the picture into the round shape as shown in the image above.
11. How to Insert a Linked Picture in PowerPoint?
Microsoft PowerPoint offers the feature to insert a linked picture so that the inserted picture in the presentation can update automatically when it is edited outside the PowerPoint file. To insert a linked picture, follow the 3 easy steps.
Step-1: Click on the “Insert” tab
In the menu ribbon located at the top of the screen, click on the “Insert” tab.
Step-2: Click on the “This Device” option
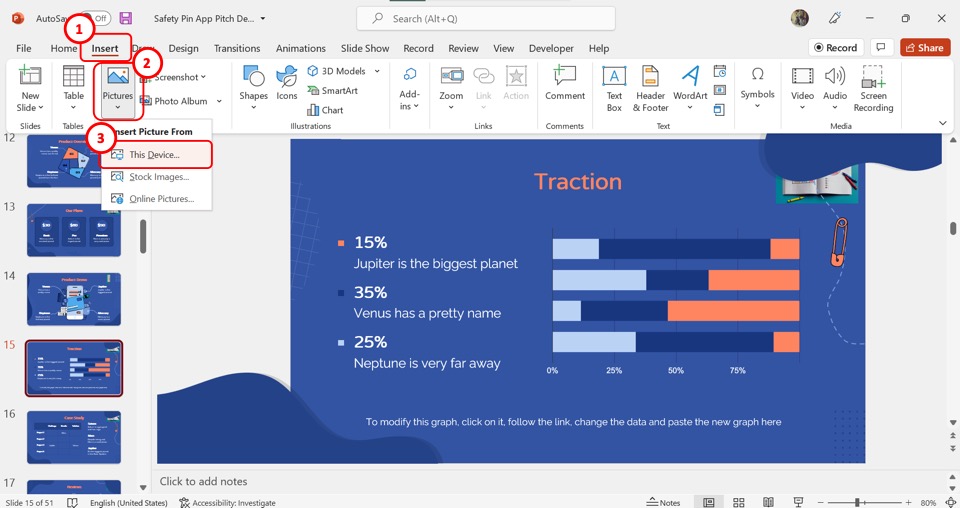
In the “Insert” menu, click on the “Pictures” option. Then click on the “This Device” option from the dropdown menu. You can insert a linked picture only from this option. (shown in the image above)
Step-3: Click on the “Insert and Link” option
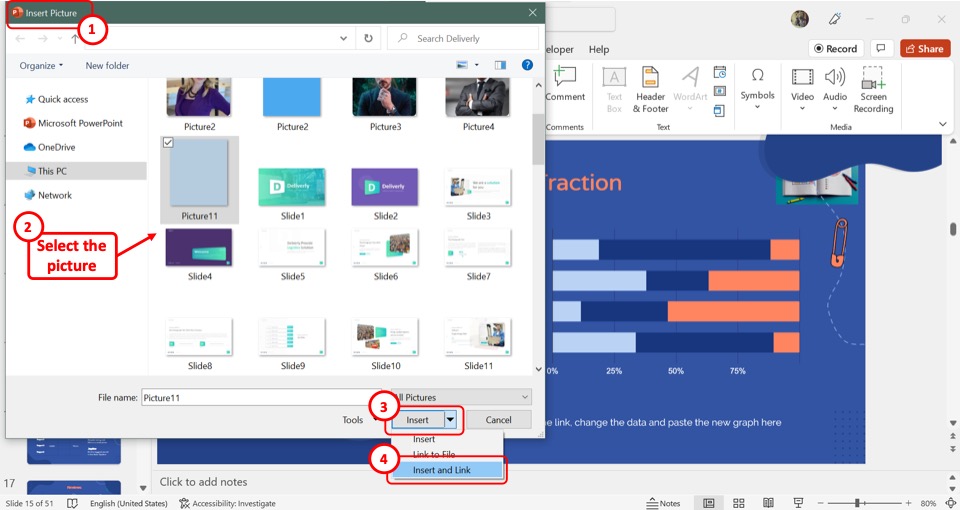
In the “Insert Picture” dialog, click on the picture that you want to add. Then click on the down arrow by the “Insert” button at the bottom of the dialog box. Click on the “Insert and Link” option from the dropdown list to insert the linked picture.
12. How to Insert a Screenshot in PowerPoint? [Link to Existing Article]
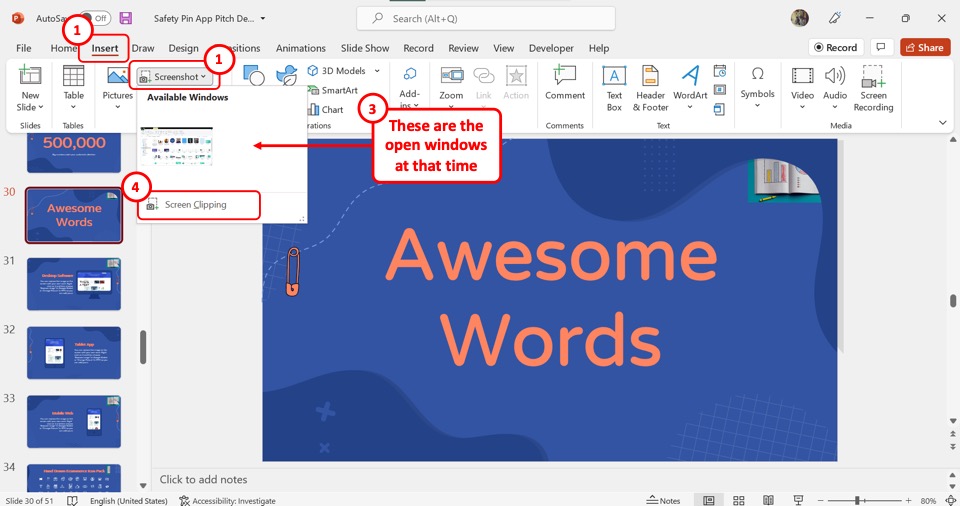
In PowerPoint, you can directly take and add a screenshot to a slide. To do so, you have to first click on the “Insert” tab in the menu ribbon. In the “Images” group of the “Insert” tab, click on the “Screenshot” option.
The “Available Windows” option allows you to take a screenshot of any of the open windows. You can use the “Screen Clipping” option to take a screenshot of the current screen. Read my article here to learn more about the “Screenshot” feature in PowerPoint.
13. Insert Image in a Table in PowerPoint
In Microsoft PowerPoint, you can insert an image inside a table. All you have to do is follow the 2 quick steps.
Step-1: Click inside a cell
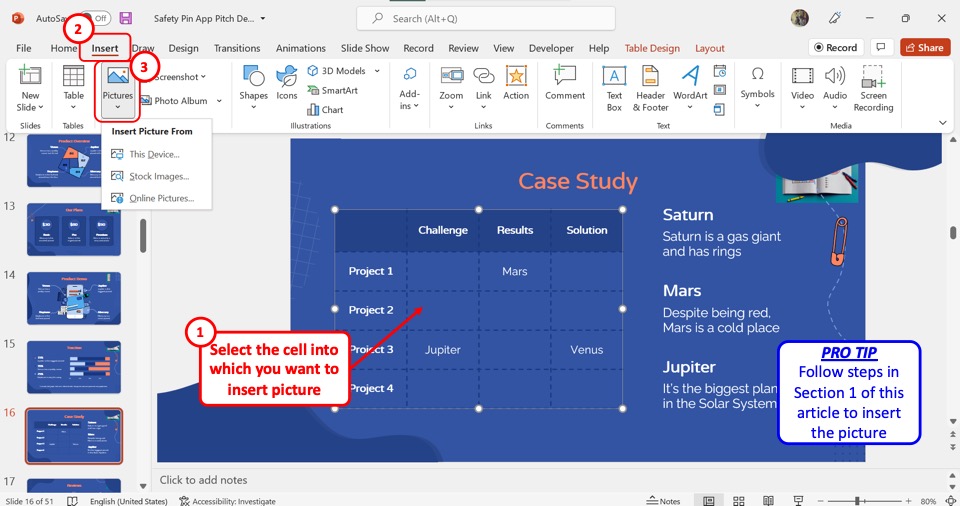
You have to insert the picture inside a single cell in a table. So the first step is to click on the cell where you want to insert the picture. Then click on the “Insert” tab in the menu ribbon.
Step-2: Click on the “Pictures” option
In the “Insert” menu, click on the “Pictures” option. Refer to section 1 for the detailed steps on inserting images from different sources into PowerPoint. (shown in the image above)
14. Unable to Insert Image in PowerPoint Error
If PowerPoint shows an error message when inserting an image into a slide, you can embed the picture into the slide instead. To do so, follow the 4 simple steps.
Step-1: Click on the “Object” option
In the menu ribbon located at the top of the screen, click on the “Insert” tab. Then click on the “Object” option which is the last icon in the “Text” group of the “Insert” tab.
Step-2: Click on the “Browse” option
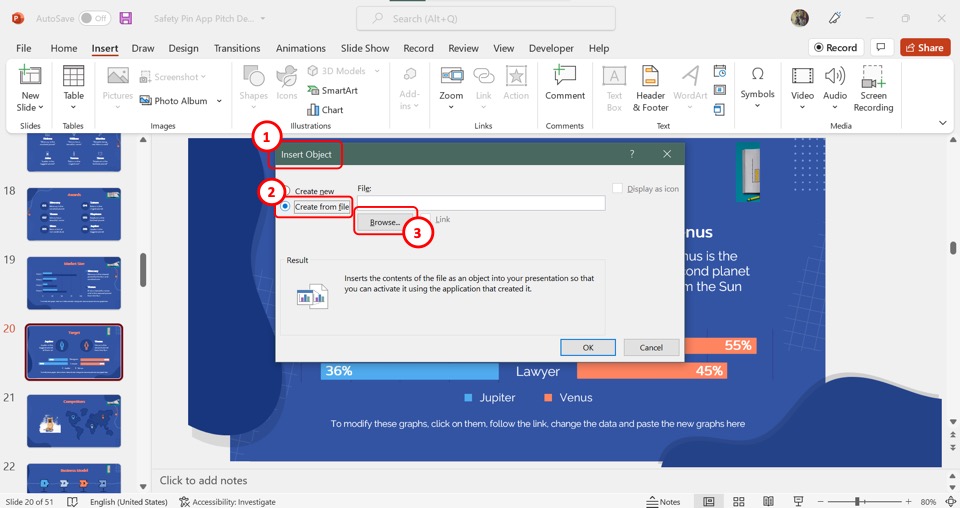
In the left column of the “Insert Object” dialog box, click on the “Create from file” option. Then click on the “Browse” button at the center of the dialog box.
Step-3: Click on the “OK” button
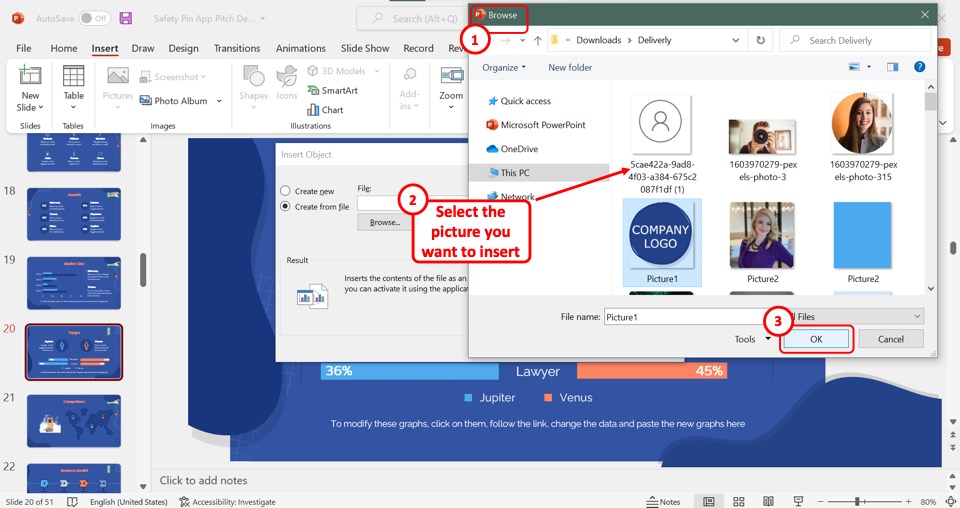
In the “Browse” window, select the picture that you want to insert into the slide. Then click on the “OK” button at the bottom.
Step-4: Click on the “OK” option
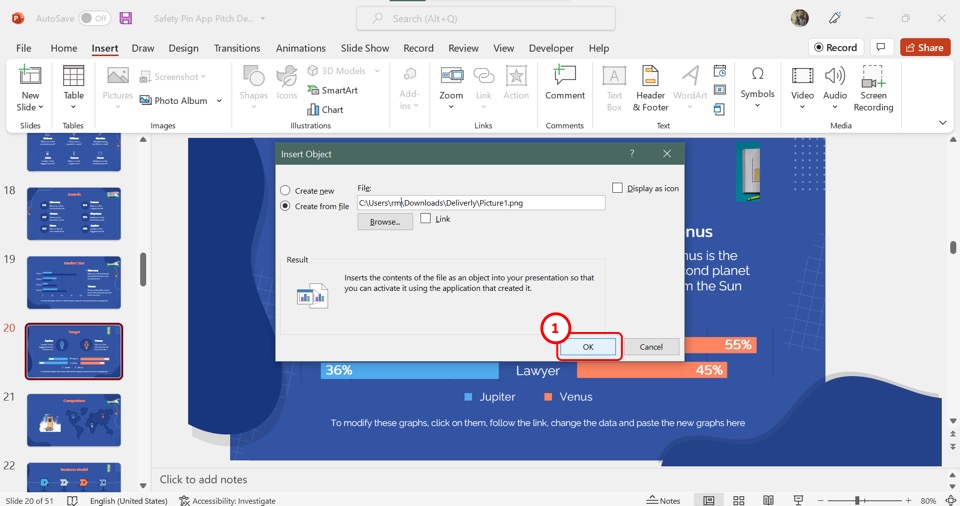
Finally, all you have to do is click on the “OK” button at the bottom of the “Insert Object” dialog box to embed the selected picture into the PowerPoint slide.
Credit to wayhomestudio (on Freepik) for the featured image of this article (further edited).

- Onsite training
3,000,000+ delegates
15,000+ clients
1,000+ locations
- KnowledgePass
- Log a ticket
01344203999 Available 24/7
What is PowerPoint: A Comprehensive Guide for Beginners
What is PowerPoint? This blog provides the essence of PowerPoint, a versatile presentation software by Microsoft. Discover its features, uses, and the art of crafting compelling slideshows. Whether you're a student, professional, or simply curious, explore the power of PowerPoint and learn how to create impactful presentations effortlessly.

Exclusive 40% OFF
Training Outcomes Within Your Budget!
We ensure quality, budget-alignment, and timely delivery by our expert instructors.
Share this Resource
- Microsoft Dynamics 365 Fundamentals (ERP) MB920
- Microsoft Access Training
- Microsoft Dynamics 365 Fundamentals (CRM) MB910
- Microsoft Word Course
- Microsoft Dynamics 365 Marketing MB220

According to Glassdoor , a PowerPoint designer's average salary in the UK is about £37,811 annually. In this blog, you will learn What is PowerPoint, its key features, its benefits, and how to use it, as well as learn some tips for creating effective presentations.
Table of contents
1) What is PowerPoint?
2) Understanding the PowerPoint Interface
3) Key Features of PowerPoint
4) How to use PowerPoint to create a presentation?
5) Benefits of PowerPoint
6) Tips for Creating Effective PowerPoint Presentations
7) Conclusion
What is PowerPoint?
PowerPoint is a versatile and popular presentation software developed by Microsoft (MS). It is a part of the Microsoft Office Suite and offers various features and tools to create visually appealing and engaging presentations. MS PowerPoint allows users to combine text, graphics, multimedia elements, and animations to convey information effectively .
Evolution of PowerPoint

Understanding the PowerPoint Interface
The PowerPoint interface provides a user-friendly environment for creating and editing presentations. Familiarising yourself with its essential components will help you navigate the software efficiently. Here's a breakdown of the MS PowerPoint interface:
1) Ribbon : The Ribbon is located at the top of the MS PowerPoint window and consists of multiple tabs, such as Home, Insert, Design, Transitions, and more.
2) Slides pane : The Slides pane is on the left side of the PowerPoint window. It displays thumbnail images of your presentation slides, allowing you to navigate and rearrange them easily. You can add, delete, duplicate, or hide slides from this pane.
3) Notes pane : The Notes pane is located below the Slides pane. It provides space for adding speaker notes or additional information related to each slide.
4) Slide area : The Slide area occupies the central part of the PowerPoint window. It displays the selected slide, where you can add and arrange content such as text, images, charts, and multimedia elements .
5) Task panes : Task panes are additional panels on the PowerPoint window's right side. They offer various functionalities such as formatting options, slide layouts, animations, etc. Task panes can be opened or closed based on your specific needs.
Understanding the MS PowerPoint interface will help you navigate the software effectively and make the most of its features. Whether you are creating slides, adding content, or applying formatting, having a good grasp of the interface ensures a smooth and productive experience .
Key Features of PowerPoint
When it comes to creating captivating and professional presentations, MS PowerPoint stands out as versatile and feature-rich software. Its array of tools and functionalities enables users to bring their imagination and ideas to life. Moreover, it also helps engage their audience effectively .

1) Slide Templates : PowerPoint provides a collection of pre-designed templates that make it easy to create visually appealing slides.
2) Slide Master : The Slide Master feature allows users to define the overall layout, font styles, and colour scheme for the entire presentation .
3) Animations and transitions : PowerPoint offers various animation effects and slide transitions to add visual interest and captivate the audience .
4) Multimedia integration : Users can embed images, videos, and audio files directly into their presentations, enhancing the overall impact .
5) Collaboration tools : MS PowerPoint allows multiple users to work on a presentation simultaneously, making it ideal for team projects and remote collaboration .
6) Presenter View : The Presenter View feature gives presenters access to speaker notes, a timer, and a preview of upcoming slides, enabling a seamless presentation experience .
These features collectively contribute to PowerPoint's versatility and make it a powerful tool for developing engaging and impactful presentations.
How to use PowerPoint to create a presentation?
Creating a presentation in PowerPoint is a straightforward process. Whether it's simple animations or explainer videos learning H ow to use PowerPoint is an extremely valuable skill. Here's a step-by-step guide on how to create a presentation:
1) Launch PowerPoint and choose a template or start with a blank slide.
2) Add slides by clicking "New Slide" or using the shortcut key (Ctrl + M).
3) Customise slide content by entering text and inserting visuals.
4) Rearrange slides for a logical flow by dragging them in the slide navigation pane.
5) Apply slide transitions for visual effects in the "Transitions" tab.
6) Add animations to objects in the "Animations" tab.
7) Preview your presentation by clicking "Slide Show".
8) Save your presentation and choose a format (.pptx or .pdf).
9) Share your presentation via email, cloud storage, or collaboration tools.
By following these steps, you can create a well-structured and visually appealing presentation in Microsoft PowerPoint. Remember to keep your content concise, use engaging visuals, and practice your presentation skills to deliver an impactful presentation .
Benefits of PowerPoint

1) Visual appeal : Microsoft PowerPoint allows you to create visually appealing presentations with its wide range of design tools and features. You can use templates, themes, and customisable layouts to make your slides visually engaging and professional .
2) Easy to use : PowerPoint has a user-friendly interface, making it accessible to users of all levels. The intuitive tools and straightforward navigation make it easy to create, edit, and deliver presentations efficiently .
3) Flexibility : PowerPoint provides flexibility in terms of content creation. You can include various types of content, such as text, images, charts, graphs, videos, and audio files, to enhance your message and engage your audience effectively.
4) Organisation and structure : PowerPoint offers features to help you organise and structure your content. You can create multiple slides, use slide masters for consistent formatting, and arrange the sequence of slides to create a logical flow .
5) Presenter tools : PowerPoint includes built-in presenter tools that aid in delivering presentations smoothly. You can use presenter view to see your notes and upcoming slides while your audience sees only the presentation. Additionally, features like slide transitions and animations add visual interest and help you control the flow of information .
6) Collaboration and sharing : PowerPoint allows for easy collaboration and sharing of presentations. Several users can simultaneously work on the same presentation, making it convenient for team projects. You can also share your presentations via email, cloud storage, or online platforms, ensuring easy access for viewers .
7) Integration with other tools : PowerPoint can seamlessly integrate with other Microsoft Office applications, such as Word and Excel. You can import data and charts from Excel or copy and paste content between different Office applications, saving time and effort .
8) Presenter-audience interaction : PowerPoint provides features that facilitate interaction between the presenter and the audience. You can include interactive elements like hyperlinks, buttons, and quizzes to engage your audience and make your presentations more dynamic.
9) Portable and accessible : PowerPoint presentations can be saved in various formats, such as .pptx or .pdf, making them easily accessible on different devices. This portability allows you to deliver presentations on laptops, tablets, or even projectors without compatibility issues .
10) Time and effort savings : PowerPoint simplifies the process of creating presentations, saving you time and effort. The pre-designed templates, slide layouts, and formatting options enable you to create professional-looking presentations efficiently .
Unleash your creativity to deliver captivating presentations that leave a lasting impact with our Microsoft PowerPoint Masterclass – Sign up now!
Tips for Creating Effective PowerPoint Presentations

1) Simplicity is key : Keep your slides clean and uncluttered. Use concise bullet points and simple visuals to convey your message effectively .
2) Visuals matter : Incorporate relevant, high-quality visuals such as images, charts, and diagrams to enhance understanding and engagement .
3) Limit text : Avoid overwhelming your audience with excessive text on slides. Use brief phrases or keywords to communicate key points .
4) Choose legible fonts : Opt for clear and readable fonts that are easy to read, even from a distance. Maintain consistency in font styles throughout your presentation .
5) Consistent design : Maintain a consistent design theme, including colours, fonts, and layout, to create a visually appealing and professional presentation.
6) Emphasise important points : Use visual hierarchy techniques, such as font size, colour, and formatting, to draw attention to essential information .
7) Use transitions and animations sparingly : Incorporate slide transitions and animations thoughtfully, focusing on enhancing content and transitions without distracting the audience .
8) S lide notes for guidance : Utilise the slide notes feature to include additional details, explanations, or reminders for a well-prepared and confident presentation.
9) Practice and time yourself : Rehearse your presentation to ensure smooth delivery and stay within the allocated time. Practice helps you refine your content and delivery.
10) Engage the audience : Encourage audience participation through interactive elements, questions, or discussions to foster engagement and make your presentation more memorable.
By implementing these tips, you can create effective MS PowerPoint presentations that capture attention, communicate information clearly, and engage your audience effectively.
Conclusion
We hope this blog has helped you understand What is PowerPoint and how it can help you. It offers powerful features with a user-friendly interface for creating visually appealing presentations. With its tools for organising information, incorporating text and visuals, and delivering impactful content, PowerPoint is a valuable tool for beginners to communicate their ideas effectively .
Master the art of effective communication and productivity and unlock your potential with our comprehensive Microsoft Office Training – Sign up now!
Frequently Asked Questions
Upcoming office applications resources batches & dates.
Thu 16th May 2024
Thu 6th Jun 2024
Thu 4th Jul 2024
Thu 8th Aug 2024
Thu 5th Sep 2024
Thu 10th Oct 2024
Thu 7th Nov 2024
Thu 5th Dec 2024
Get A Quote
WHO WILL BE FUNDING THE COURSE?
My employer
By submitting your details you agree to be contacted in order to respond to your enquiry
- Business Analysis
- Lean Six Sigma Certification
Share this course
Our biggest spring sale.

We cannot process your enquiry without contacting you, please tick to confirm your consent to us for contacting you about your enquiry.
By submitting your details you agree to be contacted in order to respond to your enquiry.
We may not have the course you’re looking for. If you enquire or give us a call on 01344203999 and speak to our training experts, we may still be able to help with your training requirements.
Or select from our popular topics
- ITIL® Certification
- Scrum Certification
- Change Management Certification
- Business Analysis Courses
- Microsoft Azure Certification
- Microsoft Excel Courses
- Microsoft Project
- Explore more courses
Press esc to close
Fill out your contact details below and our training experts will be in touch.
Fill out your contact details below
Thank you for your enquiry!
One of our training experts will be in touch shortly to go over your training requirements.
Back to Course Information
Fill out your contact details below so we can get in touch with you regarding your training requirements.
* WHO WILL BE FUNDING THE COURSE?
Preferred Contact Method
No preference
Back to course information
Fill out your training details below
Fill out your training details below so we have a better idea of what your training requirements are.
HOW MANY DELEGATES NEED TRAINING?
HOW DO YOU WANT THE COURSE DELIVERED?
Online Instructor-led
Online Self-paced
WHEN WOULD YOU LIKE TO TAKE THIS COURSE?
Next 2 - 4 months
WHAT IS YOUR REASON FOR ENQUIRING?
Looking for some information
Looking for a discount
I want to book but have questions
One of our training experts will be in touch shortly to go overy your training requirements.
Your privacy & cookies!
Like many websites we use cookies. We care about your data and experience, so to give you the best possible experience using our site, we store a very limited amount of your data. Continuing to use this site or clicking “Accept & close” means that you agree to our use of cookies. Learn more about our privacy policy and cookie policy cookie policy .
We use cookies that are essential for our site to work. Please visit our cookie policy for more information. To accept all cookies click 'Accept & close'.
Buy Me a Coffee
- Share this article

- Posted in in How To PowerPoint
How to Insert Picture in PowerPoint
In most cases, we use pictures or images to make our PowerPoint slides more visually appealing and engaging for the audience. Adding pictures to PowerPoint is an easy task. In this article, we will discuss the different methods that you can use to insert pictures in your PowerPoint presentation slide, as well as some best practices to follow. Additionally, we will share some resource links where you can find high-quality images to use in your presentation.
Methods of Inserting Pictures in PowerPoint:
There are two ways to insert pictures in PowerPoint: manually through Insert > Picture or by copying & pasting or dragging & dropping onto a slide.
Method 01: Copy & paste images
One of the easiest ways to insert a picture is by copying it by using CTRL+C (for Windows) or ⌘ + C (for Mac) and then pasting it with CTRL+V or ⌘ + V onto the slide. Alternatively, you can also drag and drop the pictures into the PowerPoint slide as well.
Method 02: From insert pictures
To insert pictures in PowerPoint, you can navigate to the ‘Insert’ tab and click on the ‘Pictures’ option. A dropdown list will appear with three options to choose from: ‘From this device’ , ‘Stock images’ , and ‘Online pictures’ . Simply select the option that suits you best and insert the picture into your presentation.

From this device: This option allows you to select images or pictures from your computer’s internal or external storage by browsing through them.

From Stock Images: If you select the stock images option, you will see a collection of available stock images. Most of these images come with a Microsoft Office 365 subscription.
From Online Pictures: You can also get access to Bing images.
Sample Slide After Inserting Pictures:
Let’s take a look at our sample slide that contains four different pictures alongside text boxes. It is just to give you a rough idea of how you can insert and organize pictures in a PowerPoint slide.

Recommended Websites for Free Pictures:
Our sample slide features images from Unsplash , a website that offers high-quality free photos. You can also check out Pexels and Pixabay for more free image options.
How to Crop Inserted Pictures in PowerPoint:
Cropping a picture in PowerPoint is useful to exclude unwanted areas. Pictures can be cropped manually or to prebuilt/custom shapes as well. When done correctly, it can enhance the visual appearance. To crop a picture, first select it, then from the picture format tab click on the crop option. However, we have covered how to crop a picture in PowerPoint in another article that you may check as well.
Get a Printable PDF of this Article
Similar to our other PowerPoint how-to articles, you have the option to download a printable PDF of this step-by-step guide on how to insert a picture in PowerPoint.
Frequently Asked Questions
Here we have tried to answer some of your questions about how to insert pictures in PowerPoint slides.
How to insert a video inside a PowerPoint slide?
You can copy and paste or simply drag and drop the video file onto the PowerPoint slide, similar to how we inserted pictures. Alternatively, you can go to the Insert tab, click on Video , and select the video from your device.
Can I save my PowerPoint slide as an Image?
Yes, you can your PowerPoint slide as an image. The process is straightforward. Use the “Save As” option and select either JPG or PNG file format from the dropdown menu. Once you click on “OK” , you will be prompted to save either the current slide or all slides . If you want to save only the current slide as a picture, select the “just this slide” option.
Become a Sponsor and Support Our Creative Journey.
Hey there! This is Team PowerPoint School. You can support our work by sending us a cup of coffee and get access to all our premium templates.
More Reading
Post navigation.

How to Insert Hyperlink in PowerPoint

How to Crop Picture in PowerPoint
Leave a comment, leave a reply.
Your email address will not be published. Required fields are marked *
You might also like
Stay a while and check more templates like this
Subscribe to our newsletter
How-To Geek
8 tips to make the best powerpoint presentations.
Want to make your PowerPoint presentations really shine? Here's how to impress and engage your audience.
Quick Links
Table of contents, start with a goal, less is more, consider your typeface, make bullet points count, limit the use of transitions, skip text where possible, think in color, take a look from the top down, bonus: start with templates.
Slideshows are an intuitive way to share complex ideas with an audience, although they're dull and frustrating when poorly executed. Here are some tips to make your Microsoft PowerPoint presentations sing while avoiding common pitfalls.
It all starts with identifying what we're trying to achieve with the presentation. Is it informative, a showcase of data in an easy-to-understand medium? Or is it more of a pitch, something meant to persuade and convince an audience and lead them to a particular outcome?
It's here where the majority of these presentations go wrong with the inability to identify the talking points that best support our goal. Always start with a goal in mind: to entertain, to inform, or to share data in a way that's easy to understand. Use facts, figures, and images to support your conclusion while keeping structure in mind (Where are we now and where are we going?).
I've found that it's helpful to start with the ending. Once I know how to end a presentation, I know how best to get to that point. I start by identifying the takeaway---that one nugget that I want to implant before thanking everyone for their time---and I work in reverse to figure out how best to get there.
Your mileage, of course, may vary. But it's always going to be a good idea to put in the time in the beginning stages so that you aren't reworking large portions of the presentation later. And that starts with a defined goal.
A slideshow isn't supposed to include everything. It's an introduction to a topic, one that we can elaborate on with speech. Anything unnecessary is a distraction. It makes the presentation less visually appealing and less interesting, and it makes you look bad as a presenter.
This goes for text as well as images. There's nothing worse, in fact, than a series of slides where the presenter just reads them as they appear. Your audience is capable of reading, and chances are they'll be done with the slide, and browsing Reddit, long before you finish. Avoid putting the literal text on the screen, and your audience will thank you.
Related: How to Burn Your PowerPoint to DVD
Right off the bat, we're just going to come out and say that Papyrus and Comic Sans should be banned from all PowerPoint presentations, permanently. Beyond that, it's worth considering the typeface you're using and what it's saying about you, the presenter, and the presentation itself.
Consider choosing readability over aesthetics, and avoid fancy fonts that could prove to be more of a distraction than anything else. A good presentation needs two fonts: a serif and sans-serif. Use one for the headlines and one for body text, lists, and the like. Keep it simple. Veranda, Helvetica, Arial, and even Times New Roman are safe choices. Stick with the classics and it's hard to botch this one too badly.
There reaches a point where bullet points become less of a visual aid and more of a visual examination.
Bullet points should support the speaker, not overwhelm his audience. The best slides have little or no text at all, in fact. As a presenter, it's our job to talk through complex issues, but that doesn't mean that we need to highlight every talking point.
Instead, think about how you can break up large lists into three or four bullet points. Carefully consider whether you need to use more bullet points, or if you can combine multiple topics into a single point instead. And if you can't, remember that there's no one limiting the number of slides you can have in a presentation. It's always possible to break a list of 12 points down into three pages of four points each.
Animation, when used correctly, is a good idea. It breaks up slow-moving parts of a presentation and adds action to elements that require it. But it should be used judiciously.
Adding a transition that wipes left to right between every slide or that animates each bullet point in a list, for example, starts to grow taxing on those forced to endure the presentation. Viewers get bored quickly, and animations that are meant to highlight specific elements quickly become taxing.
That's not to say that you can't use animations and transitions, just that you need to pick your spots. Aim for no more than a handful of these transitions for each presentation. And use them in spots where they'll add to the demonstration, not detract from it.
Sometimes images tell a better story than text can. And as a presenter, your goal is to describe points in detail without making users do a lot of reading. In these cases, a well-designed visual, like a chart, might better convey the information you're trying to share.
The right image adds visual appeal and serves to break up longer, text-heavy sections of the presentation---but only if you're using the right images. A single high-quality image can make all the difference between a success and a dud when you're driving a specific point home.
When considering text, don't think solely in terms of bullet points and paragraphs. Tables, for example, are often unnecessary. Ask yourself whether you could present the same data in a bar or line chart instead.
Color is interesting. It evokes certain feelings and adds visual appeal to your presentation as a whole. Studies show that color also improves interest, comprehension, and retention. It should be a careful consideration, not an afterthought.
You don't have to be a graphic designer to use color well in a presentation. What I do is look for palettes I like, and then find ways to use them in the presentation. There are a number of tools for this, like Adobe Color , Coolors , and ColorHunt , just to name a few. After finding a palette you enjoy, consider how it works with the presentation you're about to give. Pastels, for example, evoke feelings of freedom and light, so they probably aren't the best choice when you're presenting quarterly earnings that missed the mark.
It's also worth mentioning that you don't need to use every color in the palette. Often, you can get by with just two or three, though you should really think through how they all work together and how readable they'll be when layered. A simple rule of thumb here is that contrast is your friend. Dark colors work well on light backgrounds, and light colors work best on dark backgrounds.
Spend some time in the Slide Sorter before you finish your presentation. By clicking the four squares at the bottom left of the presentation, you can take a look at multiple slides at once and consider how each works together. Alternatively, you can click "View" on the ribbon and select "Slide Sorter."
Are you presenting too much text at once? Move an image in. Could a series of slides benefit from a chart or summary before you move on to another point?
It's here that we have the opportunity to view the presentation from beyond the single-slide viewpoint and think in terms of how each slide fits, or if it fits at all. From this view, you can rearrange slides, add additional ones, or delete them entirely if you find that they don't advance the presentation.
The difference between a good presentation and a bad one is really all about preparation and execution. Those that respect the process and plan carefully---not only the presentation as a whole, but each slide within it---are the ones who will succeed.
This brings me to my last (half) point: When in doubt, just buy a template and use it. You can find these all over the web, though Creative Market and GraphicRiver are probably the two most popular marketplaces for this kind of thing. Not all of us are blessed with the skills needed to design and deliver an effective presentation. And while a pre-made PowerPoint template isn't going to make you a better presenter, it will ease the anxiety of creating a visually appealing slide deck.
Researched by Consultants from Top-Tier Management Companies

Powerpoint Templates
Icon Bundle
Kpi Dashboard
Professional
Business Plans
Swot Analysis
Gantt Chart
Business Proposal
Marketing Plan
Project Management
Business Case
Business Model
Cyber Security
Business PPT
Digital Marketing
Digital Transformation
Human Resources
Product Management
Artificial Intelligence
Company Profile
Acknowledgement PPT
PPT Presentation
Reports Brochures
One Page Pitch
Interview PPT
All Categories
11 Dos and Don'ts of Using Images in Presentations

Anuj Malhotra
Many presenters are using images horribly in their presentations!
From pixelated visuals to copyright images with watermarks clearly visible on them to many other disasters, presenters are coming up with unique ways to kill all the fun. Are you guilty of poor selection of visuals? Are your experiments at creating visual slides turning into disasters?
Lucky for you, we have put together a complete list of dos and don’ts for adding images to slides. You won’t believe how a little care while handling images can make your presentation a visual success. Ready for some introspection? Compare yourself with these 11 yardsticks to determine your visual literacy:
Visuals in Presentations: Best and Worst Practices
Sin 1: Using pixelated or blurry images
It’s not that presenters do not see that the image in their slide is of poor quality but that is the last desperate move they make when they can’t find any better visual in its place. Sorry folks, you have to search harder for that high quality image. If you have to shell out a few dollars, then do. But a blurry image casts a very poor impression.

Sin 2: Tiny Images
Don’t use tiny images that require audience to carry binoculars. A high quality image lets you play up that visual on your slide, so go for it. For instance, in the Don’t slide below, the presenter has killed the action picture of football by using it up in such small space.
WHAT TO DO: If you have lots of text to incorporate, allocate half the slide to text and half to the image as you can see in the Do slide below:

Sin 3: Overuse of visuals
These presenters are the ones who have taken the use-image-advice a bit too seriously. They collect as many images as can be fit into a slide and squeeze their content into the space left. Why do they do this? They find several relevant visuals for a single slide. For instance, in the Don’t slide below, the presenter has a slide on business goals and objectives of a start-up. All visuals used in the slide are pretty relevant and the slide would have been great if the presenter went with a single, big image.
WHAT TO DO: Choose one high quality image that sums up the main theme of the slide. Choose any visual that represents Goals and Objectives; it’s not necessary to pick an image for each of those goals. If you want to show each goal visually, dedicate a complete slide to each. Check out the difference:

Sin 4: Multiple pictures arranged poorly
Yes, there are times when the slide warrants multiple pictures. A campus view, various benefits of a product, trip collage, etc. require you to arrange multiple visuals aesthetically. This, however, requires basic design knowledge such as giving frames or borders to each image. The Don’t slide below is a bad way to arrange your images.
WHAT TO DO: Place your image along grids using the Gridlines feature ( View tab) in PowerPoint. Or give them a frame using the default frames in PowerPoint ( Format tab). The Do slide below is a good way to arranged multiple pictures in a single slide.

Sin 5: Cliparts that add no value, except shock value
If you haven’t heard so many presentation experts screaming their heads off calling clipart crappy and tacky, hear us now. These cartoonish characters add absolutely no value to your slide and make you look a tacky presenter too. An exception is always there, say designing a cartoonish slide is your purpose, but they don’t stand a chance in a corporate presentation. In the Don’t slide below, the clipart of suited professionals can still be forgiven but why not show your awesomeness like the Do slide shows.
WHAT TO DO: Nothing, just forget about clipart. Any visual would look better than it.

Sin 6: Watermark Images
This is the worst sin of all. Even if you make the image small enough to hide the watermark, many in the audience would be quick to spot it and trust us, it’s the worst thing that can mar the reputation of a presenter.
WHAT TO DO: Need we say anything here? Please buy the image; don’t attempt to blur or remove the watermark even if you know how to do it.

Sin 7: Pictures with headache-inducing backgrounds
Unless your objective is to perform a hypnosis session or cause excruciating pain to audience’s eyes, never choose a visual that has swirls, rainbows and other distracting elements in the background. Moreover, the content fails to stand apart from the background making it very difficult (practically impossible) for the audience to read the content. The Don’t slide below is a perfect example of what not to do.
WHAT TO DO: Choose an impressive visual that covers the whole slide. If you want to show growth, there are hundred options you can choose from- towering building, bar diagram, growth of a plant from sapling to tree, ladder steps, etc. If you have lots of text to accommodate within the slide, add a transparent layer over the complete image and then place your content. As you can see in the Do slide below, the image and content complement each other to create a professional, sophisticated presentation slide.

Sin 8: Amputating people while cropping images
Don’t be merciless while cropping images. Place yourself in the shoes of the person you are cropping. Would you like to see your photo with one arm missing? Obviously not. But yes, cropping an image to make it fit within the slide and to accommodate text at the same time is indeed tricky. As a presenter, you have to cut off portion of an image without making it look awkward. How do you that?
One tip that all professional photographers give, while composing an image or cropping it post production, is to “never crop at joints”. Don’t cut off the person’s feet, fingers, and at the points dissecting any body part. See the Don’t slide below; the image composition doesn’t give due respect to the CEO.
WHAT TO DO: If the image itself is poorly composed, you need to take it again or choose a different picture. In the Do slide below, a different image has been taken and it’s taking up the same area without any need for cropping.

But what do you if you have a large-sized image that covers the complete slide space? Chop off all body parts left and right so that you can show the faces? Let’s take another example. Check out the Don’t slide below which has been brutally cropped to fit the content. Even the head and the crucial handshake signifying partnership has been hacked for convenience.
Now, check the Do slide- you only need to minimise the photo, crop the unnecessary portions (not the limbs, please), give it a nice frame (Go to the Format tab and check out the default Picture Styles) and tilt the photo to make it stand out and relevant to the slide. Not bad, uh?

Sin 9- Badly stretched photos
This sin is unforgivable and makes your slide an eyesore of the worst kind. Even if the stretched photo is of a high quality! What was the presenter thinking? We know. The presenter has a picture of a certain dimension, say in a portrait style, but wants to display it in the landscape format. So he stretches it to accomplish his mission knowing the damage he is doing to the image and the complete slide.
The Don’t slide below is an adaptation of a similar slide I came across on a presentation sharing platform. This also happens when a presenter chooses a shape and uses the Picture fill option in PowerPoint to fill the area with an image. If the image has a different aspect ratio than the area of the shape, PowerPoint will stretch the photo to fill the area, distorting the image in this process.

WHAT TO DO: If you use the Picture Fill option in PowerPoint and the image gets stretched, follow these simple steps:
- Click the stretched photo
- Go to the Format tab on PowerPoint ribbon
- Under the Crop dropdown menu, choose the Fill option (see the screenshot below)
PowerPoint will resize the image while maintaining the original aspect ratio of the image:

You can now drag the photo to adjust the required portion within the area. This might not work in your favor because you can’t have the teacher, student as well as the book within the small rectangular shape.
Check out what we did in the Do slide again. We cropped the photo and removed the white space in the image, chose a white background so that the image gels in smoothly, drew a circular outline around the image and placed our content alongside the image. You can try this or some other design trick, but stretching won’t do. Even a slight stretching distorts the image and is easily noticeable casting a bad impression on the presenter.
Sin 10: Using irrelevant silhouettes or other images
Silhouettes aren’t all that bad. They can be used if you want a visual element in your presentation but don’t want the audience to be distracted by the details. But adding silhouette just for the sake of it distracts the audience even more.
In the Don’t slide, the silhouette of a businesswoman doesn’t say anything. In a slide already having one visual element- a line chart- adding the silhouette is unnecessary and makes it difficult for the audience to read the chart values.
WHAT TO DO: Choose an image that adds value to your content. If it doesn’t, simply scrap it. The Do slide looks much better and cleaner with simply the graph:

Sin 11: Image with a thick outline
Creativity sometimes misfires and gives an unpleasant look and feel to your slide. One such creative effort is giving very thick border line to an image. The frame becomes as heavy as the image itself making one wonder what is more important- the image or the frame. Even if you picked the same from PowerPoint’s default Picture Styles, it doesn’t mean it is suitable for your presentation. In the Don’t slide below, the frame seems to be jumping from the slide and is too harsh on the eyes.
WHAT TO DO: If you wish to give it an outline, don’t keep the width of the line more than 1 point. Pick a light color for the outline if the background is dark. In the Do slide below, we encapsulated the image within a circle so that it doesn’t look jutting out of the slide. The outline was also chosen white and the width was kept at 1 point. The color of the text was picked as white to have a soothing contrast and not as jarring as black and red.

BONUS TIP 1: Characters in the image should look within the slide
Now this is a small error that dilutes the impact of a slide. It’s a basic human behavior to look where others are looking. This knowledge of eye movement should guide you while choosing images for your PowerPoint presentation too.
If you have an image looking out of the slide, the audience tends to look there too and returns to the slide to read the content. For a brief second or so, you disconnect with the audience. If the image, instead, looks into the slide towards the content, the audience first looks at the image and then reads the content, their attention focused within the slide. This is exactly what you want. The Don’t slide below is an example how you should not be placing your image.
WHAT TO DO: You can move the image to the other side of the slide like we did in the Do slide below. Else, you can flip the image within PowerPoint using the Rotate feature. Select the image, go to the Format tab, locate the Rotate dropdown menu and click Flip Horizontal . That solves the problem too!

BONUS TIP 2: Maintain consistency of images throughout the presentation
You should not be using a clipart on one slide, an image on another and an illustration in a different slide. Avoid too much variation as it breaks the smooth flow of a presentation. It makes you look like an amateur presenter.
There can be countless other ways to screw your slides. To save your skin, show your presentation to your family member or close friend before putting it online or broadcasting it before an audience. Trust us, you’ll be saved from many embarrassing mistakes with this exercise. If you have come across any other visual disasters, share with us in the comments below.
Spread the visual literacy by sharing this article with your friends and followers. Here’s a pre-populated tweet to get you started!
Related posts:
- How to Create a Fantastic PowerPoint Agenda Slide Template in 5 Steps [Presentation Hackathon 4]
- 6 Easy Steps to Create a “Stand Out” Slide and Beat the Background Noise
- How to Quickly Find the Best Content for Your Presentation on SlideTeam
- How To Create an Awesome PowerPoint Presentation in 3 Steps
Liked this blog? Please recommend us

17 Presentation Design Trends to Look Out For in 2017

11 Typography Tweaks and Text Effects to Spice Up Your Presentation Content
67 thoughts on “11 dos and don'ts of using images in presentations”.

This form is protected by reCAPTCHA - the Google Privacy Policy and Terms of Service apply.

Digital revolution powerpoint presentation slides

Sales funnel results presentation layouts
3d men joinning circular jigsaw puzzles ppt graphics icons

Business Strategic Planning Template For Organizations Powerpoint Presentation Slides

Future plan powerpoint template slide

Project Management Team Powerpoint Presentation Slides

Brand marketing powerpoint presentation slides

Launching a new service powerpoint presentation with slides go to market

Agenda powerpoint slide show

Four key metrics donut chart with percentage

Engineering and technology ppt inspiration example introduction continuous process improvement

Meet our team representing in circular format


How to make a slide show
Learn how to make a slide show with photos, videos, music, and custom settings using a slide show maker.
Learn how to make a slide show with PowerPoint
Discover how to make a slide show with photos, videos, music, and custom settings using a slide show app like PowerPoint.
What is a slide show maker?
To create a slide show, you’ll want to use a slide show maker—or slide show app—which is a software program or online service that enables you create digital slide shows with text, photos, videos, music, and other special effects. The full range of slide show features and functionality varies from program to program.
Once you’ve created a slide show, it can be published on the internet or shared with others as a video file. Additionally, you can use slide shows to create dynamic, interactive content on websites.
Slide show software can be used for a variety of purposes, such as creating presentations for work, school, and even your personal life. For instance, slide shows are often used to:

Display photos during an event
Slide shows are a great way to share photos and videos with guests at a wedding, birthday, or other special event.
Create a digital photo album
Some slide shows are created for personal reasons, such as sharing important memories with family or friends.

Highlight products or services
Businesses can use slide shows to showcase their products, promote special offers and sales, or pitch their services to potential clients.
Enhance teaching, training, and public speaking
Slide shows can also provide helpful visuals in educational settings, classroom presentations, and public speaking forums.
What you need to make a slide show
When it comes to creating a slide show, there are a few things you'll need to get started. First and foremost, you'll need a device equipped with presentation software or access to an online slide show app. Secondly, you’ll need a way to display your slide show, which usually means connecting your device to a projector or big screen TV. Beyond that, you’ll need some visual aids and other media to bring your slide show to life.
Explore each of these slide show requirements in more detail:
Devices and equipment —To create a slide show, you’ll use a computer or other device—such as a tablet or mobile phone—with PowerPoint or a similar program installed. You will also need a way to project the slides onto a screen or wall. This can be done with a projector, but if you don't have one available, you can use your TV or computer monitor. Simply connect your device to the TV or monitor using an HDMI cable and select the correct input. Your slides will now be projected onto the screen.
Media —Of course, creating a slide show requires media that adds visual and even audio elements to your presentation. This can be anything from photos and videos to music and text. You can use search engines to find copyright-free media to use in your slide show.
Another option is to purchase royalty-free stock footage, images, and audio files from online media libraries. This could be a bit more expensive, but it guarantees that you have the legal right to use the media in your presentation.
Finally, you can also use your own videos, images, and even music. While this can be a time-consuming process, it does allow you to create custom content specifically for your slide show.
Slide show creator —To bring your slide show together, you’ll need a slide show creator. The slide show software you choose will depend on your presentation requirements and preferences. There are many slide show makers on the market, with Microsoft PowerPoint being one of the most popular and widely used programs globally.
How to choose a slide show maker
When choosing slide show software, it's important to consider the features and specifications that are most important to you. Some of the questions you might ask when choosing a slide show maker include:
- How easy is the software to use?
- Is the software Mac or PC compatible?
- Can I access and edit my slide show on the cloud?
- What kind of slide shows can be created with the software?
- How many photos and/or videos can be included in a slide show?
- Can text and other elements be added to slide shows?
- Are transitions and effects available for slide shows?
- Is music accompaniment an option?
- What are the options for saving and sharing your slide show?
Building a slide show doesn't have to be difficult. With the right software, you can create an engaging presentation in no time.
Six steps for creating a slide show

1. Plan your slide show
Before getting too deep into your slide show project, it’s a good idea to select and save the photos and videos you want to use. This helps you create a slide show more efficiently and purposefully, ensuring a better outcome.
4. Import media
Start adding photos, videos, and other desired media to your slides. You can upload these from your device or online media libraries. If you planned your slide show in advance, you should have all your media saved in one place.

2. Launch your slide show app
Once you’ve decided on a slide show maker, you’ll want to launch the app from whatever device you’ll be using to create your presentation.
5. Add text, music, and transitions
After you’ve arranged the visuals in your slide show, you can provide additional information and communicate sentiment using custom text, music, and timed slide transitions.

3. Choose your theme
Most slide show software offers a variety of pre-set themes, colors, and designs. You can choose one that best suits your slide show or create a custom theme using the program’s various tools and features.
6. Record, save, and share your slide show
Now you’re ready to record your slide show, which can include a voiceover or Cameo . Once your slide show is complete, you can save it as a video to your device or to the cloud, such as OneDrive . You can access your saved slide show at any time to display at events, use in meetings, share online, or send directly to other people.
How to make a slide show with photos
Adding photos to your slide show is a great way to enliven your presentation and make it more visually interesting. Here are a few different ways you can add photos to your slide show in PowerPoint.

Add photos from your device
Whether you’re using a computer, tablet, phone, or other device, you can use photos that are saved to your device to create your slide show. In PowerPoint, simply select “Insert” then “Pictures” from the program menu, then choose “This Device.” This will open your photo library and allow you to find the photos you want to use. Once you’ve selected the photos that you want to import, just click on the "Insert" button and they will be added to your slide show. If you’re using a pre-made theme, you can also right-click the image in the slide show and select “Change Picture.” Again, you will choose “This Device” to access your photo library. After inserting your photo, you can reposition it on your slide or resize it however you like.

Use stock photos
Another way to add photos in PowerPoint is to follow the same process you would when adding photos from your device, but when prompted to choose your photo source, select “From Stock Images” instead of “This Device.” This will display a library of photos that you can use in your slide show without worrying about copyright infringement. There are thousands of stock images available in most slide show maker programs. Once the library is open, you can explore existing photo categories or use keywords to search for photos that fit your needs.

Explore online photo sources
Online photos are images you can insert into a PowerPoint slide show directly from the internet, as opposed to using those you have saved on your device. This is a convenient option if you don't have photos already prepared for your slide show, or if you can’t find the right kind of photo in the stock image library. However, there are some potential risks associated with using online photos, namely that you must be careful to use royalty-free images so not to infringe on any copyrights. In PowerPoint, there is a filtering option to ensure your search results only show royalty-free photos. Inserting photos from online sources follows the same process as the previous two methods, but this time, you’ll select “From Online Sources.”
How to add videos, music, and text

How to add videos to PowerPoint slide shows
Adding videos to your slide show involves accessing videos from your device, a stock video library, or online video sources—just as you would when adding photos. In this case, however, you’ll navigate to the menu in PowerPoint and select “Insert,” followed by “Media,” then “Video.” Once your video appears on your slide, you can resize or reposition it to fit your presentation needs. You can also set your video to play automatically in the slide show by selecting “Playback” on the menu and choosing “Start Automatically.”

How to add music to PowerPoint slide shows
Much like adding videos, you can add music to individual slides in PowerPoint by navigating to “Insert” on the menu, then “Media,” and finally “Audio.” You can then import music from your device, or you can record your own audio directly in PowerPoint. However, if you want your audio to play across multiple slides in your presentation—for example, as background music for a slide show—you’ll have to take a couple of extra steps. Once you’ve imported your audio file, select “Playback” from the menu and choose the “Play in Background” option. Your music will now play across all slides. You can set one song to loop for the duration of the slide show, or you can add more songs to play continuously throughout the slide show.

How to add text to PowerPoint slide shows
Premade themes in PowerPoint make adding text slide shows easy. On slides that already have templated content, you can simply click on the text and begin editing. In addition to changing what the text says, you can resize, recolor, reposition, and add special effects to the text. Of course, you can also change the font—or style—of the text. Most of this can be done from the “Home” tab on the menu while certain effects, such as shadows, can be found on the “Shape Format” tab. If you’re designing your presentation slides from scratch, or want to create additional text, find “Insert” on the menu, then choose “Text Box” or “Word Art,” depending on your desired text effect.
Discover custom slide show settings
Add even more effects to your PowerPoint slide show with custom settings like timing, transitions, and looping.

Set slide show timing
Adding timing to your slide show is a great way to control the pacing and flow of your presentation. To add timing in PowerPoint, go to the "Transitions" tab on the menu and find the "Advance Slide" area. Make sure the box next to “After:” is checked, then input the amount of time you’d like each slide to appear on-screen. The slides will automatically advance, creating a movie-like effect that’s great for events and special occasions.

Create slide show transitions
Now that you’ve added automatic timing to your slide show, you can make it more visually appealing by creating slide transitions. Transitions are special effects that allow you to animate the way your slides change from one to the next, and there are a variety of different transitions in PowerPoint that you can choose from. You can add these transitions to your slide show from the "Transitions” tab. From there, you’ll select the transition you want to add. To preview the transition, simply click on it. You can click “Apply To All” to automatically add the same transition to every slide in your slide show, or you can manually add different transitions to different slides.

Loop your slide show
If you want your slide show to play continuously until you choose to turn it off, you can set your PowerPoint presentation to loop. This will ensure your slide show automatically starts over from the beginning once it reaches the end. To get started, navigate to the “Slide Show” tab on the menu and select “Set Up Slide Show.” When the settings window opens, check the box next to “Loop continuously until ‘ESC’” and then click “OK.” When you’re ready to turn your slide show off, simply press the Esc key on your keyboard.
Slide show template and theme tips
Search themes and templates online.
With numerous slide show themes and templates available, it’s easy to find one that fits your needs.
Customize your design
If you can’t find the perfect theme or template, you can change things like colors and fonts.
Build a custom template
If you want a blueprint to use with future slide shows, you can create your own template.
Add new slides
If you need more slides, you can choose a specific layout and your theme will be carried over.
Edit your slide layouts
Even when using a theme or template, you can rearrange slide content to highlight key information.
Add photos, videos, and text
Themes and templates make adding media easy since most slides have designated content areas.
Change or resize your fonts
If your theme’s font is too small, you can resize it or choose a new font to make it easy to read.
Reorder your slide show
Some themes and templates have a predefined sequence, but you can reorder slides to meet your needs.
Create your own slide show
Slide shows are a great way to engage your audience and present important information. Whether you're creating a slide show for personal or professional reasons, slide shows are an essential tool for anyone who wants to share information in a visually appealing manner.
Discover more ways to improve your slide show
What options are available to create a slide show?
Slide show makers come in many forms. Some slide show software can only be used on specific devices, while other slide show creators can be accessed via the cloud from any device at any time.
It’s a good idea to evaluate a variety of slide show makers to ensure that you find one with all the features you need. For instance, some slide show software skews toward business use cases and others toward personal.
Microsoft PowerPoint is a popular slide show app that allows you to save presentations to your device or the cloud, and is widely used for personal, professional, and educational purposes.
Frequently asked questions
What are slide show apps and software.
Slide show apps and software are used to create and share slide shows. Slide show programs are typically used to communicate information, diagrams, plans, or processes. They can also be used to display photos and videos at events or retail stores. Usually, slide show makers have a range of built-in features and layouts, making them easy to use, regardless of technical skill levels.
What should a slide show include?
An effective slide show should be engaging, visually appealing, and informative. To achieve this, you'll want to make sure to include the following elements:
- A catchy headline or title. This will help grab your audience's attention and set the tone for the rest of your presentation.
- A variety of images. Don't just rely on text—incorporate photos, illustrations, or even video to maximize viewership.
- Bullet points or short blocks of text. Keep your slide content concise and easy to digest; too much information will only overwhelm your viewers.
How do I make a picture slide show?
There are a few different ways to make picture slide shows. You can use online programs, or you can create a slide show directly on your computer, phone, tablet, or other device using slide show software. Some programs, such as Microsoft PowerPoint, can be accessed on your personal device and on the cloud.
How long should a slide show be?
The length of your slide show will depend on several factors, such as the topic of your presentation, the audience you're presenting to, and the amount of time you have. That said, slide shows are generally between five and ten minutes long.
How can I make a slide show better?
Here are a few tips to make your slide show more engaging:
- Add images, videos, and music to bring your slide show to life.
- Use a font that is easy to read from a distance.
- Try not to use too many words on each slide.
- Use custom transitions and timing to make your slide show flow.
- Ensure a cohesive slide show by using a theme or template.
- For live presentations, practice with the Speaker Coach feature .
Follow Microsoft 365
File formats that are supported in PowerPoint
PowerPoint supports several different presentation-file formats, as described below.
Use File > Save As to save your presentation as one of the file types listed below.
Important: PowerPoint doesn't support Pack and Go Wizard (.ppz) files.
Top of Page
Save as JPEG or other image type
When you save a presentation as a JPEG or other image file type, each slide becomes a picture and is saved as a separate file in a new folder.
Click File > Export .
Choose the location where you want to save your files, and then in the File Format box, click an option: JPEG, TIFF, PNG, GIF, or BMP.
Click Save .
In PowerPoint for the web, you can open these types of files for editing:
You can also open these older file types, but only to read the file, not edit it. If you want to edit a file of this type, open it and then use File > Save a Copy to save the file as a .pptx that can be edited:
You can't open the following file formats in PowerPoint for the web, but you can open a .pptx, .ppsx, or .odp file and then use File > Download As to save a presentation in these formats:
.jpg (When you choose this format, each slide in the presentation is saved as an individual .jpg image file.)
Video and audio file formats supported in PowerPoint
Package a presentation for CD or USB flash drive
Block or unblock external content in Office documents
Get Microsoft PowerPoint templates

Need more help?
Want more options.
Explore subscription benefits, browse training courses, learn how to secure your device, and more.

Microsoft 365 subscription benefits

Microsoft 365 training

Microsoft security

Accessibility center
Communities help you ask and answer questions, give feedback, and hear from experts with rich knowledge.

Ask the Microsoft Community

Microsoft Tech Community

Windows Insiders
Microsoft 365 Insiders
Was this information helpful?
Thank you for your feedback.
Unravelling PowerPoint picture size and resolution
- Written by: Jamie Garroch
- Categories: PowerPoint design , PowerPoint productivity
- Comments: 6

If you come from a print media background you’ll be familiar with the importance of image resolution and how it affects quality. If you come from a web design environment you might be more familiar with pixels. But when it comes to PowerPoint, there’s an odd mix of measurements from the physical and digital worlds even though the majority of what is produced is shown on either a monitor or a projector. So what do presentation professionals need to know about picture size and resolution?
Pictures are made of dots
OK, so this might not be the most exciting news headline but we need to start from the beginning. A raster or bitmap picture (contrary to a vector image) is made up of thousands of tiny dots or pixels. Each of these dots is a single colour and the number of dots affects the file size of the picture. The image below shows how pixels are used to form an image. The first shows the image at a normal scale:

But when we zoom in you can clearly see each individual pixel that makes up the picture:

When you resize pictures in PowerPoint beyond their original 100% size, extra pixels have to be ‘invented’ by PowerPoint through a process of interpolation. This can cause pictures to appear blurry and degrade the quality of your slide show when displayed on a monitor or projector. In addition to the size of the picture in pixels, some image editors set a DPI (Dots Per Inch) parameter. This is usually only applicable for printed media and defines how many pixels (dots) are crammed into each inch. But PowerPoint does take DPI into account as you’ll see later.
So there are two aspects of a picture you need to be aware of:
Size : the number of pixels horizontally by the number of pixels vertically. This affects file size.
Resolution : the density of pixels per inch. This does not affect file size.
Points vs. Pixels
To add to the complexity of picture size and resolution, PowerPoint measures picture sizes in points under the hood and then converts them into your preferred measurement system, inches or centimetres, before displaying them in the user interface:

Points may mean prizes in game shows but in PowerPoint, points are not equivalent to prizes nor pixels. A point is actually 0.75 of a pixel on a 96 DPI monitor which comes from 96 DPI / 72 PPI ( dots or pixels per inch versus points per inch). The 96 number comes from the resolution of your monitor (more on that later) and 72 comes from the world of typography where a point is a physical unit of distance. A point (pt) is equal to 1/12 Pica, and 1 Pica = 1/6 inch. Hence 1 pt = 1/72 inch, meaning 1 inch contains 72 points. Phew!
Let’s see this in practice when examining a standard 16:9 widescreen slide in PowerPoint. If you click the Design tab followed by Slide Size and choose Custom Slide Size , you’ll see the size of your slide in either inches or centimetres:

Inches are actually easier to deal with here because you’re going to see conversions using DPI or Dots Per Inch. In the above example the slide has a size of 13.333 x 7.5 inches. Now, because there are 72 points per inch (don’t get this confused with dots per inch!) this translates to 960 (13.333 x 72) by 540 (7.5 x 72) points . This is what’s used to scale your picture as it’s inserted into your slide. That then translates to 1280 (960 / 0.75) by 720 (540 / 0.75) dots or pixels and that is what is used to project your picture during a slide show.
A little known secret is that regardless of the measurement system set on your computer, you can actually enter dimensions for your slide setup and/or objects on your slide by typing in a number followed by px for pixels or pt for points. As soon as you hit return, the number is converted to your default units of measurement. So entering 1in, 2.54cm, 72pt or 96px all yield the same result. Go ahead and try it!
Now, let’s take a look at what happens when you insert pictures into your slides at various sizes and resolutions.
Below are the settings for the stopwatch picture which we’ve scaled to 960 x 540 pixels at 72 DPI. Most decent image editor apps will allow you to set both the size and resolution and in this example we used the free GIMP (GNU Image Manipulation Program) app which is available for both Windows and Mac.

When it’s inserted into the slide it occupies the full slide size and PowerPoint has kept it scaled at 100%. This is because we have the same number of pixels in the picture as there are points for the slide and the image is set to 72DPI:

You’ll get the same result if you rescale the source picture in your preferred image editor to 1280 x 720 pixels, but at 96DPI. This is because PowerPoint scales it by the ratio of 72/96 or 0.75.
Making this picture larger than the slide or projecting it at anything bigger than HD720p can cause it to become blurry.
If you now insert the same picture scaled to HD1080P (1920 x 1080 pixels) at 72DPI you’ll see that it’s automatically scaled down in PowerPoint to 50% of its original size or ¼ the size of HD1080P so that it fits on the slide:

In this case, even though the picture has been scaled to the slide size all of the pixel data is still there for use when projecting. That means you can display or project this slide at a maximum size of HD1080P without any degradation of the picture.

If you were to project at a higher size such as 4k or 8k HD, there’s a chance that the projected image will not be pin-point sharp. This depends on the image interpolation algorithms in use by the combination of PowerPoint, your graphics card and the projector. If you insert the same picture at HD1080p size but with the DPI set to 144, it’ll get inserted at 100% scale and fit the slide exactly.
When looking at file size, it’s clear to see that it’s the number of pixels in the file that makes the difference and that the DPI setting does not impact file size at all. This is the relevant information in Windows Explorer for our test pictures:

So what have you learned?
- That the DPI setting within a picture file is used to scale the picture as it’s inserted onto the slide but it has no impact on the projected quality nor the size of the picture file.
- 960 x 540 pixels at 72 DPI
- 1280 x 720 pixels at 96 DPI
- The second picture will have a larger file size as it contains more pixel data.
Monitor Scaling
Now you know how DPI has an impact on pictures in PowerPoint, you might be asking yourself how does the Windows scaling affect all of this? When you change the scale factor in Windows Settings what is essentially happening is that the display DPI is being changed. You might have one HD1080p monitor set to 100% scale and another set to 200%. The corresponding monitor DPI values for these are:
- 100% = 96DPI
- 200% = 192DPI
This means that there are twice as many dots/pixels in use on the second monitor. The impact on PowerPoint is therefore that you need twice as many pixels in the image to display it optimally, irrespective of the DPI setting in the picture file. That means taking your HD1080p picture and sourcing a 4k version of it, which is 3840 x 2160 pixels.
Other PowerPoint Considerations
If you dig around in PowerPoint you’ll find a couple of other features that affect picture quality. The first is in the ribbon and the second is in the backstage.
Compress Pictures is found in the ribbon when you have a picture selected and you click the Format Picture tab:

This open a window that allows you to compress the currently selected picture or all pictures in your presentation:

You can click the ? icon in this window for lots more detail from Microsoft on what each of these settings does but basically, the Resolution section scales the image down to the set ppi (ppi here means dpi not points per pixel!). It doesn’t scale beyond the current DPI setting of the image because this implies creating new pixel data, which is why you’ll see some options greyed out.
You might think that PowerPoint is just changing the DPI setting in the image but it’s not. It also changes the size of the image in pixels. To test this we took the original stopwatch picture sized to 2048 x 1203 at 330DPI. Using the compress pictures tool, the picture was set to the Web (150 ppi) setting. We then used the free BrightSlide Export Media Files to observe the result in Windows Explorer:

As you can see, the resolution was indeed changed from 300 to 150 but the pixel count changed too, by an ratio of 1:2.2 (330/150). PowerPoint did this so that the picture on the slide remained the same physical in/cm size.
This is obviously a destructive process as pixels are deleted from the picture so use it with care. Also destructive is the option to delete cropped areas which deletes all the picture data outside of your cropping mask.
The other place you’ll see DPI is in the backstage when you click File / Options / Advanced , which corresponds to the Use default resolution option in the widow above. How convenient!

Maximum Size
While you’re learning all about slide and picture sizes, let’s complete the picture (sorry!) by covering the topic of maximum slide size. You might want to know this if you’re printing your creation onto a large format printer or displaying it on a monster projector. Currently, the maximum size for a PowerPoint slide is as follows:
56 x 56 in | 142.24 x 142.24 cm | 4032 x 4032 points | 5376 x 5376 pixels
Conclusion & Recommendation
Pictures in PowerPoint can be tricky to get to grips with. Choosing the right size has an impact on both the file size of your presentation and the maximum monitor/projection size you can use without degrading quality. In general, if you’re projecting at a maximum size of HD1080p, make sure you’re using pictures that are created at 1920 x 1080 pixels in size. Set the DPI to 144 if you want them to be inserted into your slide at 100% scale but remember that the DPI setting doesn’t itself impact file size or the quality of your image or how it’s projected during your slide show. Only pixels do that.

Jamie Garroch
Principal technical consultant, related articles, how to consistently brand graphs and charts across microsoft office.
- PowerPoint design / PowerPoint productivity
- Comments: 1
How do you make sure that your graphs and charts have consistent branding across Excel, PowerPoint and Word? Learn how to create and use custom templates that support your brand identity across Microsoft Office.

Protecting your prized PowerPoint content
- PowerPoint productivity / Presentation technology
Our comprehensive guide to password protecting PowerPoint files so your precious presentations stay just they you made them!

Hacking PowerPoint to create custom colors
- PowerPoint design
- Comments: 26
Tints and shades auto-generated by Microsoft from Theme Colors often take your content off-brand. How can you get the custom colors you want in PowerPoint? Read on to find out!

Thanks Jamie. A helpful article
I have a related question to help complete my understanding. Suppose you have a screen resolution of 1920 x 1080 pixels with PowerPoint slides sized set to match. What happens if you insert a picture with larger Pixel Dimensions eg 3840x 2160 pixels and then ‘Scale’ the picture to fit in the slide? Is the image ‘resampled’ down by removing pixels or is the image scaled down by shrinking existing pixels (which i imagine doesn’t make sense as presumably you can’t shrink pixels below the native pixel size for the screen) ? Similarly, if you inserted a smaller picture of eg 480 x 270 pixels and then ‘Scale’ up to fill the slide, are pixels added or are the existing pixels ‘stretched/made larger ?
Hope that makes sense and thanks for your help,
Hi Campbell. Great question! It depends on what is set for the file in File / Options / Advanced / Image Size and Quality. Take a look at the mouse hover tips for the options “Do not compress images in a file” and “Default resolution” for the answers to your questions.
Thanks for taking the time to reply to my question. The mouse hover ‘tips’ help explain what happens when the file is saved but I still have the same question when changing the size of the image on screen up/down before it is saved. I.e do you know if the images are ‘re-sampled’ by adding/deleting pixels or are existing pixels somehow stretched/shrunk. I hope that makes sense and thanks again for your help.
Useful. I did not realize ppt respects a units suffix in setting sizes in the Format pane.
I do not understand why Microsoft can’t make this app use pixels for the default dimensions. PPT is used for on-screen presentations at least 95% of the time, and yet they continue to use inches. Also, there is no easy way to see if an image (especially one used as a background image in a shape) is 100%.
For the type of picture you have, use JPG, not PNG. PNG is great for screenshots, but not “natural” images.
Leave a Reply Cancel reply
Save my name and email in this browser for the next time I comment.
Join the BrightCarbon mailing list for monthly invites and resources
We have other people in our own business reaching out to say this is the best presentation they have seen. Sarah Walker Softchoice


- SUGGESTED TOPICS
- The Magazine
- Newsletters
- Managing Yourself
- Managing Teams
- Work-life Balance
- The Big Idea
- Data & Visuals
- Reading Lists
- Case Selections
- HBR Learning
- Topic Feeds
- Account Settings
- Email Preferences
How to Make a “Good” Presentation “Great”
- Guy Kawasaki

Remember: Less is more.
A strong presentation is so much more than information pasted onto a series of slides with fancy backgrounds. Whether you’re pitching an idea, reporting market research, or sharing something else, a great presentation can give you a competitive advantage, and be a powerful tool when aiming to persuade, educate, or inspire others. Here are some unique elements that make a presentation stand out.
- Fonts: Sans Serif fonts such as Helvetica or Arial are preferred for their clean lines, which make them easy to digest at various sizes and distances. Limit the number of font styles to two: one for headings and another for body text, to avoid visual confusion or distractions.
- Colors: Colors can evoke emotions and highlight critical points, but their overuse can lead to a cluttered and confusing presentation. A limited palette of two to three main colors, complemented by a simple background, can help you draw attention to key elements without overwhelming the audience.
- Pictures: Pictures can communicate complex ideas quickly and memorably but choosing the right images is key. Images or pictures should be big (perhaps 20-25% of the page), bold, and have a clear purpose that complements the slide’s text.
- Layout: Don’t overcrowd your slides with too much information. When in doubt, adhere to the principle of simplicity, and aim for a clean and uncluttered layout with plenty of white space around text and images. Think phrases and bullets, not sentences.
As an intern or early career professional, chances are that you’ll be tasked with making or giving a presentation in the near future. Whether you’re pitching an idea, reporting market research, or sharing something else, a great presentation can give you a competitive advantage, and be a powerful tool when aiming to persuade, educate, or inspire others.
- Guy Kawasaki is the chief evangelist at Canva and was the former chief evangelist at Apple. Guy is the author of 16 books including Think Remarkable : 9 Paths to Transform Your Life and Make a Difference.
Partner Center
- Create a presentation Article
- Save Article
- Design Article
- Share and collaborate Article
- Give a presentation Article
- Set up your mobile apps Article
- Learn more Article
Create a presentation
Create a presentation in PowerPoint

Create presentations from scratch or start with a professionally designed, fully customizable template from Microsoft Create .
Open PowerPoint.
In the left pane, select New .
Select an option:
To create a presentation from scratch, select Blank Presentation .
To use a prepared design, select one of the templates.
To see tips for using PowerPoint, select Take a Tour , and then select Create , .

Add a slide
In the thumbnails on the left pane, select the slide you want your new slide to follow.
In the Home tab, in the Slides section, select New Slide .
In the Slides section, select Layout , and then select the layout you want from the menu.

Add and format text
Place the cursor inside a text box, and then type something.
Select the text, and then select one or more options from the Font section of the Home tab, such as Font , Increase Font Size , Decrease Font Size , Bold , Italic , Underline , etc.
To create bulleted or numbered lists, select the text, and then select Bullets or Numbering .

Add a picture, shape, and more
Go to the Insert tab.
To add a picture:
In the Images section, select Pictures .
In the Insert Picture From menu, select the source you want.
Browse for the picture you want, select it, and then select Insert .
To add illustrations:
In the Illustrations section, select Shapes , Icons , 3D Models , SmartArt , or Chart .
In the dialog box that opens when you click one of the illustration types, select the item you want and follow the prompts to insert it.

Need more help?
Want more options.
Explore subscription benefits, browse training courses, learn how to secure your device, and more.
Microsoft 365 subscription benefits
Microsoft 365 training
Microsoft security
Accessibility center
Communities help you ask and answer questions, give feedback, and hear from experts with rich knowledge.
Ask the Microsoft Community
Microsoft Tech Community
Windows Insiders
Microsoft 365 Insiders
Find solutions to common problems or get help from a support agent.

Online support
Was this information helpful?
Thank you for your feedback.

How to Record Customized Camera Feeds With Cameo in PowerPoint
T he widespread adoption of remote work and virtual meetings has led many people and organizations to realize they don't have to be physically present in the same conference room to make presentations. In fact, you don't even need to conduct them live.
However, recording your PowerPoint slides with your face on them requires technical know-how and third-party apps like OBS. This makes recording presentations a bit difficult and discourages people from doing it.
Thankfully, Microsoft has addressed this issue in PowerPoint 365 with the Cameo feature. Here's what it is and how to use it.
What Is Cameo in PowerPoint?
Cameo is a PowerPoint feature that lets you add your webcam or any other camera feed into your presentation. This makes it easier to present virtually, as your audience can see you from within your slides.
Previously, you needed a third-party app like OBS to overlay yourself on your presentation. You can also use a green screen overlay in Capcut or other similar apps to achieve the same effect. However, this takes a lot of effort and know-how.
But with this feature, you can do it from inside PowerPoint with just a few clicks. Here's how to insert a cameo into your slides.
- Go to Insert > Cameo .
- After clicking on Cameo, PowerPoint will insert a placeholder object on your current slide and open the Camera Format tab.
- You can edit the object as you wish, much like any other shape on PowerPoint. You can also click on the options in the Designer pane on the right side of the screen to help you work faster.
- Once you're happy with its placement on your slide, click on the Preview button to see your live video.
With that, you can start presenting your PowerPoint slides via screen sharing while still keeping yourself on the screen.
How to Record Your PowerPoint Presentation With Cameo
You can also insert a cameo from Record > Cameo . Clicking on this will bring you to the same menu tab and insert a placeholder object for your video. However, even if you didn't set up Cameo beforehand, you can insert it directly while recording your presentation. Here's how:
- Go to Record > From Beginning or Record > From Current Slide .
- In the recording screen, click on the Camera icon at the top. This will insert a round object containing your video in your slides' lower-right-hand section.
- Click on the Red icon to start recording your presentation.
- Go through your presentation as usual. For more information, check out our guide on turning your presentations into videos .
- Once you've finished, click the Red icon again to stop recording.
- Click Export to go to the Export to video screen .
- Change the File Name as needed, then click Browse to select the location where you will save your recorded video.
- Once done, click Export Video .
With that, you don't have to spend much effort to add your video feed to your PowerPoint presentation recording. However, the app only places your video at one location across every slide; it might cover some of your content. That's why it's better to use the Cameo feature when you're building or editing your PowerPoint presentation.
If you're unhappy with your recording, press the Retake Video on the left of the record icon. You can pick between On Current Slide or On All Slides .
What You Need to Record Customized Camera Feeds
You need a webcam and a Microsoft 365 account to record your customized camera feed. Furthermore, you cannot use Cameo or record presentations in the PowerPoint web app. You need to download and install it on your computer to use these features.
The Cameo feature is already available on Microsoft PowerPoint 365 in Windows and Mac. However, recording your presentation with Cameo is only available on Windows. As of the time of writing, this feature isn't available for the main PowerPoint 365 for Mac version.
If you're running macOS, you must be a Microsoft 365 Insider to get this feature. However, since the Cameo recording feature is already announced in the Microsoft 365 Insider blog , we hope it will be available in the mainstream PowerPoint for Mac version in a few months.
Recording Your Presentations Is Now Much Easier
The Cameo feature has made presenting PowerPoint slides in video calls easier. And with the recording function, you no longer need a third-party app to put your video over your presentation.
You can integrate it into each slide, allowing you to control where you are on your screen. And you also save a lot of time and effort, as you can record and save your presentation as a video from within Microsoft PowerPoint.

IMAGES
VIDEO
COMMENTS
Copy an image to your clipboard, then paste it into PPT by right-clicking and choosing Picture from the Paste Options group. (Image in sidebar source: Envato Elements.) Then, navigate to the PowerPoint slide where you want to paste your photo. Then, right-click and choose Picture from the Paste Options section.
Alternatively, go to Insert > Pictures > Picture from file, and select the photo you want from your finder. 3. Avoid Photo Clutter. The photos you add to your PowerPoint should be presented one at a time, or minimally enough to maintain focus — too many photos can cause clutter and become distracting.
PowerPoint lets you turn your slideshow into plain text. This is handy if you want to move some of the presentation's text to your website or blog. When you create a rich text format (.rtf) file, you save only the text. You lose all of the images, animations, slide-to-slide transitions, and other non-text objects.
Inside your PowerPoint presentation: Navigate to the Insert tab. Select the Photo Album command to launch the photo album dialog box. 5. Navigate to where your pictures are saved. Within the Photo Album dialog box, use the File/Disk command on the left to navigate to where you exported the pictures of your slides to. 6.
Learn how to create a photo slideshow in Microsoft PowerPoint in this tutorial video. See step-by-step how to import photos, how to make quick edits to the p...
These kind of Presentations are called as PowerPoint Picture Presentation. All you have to do is Go to of your Presentation and select Save and Send, Next select Change File Type and save it as PowerPoint Picture Presentation. This will save your presentation in pptx format but when you open it, you will see each of your slides now is an image ...
Microsoft PowerPoint is a presentation design software that is part of Microsoft 365. This software allows you to design presentations by combining text, images, graphics, video, and animation on slides in a simple and intuitive way. Over time, PowerPoint has evolved and improved its accessibility to users.
Method #1: From your computer. To insert a picture from your computer into PowerPoint, you have two options: Option 1: Simply drag a picture file from wherever it is on your computer onto the slide, using your mouse. Option 2: Go up to the Insert tab, and select Pictures, navigate to where your picture is in your system and then click on Insert.
With PowerPoint on your PC, Mac, or mobile device, you can: Create presentations from scratch or a template. Add text, images, art, and videos. Select a professional design with PowerPoint Designer. Add transitions, animations, and cinematic motion. Save to OneDrive, to get to your presentations from your computer, tablet, or phone.
To insert a picture from a file: Select the Insert tab, then click the Pictures command in the Images group. A dialog box will appear. Locate and select the desired image file, then click Insert. The picture will appear on the currently selected slide. You can also click the Pictures command in a placeholder to insert images.
PowerPoint training. Pictures and graphics. Pictures and graphics Format pictures. Add pictures Video; Format pictures Video; Add a background picture ... Try it! Once you add a photo, graphic, or picture, you have many ways to enhance the picture, such as backgrounds, shadows, and effects, to get your message across even better. Adjust the ...
PowerPoint (or PPT for short) is a staple program in the Microsoft Office software suite and comes packaged with Microsoft Word and Excel. You can use PPT on both Mac and PC, or any other computer operating system via the cloud-based Microsoft Office 365.
Open PowerPoint and create a new presentation. To do this, click on the PowerPoint icon on your browser. When PowerPoint opens, click on "File" near the top, left-hand corner and then click on "New" listed under "File". From there, you will want to choose "New Presentation" which will open up a new slide show for you to start uploading pictures to.
Select the place in the slide where you want to insert the picture. On the Insert tab, in the Images group, select Pictures and then select This Device. In the dialog box that opens, browse to the picture that you want to insert, select that picture, and then select Insert. Tip: If you want to insert multiple pictures at the same time, press ...
Ensure they are not pixelated or distorted when stretched. Step 2: Insert the picture. Select the slide you want to insert the image in by clicking on it. Then, go to the 'Insert' tab, select 'Picture,' and choose the image from your computer. Step 3: Resize and crop. Click on the image to reveal the Format tab.
Step-1: Click on the "Photo Browser" option. The first step is to open the slide where you want to add the picture. Then click on the "Picture" option in the "Insert" menu and select the "Photo Browser" option under the "Picture" option. Step-2: Select your preferred image.
PowerPoint is a versatile and popular presentation software developed by Microsoft (MS). It is a part of the Microsoft Office Suite and offers various features and tools to create visually appealing and engaging presentations. MS PowerPoint allows users to combine text, graphics, multimedia elements, and animations to convey information ...
Method 02: From insert pictures To insert pictures in PowerPoint, you can navigate to the 'Insert' tab and click on the 'Pictures' option. A dropdown list will appear with three options to choose from: 'From this device', 'Stock images', and 'Online pictures'.Simply select the option that suits you best and insert the picture into your presentation.
A good presentation needs two fonts: a serif and sans-serif. Use one for the headlines and one for body text, lists, and the like. Keep it simple. Veranda, Helvetica, Arial, and even Times New Roman are safe choices. Stick with the classics and it's hard to botch this one too badly.
Visuals in Presentations: Best and Worst Practices. Sin 1: Using pixelated or blurry images. It's not that presenters do not see that the image in their slide is of poor quality but that is the last desperate move they make when they can't find any better visual in its place. Sorry folks, you have to search harder for that high quality image.
Add images, videos, and music to bring your slide show to life. Use a font that is easy to read from a distance. Try not to use too many words on each slide. Use custom transitions and timing to make your slide show flow. Ensure a cohesive slide show by using a theme or template. For live presentations, practice with the Speaker Coach feature.
PowerPoint supports several different presentation-file formats, as described below. Windows macOS Web. Use File > Save As to save your presentation as one of the file types listed below. File type. Extension. Use to save. PowerPoint Presentation. .pptx. A presentation that you can open on a PC or a Mac.
Pictures in PowerPoint can be tricky to get to grips with. Choosing the right size has an impact on both the file size of your presentation and the maximum monitor/projection size you can use without degrading quality. ... A PowerPoint presentation design company. Advanced PowerPoint and presentation skills training. Also visual storytelling ...
Images or pictures should be big (perhaps 20-25% of the page), bold, and have a clear purpose that complements the slide's text. Layout: Don't overcrowd your slides with too much information.
Open PowerPoint. In the left pane, select New. Select an option: To create a presentation from scratch, select Blank Presentation. To use a prepared design, select one of the templates. To see tips for using PowerPoint, select Take a Tour, and then select Create, . Add a slide.
Open a new Microsoft PowerPoint. Click the Copilot button from the top bar. This will open a Copilot section from the left pane. Now, you can start creating a presentation by asking Copilot to ...
Go to Record > From Beginning or Record > From Current Slide. In the recording screen, click on the Camera icon at the top. This will insert a round object containing your video in your slides ...