- Create a presentation Article
- Save Article
- Design Article
- Share and collaborate Article
- Give a presentation Article
- Set up your mobile apps Article
- Learn more Article


Give a presentation
Give a presentation in powerpoint.
Start a presentation
On the Slide Show tab select From Beginning . Now, if you are working with PowerPoint on a single monitor and you want to display Presenter view, in Slide Show view, on the control bar at the bottom left select the three dots, and then Show Presenter View .
To move to the previous or next slide, select Previous or Next .
To view all the slides in your presentation, select See all slides .

During your presentation, the speaker notes are visible on your monitor, but aren't visible to the audience.
The Notes pane is a box that appears below each slide. Tap it to add notes.
If you don’t see the Notes pane or it is completely minimized, click Notes on the task bar across the bottom of the PowerPoint window

You can choose which language the caption/subtitle text should be shown to your audience. This feature requires Windows 10 and an up-to-date version of PowerPoint.
Select Slide Show > Subtitle Settings .
Set your Spoken Language .
Select Subtitle Language to see which languages PowerPoint can display on-screen as captions or subtitles, and select the one you want.
In the Subtitle Settings menu, set the desired position of the captions or subtitles.
More appearance settings are available by selecting Subtitle Settings > More Settings (Windows) .

Need more help?
Want more options.
Explore subscription benefits, browse training courses, learn how to secure your device, and more.

Microsoft 365 subscription benefits

Microsoft 365 training

Microsoft security

Accessibility center
Communities help you ask and answer questions, give feedback, and hear from experts with rich knowledge.

Ask the Microsoft Community

Microsoft Tech Community

Windows Insiders
Microsoft 365 Insiders
Was this information helpful?
Thank you for your feedback.

- SUGGESTED TOPICS
- The Magazine
- Newsletters
- Managing Yourself
- Managing Teams
- Work-life Balance
- The Big Idea
- Data & Visuals
- Reading Lists
- Case Selections
- HBR Learning
- Topic Feeds
- Account Settings
- Email Preferences
How to Make a “Good” Presentation “Great”
- Guy Kawasaki

Remember: Less is more.
A strong presentation is so much more than information pasted onto a series of slides with fancy backgrounds. Whether you’re pitching an idea, reporting market research, or sharing something else, a great presentation can give you a competitive advantage, and be a powerful tool when aiming to persuade, educate, or inspire others. Here are some unique elements that make a presentation stand out.
- Fonts: Sans Serif fonts such as Helvetica or Arial are preferred for their clean lines, which make them easy to digest at various sizes and distances. Limit the number of font styles to two: one for headings and another for body text, to avoid visual confusion or distractions.
- Colors: Colors can evoke emotions and highlight critical points, but their overuse can lead to a cluttered and confusing presentation. A limited palette of two to three main colors, complemented by a simple background, can help you draw attention to key elements without overwhelming the audience.
- Pictures: Pictures can communicate complex ideas quickly and memorably but choosing the right images is key. Images or pictures should be big (perhaps 20-25% of the page), bold, and have a clear purpose that complements the slide’s text.
- Layout: Don’t overcrowd your slides with too much information. When in doubt, adhere to the principle of simplicity, and aim for a clean and uncluttered layout with plenty of white space around text and images. Think phrases and bullets, not sentences.
As an intern or early career professional, chances are that you’ll be tasked with making or giving a presentation in the near future. Whether you’re pitching an idea, reporting market research, or sharing something else, a great presentation can give you a competitive advantage, and be a powerful tool when aiming to persuade, educate, or inspire others.
- Guy Kawasaki is the chief evangelist at Canva and was the former chief evangelist at Apple. Guy is the author of 16 books including Think Remarkable : 9 Paths to Transform Your Life and Make a Difference.
Partner Center
The Presenter's Guide to Nailing Your Next PowerPoint
Updated: July 27, 2022
Published: February 11, 2021
Have a presentation coming up that involves PowerPoint slides? Creating the content and design for a new presentation can be a daunting task.

Between outlining, deciding on a design, filling it out, and finalizing the details, it's not uncommon for a few questions to pop up.
Where's the best place to start? Are some steps better to take before others? How can you make sure you aren't missing anything? And how on earth do you master those essential -- yet slightly technical -- design tricks that can take a presentation from good to great?
![→ Free Download: 10 PowerPoint Presentation Templates [Access Now]](https://no-cache.hubspot.com/cta/default/53/2d0b5298-2daa-4812-b2d4-fa65cd354a8e.png "how to give ppt presentation in office")
We're here to make the process a little easier for you. We've talked to some of the best presenters at HubSpot and have included their tips throughout this blog.
With the following tips in your arsenal, you'll be able to navigate PowerPoint much more fluidly and give a standout presentation that'll leave your audience wanting more.
How to Structure a Powerpoint Presentation
1. decide on a working title and the main takeaways..
Beyond picking a topic, your first step should be coming up with a working title for your presentation. A working title is more specific than a topic: Think "How the Right Nutrition Can Strengthen Your Kids' Bones" instead of "Raising Healthy Kids." Keep in mind that a compelling presentation title is much like a compelling blog post title : short, accurate, and valuable.
Once you've got your working title, make a list of the main takeaways of your presentation to begin to give it some structure. This'll help you stay focused when writing your outline and elaborating on those sections.
Aja Frost, the Head of English SEO at HubSpot, says, "I try to structure my presentations around a story. Not only does this make the presentation more memorable and engaging, it's also easier to figure out which information is relevant."
To do this, Frost says to pick a protagonist. She adds, "It might be your team, your audience, your customer.... Then, identify the rising action, problem, climax, and falling action. It's just like grade school. This structure works whether you're talking about an accomplishment, a challenge, a big question—anything, really."
2. Create a short text outline with your audience in mind.
Once you have your main takeaways and your story in mind, it's time to begin outlining the content of your presentation in more detail, while keeping your specific audience in mind. A presentation on any topic should sound different if you're speaking to an audience of college students versus an audience of investors, for example. The tone, words, design, and delivery of your presentation should all cater to your specific audience for maximum impact.
Ask yourself: What do your audience members already know? What new information can you teach them? What are they expecting from your presentation? What's going to be interesting to them? What will keep them focused and engaged? Then, make choices during every stage of the presentation process accordingly.
Justin Champion, a content professor at HubSpot, says, "Before diving into a presentation, I create an outline of how it'll flow. I do this by creating an intro (what they're going to learn), the body (what they're learning), and finish with a conclusion (recap what they just learned) I use bullet point slide a lot for talking points I can expand on. Pro tip: use animations to guide the story. For example, instead of showing all the bullets at once, click through to each via animation."
3. Formulate your content as a narrative, if possible.
This may not apply for more formal presentation that have rigid structures (like performance reports), but for presentations that have more flexibility, presenting your content as a narrative can be much more compelling.
Stories appeal to people's emotional side in ways that information, facts, and figures can't. They help you relate to your audience -- and in turn, they'll make you and your message far more interesting to your audience. They also help make complicated concepts more easily understandable to your audience, who may not share the same experience level or work in the same industry.
Kyle Jepson, a senior professor at HubSpot, says, "Since I’m an educator, I always structure my presentations around the learning outcomes I want to achieve. If there are three things I want my listeners to understand at the end of the presentation, I’ll have three sections. Whenever possible, I put some sort of interactive element at the end of each section to assess their understanding. In a virtual event, this might be a poll or a question for people to respond to in the chat. In an in-person setting, workshop activities or small-group discussions work well."
4. Collect data and examples.
While sweeping statements can help you set the stage, supporting those statements with evidence will make your argument more interesting and credible. Data and examples give your argument content, and people will understand what you're saying much better.
But don't just slap random stats on your slides and expect to "wow" your audience. Be sure your data comes from a reputable source and that you're presenting it in a way that's easy to understand, like through accurate charts and graphs.
Finally, don't overwhelm your audience with too much data. According to psychologist George Miller , we can only remember approximately five to nine bits of information in our short-term memory at any given time. Keep that in mind as you collect your evidence.
5. Engage with your audience.
During a presentation, it's important to connect with your audience. But how can you do that when you're just talking at them?
Anni Kim, an INBOUND professor at HubSpot, says, "Staying engaged during a virtual presentation is tough, so provide plenty of opportunities for participation. You should add a slide at the beginning that points out how people can take advantage of the chat and ask questions throughout the presentation."
Once you've set the expectations, keep up on the chat and answer questions as they arise.
Now that you have a structure in mind, you'll start to write the content. Below, we'll give tips for how to start and end your presentation.
How to Start a Powerpoint Presentation
1. start with a story..
Not to be repetitive, but storytelling is one of the best ways to capture your audience's attention in general. Presentations are no different. Starting with a hook is a great way to get your audience invested in your content.
Champion says, "The best way to start a presentation is with an interesting story that connects to the content. A great way to keep you audience engaged is to make the content interesting."
2. Be yourself.
On the other hand, while you want to tell a story, you also want your audience to connect with you as the presenter.
Jepson says, "During the introduction, I think one of the most important things to do is to set expectations for your style as a presenter. You don't always need to start with a joke or a story. Start out by being you, and then keep being you for as long as you’re on stage."
3. Include surprising or unusual information at the beginning.
While you'll most likely use a standard approach with session title, presenter's bio, and an agenda, you don't want your audience to get bored.
Jepson adds "I think the standard approach (session title, presenter’s bio, agenda) is pretty effective except that it’s usually super boring. I try to include the standard information but sprinkle in things that are surprising or unusual."
Some examples include:
- Adding a photo of your family on the About Me slide. "A lot of presenters put a picture of themselves on their About Me slide. But I think that’s silly because I’m standing right there," Jepson says. "If people don’t know what I look like, they will by the end of the presentation! So I’ve started putting a picture of my wife and kids on that slide and saying something sweet or silly about that."
- Asking people to use their phones. "A lot of in-person presentations start with a request to silence cell phones," Jepson comments. "Sometimes I’ll do the opposite and say something like, 'Before we get started, I want you all to pull out your phones. You probably think I’m going to ask you to silence them. But I’m not. I’m here from HubSpot, and I’m here to help you however I can. So if there’s anyone from your team who might have questions or need help from a HubSpotter, I want you to send them a message and tell them to send their questions to you before we get to the Q&A section of presentation. To give you time to do this, I’m going to send a text to my wife to let her know I made it here safely.' And then I’ll literally pull out my phone and send a text message on stage."
Now that you've structured your post and have ironed out the details of your introduction, it's time to work on the end of the presentation.
How to End a Powerpoint Presentation
1. recap what the audience has learned..
First and foremost, the end of your presentation should tie everything together.
Champion adds, "Recap what they just learned, explain next steps based on learnings, and offer any associated resources to continue learning."
This will help people remember the content and give them resources to learn more or reach out if they have questions.
2. Q&A.
Another great way to end a presentation is with a Q&A.
Jepson remarks, "I always end with Q&A. The only tricky thing about that is knowing how to cut it off if you’re getting more questions than you have time to answer or if you aren’t getting any questions at all. In both of those situations, I do essentially the same: I cut it off and tell people to come talk to me individually."
For in-person meetings, Jepson will tell the audience to come find him after the presentation to ask more questions. However, for virtual meetings, he'll let people know how to reach him, whether that's via LinkedIn or email.
3. Call to action.
Calls to action are an important component of any piece of content and presentations are no different. What do you want your audience to do with this information?
In your recap, include actionable ways for your audience to incorporate your information into their day-to-day (if applicable). You can also let people know to reach out to you with questions so they know the next steps in case they want to discuss the presentation further.
Now that you have an idea of what you're going to be talking about and how you'll be laying it out, it's time to open up a new PowerPoint presentation and apply those basic design elements.
Outlining Your PowerPoint Design
1. pick a color scheme..
Before you begin translating your text outline into PowerPoint, you'll want to start by adding some very basic design elements to your PowerPoint slides. First, choose a color scheme -- one that has enough contrast between colors to make colors stand out. Whether you decide to use two, three, or four different colors in your presentation is up to you, but certain color combinations go together better than others. Read the sections on creating color schemes in this blog post to figure out a good color combination.

Image Source
2. Design your slide backgrounds.
In PowerPoint, less is more. You don’t ever want to let the design distract from your message. But at the same time, you want to get more creative than a plain, white background -- even if you're going for a very simple design.
The three main ways to add a background design to a PowerPoint presentation are: 1) to use a predesigned template from PowerPoint; 2) to create a custom background using a solid color; or 3) to create a custom background using an image. Here's how to do each of those things.
(We also have a few general PowerPoint templates available for download here , which come with a series of videos to teach you some basic PowerPoint creation tips.)
How to Browse Predesigned Templates in PowerPoint
PowerPoint comes with a series of predesigned templates to choose from.
To browse these templates on a Mac: Click on the slide or slides you want to add the background to. Then, click the "Themes" tab at the top of the screen.

You can either scroll through your options up there, or you can access the themes gallery in a bigger window by hovering your mouse over the theme previews and clicking the dropdown arrow that appears below them.
Right-click the background style that you want. To apply the background style to the selected slides, click "Apply to Selected Slides." To apply the background style to all of the slides in your presentation, click "Apply to All Slides."
To browse these templates on a PC: Click on the slide or slides you want to add the background to. Then, click the "Design" tab at the top of the screen. In the "Background" group, click the arrow next to "Background Styles" to open up the theme gallery.

Pro Tip: You can also apply any PowerPoint template you already have as a theme, even if it doesn't show up in the theme gallery. To do that, click the "Browse Themes" option you'll find at the bottom of the dropdown themes gallery, and navigate to wherever the given presentation, template, or theme is located on your computer. Then, click "Apply."
How to Create a Custom Background Using a Solid Color
Want your slide background to be a simple, solid color? The steps to do this are almost identical on a Mac and a PC.
Simply right-click the slide(s) you want to add a background color to, then click "Format Background." In the window that appears, click "Fill" and then "Solid." Notice you can also adjust the gradient or make the background a pattern. Click "Apply" at the bottom to apply the changes.

How to Create a Custom Background Using an Image
Sometimes, making the slide background a high-definition image can really make that slide pop. It also encourages you to cut down on text so that only a few keywords complement the image. PowerPoint makes it easy to create a custom background using an image you own.

First, choose your image. Size matters here: Be sure it's high resolution so that it can fill your slide without becoming blurry or distorted. Here are the 17 best free stock photo sites to help you find some large, great quality images.
To create a custom background using an image on a Mac: Click the slide that you want to add a background picture to. To select multiple slides, click a slide and then press and hold CTRL while you click the other slides.
Next, click the "Themes" tab at the top of your screen. In the "Theme Options" group, click "Background," then "Format Background."

In the window that appears, click "Fill," then "Picture or Texture." To insert a picture from a file, click "Choose Picture..." and then locate and double-click the picture you want to insert. If you want to use this picture as a background for just the slides you selected, click "Apply." If you want to use the picture as a background for all the slides in your presentation, click "Apply to All."
To create a custom background using an image on a PC: Click the slide that you want to add a background picture to. To select multiple slides, click a slide and then press and hold CTRL while you click the other slides.
Next, click the "Design" tab at the top of your screen. In the "Background" group, click "Background Styles," then "Format Background."
In the window that appears, click "Fill," then "Picture or texture fill." To insert a picture from a file, click "File" and then locate and double-click the picture you want to insert. If you want to use this picture as a background for just the slides you selected, click "Close." If you want to use the picture as a background for all the slides in your presentation, click "Apply to All."
Filling In the Content
1. fill in the text on your slides using concise language..
Your slides are there to support your speech, not replace it. If your slides contain too much information -- like full sentences or (gasp) paragraphs -- then your audience members won't be able to help but read the slides instead of listening to you. Plus ... that's boring. Instead, use slides to enhance keywords and show visuals while you stand up there and do the real work: telling a story and describing your data.
When it comes to your slide text, focus on the main phrases of a bullet point, and cover details verbally. We recommend using up to three bullet points per slide and making any text as simple and concise as possible. A good rule of thumb is this: If you're using more than two lines per slide or per idea, then you've used too much text. Depending on the type of presentation, two lines might even be a little text-heavy.
Are you planning on sending your slides to your audience afterward? If you're concerned about putting enough information on the slides for people to understand your presentation when they go back to it later, you can always add little details into the slide notes in PowerPoint. You can find the Notes pane at the bottom of your PowerPoint screen, right below your slides. Click and drag the edge of the pane to make it larger or smaller.

2. Brainstorm your final title with someone else.
Once all your content is there, you're ready to finalize your title. First, refine your working title as best you can on your own. Is it compelling and interesting enough to engage your audience from the very start? Does it accurately reflect your presentation?
Next -- and this is important -- connect with someone else to brainstorm the final title together. Read this blog post for a helpful walkthrough on writing a great title and title brainstorming with others.
Filling In Your PowerPoint Design
1. choose a font that's easy to read..
Choose either one font to use throughout your presentation, or two (one for your headers and one for your body text) that contrast each other well. Here's a list of 35 beautiful fonts you can download for free to get you started.
If you decide on two fonts, your header font should be bold and eye-catching, and your body text font should be simple and easy to read. (For more guidance on what fonts work best together, take a look at this visual guide .)
2. Embed your font files.
Fonts changing from one computer to another is one of the most common problems PowerPoint presenters have -- and it can really mess up your presentation and flow. What's actually happening in this case is not that the fonts are changing; it's that the presentation computer just doesn’t have the same font files installed .
If you’re using a PC and presenting on a PC, then there is a smooth workaround for this issue. When you involve Mac systems, the solution is a bit rougher.
On a PC: When you save your PowerPoint file, click "Save As" and then "Save Options." Then, select the "Embed TrueType fonts" check box and press "OK." Now, your presentation will keep the font file and your fonts will not change when you move computers (unless you give your presentation on a Mac).
On a Mac: In PowerPoint for Mac, there's no option to embed fonts within the presentation. So unless you use ubiquitous typefaces like Arial or Tahoma, your PowerPoint is likely going to encounter font changes on different computers. The best way to avoid this is to save the final version of your presentation slides as JPEGs, and then insert those JPEGs onto your PowerPoint slides. In other words, make each slide a JPEG picture of your slide. (Note that the file size of your PowerPoint will increase if your presentation includes a lot of JPEGs.)
Mac users can easily drag and drop the JPEGs into PowerPoint. If you don't use actions in your presentation, then this option works especially well.
If you want your presentation to appear "animated," then you'll need to do a little tinkering. All you need to do is save JPEGs of each "frame" of the animation. Then, in your final presentation, you'll just display those JPEGs in the order you'd like the animation to appear. While you'll technically have several new slides in place of one original one, your audience won't know the difference.
If you're a Mac user and want to use this option, then be sure to add this to your checklist as the final step.
3. Adjust the font sizes.
Once you've chosen your font, you can start playing around with font size. Carefully choose the font sizes for headers and text, and consistently use the same font face and sizes on all your slides to keep things clean and legible. Be sure your font is big enough so even the audience members in the way back of the room can read them.
4. Adjust line and character spacing.
The biggest PowerPoint no-no is using too much text on a slide. The most effective slides use text sparingly and present it in a way that's easy to read. One trick to make text more legible without changing the font size or layout is to increase or decrease the space between each line and each letter.
To adjust line spacing:
Select the text you'd like to adjust. On the "Home" tab, in the "Paragraph" group, click "Line Spacing" and choose "Line Spacing Options." In the Paragraph dialog box's "Spacing" section, click the "Line Spacing" dropdown list and choose "Exactly." In the "At" text box, adjust the value accordingly. Click "OK" to save your changes.

To adjust character spacing:
Select the text you want to change. Then, on the "Home" tab, find and click the "Font" button." Choose "Character Spacing Options" from the dropdown menu. Adjust spacing as needed.

5. Add images.
Great visual cues can have a huge impact on how well your audience understands your message. Using gorgeous images in a slide presentation is the perfect way to keep things interesting.
It's important, though, that you don't use images to decorate. This is a very common mistake. Remember: Images are meant to reinforce or complement your message, but they can be distracting. Focus on finding high resolution images so that they look good when expanded without becoming blurry or distorted.
If you don't have your own images to use, check out our roundup of the 17 best free stock photo sites .
Pro Tip: If you're finding that the background of an image is distracting, you can actually remove it before putting it into your presentation directly inside PowerPoint -- no Photoshop required. Read this blog post for instructions .

6. Use multimedia, but sparingly.
Using multimedia in your presentation, like video and audio, can be an effective way to capture your audience's attention and encourage retention of your message. In most cases, it's best to avoid using more than one or two video or audio clips so you don't detract from your talk or your message.
PowerPoint lets you either link to video/audio files externally, or embed the media directly in your presentation. You should embed these files if you can, but if you use a Mac, you cannot actually embed the video. We'll get to that in a second.
PC users: Here are two great reasons to embed your multimedia:
- Embedding allows you to play media directly in your presentation. It'll look much more professional than switching between windows.
- Embedding also means that the file stays within the PowerPoint presentation, so it should play normally without extra work (except on a Mac).
Mac users: You need to be extra careful about using multimedia files. You'll always need to bring the video and/or audio file with you in the same folder as the PowerPoint presentation. It’s best to only insert video or audio files once the presentation and the containing folder have been saved on a portable drive in their permanent folder. You can also record voiceovers for your presentation or hire a voice actor through Voice123 .
If your presentation is going to be played on a Windows computer, then Mac users need to make sure their multimedia files are in WMV format . That can get complicated, so if you want to use PowerPoint effectively, consider using the same operating system for designing and presenting no matter what (if that's something you can control).
7. Design your title slide.
The title of your presentation is often the first impression it gives off -- especially if it's going to be on display as people file in to your presentation -- so it's important to put some time and careful thought into its design.
Here are 20 layout ideas for PowerPoint title slides from Chris Lema :
8. Add any consistent elements, like your company logo.
There's a reason this is at the end. If you add things like your logo that you want to be in the same place on every slide, any adjustments you make to individual slides could slightly alter the alignment ... and you'll have to go back and adjust them all over again.
Preparing For the Presentation
1. review and edit your slides..
Spend some time on your own flipping through your slides while practicing your talk. Make sure you can check all of the following off the list:
- Your slides flow well and align with your talk.
- Your slides are free of all grammatical, formatting, or design errors.
- Your multimedia files work.
- You've double-checked any mathematical calculations you made yourself.
- You've properly attributed any statistics, data, quotes, ideas, etc. to the original source.
- You've double-checked you're actually allowed to use the photos/images you used . (Don't skip this step. Here's a cautionary tale about internet copyright law .)
- You're sure nothing in your presentation could potentially harm any of your partners, stakeholders, audience members, or your company.
- You've checked with a friend that nothing in your presentation might offend certain people in your audience -- or, if so, that it's worth it.
2. Know your slides inside out.
The best presenters don't read off your slides, so it's important to prepare and practice your presentation ahead of time. You never want to be the person finalizing your talk or presentation half an hour before an event ... that's just poor planning. Plus, what if the projector fails and you have to give your talk without slides? It can happen, and if does, you'll be incredibly happy you spent so much time preparing.
3. Practice using "presenter view."
Depending on the venue, you might have a presenter's screen available to you in addition to the main projected display that your audience can see. PowerPoint has a great tool called "Presenter View," which includes an area for notes, a timer/clock, a presentation display, and a preview of the next slide.
Make sure "Presenter View" is turned on by selecting it in the "Slide Show" tab of your PowerPoint.
To practice using "Presenter View," open the "Slide Show" tab within PowerPoint. In the "Presenter Tools" box, click "Presenter View."

4. Bring your own laptop and a backup copy of your presentation.
This isn't just a bonus step -- it's an essential one. Technology can mess up on you, and you need to be prepared. Between operating systems or even between different versions of Microsoft Office, PowerPoint can get a little wonky. One way to avoid problems is to ensure you have all the right hardware with you. Bring along your own laptop when you're presenting, just in case.
Even if you bring your laptop, but especially if you for some reason cannot, bring a backup copy of your PowerPoint file on a flash drive.
What other tips do you have for nailing PowerPoint presentations?
Editor's note: This post was originally published in October 2015 and has been updated for comprehensiveness.
![Blog - Beautiful PowerPoint Presentation Template [List-Based]](https://no-cache.hubspot.com/cta/default/53/013286c0-2cc2-45f8-a6db-c71dad0835b8.png "how to give ppt presentation in office")
Don't forget to share this post!
Related articles.
![How to Write an Ecommerce Business Plan [Examples & Template]](https://blog.hubspot.com/hubfs/ecommerce%20business%20plan.png "how to give ppt presentation in office")
How to Write an Ecommerce Business Plan [Examples & Template]
![How to Create an Infographic in Under an Hour — the 2024 Guide [+ Free Templates]](https://blog.hubspot.com/hubfs/Make-infographic-hero%20%28598%20%C3%97%20398%20px%29.jpg "how to give ppt presentation in office")
How to Create an Infographic in Under an Hour — the 2024 Guide [+ Free Templates]
![20 Great Examples of PowerPoint Presentation Design [+ Templates]](https://blog.hubspot.com/hubfs/powerpoint-presentation-examples.webp "how to give ppt presentation in office")
20 Great Examples of PowerPoint Presentation Design [+ Templates]

Get Buyers to Do What You Want: The Power of Temptation Bundling in Sales

How to Create an Engaging 5-Minute Presentation
![How to Start a Presentation [+ Examples]](https://blog.hubspot.com/hubfs/how-to-start-presenting.webp "how to give ppt presentation in office")
How to Start a Presentation [+ Examples]
![17 PowerPoint Presentation Tips to Make More Creative Slideshows [+ Templates]](https://blog.hubspot.com/hubfs/powerpoint-design-tricks_7.webp "how to give ppt presentation in office")
17 PowerPoint Presentation Tips to Make More Creative Slideshows [+ Templates]

120 Presentation Topic Ideas Help You Hook Your Audience
![How to Create the Best PowerPoint Presentations [Examples & Templates]](https://blog.hubspot.com/hubfs/Powerpoint%20presentation.jpg "how to give ppt presentation in office")
How to Create the Best PowerPoint Presentations [Examples & Templates]
![How to Create a Stunning Presentation Cover Page [+ Examples]](https://blog.hubspot.com/hubfs/presentation-cover-page_3.webp "how to give ppt presentation in office")
How to Create a Stunning Presentation Cover Page [+ Examples]
Download ten free PowerPoint templates for a better presentation.
Marketing software that helps you drive revenue, save time and resources, and measure and optimize your investments — all on one easy-to-use platform
How-To Geek
8 tips to make the best powerpoint presentations.
Want to make your PowerPoint presentations really shine? Here's how to impress and engage your audience.
Quick Links
Table of contents, start with a goal, less is more, consider your typeface, make bullet points count, limit the use of transitions, skip text where possible, think in color, take a look from the top down, bonus: start with templates.
Slideshows are an intuitive way to share complex ideas with an audience, although they're dull and frustrating when poorly executed. Here are some tips to make your Microsoft PowerPoint presentations sing while avoiding common pitfalls.
It all starts with identifying what we're trying to achieve with the presentation. Is it informative, a showcase of data in an easy-to-understand medium? Or is it more of a pitch, something meant to persuade and convince an audience and lead them to a particular outcome?
It's here where the majority of these presentations go wrong with the inability to identify the talking points that best support our goal. Always start with a goal in mind: to entertain, to inform, or to share data in a way that's easy to understand. Use facts, figures, and images to support your conclusion while keeping structure in mind (Where are we now and where are we going?).
I've found that it's helpful to start with the ending. Once I know how to end a presentation, I know how best to get to that point. I start by identifying the takeaway---that one nugget that I want to implant before thanking everyone for their time---and I work in reverse to figure out how best to get there.
Your mileage, of course, may vary. But it's always going to be a good idea to put in the time in the beginning stages so that you aren't reworking large portions of the presentation later. And that starts with a defined goal.
A slideshow isn't supposed to include everything. It's an introduction to a topic, one that we can elaborate on with speech. Anything unnecessary is a distraction. It makes the presentation less visually appealing and less interesting, and it makes you look bad as a presenter.
This goes for text as well as images. There's nothing worse, in fact, than a series of slides where the presenter just reads them as they appear. Your audience is capable of reading, and chances are they'll be done with the slide, and browsing Reddit, long before you finish. Avoid putting the literal text on the screen, and your audience will thank you.
Related: How to Burn Your PowerPoint to DVD
Right off the bat, we're just going to come out and say that Papyrus and Comic Sans should be banned from all PowerPoint presentations, permanently. Beyond that, it's worth considering the typeface you're using and what it's saying about you, the presenter, and the presentation itself.
Consider choosing readability over aesthetics, and avoid fancy fonts that could prove to be more of a distraction than anything else. A good presentation needs two fonts: a serif and sans-serif. Use one for the headlines and one for body text, lists, and the like. Keep it simple. Veranda, Helvetica, Arial, and even Times New Roman are safe choices. Stick with the classics and it's hard to botch this one too badly.
There reaches a point where bullet points become less of a visual aid and more of a visual examination.
Bullet points should support the speaker, not overwhelm his audience. The best slides have little or no text at all, in fact. As a presenter, it's our job to talk through complex issues, but that doesn't mean that we need to highlight every talking point.
Instead, think about how you can break up large lists into three or four bullet points. Carefully consider whether you need to use more bullet points, or if you can combine multiple topics into a single point instead. And if you can't, remember that there's no one limiting the number of slides you can have in a presentation. It's always possible to break a list of 12 points down into three pages of four points each.
Animation, when used correctly, is a good idea. It breaks up slow-moving parts of a presentation and adds action to elements that require it. But it should be used judiciously.
Adding a transition that wipes left to right between every slide or that animates each bullet point in a list, for example, starts to grow taxing on those forced to endure the presentation. Viewers get bored quickly, and animations that are meant to highlight specific elements quickly become taxing.
That's not to say that you can't use animations and transitions, just that you need to pick your spots. Aim for no more than a handful of these transitions for each presentation. And use them in spots where they'll add to the demonstration, not detract from it.
Sometimes images tell a better story than text can. And as a presenter, your goal is to describe points in detail without making users do a lot of reading. In these cases, a well-designed visual, like a chart, might better convey the information you're trying to share.
The right image adds visual appeal and serves to break up longer, text-heavy sections of the presentation---but only if you're using the right images. A single high-quality image can make all the difference between a success and a dud when you're driving a specific point home.
When considering text, don't think solely in terms of bullet points and paragraphs. Tables, for example, are often unnecessary. Ask yourself whether you could present the same data in a bar or line chart instead.
Color is interesting. It evokes certain feelings and adds visual appeal to your presentation as a whole. Studies show that color also improves interest, comprehension, and retention. It should be a careful consideration, not an afterthought.
You don't have to be a graphic designer to use color well in a presentation. What I do is look for palettes I like, and then find ways to use them in the presentation. There are a number of tools for this, like Adobe Color , Coolors , and ColorHunt , just to name a few. After finding a palette you enjoy, consider how it works with the presentation you're about to give. Pastels, for example, evoke feelings of freedom and light, so they probably aren't the best choice when you're presenting quarterly earnings that missed the mark.
It's also worth mentioning that you don't need to use every color in the palette. Often, you can get by with just two or three, though you should really think through how they all work together and how readable they'll be when layered. A simple rule of thumb here is that contrast is your friend. Dark colors work well on light backgrounds, and light colors work best on dark backgrounds.
Spend some time in the Slide Sorter before you finish your presentation. By clicking the four squares at the bottom left of the presentation, you can take a look at multiple slides at once and consider how each works together. Alternatively, you can click "View" on the ribbon and select "Slide Sorter."
Are you presenting too much text at once? Move an image in. Could a series of slides benefit from a chart or summary before you move on to another point?
It's here that we have the opportunity to view the presentation from beyond the single-slide viewpoint and think in terms of how each slide fits, or if it fits at all. From this view, you can rearrange slides, add additional ones, or delete them entirely if you find that they don't advance the presentation.
The difference between a good presentation and a bad one is really all about preparation and execution. Those that respect the process and plan carefully---not only the presentation as a whole, but each slide within it---are the ones who will succeed.
This brings me to my last (half) point: When in doubt, just buy a template and use it. You can find these all over the web, though Creative Market and GraphicRiver are probably the two most popular marketplaces for this kind of thing. Not all of us are blessed with the skills needed to design and deliver an effective presentation. And while a pre-made PowerPoint template isn't going to make you a better presenter, it will ease the anxiety of creating a visually appealing slide deck.

How it works
Transform your enterprise with the scalable mindsets, skills, & behavior change that drive performance.
Explore how BetterUp connects to your core business systems.
We pair AI with the latest in human-centered coaching to drive powerful, lasting learning and behavior change.
Build leaders that accelerate team performance and engagement.
Unlock performance potential at scale with AI-powered curated growth journeys.
Build resilience, well-being and agility to drive performance across your entire enterprise.
Transform your business, starting with your sales leaders.
Unlock business impact from the top with executive coaching.
Foster a culture of inclusion and belonging.
Accelerate the performance and potential of your agencies and employees.
See how innovative organizations use BetterUp to build a thriving workforce.
Discover how BetterUp measurably impacts key business outcomes for organizations like yours.
A demo is the first step to transforming your business. Meet with us to develop a plan for attaining your goals.

- What is coaching?
Learn how 1:1 coaching works, who its for, and if it's right for you.
Accelerate your personal and professional growth with the expert guidance of a BetterUp Coach.
Types of Coaching
Navigate career transitions, accelerate your professional growth, and achieve your career goals with expert coaching.
Enhance your communication skills for better personal and professional relationships, with tailored coaching that focuses on your needs.
Find balance, resilience, and well-being in all areas of your life with holistic coaching designed to empower you.
Discover your perfect match : Take our 5-minute assessment and let us pair you with one of our top Coaches tailored just for you.

Research, expert insights, and resources to develop courageous leaders within your organization.
Best practices, research, and tools to fuel individual and business growth.
View on-demand BetterUp events and learn about upcoming live discussions.
The latest insights and ideas for building a high-performing workplace.
- BetterUp Briefing
The online magazine that helps you understand tomorrow's workforce trends, today.
Innovative research featured in peer-reviewed journals, press, and more.
Founded in 2022 to deepen the understanding of the intersection of well-being, purpose, and performance
We're on a mission to help everyone live with clarity, purpose, and passion.
Join us and create impactful change.
Read the buzz about BetterUp.
Meet the leadership that's passionate about empowering your workforce.
For Business
For Individuals
How to give a good presentation that captivates any audience

Jump to section
What are the main difficulties when giving presentations?
How to create an effective presentation, after that, how do i give a memorable presentation, how to connect with the audience when presenting.
If you’ve ever heard someone give a powerful presentation, you probably remember how it made you feel. Much like a composer, a good speaker knows precisely when each note should strike to captivate their audience’s attention and leave them with a lasting impression.
No one becomes a great public speaker or presenter without practice. And almost everyone can recall a time one of their presentations went badly — that’s a painful part of the learning process.
Whether you’re working within a small creative team or a large organization, public speaking and presentation skills are vital to communicating your ideas. Knowing how to present your vision can help you pitch concepts to clients, present ideas to your team, and develop the confidence to participate in team meetings.
If you have an upcoming presentation on the horizon and feel nervous, that’s normal. Around 15-30% of the general population experience a fear of public speaking . And, unfortunately, social anxiety is on the rise, with a 12% increase in adults over the last 20 years .
Learning how to give a good presentation can dismantle your fears and break down these barriers, ensuring you’re ready to confidently share your point of view.
It’s the week before your presentation, and you’re already feeling nervous . Maybe there’ll be an important mentor in the room you need to impress, or you’re looking for an opportunity to show your boss your value. Regardless of your countless past presentations, you still feel nervous.
Sharing your vision and ideas with any sized group is intimidating. You’re likely worrying about how you’ll perform as a presenter and whether the audience will be interested in what you offer. But nerves aren’t inherently negative — you can actually use this feeling to fuel your preparation.

It’s helpful to identify where your worries are coming from and address your fears. Here are some common concerns when preparing for an upcoming presentation:
Fear of public speaking: When you share your ideas in front of a group, you’re placing yourself in a vulnerable position to be critiqued on your knowledge and communication skills . Maybe you feel confident in your content, but when you think about standing in front of an audience, you feel anxious and your mind goes blank.
It’s also not uncommon to have physical symptoms when presenting . Some people experience nausea and dizziness as the brain releases adrenaline to cope with the potentially stressful situation . Remember to take deep breaths to recenter yourself and be patient, even if you make a mistake.
Losing the audience’s attention: As a presenter, your main focus is to keep your audience engaged. They should feel like they’re learning valuable information or following a story that will improve them in life or business.
Highlight the most exciting pieces of knowledge and ensure you emphasize those points in your presentation. If you feel passionate about your content, it’s more likely that your audience will experience this excitement for themselves and become invested in what you have to say.
Not knowing what content to place on presentation slides: Overloading presentation slides is a fast way to lose your audience’s attention. Your slides should contain only the main talking points and limited text to ensure your audience focuses on what you have to say rather than becoming distracted by the content on your slides.
Discomfort incorporating nonverbal communication: It’s natural to feel stiff and frozen when you’re nervous. But maintaining effective body language helps your audience stay focused on you as you speak and encourages you to relax.
If you struggle to incorporate body language into your presentations, try starting small by making hand gestures toward your slides. If you’re working with a large audience, use different parts of the stage to ensure everyone feels included.
Each presenter has their own personal brand and style. Some may use humor to break the ice, while others might appeal to the audience’s emotional side through inspiring storytelling.
Watching online presentations, such as TED talks, is an excellent way to expose yourself to various presentation styles and develop your own. While observing others, you can note how they carry themselves on stage and learn new ways to keep your audience engaged.
Once you’ve addressed what’s causing your fears, it’s time to prepare for a great presentation. Use your past experience as inspiration and aim to outshine your former self by learning from your mistakes and employing new techniques. Here are five presentation tips to help you create a strong presentation and wow your audience:
1. Keep it simple
Simple means something different to everyone.
Before creating your presentation, take note of your intended audience and their knowledge level of your subject. You’ll want your content to be easy for your intended audience to follow.
Say you’re giving a presentation on improving your company’s operational structure. Entry-level workers will likely need a more straightforward overview of the content than C-suite leaders, who have significantly more experience.
Ask yourself what you want your audience to take away from your presentation and emphasize those important points. Doing this ensures they remember the most vital information rather than less important supporting ideas. Try organizing these concepts into bullet points so viewers can quickly identify critical takeaways.
2. Create a compelling structure
Put yourself in your audience member’s shoes and determine the most compelling way to organize your information. Your presentation should be articulate , cohesive, and logical, and you must be sure to include all necessary supporting evidence to strengthen your main points.
If you give away all of your answers too quickly, your audience could lose interest. And if there isn’t enough supporting information, they could hit a roadblock of confusion. Try developing a compelling story that leads your audience through your thought processes so they can experience the ups and downs alongside you.
By structuring your presentation to lead up to a final conclusion, you’re more likely to keep listeners’ attention. Once you’ve reached that conclusion, you can offer a Q&A period to put any of their questions or concerns to rest.
3. Use visual aids
Appealing to various learning styles is a great way to keep everyone on the same page and ensure they absorb your content. Visual aids are necessary for visual learners and make it easier for people to picture your ideas.
Aim to incorporate a mixture of photos, videos, and props to engage your audience and convey your key points. For instance, if you’re giving a presentation on anthropology subject matter, you could show your audience an artifact to help them understand how exciting a discovery must have been.
If your presentation is long, including a video for your audience to watch is an excellent way to give yourself a break and create new jumping-off points for your speech.
4. Be aware of design techniques and trends
Thanks to cutting-edge technology and tools, you have numerous platforms at your disposal to create a good presentation. But keep in mind that although color, images, and graphics liven things up, they can cause distraction when misused.
Here are a few standard pointers for incorporating visuals on your slides:
- Don’t place blocks of small text on a single slide
- Use a minimalistic background instead of a busy one
- Ensure text stands out against the background color
- Only use high-resolution photos
- Maintain a consistent font style and size throughout the presentation
- Don’t overuse transitions and effects
5. Try the 10-20-30 rule
Guy Kawasaki, a prominent venture capitalist and one of the original marketing specialists for Apple, said that the best slideshow presentations are less than 10 slides , last at most 20 minutes, and use a font size of 30. Following this strategy can help you condense your information, eliminate unnecessary ideas, and maintain your audience’s focus more efficiently.
Once you’re confident in creating a memorable presentation, it’s time to learn how to give one. Here are some valuable tips for keeping your audience invested during your talk:
Tip #1: Tell stories
Sharing an anecdote from your life can improve your credibility and increase your relatability. And when an audience relates to you, they’re more likely to feel connected to who you are as a person and encouraged to give you their full attention, as they would want others to do the same.
Gill Hicks utilized this strategy well when she shared her powerful story, “ I survived a terrorist attack. Here’s what I learned .” In her harrowing tale, Hicks highlights the importance of compassion, unconditional love, and helping those in need.
If you feel uncomfortable sharing personal stories, that’s okay. You can use examples from famous individuals or create a fictional account to demonstrate your ideas.
Tip #2: Make eye contact with the audience
Maintaining eye contact is less intimidating than it sounds. In fact, you don’t have to look your audience members directly in their eyes — you can focus on their foreheads or noses if that’s easier.
Try making eye contact with as many people as possible for 3–5 seconds each. This timing ensures you don’t look away too quickly, making the audience member feel unimportant, or linger too long, making them feel uncomfortable.
If you’re presenting to a large group, direct your focus to each part of the room to ensure no section of the audience feels ignored.

Tip #3: Work on your stage presence
Although your tone and words are the most impactful part of your presentation, recall that body language keeps your audience engaged. Use these tips to master a professional stage presence:
- Speak with open arms and avoid crossing them
- Keep a reasonable pace and try not to stand still
- Use hand gestures to highlight important information
Tip #4: Start strong
Like watching a movie trailer, the first seconds of your talk are critical for capturing your audience’s attention. How you start your speech sets the tone for the rest of your presentation and tells your audience whether or not they should pay attention. Here are some ways to start your presentation to leave a lasting impression:
- Use a quote from a well-known and likable influential person
- Ask a rhetorical question to create intrigue
- Start with an anecdote to add context to your talk
- Spark your audience’s curiosity by involving them in an interactive problem-solving puzzle or riddle
Tip #5: Show your passion
Don’t be afraid of being too enthusiastic. Everyone appreciates a speaker who’s genuinely excited about their field of expertise.
In “ Grit: The Power of Passion and Perseverance ,” Angela Lee Duckworth discusses the importance of passion in research and delivery. She delivers her presentation excitedly to show the audience how excitement piques interest.
Tip #6: Plan your delivery
How you decide to deliver your speech will shape your presentation. Will you be preparing a PowerPoint presentation and using a teleprompter? Or are you working within the constraints of the digital world and presenting over Zoom?
The best presentations are conducted by speakers who know their stuff and memorize their content. However, if you find this challenging, try creating notes to use as a safety net in case you lose track.
If you’re presenting online, you can keep notes beside your computer for each slide, highlighting your key points. This ensures you include all the necessary information and follow a logical order.

Tip #7: Practice
Practice doesn’t make perfect — it makes progress. There’s no way of preparing for unforeseen circumstances, but thorough practice means you’ve done everything you can to succeed.
Rehearse your speech in front of a mirror or to a trusted friend or family member. Take any feedback and use it as an opportunity to fine-tune your speech. But remember: who you practice your presentation in front of may differ from your intended audience. Consider their opinions through the lens of them occupying this different position.
Tip #8: Read the room
Whether you’re a keynote speaker at an event or presenting to a small group of clients, knowing how to read the room is vital for keeping your audience happy. Stay flexible and be willing to move on from topics quickly if your listeners are uninterested or displeased with a particular part of your speech.
Tip #9: Breathe
Try taking deep breaths before your presentation to calm your nerves. If you feel rushed, you’re more likely to feel nervous and stumble on your words.
The most important thing to consider when presenting is your audience’s feelings. When you approach your next presentation calmly, you’ll put your audience at ease and encourage them to feel comfortable in your presence.
Tip #10: Provide a call-to-action
When you end your presentation, your audience should feel compelled to take a specific action, whether that’s changing their habits or contacting you for your services.
If you’re presenting to clients, create a handout with key points and contact information so they can get in touch. You should provide your LinkedIn information, email address, and phone number so they have a variety of ways to reach you.
There’s no one-size-fits-all template for an effective presentation, as your unique audience and subject matter play a role in shaping your speech. As a general rule, though, you should aim to connect with your audience through passion and excitement. Use strong eye contact and body language. Capture their interest through storytelling and their trust through relatability.
Learning how to give a good presentation can feel overwhelming — but remember, practice makes progress. Rehearse your presentation for someone you trust, collect their feedback , and revise. Practicing your presentation skills is helpful for any job, and every challenge is a chance to grow.
Elevate your communication skills
Unlock the power of clear and persuasive communication. Our coaches can guide you to build strong relationships and succeed in both personal and professional life.
Elizabeth Perry, ACC
Elizabeth Perry is a Coach Community Manager at BetterUp. She uses strategic engagement strategies to cultivate a learning community across a global network of Coaches through in-person and virtual experiences, technology-enabled platforms, and strategic coaching industry partnerships. With over 3 years of coaching experience and a certification in transformative leadership and life coaching from Sofia University, Elizabeth leverages transpersonal psychology expertise to help coaches and clients gain awareness of their behavioral and thought patterns, discover their purpose and passions, and elevate their potential. She is a lifelong student of psychology, personal growth, and human potential as well as an ICF-certified ACC transpersonal life and leadership Coach.
6 presentation skills and how to improve them
How to make a presentation interactive and exciting, how to write a speech that your audience remembers, 3 stand-out professional bio examples to inspire your own, tell a story they can't ignore these 10 tips will teach you how, reading the room gives you an edge — no matter who you're talking to, writing an elevator pitch about yourself: a how-to plus tips, 18 effective strategies to improve your communication skills, your ultimate guide on how to be a good storyteller, similar articles, the importance of good speech: 5 tips to be more articulate, the 11 tips that will improve your public speaking skills, 30 presentation feedback examples, how to not be nervous for a presentation — 13 tips that work (really), how the minto pyramid principle can enhance your communication skills, 8 clever hooks for presentations (with tips), stay connected with betterup, get our newsletter, event invites, plus product insights and research..
3100 E 5th Street, Suite 350 Austin, TX 78702
- Platform Overview
- Integrations
- Powered by AI
- BetterUp Lead
- BetterUp Manage™
- BetterUp Care™
- Sales Performance
- Diversity & Inclusion
- Case Studies
- Why BetterUp?
- About Coaching
- Find your Coach
- Career Coaching
- Communication Coaching
- Life Coaching
- News and Press
- Leadership Team
- Become a BetterUp Coach
- BetterUp Labs
- Center for Purpose & Performance
- Leadership Training
- Business Coaching
- Contact Support
- Contact Sales
- Privacy Policy
- Acceptable Use Policy
- Trust & Security
- Cookie Preferences
- PRO Courses Guides New Tech Help Pro Expert Videos About wikiHow Pro Upgrade Sign In
- EDIT Edit this Article
- EXPLORE Tech Help Pro About Us Random Article Quizzes Request a New Article Community Dashboard This Or That Game Popular Categories Arts and Entertainment Artwork Books Movies Computers and Electronics Computers Phone Skills Technology Hacks Health Men's Health Mental Health Women's Health Relationships Dating Love Relationship Issues Hobbies and Crafts Crafts Drawing Games Education & Communication Communication Skills Personal Development Studying Personal Care and Style Fashion Hair Care Personal Hygiene Youth Personal Care School Stuff Dating All Categories Arts and Entertainment Finance and Business Home and Garden Relationship Quizzes Cars & Other Vehicles Food and Entertaining Personal Care and Style Sports and Fitness Computers and Electronics Health Pets and Animals Travel Education & Communication Hobbies and Crafts Philosophy and Religion Work World Family Life Holidays and Traditions Relationships Youth
- Browse Articles
- Learn Something New
- Quizzes Hot
- This Or That Game New
- Train Your Brain
- Explore More
- Support wikiHow
- About wikiHow
- Log in / Sign up
- Computers and Electronics
- Presentation Software
- PowerPoint Presentations
6 Simple Parts for Beginners to Create a PowerPoint Presentation
Last Updated: December 19, 2022 Fact Checked
Creating a New PowerPoint
Creating the title slide, adding a new slide, adding content to slides, adding transitions, testing and saving your presentation.
This article was co-authored by wikiHow staff writer, Darlene Antonelli, MA . Darlene Antonelli is a Technology Writer and Editor for wikiHow. Darlene has experience teaching college courses, writing technology-related articles, and working hands-on in the technology field. She earned an MA in Writing from Rowan University in 2012 and wrote her thesis on online communities and the personalities curated in such communities. This article has been fact-checked, ensuring the accuracy of any cited facts and confirming the authority of its sources. This article has been viewed 4,319,938 times. Learn more...
Do you want to have your data in a slide show? If you have Microsoft 365, you can use PowerPoint! PowerPoint is a program that's part of the Microsoft Office suite (which you have to pay for) and is available for both Windows and Mac computers. This wikiHow teaches you how to create your own Microsoft PowerPoint presentation on a computer.
Things You Should Know
- Templates make it easy to create vibrant presentations no matter your skill level.
- When adding photos, you can adjust their sizes by clicking and dragging in or out from their corners.
- You can add animated transitions between slides or to individual elements like bullet points and blocks of text.

- If you don't have a Microsoft Office 365 subscription, you can use the website instead of the desktop app. Go to https://powerpoint.office.com/ to use the website version.
- You can also use the mobile app to make presentations, though it's easier to do this on a computer, which has a larger screen, a mouse, and a keyboard.

- If you don't want to use a template, just click the Blank option in the upper-left side of the page and skip to the next part.

- Skip this step if your selected template has no themes available.

- If you're creating a PowerPoint presentation for which an elaborate title slide has been requested, ignore this step.

- You can change the font and size of text used from the Home tab that's in the orange ribbon at the top of the window.

- You can also just leave this box blank if you like.

- You can also click and drag in or out one of a text box's corners to shrink or enlarge the text box.

- On a Mac, you'll click the Home tab instead. [1] X Research source

- Clicking the white slide-shaped box above this option will result in a new text slide being inserted.

- Title Slide
- Title and Content
- Section Header
- Two Content
- Content with Caption
- Picture with Caption

- Naturally, the title slide should be the first slide in your presentation, meaning that it should be the top slide in the left-hand column.

- Skip this step and the next two steps if your selected slide uses a template that doesn't have text boxes in it.

- Text boxes in PowerPoint will automatically format the bulk of your text for you (e.g., adding bullet points) based on the context of the content itself.
- You can add notes that the Presentation will not include (but you'll still be able to see them on your screen) by clicking Notes at the bottom of the slide.

- You can change the font of the selected text by clicking the current font's name and then clicking your preferred font.
- If you want to change the size of the text, click the numbered drop-down box and then click a larger or smaller number based on whether you want to enlarge or shrink the text.
- You can also change the color, bolding, italicization, underlining, and so on from here.

- Photos in particular can be enlarged or shrunk by clicking and dragging out or in one of their corners.

- Remember to keep slides uncluttered and relatively free of distractions. It's best to keep the amount of text per slide to around 33 words or less. [2] X Research source

- Slide content will animate in the order in which you assign transitions. For example, if you animate a photo on the slide and then animate the title, the photo will appear before the title.
- Make your slideshow progress automatically by setting the speed of every transition to align with your speech as well as setting each slide to Advance . [3] X Trustworthy Source Microsoft Support Technical support and product information from Microsoft. Go to source

- If you need to exit the presentation, press Esc .

- Windows - Click File , click Save , double-click This PC , select a save location, enter a name for your presentation, and click Save .
- Mac - Click File , click Save As... , enter the presentation's name in the "Save As" field, select a save location by clicking the "Where" box and clicking a folder, and click Save .
Community Q&A
- If you save your PowerPoint presentation in .pps format instead of the default .ppt format, double-clicking your PowerPoint presentation file will prompt the presentation to open directly into the slideshow view. Thanks Helpful 5 Not Helpful 0
- If you don't have Microsoft Office, you can still use Apple's Keynote program or Google Slides to create a PowerPoint presentation. Thanks Helpful 0 Not Helpful 0

- Your PowerPoint presentation (or some features in it) may not open in significantly older versions of PowerPoint. Thanks Helpful 1 Not Helpful 1
- Great PowerPoint presentations avoid placing too much text on one slide. Thanks Helpful 0 Not Helpful 0
You Might Also Like

- ↑ https://onedrive.live.com/view.aspx?resid=DBDCE00C929AA5D8!252&ithint=file%2cpptx&app=PowerPoint&authkey=!AH4O9NxcbehqzIg
- ↑ https://www.virtualsalt.com/powerpoint.htm
- ↑ https://support.microsoft.com/en-us/office/set-the-timing-and-speed-of-a-transition-c3c3c66f-4cca-4821-b8b9-7de0f3f6ead1#:~:text=To%20make%20the%20slide%20advance,effect%20on%20the%20slide%20finishes .
About This Article

- Send fan mail to authors
Reader Success Stories
Artis Holland
Sep 22, 2016
Is this article up to date?

Oct 18, 2016
Jul 23, 2016
Margery Niyi
Sep 25, 2017
Jul 21, 2016

Featured Articles

Trending Articles

Watch Articles

- Terms of Use
- Privacy Policy
- Do Not Sell or Share My Info
- Not Selling Info
wikiHow Tech Help Pro:
Level up your tech skills and stay ahead of the curve
Critical PowerPoint Shortcuts – Claim Your FREE Training Module and Get Your Time Back!
How to Make a PowerPoint Presentation (Step-by-Step)
- PowerPoint Tutorials
- Presentation Design
- January 22, 2024
In this beginner’s guide, you will learn step-by-step how to make a PowerPoint presentation from scratch.
While PowerPoint is designed to be intuitive and accessible, it can be overwhelming if you’ve never gotten any training on it before. As you progress through this guide, you’ll will learn how to move from blank slides to PowerPoint slides that look like these.

Table of Contents
Additionally, as you create your presentation, you’ll also learn tricks for working more efficiently in PowerPoint, including how to:
- Change the slide order
- Reset your layout
- Change the slide dimensions
- Use PowerPoint Designer
- Format text
- Format objects
- Play a presentation (slide show)
With this knowledge under your belt, you’ll be ready to start creating PowerPoint presentations. Moreover, you’ll have taken your skills from beginner to proficient in no time at all. I will also include links to more advanced PowerPoint topics.
Ready to start learning how to make a PowerPoint presentation?
Take your PPT skills to the next level
Start with a blank presentation.
Note: Before you open PowerPoint and start creating your presentation, make sure you’ve collected your thoughts. If you’re going to make your slides compelling, you need to spend some time brainstorming.
For help with this, see our article with tips for nailing your business presentation here .
The first thing you’ll need to do is to open PowerPoint. When you do, you are shown the Start Menu , with the Home tab open.
This is where you can choose either a blank theme (1) or a pre-built theme (2). You can also choose to open an existing presentation (3).
For now, go ahead and click on the Blank Presentation (1) thumbnail.

Doing so launches a brand new and blank presentation for you to work with. Before you start adding content to your presentation, let’s first familiarize ourselves with the PowerPoint interface.
The PowerPoint interface

Here is how the program is laid out:
- The Application Header
- The Ribbon (including the Ribbon tabs)
- The Quick Access Toolbar (either above or below the Ribbon)
- The Slides Pane (slide thumbnails)
The Slide Area
The notes pane.
- The Status Bar (including the View Buttons)
Each one of these areas has options for viewing certain parts of the PowerPoint environment and formatting your presentation.
Below are the important things to know about certain elements of the PowerPoint interface.
The PowerPoint Ribbon

The Ribbon is contextual. That means that it will adapt to what you’re doing in the program.
For example, the Font, Paragraph and Drawing options are greyed out until you select something that has text in it, as in the example below (A).

Furthermore, if you start manipulating certain objects, the Ribbon will display additional tabs, as seen above (B), with more commands and features to help you work with those objects. The following objects have their own additional tabs in the Ribbon which are hidden until you select them:
- Online Pictures
- Screenshots
- Screen Recording
The Slides Pane

This is where you can preview and rearrange all the slides in your presentation.
Right-clicking on a slide in the pane gives you additional options on the slide level that you won’t find on the Ribbon, such as Duplicate Slide , Delete Slide , and Hide Slide .

In addition, you can add sections to your presentation by right-clicking anywhere in this Pane and selecting Add Section . Sections are extremely helpful in large presentations, as they allow you to organize your slides into chunks that you can then rearrange, print or display differently from other slides.

The Slide Area (A) is where you will build out your slides. Anything within the bounds of this area will be visible when you present or print your presentation.
Anything outside of this area (B) will be hidden from view. This means that you can place things here, such as instructions for each slide, without worrying about them being shown to your audience.

The Notes Pane is the space beneath the Slide Area where you can type in the speaker notes for each slide. It’s designed as a fast way to add and edit your slides’ talking points.
To expand your knowledge and learn more about adding, printing, and exporting your PowerPoint speaker notes, read our guide here .
Your speaker notes are visible when you print your slides using the Notes Pages option and when you use the Presenter View . To expand your knowledge and learn the ins and outs of using the Presenter View , read our guide here .

You can resize the Notes Pane by clicking on its edge and dragging it up or down (A). You can also minimize or reopen it by clicking on the Notes button in the Status Bar (B).
Note: Not all text formatting displays in the Notes Pane, even though it will show up when printing your speaker notes. To learn more about printing PowerPoint with notes, read our guide here .
Now that you have a basic grasp of the PowerPoint interface at your disposal, it’s time to make your presentation.
Adding Content to Your PowerPoint Presentation
Notice that in the Slide Area , there are two rectangles with dotted outlines. These are called Placeholders and they’re set on the template in the Slide Master View .
To expand your knowledge and learn how to create a PowerPoint template of your own (which is no small task), read our guide here .

As the prompt text suggests, you can click into each placeholder and start typing text. These types of placeholder prompts are customizable too. That means that if you are using a company template, it might say something different, but the functionality is the same.

Note: For the purposes of this example, I will create a presentation based on the content in the Starbucks 2018 Global Social Impact Report, which is available to the public on their website.
If you type in more text than there is room for, PowerPoint will automatically reduce its font size. You can stop this behavior by clicking on the Autofit Options icon to the left of the placeholder and selecting Stop Fitting Text to this Placeholder .
Next, you can make formatting adjustments to your text by selecting the commands in the Font area and the Paragraph area of the Home tab of the Ribbon.

The Reset Command: If you make any changes to your title and decide you want to go back to how it was originally, you can use the Reset button up in the Home tab .

Insert More Slides into Your Presentation
Now that you have your title slide filled in, it’s time to add more slides. To do that, simply go up to the Home tab and click on New Slide . This inserts a new slide in your presentation right after the one you were on.

You can alternatively hit Ctrl+M on your keyboard to insert a new blank slide in PowerPoint. To learn more about this shortcut, see my guide on using Ctrl+M in PowerPoint .
Instead of clicking the New Slide command, you can also open the New Slide dropdown to see all the slide layouts in your PowerPoint template. Depending on who created your template, your layouts in this dropdown can be radically different.

If you insert a layout and later want to change it to a different layout, you can use the Layout dropdown instead of the New Slide dropdown.
After inserting a few different slide layouts, your presentation might look like the following picture. Don’t worry that it looks blank, next we will start adding content to your presentation.

If you want to follow along exactly with me, your five slides should be as follows:
- Title Slide
- Title and Content
- Section Header
- Two Content
- Picture with Caption
Adding Content to Your Slides
Now let’s go into each slide and start adding our content. You’ll notice some new types of placeholders.

On slide 2 we have a Content Placeholder , which allows you to add any kind of content. That includes:
- A SmartArt graphic,
- A 3D object,
- A picture from the web,
- Or an icon.
To insert text, simply type it in or hit Ctrl+C to Copy and Ctrl+V to Paste from elsewhere. To insert any of the other objects, click on the appropriate icon and follow the steps to insert it.
For my example, I’ll simply type in some text as you can see in the picture below.

Slides 3 and 4 only have text placeholders, so I’ll go ahead and add in my text into each one.

On slide 5 we have a Picture Placeholder . That means that the only elements that can go into it are:
- A picture from the web

To insert a picture into the picture placeholder, simply:
- Click on the Picture icon
- Find a picture on your computer and select it
- Click on Insert
Alternatively, if you already have a picture open somewhere else, you can select the placeholder and paste in (shortcut: Ctrl+V ) the picture. You can also drag the picture in from a file explorer window.

If you do not like the background of the picture you inserted onto your slide, you can remove the background here in PowerPoint. To see how to do this, read my guide here .
Placeholders aren’t the only way to add content to your slides. At any point, you can use the Insert tab to add elements to your slides.
You can use either the Title Only or the Blank slide layout to create slides for content that’s different. For example, a three-layout content slide, or a single picture divider slide, as shown below.

In the first example above, I’ve inserted 6 text boxes, 3 icons, and 3 circles to create this layout. In the second example, I’ve inserted a full-sized picture and then 2 shapes and 2 text boxes.
The Reset Command: Because these slides are built with shapes and text boxes (and not placeholders), hitting the Reset button up in the Home tab won’t do anything.
That is a good thing if you don’t want your layouts to adjust. However, it does mean that it falls on you to make sure everything is aligned and positioned correctly.
For more on how to add and manipulate the different objects in PowerPoint, check out our step-by-step articles here:
- Using graphics in PowerPoint
- Inserting icons onto slides
- Adding pictures to your PowerPoint
- How to embed a video in PowerPoint
- How to add music to your presentation
Using Designer to generate more layouts ideas
If you have Office 365, your version of PowerPoint comes with a new feature called Designer (or Design Ideas). This is a feature that generates slide layout ideas for you. The coolest thing about this feature is that it uses the content you already have.
To use Designer , simply navigate to the Design tab in your Ribbon, and click on Design Ideas .

NOTE: If the PowerPoint Designer is not working for you (it is grey out), see my troubleshooting guide for Designer .
Change the Overall Design (optional)
When you make a PowerPoint presentation, you’ll want to think about the overall design. Now that you have some content in your presentation, you can use the Design tab to change the look and feel of your slides.
For additional help thinking through the design of your presentation, read my guide here .
A. Picking your PowerPoint slide size
If you have PowerPoint 2013 or later, when you create a blank document in PowerPoint, you automatically start with a widescreen layout with a 16:9 ratio. These dimensions are suitable for most presentations as they match the screens of most computers and projectors.
However, you do have the option to change the dimensions.
For example, your presentation might not be presented, but instead converted into a PDF or printed and distributed. In that case, you can easily switch to the standard dimensions with a 4:3 ratio by selecting from the dropdown (A).
You can also choose a custom slide size or change the slide orientation from landscape to portrait in the Custom Slide Size dialog box (B).

To learn all about the different PowerPoint slide sizes, and some of the issues you will face when changing the slide size of a non-blank presentation, read my guide here .
B. Selecting a PowerPoint theme
The next thing you can do is change the theme of your presentation to a pre-built one. For a detailed explanation of what a PowerPoint theme is, and how to best use it, read my article here .
In the beginning of this tutorial, we started with a blank presentation, which uses the default Office theme as you can see in the picture below.

That gives you the most flexibility because it has a blank background and quite simple layouts that work for most presentations. However, it also means that it’s your responsibility to enhance the design.
If you’re comfortable with this, you can stay with the default theme or create your own custom theme ( read my guide here ). But if you would rather not have to think about design, then you can choose a pre-designed theme.
Microsoft provides 46 other pre-built themes, which include slide layouts, color variants and palettes, and fonts. Each one varies quite significantly, so make sure you look through them carefully.
To select a different theme, go to the Design tab in the Ribbon, and click on the dropdown arrow in the Themes section .

For this tutorial, let’s select the Frame theme and then choose the third Variant in the theme. Doing so changes the layout, colors, and fonts of your presentation.

Note: The theme dropdown area is also where you can import or save custom themes. To see my favorite places to find professional PowerPoint templates and themes (and recommendations for why I like them), read my guide here .
C. How to change a slide background in PowerPoint
The next thing to decide is how you want your background to look for the entire presentation. In the Variants area, you can see four background options.

For this example, we want our presentation to have a dark background, so let’s select Style 3. When you do so, you’ll notice that:
- The background color automatically changes across all slides
- The color of the text on most of the slides automatically changes to white so that it’s visible on the dark background
- The colors of the objects on slides #6 and #7 also adjust, in a way we may not want (we’ll likely have to make some manual adjustments to these slides)

Note: If you want to change the slide background for just that one slide, don’t left-click the style. Instead, right-click it and select Apply to Selected Slides .
After you change the background for your entire presentation, you can easily adjust the background for an individual slide.

Inside the Format Background pane, you can see you have the following options:
- Gradient fill
- Picture or texture fill
- Pattern fill
- Hide background
You can explore these options to find the PowerPoint background that best fits your presentation.
D. How to change your color palette in PowerPoint
Another thing you may want to adjust in your presentation, is the color scheme. In the picture below you can see the Theme Colors we are currently using for this presentation.

Each PowerPoint theme comes with its own color palette. By default, the Office theme includes the Office color palette. This affects the colors you are presented with when you format any element within your presentation (text, shapes, SmartArt, etc.).

The good news is that the colors here are easy to change. To switch color palettes, simply:
- Go to the Design tab in the Ribbon
- In the Variants area, click on the dropdown arrow and select Colors
- Select the color palette (or theme colors) you want
You can choose among the pre-built color palettes from Office, or you can customize them to create your own.
As you build your presentation, make sure you use the colors from your theme to format objects. That way, changing the color palette adjusts all the colors in your presentation automatically.
E. How to change your fonts in PowerPoint
Just as we changed the color palette, you can do the same for the fonts.

Each PowerPoint theme comes with its own font combination. By default, the Office theme includes the Office font pairing. This affects the fonts that are automatically assigned to all text in your presentation.

The good news is that the font pairings are easy to change. To switch your Theme Fonts, simply:
- Go to the Design tab in the Ribbon
- Click on the dropdown arrow in the Variants area
- Select Fonts
- Select the font pairing you want
You can choose among the pre-built fonts from Office, or you can customize them to create your own.
If you are working with PowerPoint presentations on both Mac and PC computers, make sure you choose a safe PowerPoint font. To see a list of the safest PowerPoint fonts, read our guide here .
If you receive a PowerPoint presentation and the wrong fonts were used, you can use the Replace Fonts dialog box to change the fonts across your entire presentation. For details, read our guide here .
Adding Animations & Transitions (optional)
The final step to make a PowerPoint presentation compelling, is to consider using animations and transitions. These are by no means necessary to a good presentation, but they may be helpful in your situation.
A. Adding PowerPoint animations
PowerPoint has an incredibly robust animations engine designed to power your creativity. That being said, it’s also easy to get started with basic animations.
Animations are movements that you can apply to individual objects on your slide.

To add a PowerPoint animation to an element of your slide, simply:
- Select the element
- Go to the Animations tab in the Ribbon
- Click on the dropdown arrow to view your options
- Select the animation you want
You can add animations to multiple objects at one time by selecting them all first and then applying the animation.
B. How to preview a PowerPoint animation

There are three ways to preview a PowerPoint animation:
- Click on the Preview button in the Animations tab
- Click on the little star next to the slide
- Play the slide in Slide Show Mode
To learn other ways to run your slide show, see our guide on presenting a PowerPoint slide show with shortcuts .
To adjust the settings of your animations, explore the options in the Effect Options , Advanced Animation and the Timing areas of the Animation tab .

Note: To see how to make objects appear and disappear in your slides by clicking a button, read our guide here .
C. How to manage your animations in PowerPoint

The best way to manage lots of animations on your slide is with the Animation Pane . To open it, simply:
- Navigate to the Animations tab
- Select the Animation Pane
Inside the Animation Pane, you’ll see all of the different animations that have been applied to objects on your slide, with their numbers marked as pictured above.
Note: To see examples of PowerPoint animations that can use in PowerPoint, see our list of PowerPoint animation tutorials here .
D. How to add transitions to your PowerPoint presentation
PowerPoint has an incredibly robust transition engine so that you can dictate how your slides change from one to the other. It is also extremely easy to add transitions to your slides.
In PowerPoint, transitions are the movements (or effects) you see as you move between two slides.

To add a transition to a PowerPoint slide, simply:
- Select the slide
- Go to the Transitions tab in the Ribbon
- In the Transitions to This Slide area, click on the dropdown arrow to view your options
- Select the transition you want
To adjust the settings of the transition, explore the options in the Timing area of the Transitions tab.
You can also add the same transition to multiple slides. To do that, select them in the Slides Pane and apply the transition.
E. How to preview a transition in PowerPoint

There are three ways to preview your PowerPoint transitions (just like your animations):
- Click on the Preview button in the Transitions tab
- Click on the little star beneath the slide number in the thumbnail view
Note: In 2016, PowerPoint added a cool new transition, called Morph. It operates a bit differently from other transitions. For a detailed tutorial on how to use the cool Morph transition, see our step-by-step article here .
Save Your PowerPoint Presentation
After you’ve built your presentation and made all the adjustments to your slides, you’ll want to save your presentation. YOu can do this several different ways.

To save a PowerPoint presentation using your Ribbon, simply:
- Navigate to the File tab
- Select Save As on the left
- Choose where you want to save your presentation
- Name your presentation and/or adjust your file type settings
- Click Save
You can alternatively use the Ctrl+S keyboard shortcut to save your presentation. I recommend using this shortcut frequently as you build your presentation to make sure you don’t lose any of your work.

This is the standard way to save a presentation. However, there may be a situation where you want to save your presentation as a different file type.
To learn how to save your presentation as a PDF, see our guide on converting PowerPoint to a PDF .
How to save your PowerPoint presentation as a template
Once you’ve created a presentation that you like, you may want to turn it into a template. The easiest – but not technically correct – way, is to simply create a copy of your current presentation and then change the content.
But be careful! A PowerPoint template is a special type of document and it has its own parameters and behaviors.
If you’re interested in learning about how to create your own PowerPoint template from scratch, see our guide on how to create a PowerPoint template .
Printing Your PowerPoint Presentation
After finishing your PowerPoint presentation, you may want to print it out on paper. Printing your slides is relatively easy.

To open the Print dialog box, you can either:
- Hit Ctrl+P on your keyboard
- Or go to the Ribbon and click on File and then Print

Inside the Print dialog box, you can choose from the various printing settings:
- Printer: Select a printer to use (or print to PDF or OneNote)
- Slides: Choose which slides you want to print
- Layout: Determine how many slides you want per page (this is where you can print the notes, outline, and handouts)
- Collated or uncollated (learn what collated printing means here )
- Color: Choose to print in color, grayscale or black & white
There are many more options for printing your PowerPoint presentations. Here are links to more in-depth articles:
- How to print multiple slides per page
- How to print your speaker notes in PowerPoint
- How to save PowerPoint as a picture presentation
So that’s how to create a PowerPoint presentation if you are brand new to it. We’ve also included a ton of links to helpful resources to boost your PowerPoint skills further.
When you are creating your presentation, it is critical to first focus on the content (what you are trying to say) before getting lost inserting and playing with elements. The clearer you are on what you want to present, the easier it will be to build it out in PowerPoint.
If you enjoyed this article, you can learn more about our PowerPoint training courses and other presentation resources by visiting us here .
🔒 Unlock the PowerPoint Shortcuts Trusted by Industry Leaders KKR, American Express, HSBC, and More!
Join over 114,880 professionals from diverse fields including consulting, investment banking, advertising, marketing, sales, and business development who have supercharged their PowerPoint game with our proven methods.
✅ Customize compelling presentations effortlessly.
✅ Master time-saving techniques for faster deck creation.
✅ Boost your career prospects with top-notch PowerPoint skills.
Get FREE access to the Critical PowerPoint Shortcuts module of our premium training course by entering your name and email below.
DISCLAIMER: PC Users Only!
We respect your privacy and will keep your info safe and confidential.
About The Author

Popular Tutorials
- How to Strikethrough Text (l̶i̶k̶e̶ ̶t̶h̶i̶s̶) in Word, Excel & PowerPoint
- How to Make Animated Fireworks in PowerPoint (Step-by-Step)
- Strikethrough Shortcut (l̶i̶k̶e̶ ̶t̶h̶i̶s̶) for Word, Excel & PowerPoint
- How to Create a Flash Card Memory Game in PowerPoint (Like Jeopardy)
- Keyboard Shortcuts Not Working: Solved
PowerPoint Tutorial Categories
- Strategies & Opinions
- Shortcuts & Hacks
- Pictures, Icons, Videos, Etc.
- New Features
- Miscellaneous
- Charts & Data Viz
We help busy professionals save hours and gain peace of mind, with corporate workshops, self-paced courses and tutorials for PowerPoint and Word.
Work With Us
- Corporate Training
- Presentation & Template Design
- Courses & Downloads
- PowerPoint Articles
- Word Articles
- Productivity Resources
Find a Tutorial
- Free Training
- For Businesses
We help busy office workers save hours and gain peace of mind, with tips, training and tutorials for Microsoft PowerPoint and Word.
Master Critical PowerPoint Shortcuts – Secure Your FREE Training Module and Save Valuable Time!
⌛ Master time-saving expert techniques.
🔥 Create powerful presentations.
🚀 Propel your career to new heights.
We value your privacy – we keep your info safe.
Discover PowerPoint Hacks Loved by Industry Giants - KKR, AmEx, HSBC!
Over 114,880 professionals in finance, marketing and sales have revolutionized their PPT skills with our proven methods.
Gain FREE access to a full module of our premium PowerPoint training program – Get started today!
We hate spam too and promise to keep your information safe.
You are currently viewing a placeholder content from Facebook . To access the actual content, click the button below. Please note that doing so will share data with third-party providers.

7 Creative Ways to Start Any Presentation (With Examples!)

I like building and growing simple yet powerful products for the world and the worldwide web.
Published Date : December 4, 2020
Reading Time :
Creating an effective presentation is challenging and needs a lot of effort to become engaging with your audience. Many questions are indeed rounding up your head.
Like how to start a PowerPoint presentation and a class set-up presentation, it helps people, such as entrepreneurs, organize and disseminate their ideas flawlessly.
It clarifies intentions, concepts, and other feasible topics specifically. They may differ from execution, events, and for whom the presentation.
With that, the bottom line and the question is how to do it. How do you start a board meeting presentation, or how do you start a presentation introduction in class?
Many students are also struggling with how to start a case study presentation, and young entrepreneurs or start-ups are struggling with how to start a business presentation.
To ease the tension and upgrade your confidence , furthermore those people above, I will share some tips, steps, and how to start a presentation example.
Why Presentation is Important in Persuading
Presentations break communication barriers. Across this, it brings mutual understanding to the audience.
In winning your stances and goals, having and knowing how to start a presentation is a must. It helps you more to give an idea of what your topic could be through moving pictures and graphics in reality.
The role of presentation in persuading can be categorized into many factors. First, it helps your audience to feel more comfortable with your spiels.
Second, you have the chance to tell your options, choices, summary, and the result of your case study, etc., within your presentation. Especially can be stoop on how to start a business presentation.
Lastly, knowing how to deliver and how to start a presentation in persuading your listener includes support for your audience’s decision. Through it, the concept of persuasion becomes more reliable with tangible materials.
It is evident in thesis defenses and academic proposals. To start a case study presentation, you must present facts, stats, related studies, and other materials.
And to achieve that in a well-presented way, you need to think and come up with a composition associated with your topic to make it reliable and credible.

Different Ways to Start a Presentation
Difficulties on how to start a case study presentation and the things you need to behold within your PowerPoint presentation would be easy after sharing with you this advice.
As for direction and advice, take a look at this list to start a presentation generally.
1. Start With a Strong Claim
The beginning is always the hard part of a presentation. But like a bottle of water, after it gets opened, the water inside can flow smoothly to your gulp.
Meaning after spitting out your first words, everything should follow accordingly to your presentation. That’s why it is the most crucial when you are learning how to start a presentation.
Try to use the iconic lines of a famous philosopher —striking advice of a hotshot entrepreneur for your business proposal presentation.
Through this, you can have a good impression on your listener. Shook them and contradict their ideas; indeed, you can have an intense or beneficial presentation.
2. Know Your Prospect
Besides technicalities and visuals, knowing first the current state, perspective, wants, and needs of your prospect or audience is vital.
Before the presentation, you can send them a pre-assessment or survey consisting of what they want to see and learn and things to keep them interested, or you need to get their attention and interest.

3. Assist the Flow With Visuals
Showing your audience a good spiel in presenting your developing ideas and concepts through pictures that can’t be put quickly in language can break communication drawbacks.
Apart from describing your idea in a presentation, you are also giving quick ways to dice abstract ideas.
4. Moving Pictures
Pictures and videos are great instruments for nurturing your ideas and your audience counterparts.
The power of moving pictures is evident as the film business and the movie industry is booming and depicting fictional stories into reality.
5. Break People’s Expectation
To break the set expectations of your audience for you, always stick to your premise. Whether on business, academics, proposals, and other topical presentations.
Call an action to smash misconceptions about your particular presentation.
6. Spill Surprising Stories
Bring stories and the characters in life. Create conflict and suspense to highlight your goal’s presentation.
It also helps you to organize your presentation’s information to be catchy and relatable. Touching stories can affect audience decision-making.
7. Know When to Pause
Don’t present vague ideas, premises, and concepts. Stop bombarding your audience.
After a round of applause or before speaking, take a three-second pause. Observe your audience’s facial expressions.
With that, you can focus on your tone. It is also an indication that you want to give your audience a short rest.
Orai helps you perfect your speech with feedback on your tone, tempo, confidence , and conciseness .
Things to Avoid on Presentation
Introducing your name along with your topic is not acceptable and is not a killer intro. To nail a presentation, be careful and prevent unnecessary elements.
Here is the list of recommended things you should avoid on how to start a presentation.
1. Cliché Sentences
Do you believe that the flow and relevancy of your presentation depend on your introduction?
If you do believe, avoid cruddy beginnings, initials, and phrases. Instead of stating, “What will your presentation be about,” give them an idea of why they need it and why it is worth sharing.
2. Plain Visuals
Stop using standard PowerPoint templates, discarded pictures, and non-HD videos. For engaging your audience, mastering your spiels is not enough to convince your listeners.
The balanced presentation consists of a good speech , spiels, and an enticing display. Instead of using plain visuals, use simple but complex graphics.
3. Lame Transitions
It is not all about effects or glitching transition effects but about how you transmit your spiels. Always open your arguments with a bang and end them using striking remarks.

4. Unstable Stats and Facts
Don’t use outdated data, studies, and facts. Don’t go to less up-to-date data websites.
Treat the facts and stats as vitamins for your presentation, as it helps your exhibition look reliable and robust.
5. Colorless Templates
Pick templates that fit your topic and theme—download innovative templates and slides. Analyze your presentation structure.
Make sure to go for a font that suits perfectly to the presentation. Go for roadmaps, unique mats, and decks.
Check out this video for more tips on how to avoid presentation pitfalls:
Steps to Enhance Your Visual Presentation
To sort things specifically on how to start a presentation. Here are the steps and tips on how to start a PowerPoint presentation.
Step 1: Get a Color Palette
“Colors speak louder than texts.”
Aside from shapes, figures, and moving objects, picking the right color palette for your presentation can beautify the board’s ambiance if that’s the case.
Logos and company icons have their color combination to mark and emphasize their brand to all consumers. It may also apply to presentations.
If you want to be considered or remembered, start by choosing the right color palette.
Step 2: Create a Theme
The theme supports the flow of your topic; it is the backbone of your presentation. Not considering this element can’t make your topic vague and not intact.
Step 3: Add Hyperlinks
Going back to how to start a presentation, comparing specific ideas is a waste of time. Using hyperlinks, you can offer your audience a “video game” theme.
Step 4: Play Short Video or Create GIFS
Before or after spiels about a particular slide, play a short video as an icebreaker. It helps you to feed your audience with a large amount of information in a shorter period.
Step 5: Practice the Presentation with Spiels in Every Portion
Practice helps you to attain presentation skills. You can interact with your audience, disseminate the messages clearly, and analyze your listeners’ mindset.
You can also improve the flow of run-throughs. These will support you to polish and enhance persuasive skills.
Practice your perfect speech with Orai
Presentation Checklist
Besides sharing the tips and steps on how to start a presentation, let me give you a sample presentation checklist to support and organize your presentation.
This checklist may vary in every presentation. You can create and set your reminders.
Vital Points of a Presentation
To use your time wisely , try this outline on creating a presentation, such as how to start a board meeting presentation and more.
This table only serves as a sample outline. It may also vary depending on your topic and forte.
How to Start Business Presentation and Other Samples
For all entrepreneurs, this portion is for you. To gratify your needs and to enlighten you on how to start a business presentation. Here are the basics.
- Create a Plan
Always start with a concrete plan to strengthen the body of your presentation. With that, your listeners can’t easily stab your presentation.
- Pick The Right Deck
If you are discussing in a formal setting, pick a deck with gray colors, choose dominant colors, and then combine.
- Tell Stories and Laugh
To balance the whole presentation, put some icebreakers and funny idioms about your topic. Make sure it is sensible.
- Add Verbal Cues and Signpost
It helps your audience to get intact through the presentation. Try to use signal transitions, such as words or phrases that would give interconnections.
- Collect Images and Charts
Of course, images and charts are vital. Make sure to use HD photos and reliable maps from data websites.
- Initiate Audience Interaction
After the presentation, evaluate it by asking your listeners if they have any questions.
Questions like these must be considered and answered in your presentation.
- How would you design your material?
- How factual is it?
- What is the target deadline? Show your timeline.
Watch this live speech or business seminar to get different hooks and other strategies to impress your listeners with your business presentation:
3 Essential Parts on How to Start a Board Meeting Presentation
As your supervisor and other executives watch you presenting, stand tall and present like a boss through these points.
- Create the Structure of Your Presentation
It organizes the presentation and connects the main points to sub-points. With that, you can have minimal effort but impactful results.
- Build Big Introduction
Try to begin asking the “why’s,” furthermore, enlighten them of “hows.” How to conduct, how to execute, and how to surpass their limits.
Stop introducing your presentation with your name. Always start to implore your audience with no cliché intro.
- Develop Your Data and Tell Crucial Parts
You can be ideological, symbolic, and rhetorical, and these things are not yet easy to comprehend without visuals. That’s why it is essential to develop and expand your data to make it understandable.
Suppose you want to have a good impression when presenting a business proposal to your bosses and other hotshots. Watch this video on striking tips and techniques for a presentation:
Vital Aspects of How to Start a Case Study Presentation
Case study presentations are more technical, unlike the other displays. It should be specific, tangible, credible, and substantial.
Also, here are the vital points to follow.
- Show the Possible Results. Collect the possible outcomes or predicted results. With that, you can jump to “how” you will carry the topic into different methods and production.
- Prepare Back-Up Studies. Always have a backup; there are some unexpected circumstances, emergencies, and other possible matters that may ruin your original presentation. It is wise to prepare around three to six backup studies you can easily refer to.
- Connect to Your Prospect’s Situation. Research on their state, status, and other related ideas. It will help your case study to get a thumbs up.
- Focus on Deals. Keep in mind that you have a target deal. Always connect your study to the current agreement and profitable offers.
How to Start a Presentation Introduction in Class
Facing new students is challenging, right? If you want to get a good impression from your class in different situations, take a look at these tips.
- Present Yourself With Manners
Tell them briefly who you are and why you are there in front of them while showing the right conduct and manners.

- Cite Your Objectives and Its Relevance
The material or your material must be the center of any presentation. Discuss its factuality and how tangible it is. Along with these, tell stories that may catch their interest and attention throughout the presentation.
- Leave Interesting Statement
End it with a bang! Make them think and stare at you. You can also give them riddles and some metaphorical set of words as an ending remark .
Indeed, you will gain their participation, plus you are helping your listeners to think critically.
Become a pro presenter. Download Orai and start practicing
How to Make an Unforgettable Start-Up Presentation
To give more emphasis on how to start a business presentation and to help young entrepreneurs. I’ll share with you this detailed outline. I hope you tuck this with you.
1. Set Goals For Your Business Presentation
Always set the stage with objectives. Since you are presenting to get clients and investment, it would help if you cleared how long it takes your business proposal.
2. Start With Provoking Questions or Stories
Never underestimate the power of storytelling. Initiate your presentation with real-life stories.
Stating provoking questions can grab attention, positive or negative, is a good result. It helps you to get your listener’s ears and eyes.
3. Show Alarming Statistics, Graphics as a Clue
This recommendation is similar to a word game, the “4-pics, One Word,” demonstrating the idea or topic with photos will be more immersing.
Visuals are one of the key points to expand a presentation. They are depicting patterns, diagrams, and trends. Lend quick analysis and predictions.

By using graphics, you can easily sustain the interest of your listeners and attract more viewers.
4. Know Your Material
Master your presentation and fill loops. And on your topic. Study the weak points and establish more of the strengths of the presentation.
With that, you can derive the information smoothly. Take note of this. It is also vital on how to start a board meeting presentation.
5. Add Business-Related Stories and Humor
Put the top 10 successful corporations, traders, companies, and other information that may help you present your goal. Flash the motto of some famous entrepreneurs. Analyze or contradict it to gain more attention.
Try to spiel some business jokes as an icebreaker. Any possible facts about business that you can use — catch it!
6. Hold Your Audience With Visuals
Play videos like a Public Service Announcement (PSA), but make sure it is connected to your topic.
Learn how to start a business presentation that has movement and action for society. With that, your listeners may think your presentation is worth investing in.
7. Relax and Have an Early Set-Up
Stay calm and don’t even think about drawbacks or shortcomings, especially the night before the presentation.
Make sure to pamper your body. Create also a plan B for unexpected circumstances.
8. Calculate Your Time and Sort it Into Parts
In your run-through, always set a timer. It gives you a heads up if you may look rushing or too slow in explaining each slide.
Being not responsible for other people’s time is a turn-off, especially in business, where time is essential in the industry.
To present other samples wisely. Let me share some videos to rock and how to start a presentation:
What are some examples of great presentation structures and delivery techniques?
Successful presentations like “How Google Works” and “Start with Why” prove the power of clarity and simplicity. Both Schmidt and Sinek captivate audiences with straightforward messages enhanced by visuals (slides or whiteboard) that support, not overpower, their narratives. The lesson: ditch complexity, focus on your core message, and deliver it with a conviction for maximum impact.
How can group presentations be structured effectively?
Effective group presentations require thorough rehearsal, clean transitions, and speaker handovers. Recap your section, introduce the next speaker, and gesture towards them to link sections and keep the audience engaged.
How can physical movement enhance the delivery of my presentation?
Ditch the podium! Move around the stage to grab attention, connect with listeners, and emphasize key points. Strategic shifts in location signal transitions, while your energy and passion come alive through purposeful movement. Make your presentation dynamic and memorable – get moving!
How can I structure a presentation using the remaining method approach?
To master the “remaining method,” Briefly introduce the controversy, dive deep with your side (logos & pathos!), acknowledge and dissect opposing solutions, and then unveil your “remaining solution” as the superior answer. Wrap up with a strong summary and a call to action. Guide your audience, earn trust, and win them over!
What are the key elements involved in storytelling for presentations?
Ditch the dry facts! Captivate your audience with stories. Use classic structures like the hero’s journey or jump into the action with “in media res.” Craft your narrative with a clear plot, relatable characters, and a consistent tone. Tie it all back to your key points for maximum impact. Storytelling makes presentations memorable, engaging, and impactful – go forth and win hearts (and minds)!
How can I structure my presentation using the problem-solution method?
Hook them, hit them, fix them! Problem-solution presentations start with a clear pain point, delve deep with causes and impacts (think logic and emotions!), and then unveil your solution as the hero and its amazing benefits. Finish with a call to action – tell them what to do next! Simple, powerful, persuasive.
What are some common presentation structures beyond the typical format described in the passage?
Forget the slides; show and tell! Demo presentations explain the “what” and “why” of your product, then dazzle with a live showcase. Highlight problem-solving and potential uses to keep them hooked. Leave them curious and wanting more with a glimpse of what your product can truly do. It’s all about interactive understanding and engagement!
What is the purpose of the Q&A session at the end of a presentation?
Q&A isn’t just an add-on! It’s a chance to clear confusion, recap key points, and answer burning questions. Wrapping up the discussion, offering deeper dives, and inviting audience participation – it’s the perfect way to seal the deal and connect with your listeners.
What should be included in the main body of a presentation?
Ditch the tangents and deliver on your promises! The main body is where you unpack your points. Organize it clearly, hit each topic with evidence and examples, summarize as you go, and link your ideas. Keep it focused, relevant, and audience-friendly – take notes, stay on track, and make your impact!
How should the introduction of a presentation be structured?
Hook, roadmap, and expectations – that’s your intro! Briefly introduce the topic, explain why it matters and what you’ll cover, and tell the audience how long they’re in for and if they can participate. Set the stage, guide them through, and make them feel comfortable – then dive in!
Why is structuring a presentation important?
Get organized, and get remembered! Structure keeps your audience engaged and learning while boosting your confidence and delivery. It’s a win-win for both the speaker and the listener!
Conclusion:
To be an effective speaker or presenter, you must master how to start a presentation. Learn the basics and dynamics.
Earn persuasive skills and grasp how to start a PowerPoint presentation with the steps and tips above to disseminate the information in a free-lingual way effectively.
I hope you find this helpful; you are free to use these tips for any goals.
You can try Orai , an AI-powered speech coach that perfectly suits your budget! They provide instant feedback on you to help with your public speaking needs. Start your free trial with Orai today!
You might also like

How Many Words is a 5-Minute Speech

Good Attention Getters for Speeches with 10+ Examples!
Quick links.
- Presentation Topics
Useful Links
- Start free trial
- The art of public speaking
- improve public speaking
- mastering public speaking
- public speaking coach
- professional speaking
- public speaking classes - Courses
- public speaking anxiety
- © Orai 2023
How to Give a Presentation During a Meeting (Without Screwing Up)
Tips and tricks for being persuasive and keeping your audience engaged.

A methodology for amazing meetings. Say goodbye to boring, long, and unproductive meetings.
Giving a presentation during a meeting may seem easy on the surface, but many factors can get in the way of being effective.
You may be shy and stumble over your words. You may get nervous and rush through things too quickly in hopes of “getting it over with.”
You may even confuse your audience by sharing information in a scattered or illogical way.
It happens to the best of us.
The good news is, with thoughtful preparation, even the shiest among us can give killer presentations that captivate our coworkers.
Here’s how:
- How to start a presentation
- Effective presentation skills
- When to use PowerPoint
- Presentation tips and tricks
<div id="1"></div>
<span class="h-circle">1</span> How to start a presentation
The best presenters capture audience attention from the beginning. They know that a lackluster start to anything will immediately sow seeds of disengagement.
Whether or not you believe human attention spans are like goldfish , the fact is, a strong start to your presentation will fill the room with energy that perks people up, while a weak start paves the way for staring off into space and discretely checking email.
Here are a few tips to start your next meeting presentation right:
Ask a question
Everyone likes feeling heard. One of the easiest ways to hook an audience from the start is by inviting them to respond to a relevant prompt. If a VP of marketing were giving a presentation about the company’s upcoming brand refresh, they might start by asking something like “How many people here feel like they have a good sense of how we’re perceived as a company?”
Share a story
As humans, we’re wired to pay attention to stories. They’re especially useful when the subject matter at hand isn’t particularly interesting on its own. If a CEO were giving a presentation aimed at motivating the entire company, they might share a story about how many people it once took to operate a battleship.
<div id="2"></div>
<span class="h-circle">2</span> Effective presentation skills/techniques
Effective presentations are usually the result of careful preparation. Here are a few skills to refine during the preparation phase:
Knowing your audience
Giving an effective presentation means knowing your audience. To earn and sustain their attention, you need to assess what they already know about the subject and how much they care about it.
Use this information to calibrate your approach. You don’t want to assume they’re enthusiastic experts if they’re not, but you also want to respect their intelligence by meeting them where they are without lecturing them.
It’s a delicate balancing act, but when you get it right, you’ll leave them enough room to figure some things out on their own.
WHAT Ask questions that anyone in the audience could answer. WHY This allows you to engage the room and keep the audience energy level high.
Framing your story
If you’ve ever watched TEDTalks, you know firsthand that many of the best presentations unfold like a detective story. The speaker presents a problem, describes the quest for a solution, and leads the audience to a collective “aha” moment where their perspective shifts and they become even more engaged.
Take the time to plot your points in a meaningful way so that your message is not only easy to follow, but also easy to remember. That means eliminating any diversions that don’t serve the story.
When framed correctly, even the most serious and complex subjects can be riveting.
<div id="3"></div>
<span class="h-circle">3</span> When to use a PowerPoint and when not to
PowerPoints have become the de facto tool of choice for meeting presentations. You can share visuals, advance slides with the click of a mouse, and they don’t take a ton of technical or design chops to look pretty.
The problem is, people tend to hide behind them. While it’s undeniably handy, PowerPoint isn’t the best vehicle for every presentation.
You should use a PowerPoint when:
- You want to review team progress against metrics
- You need to share a revenue report
- You have a lot of technical and/or data-rich information to convey
You shouldn’t use a PowerPoint when:
- You need to create a strong connection with your audience
- You have an important story to tell (e.g. why the company is pivoting)
- You want to motivate and inspire people
If you’re still on the fence about whether you should use a PowerPoint for your next presentation, consider the goal of the meeting.
When your meeting goal is something straightforward, like assigning action items or reviewing team performance, go for the PowerPoint.
If you’re aiming to convey something less cerebral—and potentially more emotional—don’t distance yourself from the message. Leave PowerPoint (and all technology) out of the equation.
<div id="4"></div>
<span class="h-circle">4</span> Presentation tips and tricks
There are a few universal tips that will make your next presentation more effective no matter what it’s about:
Follow a logical structure Even if you can’t think of a relevant story, the information you present have a clear structure to keep people on track.
Slow down Speaking too fast breeds boredom and confusion. Even if you think you talk slow, talk slower.
Use questions as segues In addition to being great presentation starters, asking questions enables the presenter to shift from one topic to another without losing momentum.
Build your confidence Letting your personality shine through is a surefire way to convince people they should listen. Practice your presentation until it feels like you’re talking to a friend.
{{go-further-with-hugo="/blog-inserts"}}
Don't let unproductive meetings slow you down
See the impact of fewer, shorter meetings, increased accountability, and enhanced productivity with Fellow.
You might also like

6 Sample Meeting Agenda Examples [+Free Templates]
Meeting agenda templates to copy or download (Google Doc or Word Doc) — plus examples of how to use them.

How to Improve Written Communication Skills at Work
Written communication at work is sometimes more important than how you interact in person.

Introducing Vital — A Better Way To Have Meetings When Everyone Is WFH
Get the revolutionary eBook on how to have shorter, fewer, better meetings. FREE DOWNLOAD
Got something to contribute?
PowerPoint: How to Add Audio to Powerpoint on Windows 10 and Mac
Last Updated Thursday, August 31, 2023, at 5:00 am
Known Issue (August 14, 2023):
Some Windows 11 users are experiencing issues with PowerPoint exports when they are turned into .mp4 files. Visuals within the exported PowerPoint are appearing as flipped, or upside down. We are working with Microsoft to find a solution.
As a workaround, please convert the file as a .WMV file option and save it in My Media. The following are directions on how to convert a PowerPoint Presentation with audio to a .WMV file . For more support or to help troubleshoot issues, please reach out to the LTS Help Desk at [email protected] .
Microsoft PowerPoint offers features to record audio narration and export it as a video. PowerPoint records audio slide-by-slide rather than in one continuous file, allowing creators to easily re-record a slide if they make a mistake or need to change something later. Exporting as a video and uploading to Kaltura or Canvas for streaming is advantageous since it standardizes file types, doesn't require a download to view, is in a format that can be captioned, and allows viewers to navigate more efficiently.
A recent update has made the process comparable on a Mac, but the specifics vary. Windows 10 instructions follow; Mac users can click the link below to jump to the appropriate instructions.
- Instructions for Mac users
Windows 10 Instructions:
The following instructions explain how to add audio to your PowerPoint presentation on Windows 10 and export that PowerPoint as an MP4. The text instructions cover the same information as the embedded video below.
NOTE: If you have an older version of PowerPoint, you may need to update it to access the features described below. If you do not have PowerPoint, you can download it and other Microsoft Office products for free by going to office365.uwec.edu. If you have questions about updating or installing PowerPoint, contact the LTS Help Desk at [email protected] or 715-836-5711.
- Design your PowerPoint TIP: Use images and limit text to better engage viewers/listeners.
- Click Record Slide Show NOTE: Audio may start recording automatically if you have an older version of PowerPoint. It will still work, but this version offers reduced functionality.
- Record narration and avoid reading text on the slide out loud to viewers. Click the blue Replay button to listen to the recorded audio and ensure it was recording.
- Press [Escape] or the ‘X’ button located in the top right of the screen when the audio recordings are finished. You will see a speaker icon on slides that have audio.
- Select Export (steps 10-14 are shown in screenshot below).
- Select Create a Video .
- Optional: Select Full HD (1080p) for the video quality; it is unlikely a higher quality is needed.
- Select Use Recorded Timings and Narrations.
- Follow prompt/pop-up window to save the video in a memorable location.
- How to upload and share with Kaltura (Instructors should use Kaltura. Students will need to use it if the file is over 500 MB, which a PowerPoint probably won't be and they can use Canvas.)
- How to upload and share in a Canvas assignment (students)
- How to upload and share in a Canvas discussion (students) - the instructions refer to the "rich content editor" which is just the features in the top of the discussion post reply.
Elaboration on the Recording Features:
- Timing Feature – there is a rolling time feature for the individual slide and the overall presentation. Allows the speaker/presenter to monitor how long they are talking.
- Microphone Feature - Click on Settings and select Microphone and then the specific device to set up before recording.
- Replay Feature - Use to check that the audio is recording properly before starting additional slides.
- Clear Feature - Select Clear to delete/re-record audio.
- Don’t set the camera to record - Make sure this button has a diagonal slash through it to avoid the problem.
Mac Instructions:
The following instructions will teach you how to add audio to your PowerPoint presentation on a Mac and export that PowerPoint as an MP4. The text instructions cover the same information as the video embedded below.
NOTE: It is essential to have the Office 365 version of PowerPoint or you will not be able to save your PowerPoint as a video. If necessary, you can download it and other Microsoft Office products for free by going to office365.uwec.edu. If you have questions about updating or installing PowerPoint, contact the LTS Help Desk at [email protected] or 715-836-5711.
- TIP: Use images and limit text to better engage viewers/listeners.
- Click Record Slide Show
- TIP: Before you begin recording your full presentation, do a practice recording to verify your microphone and other settings are correct.
- NOTE: Avoid reading the text written directly on the slide; use the slide to elaborate on the material being presented.
- Stop speaking for a second to prevent the audio from cutting out as slides change. Resume speaking when the time starts moving again under the Current slide timing feature to the left of the recording button.
- Click Stop or Pause at the top of the screen and then End Show in the top left corner when all the audio recordings have been finished.
- Check the audio by clicking on Play from Start under the Slide Show tab or the presenter mode icon at the bottom of the screen.
- Edit the name of the file and where you would like to save the video following PowerPoint's prompts.
- Click Export
- Upload your mp4 video to Kaltura or Canvas to share it:
- How to upload and share to My Media (Instructors should use My Media. Students will need to use it if the file is over 500 MB, which a PowerPoint probably won't be and they can use Canvas.)
- How to upload and share in a Canvas discussion (students) - the instructions refer to the "rich content editor" which is the tool at the top of the discussion post reply.
Additional Video Tool Options
For more information about recording options available, click here to view a comparison of each tool's features.
- All about AI
- Google Bard
- Inflection AI Pi Chatbot
- Anthropic Claude
- Generative AI
- AI Image Generation
- AI Regulation
- AI Research
- Large Language Models (LLM)
- Surface Pro
- Surface Laptop
- Surface Book
- Surface Duo
- Surface Neo
- Surface Studio
- Surface Hub
- Surface Pen
- Surface Headphones
- Surface Earbuds
- About WinBuzzer
- Follow Us: PUSH, Feeds, Social
- Write for Us
- Cookie Policy and Privacy Policy
- Terms of Service
How to Password Protect Excel, Word, PowerPoint, or PDF Files with Microsoft Office
We show you how to password protect Excel, Word, PowerPoint and PDF files in Microsoft Office so that you can keep your documents private.

Table of Contents:
While most of us already have login passwords on our PC, at times it’s necessary to go one step further. As well as encrypting individual files , you can use Microsoft Office to password protect an Excel file Word Document, PDF, and more. When you password-protect documents with modern versions of Office, they’re typically encrypted. This means that anybody who tries to read them that doesn’t have your password will just see random strings of letters and numbers. This persists even if you send the document to another person. Here we show you how to password protect Excel, Word, PowerPoint or PDF files.
How to Password Protect a Word Document, Excel File, or PowerPoint Presentation
Securing your Microsoft Office documents with a password is a straightforward process. This method is applicable to Word, Excel, and PowerPoint files, providing an extra layer of security by encrypting your documents. Follow the steps below to protect your Office documents. We use Word as an example but the exact same steps also work for other Office files.

How to Create a Password Protected PDF File with Microsoft Office
Creating a password-protected PDF file is slightly different from encrypting a Word, Excel, or PowerPoint document. This method involves converting your Office document into a PDF format and then securing it with a password. Here’s how to do it.

FAQ – Frequently Asked Questions About Password-Protection for Documents
Password-protected documents maintain their encryption when stored on cloud services..
The document remains encrypted on the server, requiring the password upon opening, regardless of the cloud storage used. It’s crucial to use strong passwords and enable two-factor authentication (2FA) for your cloud storage account for additional security. Be aware of the cloud provider’s encryption in transit and at rest protocols to ensure comprehensive protection of your documents.
What should I do if a password-protected document needs to be accessed by multiple people?
For documents requiring access by multiple users, set a shared password communicated through a secure medium, ensuring all parties understand the importance of keeping the password confidential. Alternatively, consider using document management or collaboration platforms that offer granular access controls and permissions, allowing for better management of who can view or edit the document without relying on a single shared password.
Besides password protection, what other security measures should I consider for sensitive documents?
In addition to password protecting sensitive documents, consider using encryption solutions that secure the entire document beyond the application level. For highly sensitive information, employ data loss prevention (DLP) policies, secure access management (like 2FA ), and regularly audit access logs. Awareness and training on security best practices among users who will access the documents are also vital in ensuring comprehensive protection.
Can editing restrictions be set on a password-protected Word document?
Yes, Word allows you to apply editing restrictions that let users open but not modify a document. This is done by navigating to the Review tab, selecting Restrict Editing, and choosing the editing restrictions. This feature can be applied in conjunction with or separate from password protection, offering flexibility in how you secure and share documents. Engaging both protections enhances document security, especially in collaborative environments.
How can I tell if a PDF file is encrypted and password protected without opening it?
Various PDF readers and file management tools provide visual cues or properties details indicating encryption. For example, attempting to open the file in a PDF reader will prompt for a password if encrypted. In file properties or details pane, look for security settings or encryption status. Advanced PDF management tools may offer more detailed insights into the encryption level and specifics of the protection applied. Always ensure your PDF viewer or editor is up-to-date for accurate detection and handling of encrypted files.
In addition to password protection, consider utilizing encryption solutions that secure the entire document beyond the application level. Implement data loss prevention (DLP) policies, engage secure access management practices such as two-factor authentication (2FA) , and regularly audit access logs. It’s also crucial to promote awareness and training on security best practices among users with access to the documents to ensure comprehensive protection.
Yes, Word allows users to set editing restrictions on a document, enabling viewers to open but not modify the content. This feature is accessible via the Review tab by selecting Restrict Editing and then specifying the desired editing restrictions. This functionality can synergize with or operate independently from password protection, thus offering flexibility in document security and sharing practices. Utilizing both protections can significantly enhance document protection, particularly in collaborative environments.
Related: How to Remove Password Protection from a PDF

Related: How to Password Protect Excel Files

Related: How to Lock Cells in Excel to Protect Them from Editing

Related: How to Password-Protect a Folder in Windows 11 and Windows 10

- how to password protect a pdf
- how to password protect an excel file
- Microsoft Excel
- Password Protect a PDF
- Password Protect Word Document
- PDF password
- pdf with password

Recent News

Google’s Magic Editor and Other AI Tools Now Free for Google...

Meta Unveils MTIA v2 AI Chips, Promising Faster Model Training
Subscribe to WinBuzzer on Google News

Search for: Search Button
- Share a link to a specific PowerPoint slide
There’s a way to link someone to view a specific slide in a PowerPoint presentaion which is a lot faster than hunting through a big slide deck.
Requirements
Link to this slide, check the share permissions, sharing settings, edit / view only / no download, or there’s another way ….
Providing a direct link to a specific part of your slideshow not only streamlines the process of receiving feedback but also enables them to locate the content you want them to review more efficiently.
PowerPoint simplifies the process with its “Link to This Slide” feature, generating a direct link that opens the file at the specific slide in your presentation.
The presentation has to be saved in cloud storage that the receiver/s can also access it. If the presentation isn’t already saved online, modern Office will help you do that.
Launch PowerPoint presentation stored on your local drive. Next, navigate to the specific slide you wish to share. Then, right-click on the desired slide and a shortcut menu pops up. From this menu, select the option “Link To This Slide” to generate a direct link to the chosen slide within your presentation.

Selecting “Share Link To This Slide,” will prompt you to upload your presentation to OneDrive to allow sharing.

Office just dumps the file into your OneDrive account, you’ll probably want to choose a specific folder instead.
Once the presentation is saved in a cloud location, you can share it or a slide. Do that from PowerPoint on the web or modern PowerPoint for Windows/Mac. Click on the slide in the slide navigator and select the “Link To This Slide” option.

The system generates a direct link that is ready to be shared but before you copy , check what permissions you’re giving to access the presentation and to whom.
Under the link is a short note to indicate the sharing settings for the current link. Click on Settings to change or verify the sharing. Or select the copy option, and you’ll receive a notification confirming that the link has been copied.

For more specific access privileges, go to the Settings option to customize permissions for reviewers or audience. You can choose with whom you want to share your files. This typically involves setting access permissions or sharing settings with user or user groups.
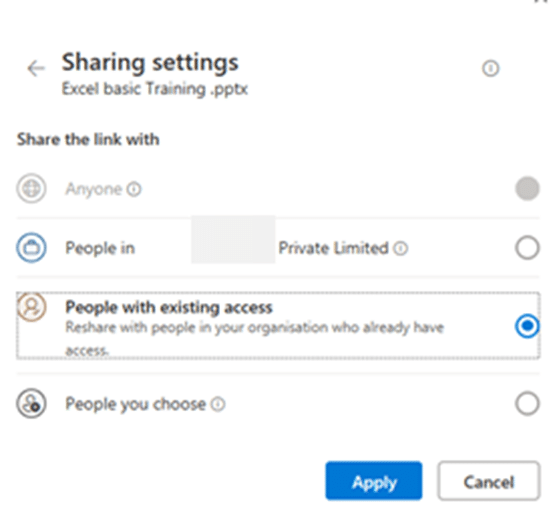
The sharing settings can include any of the following options, depending on the type of account (personal, business etc).
“Anyone With The Link Can Edit.” – permits anyone with access to the link to edit the slide’s content. This functionality facilitates effective collaboration and sharing among teams or groups. Opting for this setting grants editing privileges to anyone possessing the link.
“People in the Organization – accessible by the organization with the privileges to access the link.
“People you choose – selectively available.
Customize the access privileges more from the More Settings option, where you can define specific permissions, such as editing, viewing, and downloading for reviewers or audience.
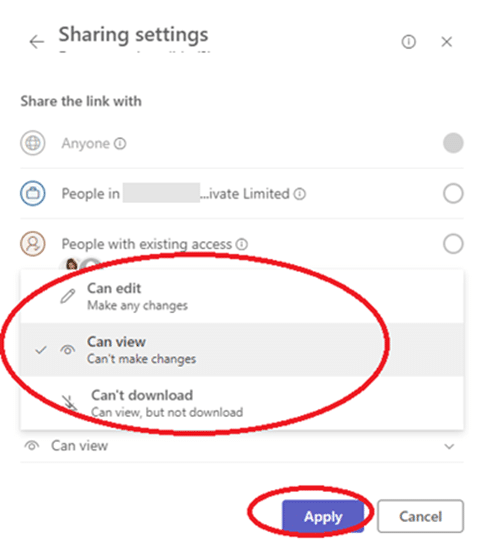
Finalize the process by clicking on the “Apply” button ensuring that the changes take effect according to your preferences.
Once you’ve configured the access privileges and applied the changes, you can proceed to share the link via email to the intended audience. Simply copy the link generated by the sharing feature and paste it into your email or other message.

At risk of stating the obvious, there’s another way to share a single slide with ‘read only’ access.

Take a screen shot of the slide and paste it into an email or message.
Using Designer for more eye-catching PowerPoint slides PowerPoint Cameo puts your video selfie into a slide Reuse slides in PowerPoint, the good and the annoying
About this author

Mayurakshi Mohapatra
Office 2021 - all you need to know . Facts & prices for the new Microsoft Office. Do you need it? Office LTSC is the enterprise licence version of Office 2021.
Office 2024 what's known so far plus educated guesses. Microsoft Office upcoming support end date checklist.
Latest from Office Watch
- Coin 🪙 emoji in Word, Excel, PowerPoint and Outlook
- Translate automatic or manual in Outlook
- Microsoft Mesh makes “magical” online meetings
- Why are Teams and Office divorcing?
- Pivotby – Excel’s new faster PivotTables
- More Excel on the web improvements
- All about editing an incoming Outlook message
- What “Update License” means on Microsoft 365 menus
- Excel’s warning about dates and centuries
- Write Excel formulas fast with free Copilot
- Easter images and icons in Microsoft Office
- Credit Card 💳 symbol in Word, Excel, PowerPoint and Outlook
- Yes, there will be a new version of Microsoft Office
- All about Office 2024 for Windows and Mac (so far)
- In person vs virtual event option coming to Outlook
- Checklists now in Microsoft Word
- Start Grouping in Excel for better looking sheets
- Three more Word features reach the web version
- Web link previews in Word for web
Paquete de Office Gratis con Editor de PDF
Editar Word, Excel y PPT de forma GRATUITA.
Leer, editar y convertir PDFs con la potente herramienta de PDF.
Interfaz similar a la de Microsoft, fácil de usar.
Windows • MacOS • Linux • iOS • Android

- Artículos de PowerPoint
- Trucos de PowerPoint
¿Cómo crear un organigrama en PowerPoint?
Crear un organigrama en PowerPoint profesional puede parecer complicado, pero lo cierto es que con las herramientas adecuadas y un buen tutorial que te explique cómo hacerlo paso a paso es posible diseñar organigramas en PPT de gran calidad con los que reflejar de una manera muy visual y atractiva la estructura de tu organización o equipo.
¿Qué es un organigrama?
Un organigrama es una representación gráfica que muestra la estructura organizacional de una empresa o entidad.
Sirve como una herramienta clave para visualizar la jerarquía de roles, responsabilidades y relaciones entre los diferentes miembros o departamentos dentro de una organización.
Además, facilita la comprensión de la cadena de mando y ayuda a mejorar la comunicación y la planificación estratégica dentro de la entidad.
Tipos de organigramas
Existen básicamente seis tipos de organigramas. Estos son:
Organigrama Jerárquico
Se trata del tipo más común de organigrama y permite presentar la estructura en distintos niveles de jerarquía.
La cúspide suele estar ocupada por la alta dirección, seguida de sus subordinados directos, y así sucesivamente hacia abajo en la cadena de mando.
Organigrama Matricial
En un organigrama matricial, los empleados están organizados por función y por producto o proyecto, creando una estructura de doble mando.
Este tipo de organigrama es utilizado frecuentemente en organizaciones que trabajan en proyectos o productos específicos, permitiendo una mayor flexibilidad y fomentando la colaboración entre departamentos.
Organigrama Horizontal o Plano
Este organigrama minimiza los niveles de jerarquía y está diseñado para promover la toma de decisiones rápida y la colaboración entre equipos.
Es más común en startups y pequeñas empresas, donde la comunicación directa y la agilidad son cruciales.
Organigrama Funcional
Este tipo organiza a los empleados según su función o departamento dentro de la empresa.
Cada sección del organigrama representa un departamento o área de especialización, lo que facilita la comprensión de cómo se divide el trabajo dentro de la organización.
Organigrama Divisional
Utilizado por organizaciones más grandes que operan en diversas regiones geográficas o que tienen múltiples líneas de productos, el organigrama divisional agrupa a los empleados según las divisiones, que pueden ser geográficas, por producto o por mercado.
Crear un organigrama en PowerPoint es un proceso sencillo que puede ayudarte a visualizar la estructura organizacional de una manera clara y profesional. A continuación te indicamos cómo hacerlo paso a paso utilizando las herramientas que PowerPoint ofrece.
Crear un organigrama con SmartArt
1.Inicia PowerPoint y elige o crea una diapositiva en blanco donde desees insertar el organigrama.
2.Ve a la pestaña "Insertar" en la cinta de opciones y selecciona "SmartArt" en el grupo de Ilustraciones.

3.En la ventana de SmartArt, selecciona "Jerarquía" en la columna de la izquierda. Luego, elige el diseño de organigrama que mejor se ajuste a tus necesidades.
4.Haz clic en los cuadros de texto dentro del gráfico SmartArt para añadir los nombres de los empleados o los títulos de los puestos. Puedes agregar más cuadros o niveles según sea necesario utilizando las opciones en la cinta de SmartArt Tools.
5.Utiliza las herramientas de diseño en la cinta de "Diseño de SmartArt" para cambiar colores, estilos y agregar efectos al organigrama para que coincida con el estilo de tu presentación.
Crear un organigrama con una plantilla predeterminada
1.Puedes encontrar plantillas de organigramas en PowerPoint buscando en la sección "Archivo" > "Nuevo" y escribiendo "organigrama" en la barra de búsqueda.
2.Elige una plantilla que se ajuste a tus necesidades y ábrela en PowerPoint.

3.Las plantillas de organigramas vienen con elementos predefinidos que puedes personalizar. Haz clic en los cuadros de texto para editar los nombres y títulos, y ajusta la disposición de los elementos si es necesario.
4.Al igual que con SmartArt, puedes personalizar la apariencia de tu organigrama en la plantilla utilizando las herramientas de diseño disponibles en PowerPoint, como cambiar colores, fuentes y añadir efectos.
Descargar plantillas de organigrama PPT
La mejor solución para crear organigramas PPT profesionales para por descargar plantillas predeterminadas tan interesantes como las que detallamos a continuación:
Organizational charts template
30 diapositivas con las que diseñar organigramas con tantos niveles como necesites en diferentes formas, colores y decenas gráficos vectoriales de conexión.
Organigramas Plantillas para PowerPoint
37 diapositivas profesionales prediseñadas con contenido 100% editable y todo tipo de elementos gráficos vectoriales editables (color, relleno, contorno, efectos, tamaño…).
Plantilla PowerPoint Startup Pitch
200 diapositivas para ilustrar la estructura organizacional de tu negocio con más de 4 000 iconos de vector y fuentes para personalizar las presentaciones de tus proyectos.
The Staff - Plantilla Organigrama PPT
150 plantillas para diapositivas disponibles en cinco colores distintos con las que presentar a todos los miembros de tu equipo y su cometido en la empresa.
Alternativas para crear un organigrama gratis en PPT
Como ya sabrás, no es necesario utilizar la suite de ofimática de Microsoft para crear organigramas. Pues bien, de entre las muchas alternativas que existen, destacan tres:
WPS Presentation
WPS Presentation es, para muchos, la mejor alternativa a PowerPoint. Esta permite crear organigramas de manera eficiente y disfrutar de herramientas como WPSArt y de una extensa biblioteca de iconos para personalizar tus organigramas y hacer que se destaquen.
Características de WPS Office : WPS Presentation es parte de WPS Office, una suite de oficina que es conocida por su compatibilidad con formatos de Microsoft Office y su facilidad de uso. Ofrece una variedad de plantillas y herramientas de diseño que facilitan la creación de documentos visuales, incluidos los organigramas.
LucidChart es una herramienta en línea que permite crear organigramas complejos e interactivos con facilidad. Se integra con PowerPoint, permitiendo importar directamente tus organigramas a tus presentaciones.
Integración y dinamismo : LucidChart se destaca por su capacidad de crear organigramas dinámicos que pueden ser fácilmente integrados en tus presentaciones de PowerPoint, haciendo tus datos más interactivos y atractivos visualmente.
EdrawMax es un software de diagramación versátil que ofrece funcionalidades avanzadas para crear organigramas detallados y personalizados.
Compatibilidad con PowerPoint : EdrawMax te permite diseñar organigramas y personalizarlos al detalle. Una vez creados, puedes exportarlos a PowerPoint para incluirlos en tus presentaciones, manteniendo la calidad y el estilo del diseño.
¿Cómo crear un organigrama en WPS Office?
Para crear un organigrama en WPS Office tan solo tienes que:
1.Iniciar WPS Office y abrir WPS Presentation : Comienza abriendo WPS Presentation y seleccionando una diapositiva en blanco.
2.Utilizar Herramientas de diseño : Emplea las herramientas de diseño de WPS Presentation para crear tu organigrama, utilizando WPSArt y la biblioteca de iconos para añadir elementos visuales que enriquezcan tu diseño.
3.Agregar Texto y Conectores : Inserta cajas de texto para los nombres y títulos de los roles y utiliza líneas o flechas para conectarlos, mostrando la relación y jerarquía entre ellos.
4.Personalizar el Diseño : Aprovecha las opciones de personalización de WPS Presentation para ajustar colores, fuentes y tamaños, haciendo que tu organigrama sea único y acorde a la identidad visual de tu organización.
5.Guardar y Exportar : Una vez finalizado tu organigrama, guárdalo y, si es necesario, expórtalo a formatos compatibles con otras aplicaciones o para su presentación.
Siguiendo estos pasos en WPS Presentation, puedes crear organigramas eficaces que reflejen la estructura y las relaciones dentro de tu organización, todo ello con la flexibilidad y las herramientas que WPS Office ofrece.
Preguntas frecuentes
¿por qué wps office es la mejor alternativa para crear un organigrama en ppt.
WPS Office se destaca como una excelente alternativa debido a su interfaz intuitiva, compatibilidad con múltiples formatos de archivo y la inclusión de herramientas avanzadas como WPSArt y una amplia biblioteca de iconos. Ofrece una solución todo en uno que es ideal para usuarios que buscan eficiencia y flexibilidad al crear organigramas.
¿Puedo usar WPS Office en diferentes dispositivos para crear mi organigrama?
Sí, WPS Office está diseñado para ser multiplataforma, lo que significa que puedes usarlo en Windows, macOS, Linux, Android e iOS. Esto te permite comenzar a trabajar en tu organigrama en un dispositivo y continuar en otro, manteniendo una experiencia de usuario coherente y accesible en todas partes.
¿Cómo puedo compartir y colaborar en mi organigrama creado en WPS Office?
WPS Office facilita la colaboración y el intercambio de archivos. Puedes compartir tu organigrama con otros usuarios de WPS Office directamente desde la aplicación o exportarlo a formatos populares como PDF o PPT para compartirlo a través de correo electrónico o plataformas de colaboración en línea. Además, la suite ofrece funciones de comentarios y edición en tiempo real, permitiendo que múltiples usuarios trabajen juntos en el mismo archivo de forma sincronizada.
Como ves, crear organigramas en PowerPoint, ya sea en la office Microsoft o en alternativas gratuitas como WPS Presentation puede ser más fácil de lo que parece. Para ello tan solo tienes que seguir los pasos indicados en esta guía sobre cómo crear un organigrama en PowerPoint. En el caso de que todavía no la hayas probado, te animamos a descargar WPS Office para acceder a una suite de ofimática completa y crear organigramas espectaculares sin coste.

Con una maestría en Desarrollo de Software, aporto más de 10 años de experiencia ofreciendo soluciones técnicas y consejos especializados para software de oficina.
IMAGES
VIDEO
COMMENTS
Start a presentation. On the Slide Show tab select From Beginning . Now, if you are working with PowerPoint on a single monitor and you want to display Presenter view, in Slide Show view, on the control bar at the bottom left select the three dots, and then Show Presenter View. To move to the previous or next slide, select Previous or Next .
Get your main point into the presentation as early as possible (this avoids any risk of audience fatigue or attention span waning), then substantiate your point with facts, figures etc and then reiterate your point at the end in a 'Summary'. 2. Practice Makes Perfect. Also, don't forget to practice your presentation.
Here are a few tips for business professionals who want to move from being good speakers to great ones: be concise (the fewer words, the better); never use bullet points (photos and images paired ...
To change your PowerPoint theme, navigate to the Design tab on PowerPoint's ribbon. Click the drop-down arrow. Choose one of the thumbnails to change your PowerPoint theme to the best one for your presentation. Change theme designs in PowerPoint. Using themes and adding your content goes hand-in-hand.
Frame your story (figure out where to start and where to end). Plan your delivery (decide whether to memorize your speech word for word or develop bullet points and then rehearse it—over and ...
Here's another one of our top PPT tips: tap into Envato Elements' unlimited stock photo library. People are more likely to take you seriously if your presentation is visually appealing. Users view attractive design as more usable. Similarly, they'll view a more attractive PowerPoint as more effective. 11.
In PowerPoint, you can create a presentation from scratch, or from a theme with built-in graphics, fonts, and placeholders for your text, images, and content...
Summary. A strong presentation is so much more than information pasted onto a series of slides with fancy backgrounds. Whether you're pitching an idea, reporting market research, or sharing ...
To select multiple slides, click a slide and then press and hold CTRL while you click the other slides. Next, click the "Themes" tab at the top of your screen. In the "Theme Options" group, click "Background," then "Format Background." In the window that appears, click "Fill," then "Picture or Texture."
A good presentation needs two fonts: a serif and sans-serif. Use one for the headlines and one for body text, lists, and the like. Keep it simple. Veranda, Helvetica, Arial, and even Times New Roman are safe choices. Stick with the classics and it's hard to botch this one too badly.
Tip #1: Tell stories. Sharing an anecdote from your life can improve your credibility and increase your relatability. And when an audience relates to you, they're more likely to feel connected to who you are as a person and encouraged to give you their full attention, as they would want others to do the same.
7) Limit bullet points. Keep your bullet points to a maximum of 5-6 per slide. In addition, the words per bullet point should also be limited to 5-6 words. It's also wise to vary what you present in each slide, such as alternating between bullet points, graphics, and graph slides, in order to sustain the interest and focus of your audience.
Move around, but make your movements deliberate. Don't nervously shift your feet (in fact, it's a good idea to imagine that your feet are nailed to the floor except for those times you deliberately choose to move). Use your vocal inflections to create a more dynamic presentation. Vary your voice as you're talking.
In this video, learn how to make modern PowerPoint Presentations and receive some of the best tips to deliver presentations with confidence. Let's face it, w...
1. Open PowerPoint. Click or double-click the PowerPoint app icon, which resembles an orange box with a white "P" on it. This will open the PowerPoint templates page. If you don't have a Microsoft Office 365 subscription, you can use the website instead of the desktop app.
1. Tell your audience who you are. Start your presentation by introducing yourself. Along with sharing your name, give your audience some information about your background. Choose details that are relevant to your presentation and help establish you as an expert in your chosen topic. Example: "Good morning.
To do that, simply go up to the Home tab and click on New Slide. This inserts a new slide in your presentation right after the one you were on. You can alternatively hit Ctrl+M on your keyboard to insert a new blank slide in PowerPoint. To learn more about this shortcut, see my guide on using Ctrl+M in PowerPoint.
As for direction and advice, take a look at this list to start a presentation generally. 1. Start With a Strong Claim. The beginning is always the hard part of a presentation. But like a bottle of water, after it gets opened, the water inside can flow smoothly to your gulp.
Learn how to use PowerPoint better, from setting up your slide designs to working with text, images, video, charts, multi-media, and more. Discover how to work with PowerPoint's core presentation tools to make great presentations quickly, while maximizing your presentation design workflow.
Here are a few tips to start your next meeting presentation right: Ask a question. Everyone likes feeling heard. One of the easiest ways to hook an audience from the start is by inviting them to respond to a relevant prompt. If a VP of marketing were giving a presentation about the company's upcoming brand refresh, they might start by asking ...
Record narration and timings for your presentation in Microsoft PowerPoint to give it a professional and polished feel. Record narration and timings:1. Selec...
Design your PowerPoint TIP: Use images and limit text to better engage viewers/listeners. Click the Slide Show tab NOTE: Do not add audio under Insert and Record Audio; this method will not allow you to save your PowerPoint as a video since it does not synchronize timings to automatically move the slides with the audio.; Click Record Slide Show NOTE: Audio may start recording automatically if ...
How to Password Protect a Word Document, Excel File, or PowerPoint Presentation Securing your Microsoft Office documents with a password is a straightforward process.
Launch PowerPoint presentation stored on your local drive. Next, navigate to the specific slide you wish to share. Then, right-click on the desired slide and a shortcut menu pops up. ... Office just dumps the file into your OneDrive account, you'll probably want to choose a specific folder instead. Link to this slide.
1.Iniciar WPS Office y abrir WPS Presentation: Comienza abriendo WPS Presentation y seleccionando una diapositiva en blanco. 2.Utilizar Herramientas de diseño: Emplea las herramientas de diseño de WPS Presentation para crear tu organigrama, utilizando WPSArt y la biblioteca de iconos para añadir elementos visuales que enriquezcan tu diseño.