Critical PowerPoint Shortcuts – Claim Your FREE Training Module and Get Your Time Back!

PowerPoint Best Practices: The Formatting Guides
- PowerPoint Tutorials
- December 16, 2014
When people see our slides, they often ask us: “What is all that stuff there on the left side of your slides and how do I get them on mine?”
“All that stuff” is what we have dubbed the “Formatting Guides” and in our opinion, is one of the cleverest PowerPoint best practices you can implement today, to save time…which is why you’ll see them across our website in our slide examples, screenshots and videos.

You might say: “But, isn’t that what creating your own custom PowerPoint theme is for in the first place?”
The answer is yes…but the formatting guides will take your formatting selections to the next level, by creating a visual guide of all the formatting that needs to be used, and give someone the bread crumbs they need to recreate your theme if they need to.
That’s why we consider it as one of the cleverest, and low tech, PowerPoint best practices that you can immediately implement today.
These breadcrumbs will also never show up when you present your presentation or convert your presentation to the PDF file format.
To learn how to convert your PowerPoint presentation into a PDF, read my guide here .
[Watch] Setting up your formatting guides
You are currently viewing a placeholder content from Youtube . To access the actual content, click the button below. Please note that doing so will share data with third-party providers.
1. Open the Slide Master View
First off, you want to add the formatting guides in the Slide Master View of your presentation, next to the parent slide. And there are number of placement advantages for doing so (as discussed below).
But first off, if you’ve never navigated to the Slide Master View before, from the View tab in your Ribbon, select Slide Master.

2. Navigate up to the Parent Master Slide
Once in the Slide Master View, on the left hand side of your screen, select the Parent Slide, or largest slide, on the left. This is where you want to add the Formatting Guides to take advantage of the three placement advantages discussed below.

Advantage #1: They show up everywhere
Once on your Slide Master, the formatting guides will show up everywhere within your presentation, or at least in enough places (you can toggle them off for specific layouts) that there is no way to “accidentally” not see them.
Additionally, if you ever need to update the formatting guides, you can update them all at once (on your Slide Master) and have those changes carried through to all of your slides!
Now, if you feel it’s too distracting to have them show up everywhere within your presentation, you can alternatively add them to the left side of your Title Slide (or other) layout and only have them show up on that specific layout.

Advantage #2: You can’t accidentally delete them
As such, they won’t get in your way and if someone does want to change them (if they dare), they’ll have to purposefully navigate to the Slide Master view to do so.

Advantage #3: They don’t print on show onscreen
Placing the formatting guides on the outside of the slide space ensures that they will NEVER show up when presenting or printing your presentation.
So they are there when you need them, building out your presentation; but they aren’t there when you don’t need them, presenting or printing your presentation.

3. Add your Formatting Guides off the slide space
What to include in your Formatting Guides
You can include as much or as little formatting guidance as you want, but our recommendation is that you should include the font styles (spelled out), font sizes, outline weights, hard code the fill colors to match the theme colors that should be used within your presentation, and include the RGB or HSL codes for your colors (see explanation below).

If you use additional formatting elements in your presentations like drop shadows, bevels, etc., you can add those to your Formatting Guides.
Tips for adding colors to the Formatting Guides
- Within the color dialog box (hard coding the color in)
- Within the Formatting Guide rectangles themselves
Hard coding the colors in
Notice in the picture below that even though I’ve selected a new theme color, the formatting guides remain the same.

On the Custom tab, all you need to do is re-type the codes that are currently in each menu item there. So for Red, you would simply place your cursor where “31” is and type “31” on your keyboard, etc. And now it’s hard coded in.

Typing in the colors codes into the Formatting Guides
The second place you want to add your color codes, is in the Formatting Guide rectangles themselves, to act as the Hansel and Gretel bread crumbs that someone can use to rebuild your theme colors if they need to.
As you can see on the right, I simply type them in with dashes separating the numbers.

Yes, in an ideal world full of unicorns and cotton candy clouds, you would create your own customized theme, distribute it to everyone properly and everyone would actually use it.
But until we see unicorns crossing the street and edible clouds floating in the skies, the formatting guides is your best insurance policy (that we know of) to police formatting consistency across your presentations.
To learn more about PowerPoint best practices for building templates, read our guide here .
If you enjoyed the depth of this article, you can learn more about our PowerPoint training courses and other free resources here .
What’s Next?
Related articles.
- PowerPoint settings: program level vs. presentation level
- Set Up Slide Show: Customize how your PPT presentations run
- What is the Popup Toolbar in PowerPoint?
- Strikethrough Shortcut (l̶i̶k̶e̶ ̶t̶h̶i̶s̶) for Word, Excel & PowerPoint
- How to hyperlink in PowerPoint (best practices)
About The Author

This Post Has 2 Comments

Genius. I need that to “force” consistency in presentation general look and feel. I wonder if that formatting guide applies to Word Doc too.

Hey Jimmy, and thanks for the comment! Yeah we’ve found that most people will take more notice of formatting with these guides. I WISH they applied to Word too! We haven’t found a way to do the same thing there, but what you could do is make page 1 a formatting guide sheet, where you put all that information, along with instructions to delete before sending or exclude from printing… not a great solution but it’s something. Let us know if you figure out something more elegant! 🙂
Comments are closed.
Popular Tutorials
- How to Strikethrough Text (l̶i̶k̶e̶ ̶t̶h̶i̶s̶) in Word, Excel & PowerPoint
- How to Make Animated Fireworks in PowerPoint (Step-by-Step)
- How to Create a Flash Card Memory Game in PowerPoint (Like Jeopardy)
- Keyboard Shortcuts Not Working: Solved
PowerPoint Tutorial Categories
- Strategies & Opinions
- Shortcuts & Hacks
- Presentation Design
- Pictures, Icons, Videos, Etc.
- New Features
- Miscellaneous
- Charts & Data Viz
We help busy professionals save hours and gain peace of mind, with corporate workshops, self-paced courses and tutorials for PowerPoint and Word.
Work With Us
- Corporate Training
- Presentation & Template Design
- Courses & Downloads
- PowerPoint Articles
- Word Articles
- Productivity Resources
Find a Tutorial
- Free Training
- For Businesses
We help busy office workers save hours and gain peace of mind, with tips, training and tutorials for Microsoft PowerPoint and Word.
Master Critical PowerPoint Shortcuts – Secure Your FREE Training Module and Save Valuable Time!
⌛ Master time-saving expert techniques.
🔥 Create powerful presentations.
🚀 Propel your career to new heights.
We value your privacy – we keep your info safe.
Discover PowerPoint Hacks Loved by Industry Giants - KKR, AmEx, HSBC!
Over 114,880 professionals in finance, marketing and sales have revolutionized their PPT skills with our proven methods.
Gain FREE access to a full module of our premium PowerPoint training program – Get started today!
We hate spam too and promise to keep your information safe.
You are currently viewing a placeholder content from Facebook . To access the actual content, click the button below. Please note that doing so will share data with third-party providers.
- PRO Courses Guides New Tech Help Pro Expert Videos About wikiHow Pro Upgrade Sign In
- EDIT Edit this Article
- EXPLORE Tech Help Pro About Us Random Article Quizzes Request a New Article Community Dashboard This Or That Game Popular Categories Arts and Entertainment Artwork Books Movies Computers and Electronics Computers Phone Skills Technology Hacks Health Men's Health Mental Health Women's Health Relationships Dating Love Relationship Issues Hobbies and Crafts Crafts Drawing Games Education & Communication Communication Skills Personal Development Studying Personal Care and Style Fashion Hair Care Personal Hygiene Youth Personal Care School Stuff Dating All Categories Arts and Entertainment Finance and Business Home and Garden Relationship Quizzes Cars & Other Vehicles Food and Entertaining Personal Care and Style Sports and Fitness Computers and Electronics Health Pets and Animals Travel Education & Communication Hobbies and Crafts Philosophy and Religion Work World Family Life Holidays and Traditions Relationships Youth
- Browse Articles
- Learn Something New
- Quizzes Hot
- This Or That Game New
- Train Your Brain
- Explore More
- Support wikiHow
- About wikiHow
- Log in / Sign up
- Computers and Electronics
- Presentation Software
- PowerPoint Presentations
6 Simple Parts for Beginners to Create a PowerPoint Presentation
Last Updated: December 19, 2022 Fact Checked
Creating a New PowerPoint
Creating the title slide, adding a new slide, adding content to slides, adding transitions, testing and saving your presentation.
This article was co-authored by wikiHow staff writer, Darlene Antonelli, MA . Darlene Antonelli is a Technology Writer and Editor for wikiHow. Darlene has experience teaching college courses, writing technology-related articles, and working hands-on in the technology field. She earned an MA in Writing from Rowan University in 2012 and wrote her thesis on online communities and the personalities curated in such communities. This article has been fact-checked, ensuring the accuracy of any cited facts and confirming the authority of its sources. This article has been viewed 4,318,171 times. Learn more...
Do you want to have your data in a slide show? If you have Microsoft 365, you can use PowerPoint! PowerPoint is a program that's part of the Microsoft Office suite (which you have to pay for) and is available for both Windows and Mac computers. This wikiHow teaches you how to create your own Microsoft PowerPoint presentation on a computer.
Things You Should Know
- Templates make it easy to create vibrant presentations no matter your skill level.
- When adding photos, you can adjust their sizes by clicking and dragging in or out from their corners.
- You can add animated transitions between slides or to individual elements like bullet points and blocks of text.

- If you don't have a Microsoft Office 365 subscription, you can use the website instead of the desktop app. Go to https://powerpoint.office.com/ to use the website version.
- You can also use the mobile app to make presentations, though it's easier to do this on a computer, which has a larger screen, a mouse, and a keyboard.

- If you don't want to use a template, just click the Blank option in the upper-left side of the page and skip to the next part.

- Skip this step if your selected template has no themes available.

- If you're creating a PowerPoint presentation for which an elaborate title slide has been requested, ignore this step.

- You can change the font and size of text used from the Home tab that's in the orange ribbon at the top of the window.

- You can also just leave this box blank if you like.

- You can also click and drag in or out one of a text box's corners to shrink or enlarge the text box.

- On a Mac, you'll click the Home tab instead. [1] X Research source

- Clicking the white slide-shaped box above this option will result in a new text slide being inserted.

- Title Slide
- Title and Content
- Section Header
- Two Content
- Content with Caption
- Picture with Caption

- Naturally, the title slide should be the first slide in your presentation, meaning that it should be the top slide in the left-hand column.

- Skip this step and the next two steps if your selected slide uses a template that doesn't have text boxes in it.

- Text boxes in PowerPoint will automatically format the bulk of your text for you (e.g., adding bullet points) based on the context of the content itself.
- You can add notes that the Presentation will not include (but you'll still be able to see them on your screen) by clicking Notes at the bottom of the slide.

- You can change the font of the selected text by clicking the current font's name and then clicking your preferred font.
- If you want to change the size of the text, click the numbered drop-down box and then click a larger or smaller number based on whether you want to enlarge or shrink the text.
- You can also change the color, bolding, italicization, underlining, and so on from here.

- Photos in particular can be enlarged or shrunk by clicking and dragging out or in one of their corners.

- Remember to keep slides uncluttered and relatively free of distractions. It's best to keep the amount of text per slide to around 33 words or less. [2] X Research source

- Slide content will animate in the order in which you assign transitions. For example, if you animate a photo on the slide and then animate the title, the photo will appear before the title.
- Make your slideshow progress automatically by setting the speed of every transition to align with your speech as well as setting each slide to Advance . [3] X Trustworthy Source Microsoft Support Technical support and product information from Microsoft. Go to source

- If you need to exit the presentation, press Esc .

- Windows - Click File , click Save , double-click This PC , select a save location, enter a name for your presentation, and click Save .
- Mac - Click File , click Save As... , enter the presentation's name in the "Save As" field, select a save location by clicking the "Where" box and clicking a folder, and click Save .
Community Q&A
- If you save your PowerPoint presentation in .pps format instead of the default .ppt format, double-clicking your PowerPoint presentation file will prompt the presentation to open directly into the slideshow view. Thanks Helpful 5 Not Helpful 0
- If you don't have Microsoft Office, you can still use Apple's Keynote program or Google Slides to create a PowerPoint presentation. Thanks Helpful 0 Not Helpful 0

- Your PowerPoint presentation (or some features in it) may not open in significantly older versions of PowerPoint. Thanks Helpful 1 Not Helpful 1
- Great PowerPoint presentations avoid placing too much text on one slide. Thanks Helpful 0 Not Helpful 0
You Might Also Like

- ↑ https://onedrive.live.com/view.aspx?resid=DBDCE00C929AA5D8!252&ithint=file%2cpptx&app=PowerPoint&authkey=!AH4O9NxcbehqzIg
- ↑ https://www.virtualsalt.com/powerpoint.htm
- ↑ https://support.microsoft.com/en-us/office/set-the-timing-and-speed-of-a-transition-c3c3c66f-4cca-4821-b8b9-7de0f3f6ead1#:~:text=To%20make%20the%20slide%20advance,effect%20on%20the%20slide%20finishes .
About This Article

- Send fan mail to authors
Reader Success Stories
Artis Holland
Sep 22, 2016
Is this article up to date?

Oct 18, 2016
Jul 23, 2016
Margery Niyi
Sep 25, 2017
Jul 21, 2016

Featured Articles

Trending Articles

Watch Articles

- Terms of Use
- Privacy Policy
- Do Not Sell or Share My Info
- Not Selling Info
Keep up with the latest tech with wikiHow's free Tech Help Newsletter
How-To Geek
8 tips to make the best powerpoint presentations.
Want to make your PowerPoint presentations really shine? Here's how to impress and engage your audience.
Quick Links
Table of contents, start with a goal, less is more, consider your typeface, make bullet points count, limit the use of transitions, skip text where possible, think in color, take a look from the top down, bonus: start with templates.
Slideshows are an intuitive way to share complex ideas with an audience, although they're dull and frustrating when poorly executed. Here are some tips to make your Microsoft PowerPoint presentations sing while avoiding common pitfalls.
It all starts with identifying what we're trying to achieve with the presentation. Is it informative, a showcase of data in an easy-to-understand medium? Or is it more of a pitch, something meant to persuade and convince an audience and lead them to a particular outcome?
It's here where the majority of these presentations go wrong with the inability to identify the talking points that best support our goal. Always start with a goal in mind: to entertain, to inform, or to share data in a way that's easy to understand. Use facts, figures, and images to support your conclusion while keeping structure in mind (Where are we now and where are we going?).
I've found that it's helpful to start with the ending. Once I know how to end a presentation, I know how best to get to that point. I start by identifying the takeaway---that one nugget that I want to implant before thanking everyone for their time---and I work in reverse to figure out how best to get there.
Your mileage, of course, may vary. But it's always going to be a good idea to put in the time in the beginning stages so that you aren't reworking large portions of the presentation later. And that starts with a defined goal.
A slideshow isn't supposed to include everything. It's an introduction to a topic, one that we can elaborate on with speech. Anything unnecessary is a distraction. It makes the presentation less visually appealing and less interesting, and it makes you look bad as a presenter.
This goes for text as well as images. There's nothing worse, in fact, than a series of slides where the presenter just reads them as they appear. Your audience is capable of reading, and chances are they'll be done with the slide, and browsing Reddit, long before you finish. Avoid putting the literal text on the screen, and your audience will thank you.
Related: How to Burn Your PowerPoint to DVD
Right off the bat, we're just going to come out and say that Papyrus and Comic Sans should be banned from all PowerPoint presentations, permanently. Beyond that, it's worth considering the typeface you're using and what it's saying about you, the presenter, and the presentation itself.
Consider choosing readability over aesthetics, and avoid fancy fonts that could prove to be more of a distraction than anything else. A good presentation needs two fonts: a serif and sans-serif. Use one for the headlines and one for body text, lists, and the like. Keep it simple. Veranda, Helvetica, Arial, and even Times New Roman are safe choices. Stick with the classics and it's hard to botch this one too badly.
There reaches a point where bullet points become less of a visual aid and more of a visual examination.
Bullet points should support the speaker, not overwhelm his audience. The best slides have little or no text at all, in fact. As a presenter, it's our job to talk through complex issues, but that doesn't mean that we need to highlight every talking point.
Instead, think about how you can break up large lists into three or four bullet points. Carefully consider whether you need to use more bullet points, or if you can combine multiple topics into a single point instead. And if you can't, remember that there's no one limiting the number of slides you can have in a presentation. It's always possible to break a list of 12 points down into three pages of four points each.
Animation, when used correctly, is a good idea. It breaks up slow-moving parts of a presentation and adds action to elements that require it. But it should be used judiciously.
Adding a transition that wipes left to right between every slide or that animates each bullet point in a list, for example, starts to grow taxing on those forced to endure the presentation. Viewers get bored quickly, and animations that are meant to highlight specific elements quickly become taxing.
That's not to say that you can't use animations and transitions, just that you need to pick your spots. Aim for no more than a handful of these transitions for each presentation. And use them in spots where they'll add to the demonstration, not detract from it.
Sometimes images tell a better story than text can. And as a presenter, your goal is to describe points in detail without making users do a lot of reading. In these cases, a well-designed visual, like a chart, might better convey the information you're trying to share.
The right image adds visual appeal and serves to break up longer, text-heavy sections of the presentation---but only if you're using the right images. A single high-quality image can make all the difference between a success and a dud when you're driving a specific point home.
When considering text, don't think solely in terms of bullet points and paragraphs. Tables, for example, are often unnecessary. Ask yourself whether you could present the same data in a bar or line chart instead.
Color is interesting. It evokes certain feelings and adds visual appeal to your presentation as a whole. Studies show that color also improves interest, comprehension, and retention. It should be a careful consideration, not an afterthought.
You don't have to be a graphic designer to use color well in a presentation. What I do is look for palettes I like, and then find ways to use them in the presentation. There are a number of tools for this, like Adobe Color , Coolors , and ColorHunt , just to name a few. After finding a palette you enjoy, consider how it works with the presentation you're about to give. Pastels, for example, evoke feelings of freedom and light, so they probably aren't the best choice when you're presenting quarterly earnings that missed the mark.
It's also worth mentioning that you don't need to use every color in the palette. Often, you can get by with just two or three, though you should really think through how they all work together and how readable they'll be when layered. A simple rule of thumb here is that contrast is your friend. Dark colors work well on light backgrounds, and light colors work best on dark backgrounds.
Spend some time in the Slide Sorter before you finish your presentation. By clicking the four squares at the bottom left of the presentation, you can take a look at multiple slides at once and consider how each works together. Alternatively, you can click "View" on the ribbon and select "Slide Sorter."
Are you presenting too much text at once? Move an image in. Could a series of slides benefit from a chart or summary before you move on to another point?
It's here that we have the opportunity to view the presentation from beyond the single-slide viewpoint and think in terms of how each slide fits, or if it fits at all. From this view, you can rearrange slides, add additional ones, or delete them entirely if you find that they don't advance the presentation.
The difference between a good presentation and a bad one is really all about preparation and execution. Those that respect the process and plan carefully---not only the presentation as a whole, but each slide within it---are the ones who will succeed.
This brings me to my last (half) point: When in doubt, just buy a template and use it. You can find these all over the web, though Creative Market and GraphicRiver are probably the two most popular marketplaces for this kind of thing. Not all of us are blessed with the skills needed to design and deliver an effective presentation. And while a pre-made PowerPoint template isn't going to make you a better presenter, it will ease the anxiety of creating a visually appealing slide deck.
You’re using an older browser version. Update to the latest version of Google Chrome , Safari , Mozilla Firefox , or Microsoft Edge for the best site experience.
- eLearning Blog
- eLearning Basics
- Instructional Design
- Corporate Training
- Course Selling
- Manufacturing
- Products iSpring Suite iSpring Learn
- Use Cases Onboarding Compliance Training Induction Training Product Training Channel Partner Training Sales Training Microlearning Mobile Learning
- Company About Us Case Studies Customers Partnership Course Development Contact Us Academy Blog Webinars Guides
- Community Academy Blog Webinars Guides Experts on iSpring
- Language EN English Français Deutsch Español Italiano Nederlands Português Polski 中文 日本語 العربية Indonesia
- Shopping Cart
How to Structure a PowerPoint Presentation

Table of Contents

This is the main part of your presentation, which should keep the promises you made in the introduction. This is where you explain your topic and present all your information.
Depending on the nature of your presentation, divide it into segments/points. Arrange your points in a logical order and then provide information to support each of them. There are many different ways to organize your key points, for example:
- Number your points according to their priority (1, 2, 3, …)
- Place the points in a time frame (past, present, future)
- Use narration (tell a story from beginning to end)
- Present the points with a problem-solution dynamic (state a problem, describe its impact, offer ways to solve the issue)
A good conclusion summarizes the key points you made or highlights what the audience should have learned. It clarifies the general purpose of your presentation and reinforces the reason for viewing it. Here are the slides you may want to include:
- Summary. List what goals your audience have achieved, what knowledge they got, and how this information can help them in the future.
- Conclusion. Here you can thank your audience for viewing the presentation.
Tips for Structuring a Presentation in PowerPoint
Now that you know which parts a typical presentation should consist of, let’s see how to structure it in PowerPoint.
1. Combine slides into sections
When working with a large PowerPoint presentation (PPT), you can create sections that can be collapsed and expanded. This will help you keep presentation slides organized and facilitate navigation in editing mode. To do that, follow these steps:

- To shift a section, right-click on its name and use the Move Section Up and Move Section Down options.
- To collapse or expand a certain section, click on the collapse icon to the left of the section name. You can also minimize and maximize all sections at once by right-clicking on the section name and choosing Collapse All or Expand All .
As well, you can access these settings by choosing Slide Sorter under the VIEW tab.

This kind of segmentation is a great way to overview the logical flow of your slides all at once and see if there are any changes required. For example, you may decide to break one slide into two or three, or the other way around.
2. Use the Outline View
One other way to structure a PowerPoint presentation in the editing mode is to use Outline View . You can choose it from the VIEW tab.

This view doesn’t display sections, but it shows the title and main text of each slide, which can give you a quick overview of the presentation contents. Here you can go through the entire text and edit it instantly. You can also work with text (on the left) and slides (on the right) simultaneously, as the latter is shown on the right side of your screen.
Note that, to be displayed in an outline, text needs to be typed in a text placeholder, not a text box . A text placeholder is a box with the words “Click to add text” or “Click to add title”, and it appears when you choose a standard layout.
You can also use Outline View to promote bullet text to titles and the other way around. To do that, right-click on a relevant title or text and select the Promote or Demote options.

Be attentive about demoting a title, as this will delete the original slide and move its title and text to the adjacent slide.
PowerPoint only allows users to promote and demote text, not entire slides. Therefore, there’s no possibility to change the hierarchical order of slides.
3. Create a table of contents
All the aforementioned tips help you organize a presentation when formatting it. However, it’s crucial that your viewers can easily navigate through entire presentation too. One sure way to provide them with this opportunity is to create an interactive and structured table of contents.
Though there’s no native automatic outline in PowerPoint, it can be created manually:

- Press Ctrl+A to select all the names, and Ctrl+C to copy them.
- Then Press Ctrl+V to paste the copied titles on the desired slide. In case there are too many titles and they don’t fit onto a single page, you can divide the table of contents into two columns or place it on two slides.

You’ll need to repeat this procedure to link all the chapters to corresponding slides. For more information, read this step-by-step guide on how to add a hyperlink in PowerPoint .
Now all the chapters can be accessed from a single table of contents, which is very convenient. However, you will also need to link them back to that unifying page. You can do this by inserting an Action Button on every slide of your presentation in Slide Master mode:

Now there is a single page from which all the other pages can be easily accessed. As well, it’s possible to go back to the table of contents at any time with the intuitive Home button.
Depending on the size of your presentation, the time it takes to create an interactive outline may vary, as you will need to add hyperlinks to every chapter manually. Be aware that if you rename a slide or simply delete it, these changes will not be automatically registered in the table of contents. For example, if you delete a slide, its title will still be displayed in the table of contents, but clicking on it won’t lead the viewer to another point in the presentation.
This is what our sample presentation looks like:

A Better Way to Structure a PowerPoint Presentation
Creating a table of contents manually might be fine for a small presentation, but if you have 122 slides, it would require too much time and energy to do so. That’s why, instead of manually creating a table of contents, we took advantage of iSpring Suite and simply enabled the automatic outline.
iSpring Suite
Fully-stocked eLearning authoring toolkit for PowerPoint. No training required to start!

Note: iSpring Suite turns slides into HTML5 format, so your audience can view them online, right in their browsers.

As you can see, the new presentation has a pop-up outline and a navigation panel, which make it possible to move to any slide at any time without leaving the slide show mode.
How to set up navigation
To create navigation in your presentation, follow these simple steps:
- Get a free trial of iSpring Suite.

- When you’ve configured the Slide Properties settings, click on Save & Close in the upper-left corner.
How to configure an outline
Whereas PowerPoint requires the outline to be designed manually, iSpring Suite has already prepared it for you. At the same time, you don’t have to stick with the standard outline template, as you can easily customize the player’s final look and feel:

We recommend leaving Enable Search marked, as this will allow viewers to search for any content at any time, including the texts on the slides. This is especially useful for large presentations with a lot of text.
If you have previously arranged slides into multiple levels in the Slide Properties, then leave Multilevel outline marked. That way, the outline will display the nesting structure of the presentation, facilitating navigation. You can learn more about the other outline options here .

- When you have finished configuring the player, click on Apply & Close in the upper-left corner.
- Now you can publish your enhanced presentation either to HTML5, to make it easily accessible via browser on any device, or MP4 video format. If you’re going to upload your presentation to an LMS, you can publish it to any eLearning format: SCORM, AICC, Tin Can, or cmi5.
While a standard PowerPoint slideshow is straightforward and limited, iSpring Suite saves viewers from having to follow a strict slide order. An interactive and searchable outline allows non-linear navigation, where any information can be accessed at any time at a glance.
Also read : → How to Convert PowerPoint to MP4 Video
Also read : → How To Record Presentations With Audio
Another perk
iSpring Suite comes with Content Library , which provides a great collection of presentation templates and allows you to create professional-looking presentations in a matter of minutes. Each template includes basic course elements: a title slide, a table of contents, chapters, a timeline, and info slides. Organize them in the order you prefer, populate them with your texts and images, and your presentation is ready to go.

We hope this article will help you develop an ideal structure for your PowerPoint presentation and do this quickly and easily. Captivate your audience with a powerful and persuasive presentation!
Do you have any other insights on how to simplify PowerPoint slides design? Please share them in the comment section. We’d like to hear from you.
Fast course authoring toolkit
Create online courses and assessments in record time.

Content creator:
Helen Colman
She enjoys combining in-depth research with expert knowledge of the industry. If you have eLearning insights that you’d like to share, please get in touch .
You might also like this

Subscribe to our blog
Stay tuned to get our latest eLearning tips and tricks!
By clicking “Subscribe”, you agree to our Privacy Policy . All emails include an unsubscribe link, so that you can opt-out at any time.
We use cookies to give you the best possible experience on our website and also for analytics and marketing purposes. You can enable or disable optional cookies as desired. See our Cookie Policy for more details.
Manage your cookies
Essential cookies are always on. You can turn off other cookies if you wish.
Essential cookies
Analytics cookies
Social media cookies

How To Write A Presentation 101: A Step-by-Step Guide with Best Examples
Jane Ng • 02 Nov 2023 • 8 min read
Is it difficult to start of presentation? You’re standing before a room full of eager listeners, ready to share your knowledge and captivate their attention. But where do you begin? How do you structure your ideas and convey them effectively?
Take a deep breath, and fear not! In this article, we’ll provide a road map on how to write a presentation covering everything from crafting a script to creating an engaging introduction.
So, let’s dive in!
Table of Contents
What is a presentation , what should be in a powerful presentation.
- How To Write A Presentation Script
- How to Write A Presentation Introduction
Key Takeaways
Tips for better presentation.
- How to start a presentation
- How to introduce yourself

Start in seconds.
Get free templates for your next interactive presentation. Sign up for free and take what you want from the template library!
Presentations are all about connecting with your audience.
Presenting is a fantastic way to share information, ideas, or arguments with your audience. Think of it as a structured approach to effectively convey your message. And you’ve got options such as slideshows, speeches, demos, videos, and even multimedia presentations!
The purpose of a presentation can vary depending on the situation and what the presenter wants to achieve.
- In the business world, presentations are commonly used to pitch proposals, share reports, or make sales pitches.
- In educational settings, presentations are a go-to for teaching or delivering engaging lectures.
- For conferences, seminars, and public events—presentations are perfect for dishing out information, inspiring folks, or even persuading the audience.
That sounds brilliant. But, how to write a presentation?

How To Write A Presentation? What should be in a powerful presentation? A great presentation encompasses several key elements to captivate your audience and effectively convey your message. Here’s what you should consider including in a winning presentation:
- Clear and Engaging Introduction: Start your presentation with a bang! Hook your audience’s attention right from the beginning by using a captivating story, a surprising fact, a thought-provoking question, or a powerful quote. Clearly state the purpose of your presentation and establish a connection with your listeners.
- Well-Structured Content: Organize your content logically and coherently. Divide your presentation into sections or main points and provide smooth transitions between them. Each section should flow seamlessly into the next, creating a cohesive narrative. Use clear headings and subheadings to guide your audience through the presentation.
- Compelling Visuals: Incorporate visual aids, such as images, graphs, or videos, to enhance your presentation. Make sure your visuals are visually appealing, relevant, and easy to understand. Use a clean and uncluttered design with legible fonts and appropriate color schemes.
- Engaging Delivery: Pay attention to your delivery style and body language. You should maintain eye contact with your audience, use gestures to emphasize key points, and vary your tone of voice to keep the presentation dynamic.
- Clear and Memorable Conclusion: Leave your audience with a lasting impression by providing a strong closing statement, a call to action, or a thought-provoking question. Make sure your conclusion ties back to your introduction and reinforces the core message of your presentation.

How To Write A Presentation Script (With Examples)
To successfully convey your message to your audience, you must carefully craft and organize your presentation script. Here are steps on how to write a presentation script:
1/ Understand Your Purpose and Audience:
- Clarify the purpose of your presentation. Are you informing, persuading, or entertaining?
- Identify your target audience and their knowledge level, interests, and expectations.
- Define what presentation format you want to use
2/ Outline the Structure of Your Presentation:
Strong opening: .
Start with an engaging opening that grabs the audience’s attention and introduces your topic. Some types of openings you can use are:
- Start with a Thought-Provoking Question: “Have you ever…?”
- Begin with a Surprising Fact or Statistic: “Did you know that….?”
- Use a Powerful Quote: “As Maya Angelou once said,….”
- Tell a Compelling Story : “Picture this: You’re standing at….”
- Start with a Bold Statement: “In the fast-paced digital age….”
Main Points:
Clearly state your main points or key ideas that you will discuss throughout the presentation.
- Clearly State the Purpose and Main Points: Example: “In this presentation, we will delve into three key areas. First,… Next,… Finally,…. we’ll discuss….”
- Provide Background and Context: Example: “Before we dive into the details, let’s understand the basics of…..”
- Present Supporting Information and Examples: Example: “To illustrate…., let’s look at an example. In,…..”
- Address Counterarguments or Potential Concerns: Example: “While…, we must also consider… .”
- Recap Key Points and Transition to the Next Section: Example: “To summarize, we’ve… Now, let’s shift our focus to…”
Remember to organize your content logically and coherently, ensuring smooth transitions between sections.
Ending:
You can conclude with a strong closing statement summarizing your main points and leaving a lasting impression. Example: “As we conclude our presentation, it’s clear that… By…., we can….”
3/ Craft Clear and Concise Sentences:
Once you’ve outlined your presentation, you need to edit your sentences. Use clear and straightforward language to ensure your message is easily understood.
Alternatively, you can break down complex ideas into simpler concepts and provide clear explanations or examples to aid comprehension.
4/ Use Visual Aids and Supporting Materials:
Use supporting materials such as statistics, research findings, or real-life examples to back up your points and make them more compelling.
- Example: “As you can see from this graph,… This demonstrates….”
5/ Include Engagement Techniques:
Incorporate interactive elements to engage your audience, such as Q&A sessions , conducting live polls , or encouraging participation.
6/ Rehearse and Revise:
- Practice delivering your presentation script to familiarize yourself with the content and improve your delivery.
- Revise and edit your script as needed, removing any unnecessary information or repetitions.
7/ Seek Feedback:
You can share your script or deliver a practice presentation to a trusted friend, colleague, or mentor to gather feedback on your script and make adjustments accordingly.
More on Script Presentation

How to Write A Presentation Introduction with Examples
How to write presentations that are engaging and visually appealing? Looking for introduction ideas for the presentation? As mentioned earlier, once you have completed your script, it’s crucial to focus on editing and refining the most critical element—the opening of your presentation – the section that determines whether you can captivate and retain your audience’s attention right from the start.
Here is a guide on how to craft an opening that grabs your audience’s attention from the very first minute:
1/ Start with a Hook
To begin, you can choose from five different openings mentioned in the script based on your desired purpose and content. Alternatively, you can opt for the approach that resonates with you the most, and instills your confidence. Remember, the key is to choose a starting point that aligns with your objectives and allows you to deliver your message effectively.
2/ Establish Relevance and Context:
Then you should establish the topic of your presentation and explain why it is important or relevant to your audience. Connect the topic to their interests, challenges, or aspirations to create a sense of relevance.
3/ State the Purpose
Clearly articulate the purpose or goal of your presentation. Let the audience know what they can expect to gain or achieve by listening to your presentation.
4/ Preview Your Main Points
Give a brief overview of the main points or sections you will cover in your presentation. It helps the audience understand the structure and flow of your presentation and creates anticipation.
5/ Establish Credibility
Share your expertise or credentials related to the topic to build trust with the audience, such as a brief personal story, relevant experience, or mentioning your professional background.
6/ Engage Emotionally
Connect emotional levels with your audience by appealing to their aspirations, fears, desires, or values. They help create a deeper connection and engagement from the very beginning.
Make sure your introduction is concise and to the point. Avoid unnecessary details or lengthy explanations. Aim for clarity and brevity to maintain the audience’s attention.
For example, Topic: Work-life balance
“Good morning, everyone! Can you imagine waking up each day feeling energized and ready to conquer both your personal and professional pursuits? Well, that’s exactly what we’ll explore today – the wonderful world of work-life balance. In a fast-paced society where work seems to consume every waking hour, it’s vital to find that spot where our careers and personal lives harmoniously coexist. Throughout this presentation, we’ll dive into practical strategies that help us achieve that coveted balance, boost productivity, and nurture our overall well-being.
But before we dive in, let me share a bit about my journey. As a working professional and a passionate advocate for work-life balance, I have spent years researching and implementing strategies that have transformed my own life. I am excited to share my knowledge and experiences with all of you today, with the hope of inspiring positive change and creating a more fulfilling work-life balance for everyone in this room. So, let’s get started!”
Check out: How to Start a Presentation?

Whether you’re a seasoned speaker or new to the stage, understanding how to write a presentation that conveys your message effectively is a valuable skill. By following the steps in this guide, you can become a captivating presenter and make your mark in every presentation you deliver.
Additionally, AhaSlides can significantly enhance your presentation’s impact. With AhaSlides, you can use live polls, quizzes, and word cloud to turn your presentation into an engaging and interactive experience. Let’s take a moment to explore our vast template library !
Frequently Asked Questions
1/ how to write a presentation step by step .
You can refer to our step-by-step guide on How To Write A Presentation Script:
- Understand Your Purpose and Audience
- Outline the Structure of Your Presentation
- Craft Clear and Concise Sentences
- Use Visual Aids and Supporting Material
- Include Engagement Techniques
- Rehearse and Revise
- Seek Feedback
2/ How do you start a presentation?
You can start with an engaging opening that grabs the audience’s attention and introduces your topic. Consider using one of the following approaches:
3/ What are the five parts of a presentation?
When it comes to presentation writing, a typical presentation consists of the following five parts:
- Introduction: Capturing the audience’s attention, introducing yourself, stating the purpose, and providing an overview.
- Main Body: Presenting main points, evidence, examples, and arguments.
- Visual Aids: Using visuals to enhance understanding and engage the audience.
- Conclusion: Summarizing main points, restating key message, and leaving a memorable takeaway or call to action.
- Q&A or Discussion: Optional part for addressing questions and encouraging audience participation.

A writer who wants to create practical and valuable content for the audience
More from AhaSlides

How to Format Text in PowerPoint? [A Complete Tutorial!]
By: Author Shrot Katewa
![How to Format Text in PowerPoint? [A Complete Tutorial!]](https://artofpresentations.com/wp-content/uploads/2021/06/Featured-Image-How-to-Format-Text-in-PowerPoint.jpg "format in making powerpoint presentation")
When you have to create presentations using PowerPoint, knowing how to format text in PowerPoint the correct way can actually save you a ton of time! It is one of the most important tasks that we invariably need to perform on any presentation i.e. formatting text in PowerPoint!
To format the text in PowerPoint, select the text first. Then, on the home tab, you can use the various formatting options such as Font Type, Font Size, Font Styles, Line Spacing, Font Color, Text Highlight, etc.
Formatting text correctly in PowerPoint can add emphasis and grab the attention of the audience where needed. This can not only make your presentation look good, but also help you deliver it effectively!
So, in this article, we shall take a deep dive and understand all the nuances of formatting the text correctly in PowerPoint. I shall try my best to provide information about everything you need to know when it comes to editing and formatting the text!
So, let’s get started!
A Quick Note Before We Begin – if you want to make jaw-dropping presentations, I would recommend using one of these Presentation Designs . The best part is – it is only $16.5 a month, but you get to download and use as many presentation designs as you like! I personally use it from time-to-time, and it makes my task of making beautiful presentations really quick and easy!
1. How to Add Text to a Slide in PowerPoint?
You probably may already know this, but let’s just start with the basics to make sure we are all on the same page!
You can add text to the slide in PowerPoint using a text box. Click on the “Insert” tab. Then, select the “Text Box” option. Next, click and drag on any part of your slide to add the text box. Finally, start typing to add text as soon as you have created the text box in PowerPoint.
Here’s a step by step process described in detail:
Step 1: Click on the “Insert” tab
The first step to adding text to a slide in PowerPoint is to click on the “Insert” tab which is the third tab in the ribbon and located at the top left of the PowerPoint window.
Step 2: Select the “Text Box” option
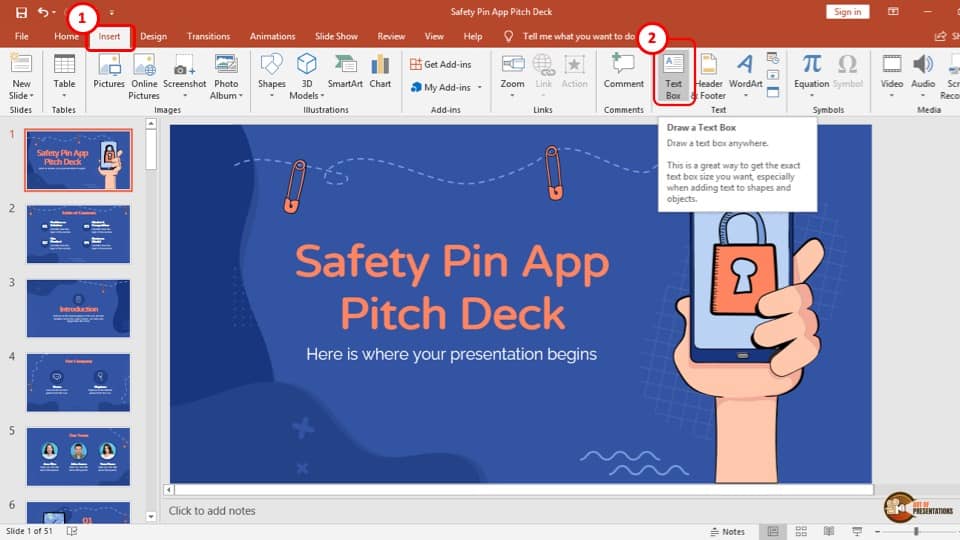
Click on the “Text Box” option which in on the right side of the “Insert” tab in the “Text” section. After clicking on the “Text Box” option, your cursor will change on the slide.
Now to add the text box to the slide, simply click and drag your cursor to draw the text box with your preferred size.
Step 3: Add text to your presentation
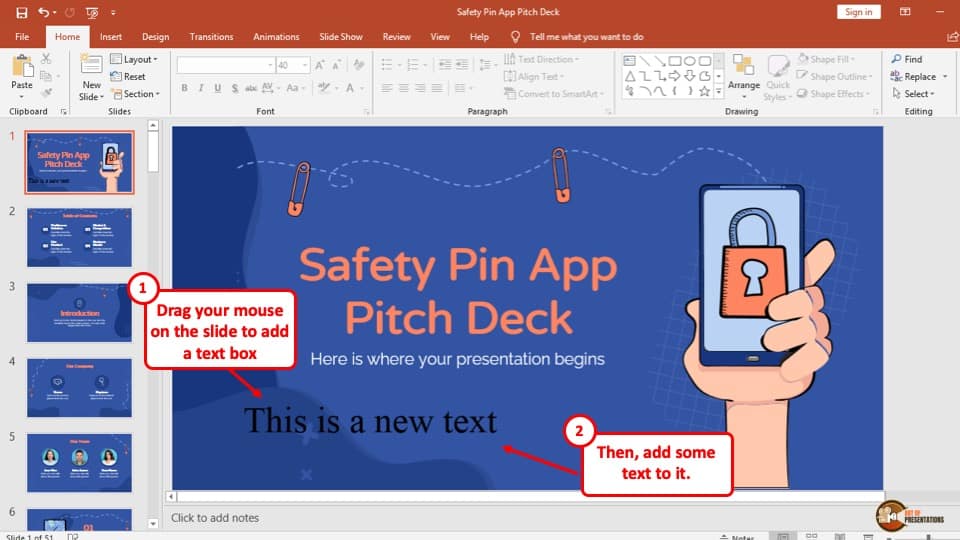
To add text, you can directly start typing as soon as you create the text box. Click outside the box when you are done, and your text will be added to the slide.
If you want to edit the text again, then click inside the text box anywhere on the text. Alternatively, you can select the text box and right-click on it, and from the menu, click on “Edit Text”.
In case you are new to PowerPoint and want to know more about the nuances of adding text such as adding text over an image, shape, or even a video, check my other article on how to add text in PowerPoint that goes in-depth on this topic.
2. How to Change the Font of the Text?
There are at least two methods you should know on how to change the font of your text in PowerPoint. However, make sure to check out our detailed guide on how to change fonts in PowerPoint where I’ve added even more relevant information explained in a step-by-step manner.
Nevertheless, the two methods are described below –
Method 1 – Using the “Home” Ribbon
The first method is by using the “Home” tab in PowerPoint . Here’s the detailed process explained –
Step 1: Select the Text
The first step is to select the text inside the text box for which you want to change the font. If you want to change the font of all the text inside the text box, you can also click on the text box itself!
Step 2: Change the Font
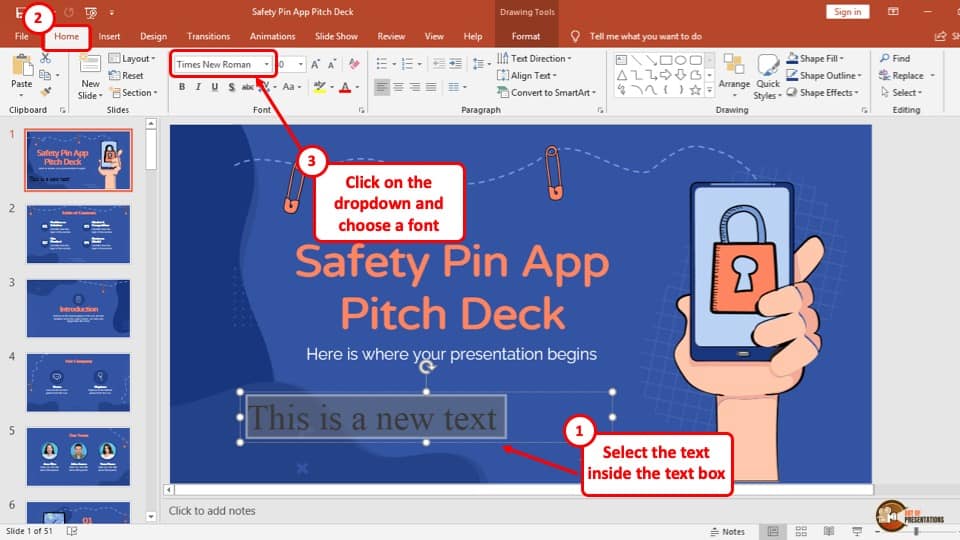
The next step is simply to change the font! To do that, make sure the “ Home ” ribbon is selected. (as shown in the image above). Then, under the “ Fonts ” section, click on the “ Font ” dropdown and choose the font as per your desire.
Method 2 – Using the Right-Click Option
The whole process is described through three simple steps below:
Step 1: Select the text
The first step is to select the text located in text boxes. You can do that by double-clicking on a word in the “Text box” or dragging your cursor over the texts while holding the “left mouse button”
Step 2: “Right-click” on your selected text.
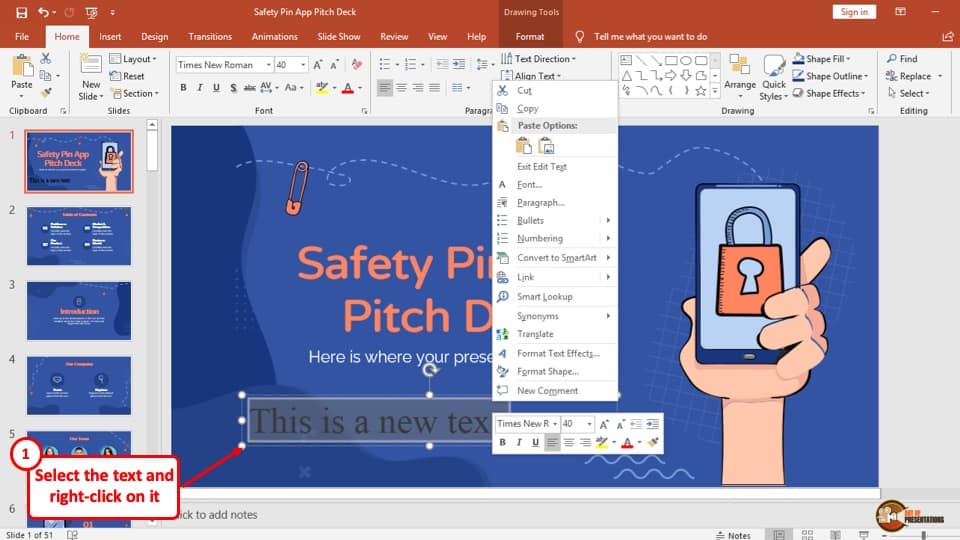
“Right-click ” on the text which you have selected. This will open a drop-down menu. The drop-down menu has the “Font” section of the “Home” tab which you can use to edit the font style, color, and size.
Step 3: Click on the “Font” drop-down menu.

Click on the “Font” option to open its drop-down menu. The drop-down menu has a variety of fonts that will appear in the middle of the screen.
Click on your preferred font style and it will change accordingly.
3. How to Change Font Size of Text in PowerPoint?
The steps of changing the font size are very similar to that of changing the font of the text. The process is described in simple steps below:
Step 1: Select the text.
Select the text in which you want to increase or decrease the size of the font and then “Right-click” on it. A drop-down menu with the “Font” section of the “Home” tab will appear.
Step 2: Click on the “Font size” option.

Right beside the current font style, a number is showing the size of the font, that is the “Font size” option.
To change the size of the text, click on the “Font size” dropdown menu and different numbers will show up. Click on the size you want, and the font size will be changed immediately.
You can also type in the exact font size that you want if it is not present in the dropdown list.
4. How to Add Styles to Text in PowerPoint?
You can also take advantage of the Font Styles in PowerPoint to emphasize the text! There are primarily 4 text styles available in PowerPoint. These are –
- Strikethrough
There are also superscript and subscript text options, which we shall cover in detail later in this article.
To change the font style to bold, italics, underline, or strikethrough in your slide, first you have to select the texts you want to change the style of and then follow the instructions below:
How to Bold the Text in PowerPoint?

At first, select the text you want to bold. The “Home” tab has a “Font” section. On the bottom left of the “Font” section, there is a “B” button which will turn your text to a “Bold” style text. Click on the “B” button and your text will turn bold.
Alternatively, you can also use the shortcut i.e. “Ctrl + B” buttons on your keyboard after selecting the text to get the job done faster.
How to Make the Text Italics in PowerPoint?

Click on the button that looks like an “ I” which is the “Italic” style font option after selecting the text. It is located on the right side of “Bold” option. The selected text will be changed to an “ Italic ” style font immediately.
Alternatively, you can also use the keyboard shortcut for italicizing the text in PowerPoint. Just press the “Ctrl + I” buttons on your keyboard after selecting the text to get the job done.
How to Underline Text in PowerPoint?
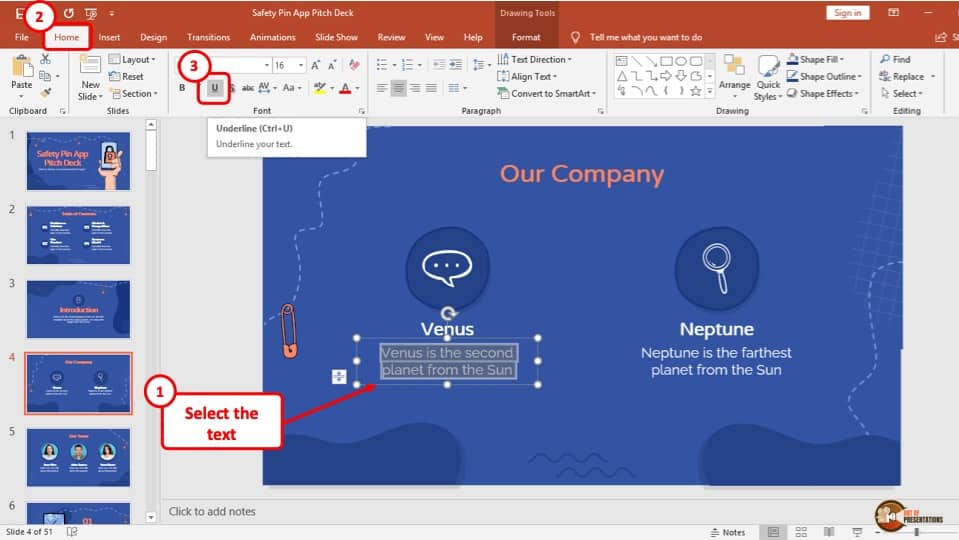
Underlining texts can be done by selecting the text and clicking on the button that looks like a “ U ” . This is the “underline” option in the “Font” section. The “ U ” button is right beside the “ I” button in the Home tab.
Alternatively, you can also use the keyboard shortcut to underline text by pressing the “Ctrl + U” buttons on your keyboard after selecting the text.
How to Strikethrough Text in PowerPoint?
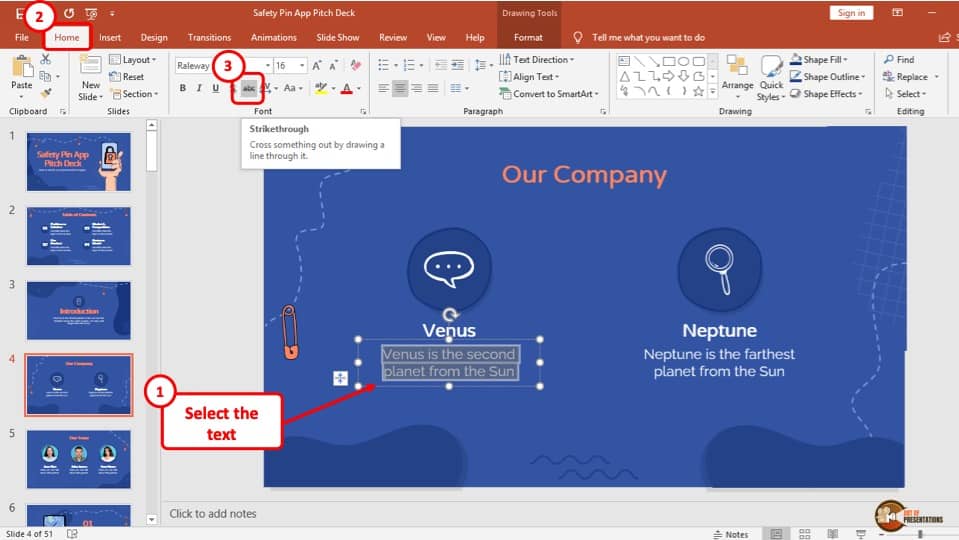
The strikethrough text is used when you want to cross out the text.
The “Strikethrough” button is beside the “Underline” button in the “Font” section and the icon has a line going through lower case “ ab ” .
After selecting the text, click on the “Strikethrough” option and it will cross out the text.
5. How to Highlight the Text in PowerPoint?
You can use the “Text Highlight Color” button to highlight the text in PowerPoint. However, this button is only available for the Office 365 version of PowerPoint .
If you are using an older version of PowerPoint, check out my other article on how to highlight text in PowerPoint . It provides you with multiple other ways to make your text stand out on a slide in PowerPoint.
That said, here’s a step-by-step process on how to highlight text in PowerPoint using the text highlight color option!
Step 1: Select the Text and Click the “Text Highlight Color” button
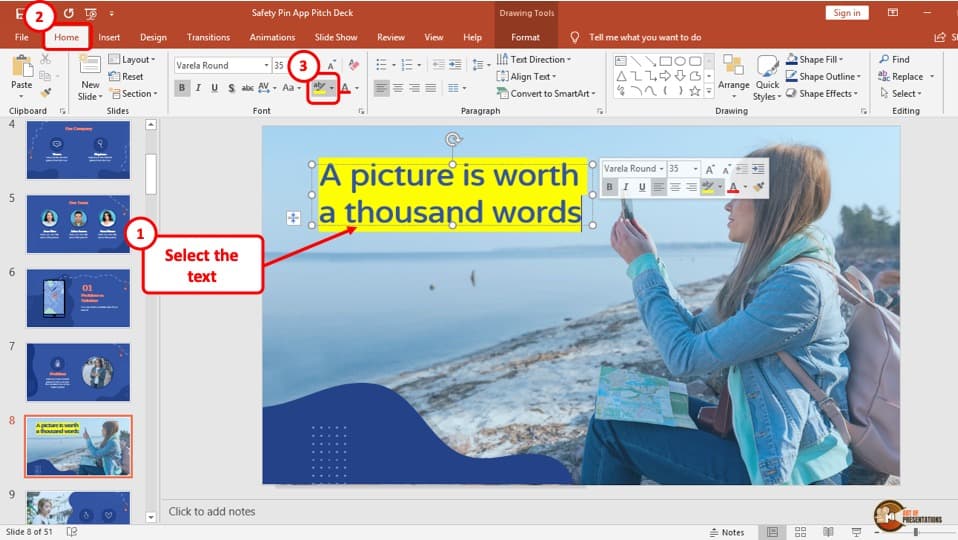
At first, you have to click on the text you want to highlight and select it. Then, you have to click the “Text Highlight Colour” button.
This button has a pen in the icon with a yellow line underneath it and it is located at the “Font” section of the “Home” tab. Doing so will instantly highlight your text.
If you want to highlight text across multiple text boxes, you can also first click on the “Text Highlight Colour” button on the “Home” tab. This will turn the cursor into a pen from the “Arrow” icon.
Now, simply click on the text box for the text you want to highlight. The text will be highlighted instantly.
6. How to Change Font Color in PowerPoint?
There are multiple ways in which you can change the color of your font in PowerPoint. I’ve listed the easiest method to change the font color below.
If you want to know ninja tips on how to change the font color for all text in PowerPoint, check out my other article. (by clicking on the link)
Follow the step-by-step guide to change your font color in PowerPoint:
Step 1: Click on the “Font Color” drop-down menu button
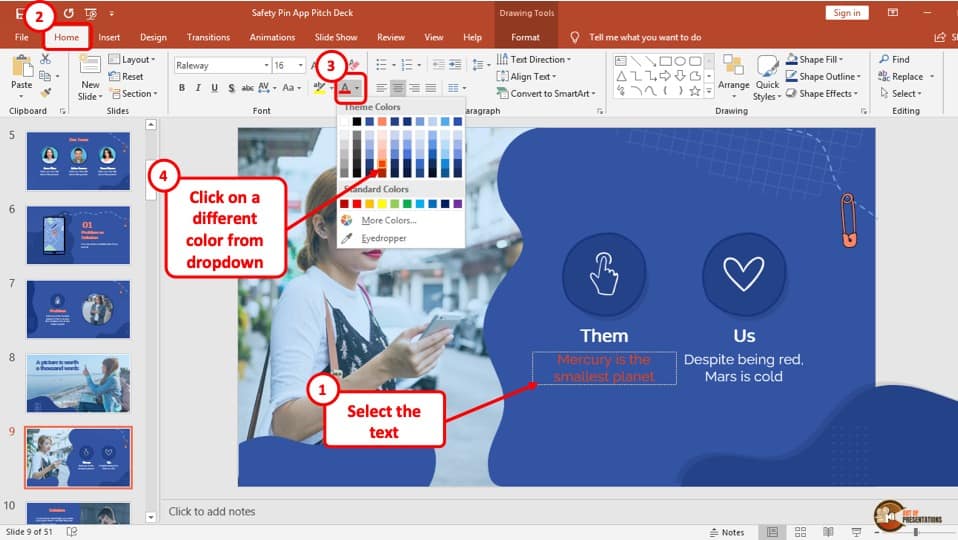
To change the color of your text, the first step is to select the text using your cursor. Then click on the “dropdown” button beside the “Font Color” button.
This button is located at the right of the “Font” section in your “Home” tab. It is an icon with a capitalized “A” and a red underline.
Step 2: Choose new font color
When you click on the dropdown menu, a color palette appears. Hover your cursor to the color you want, and you will see the text changing its color. Now, click to alter the text font color.
7. How to Clear Text Formatting in PowerPoint?
Sometimes, you don’t particularly like the changes that you’ve made to the text and perhaps you want to start over from scratch. This is when the clear text formatting option in PowerPoint comes in handy!
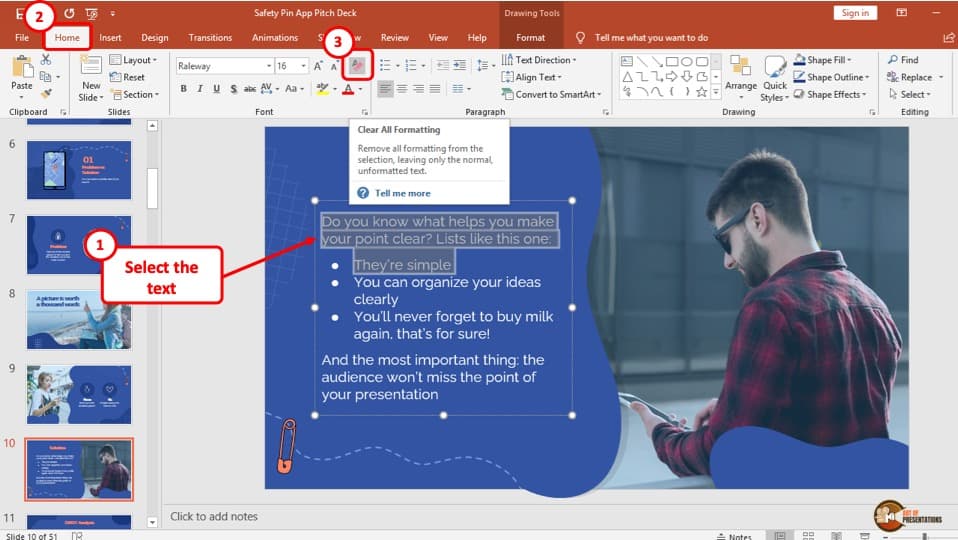
To clear the text formatting in your PowerPoint presentation, select the text you want to remove the formatting from and click on the icon with the red eraser called the “Clear All Formatting” button.
This icon is located in the “Font” section of the “Home” tab and clicking it will erase all formats such as bold, italics, underline, highlight, etc. from the text. The text will then revert to the default text of the theme.
If you want to learn how to clear formatting in PowerPoint on all slides, make sure you click on the link and check out the other article where I have gone into detail on this topic and provided tips on how to do so quickly!
8. How to Add Text Outline in PowerPoint?
You can outline text in PowerPoint to create emphasis on certain text that you want the audience to look at.
Here’s how you can outline text in PowerPoint –
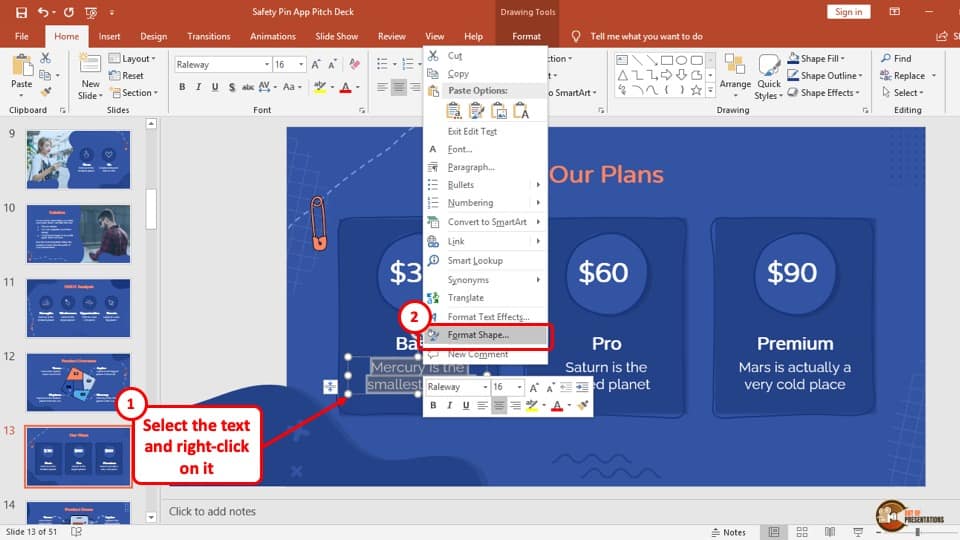
Step 1: “Right-click” on the text and select “Format Text Effects”

Select the text you want to outline and “Right-click” on it. A drop-down menu will appear with different options. Click on the “Format Text Effects” option from the menu.
Step 2: Click on the “Text Fill & Outline” button
After you click on the “Format Text Effects” option, the “Format Shape” sidebar will pop up on the right of the slide.
It usually automatically displays the “Texts Effects” option which is the icon in the middle that looks like an “A” . In case it doesn’t, click on “ Text Options ” first.
Click on the “A” icon beside it and then click on the “Text Outline” option. A menu will appear with the options like, “No line” , “Solid line” , and “Gradient line” .
Step 3: Select your desired Text Outline
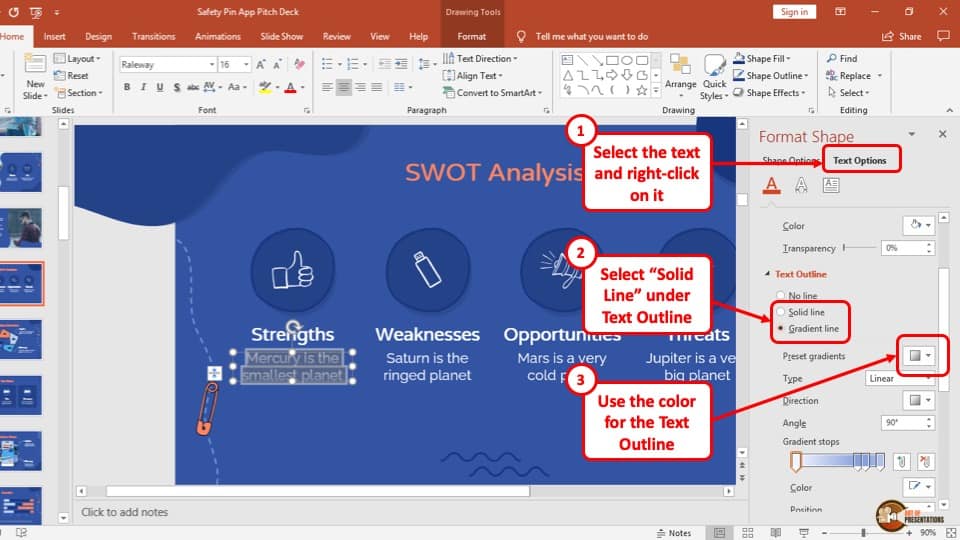
Choose the text outline you want to apply to the slide text. Gradient line will create a transparent border around your text, and a solid line will fill up your text border.
Choose a color as per preference to add the outline to text in PowerPoint.
9. Using WordArt in PowerPoint
I’ve written a detailed article on how to use WordArt in PowerPoint along with steps to customize your WordArt. So, make sure you click on the link and check out that article to learn more about WordArt. But, here’s a quick highlight on using WordArt –
To use WordArt in your PowerPoint presentation, you have to go to the “WordArt” option in the “Insert” tab. The whole process is described in easy steps below:
Step 1: Go to the “Insert” tab
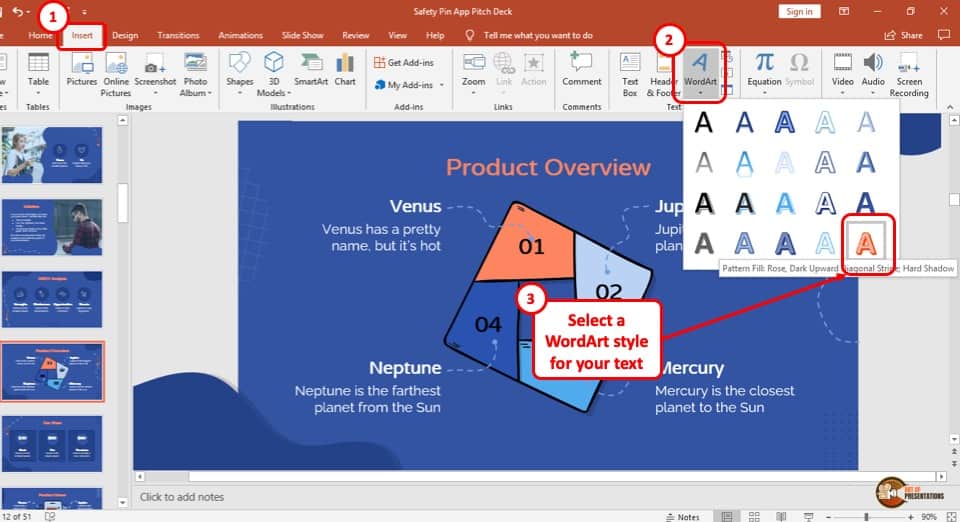
The third tab from the right in the ribbon is the “ Insert” tab. Click on the “ Insert” tab to access the “ WordArt” option.
Step 2: Click on the “WordArt” button
Now, on the “Text” section of the “Insert” tab is a leaning “A” icon which is the “WordArt” button. Click on that button to access WordArt.
Step 3: Choose your WordArt style
Different styles of WordArt appear in a drop-down menu after you click on the “WordArt” button. Now select your preferred WordArt style to place it on the slide.
Step 4: Insert the WordArt into your presentation.
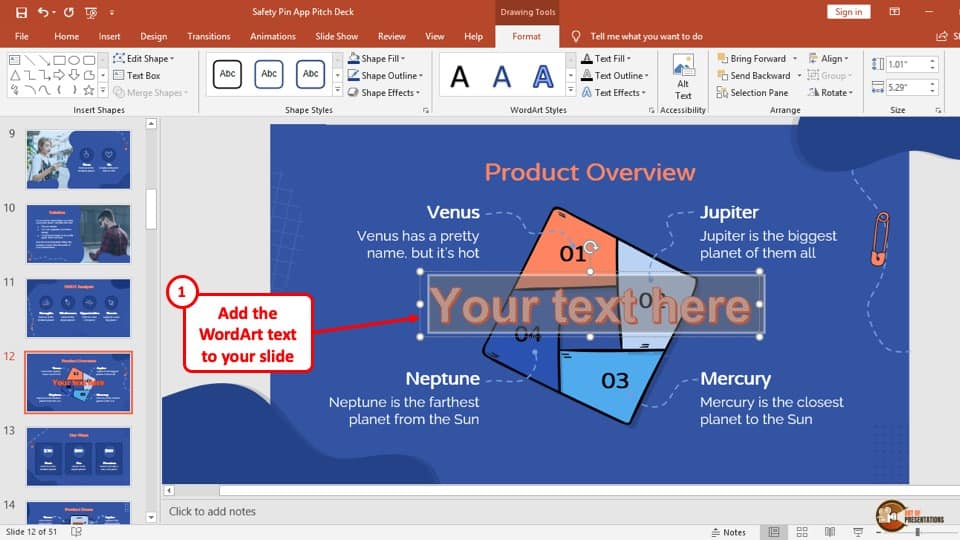
A “Text box” with the chosen style will be displayed in the middle of the slide. Select the “Your text here” texts and erase it.
Now, you can write any text with WordArt you want and then place it in your preferred location.
10. How to Change Text Direction in PowerPoint?
The method to change the text direction in PowerPoint is similar to that of changing the text outline in that it needs the user to open the format settings.
Follow the steps mentioned below to change the direction of the text in PowerPoint –
Step 1: Click on the “Format Shape” button
The first step to changing text direction is to select the text you want to change and “ Right-clicking” on it. A drop-down menu with many options will be displayed on the screen. Click on the “Format Shape” option which is located right below the “Formatting Text Effects” button.
Step 2: Click on the “Size and Properties” option
A sidebar with the title “Format Shape” will appear on the right of the screen. Click the square icon on the right side called the “Size & Properties” option.
Step 3: Click on the “Text Direction” dropdown menu
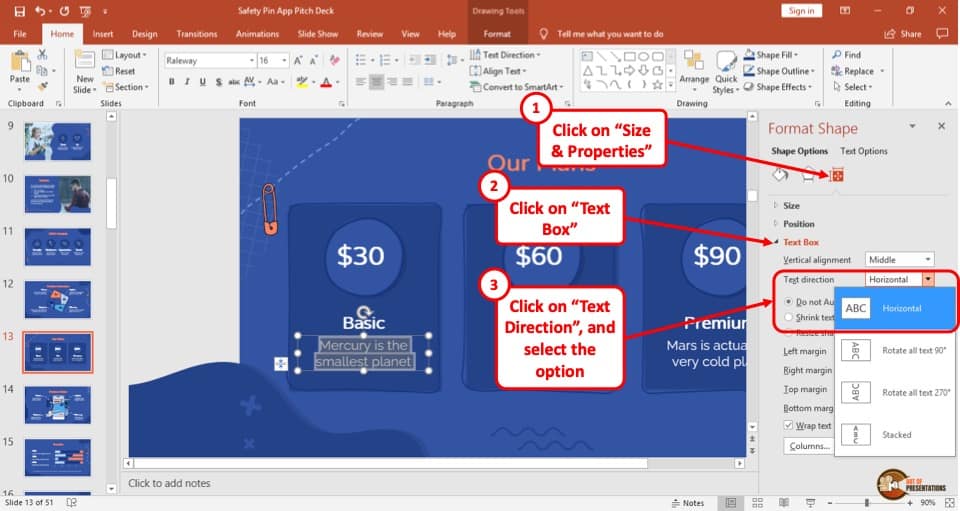
Below the “Text Box” button is the “Text Direction” option.
Every text is horizontal by default so if you want to change it, you will have to click on the arrow-mark besides the “Horizontal” option to open a dropdown menu. This will show you different text direction options. Click on the direction you want your text to move in.
You can also rotate text in PowerPoint. There are actually multiple different ways in which you can rotate the text Check out our detailed guide on how to rotate text in PowerPoint !
11. How to Cut, Copy, Paste and Duplicate Text in PowerPoint?
Copy and paste in PowerPoint are perhaps one of the most important functions in PowerPoint! Furthermore, knowing how to cut and duplicate can also help you move your text around quickly.
I’ve written a detailed guide on how to copy and paste in PowerPoint with visual references. So, make sure you check that article out for the details. For brevity, I’m just sharing the basics here –
- How to Copy Text in PowerPoint – Copying text allows you to create a photocopy of the selected text. To copy the text in PowerPoint, select the text. Then, use the keyboard shortcut by pressing the “Ctrl + C” keys simultaneously. Alternatively, “Right-click” on the text that you want to copy and press the “Copy” button from the dropdown menu.
- How to Cut Text in PowerPoint – The “Cut” function allows you to remove a text and then place it again in a different location. It is almost the same as the copy function but copying creates a photocopy while the cut function deletes the object from its original location and places it on the location where you paste it. The keyboard shortcut to cut text in PowerPoint is “Ctrl + X” . Or alternatively, “Right-click” on the object that you want to cut and hit the “Cut” button from the drop-down menu.
- Paste Text in PowerPoint – The “Paste” function allows you to place the text to a preferred location that has been copied or cut. Hence, it is done after the cut or copy function. You need to paste the text after copying or cutting it to finish the process. The keyboard shortcut of pasting text is “Ctrl + V” . Or alternatively, “Right-click” on the location that you want to paste the object and hit the “Paste” button from the dropdown menu.
- Duplicate Text in PowerPoint – Duplicating texts is a combination of the copy and paste function. After selecting your texts, if you press “Ctrl + D” then it creates a duplicate of the original. It is, however, not an alternative to the cut function. But, it can be used instead of copy and paste. One drawback, though, of this function is that it can’t duplicate elements across slides. For that, you will need to use copy and paste functions.
12. Using Format Painter to Apply Text Formatting
Format painter is a tool that allows the user to easily copy the font style, size, and color of a certain text and apply it to another text.
Actually, the format painter has the capability to do much more than just copying the formatting of the text! It can be used to apply the formatting of shapes, text boxes, images, etc. It is a super helpful tool!
In fact, I covered the use of format painter in PowerPoint in a detailed manner in another article. Make sure you check out that article too as it will save you a ton of time while editing your presentation!
Meanwhile, I’ve covered the basics of using the format painter below –
Step 1: Select the text and go to the “Format Painter” option
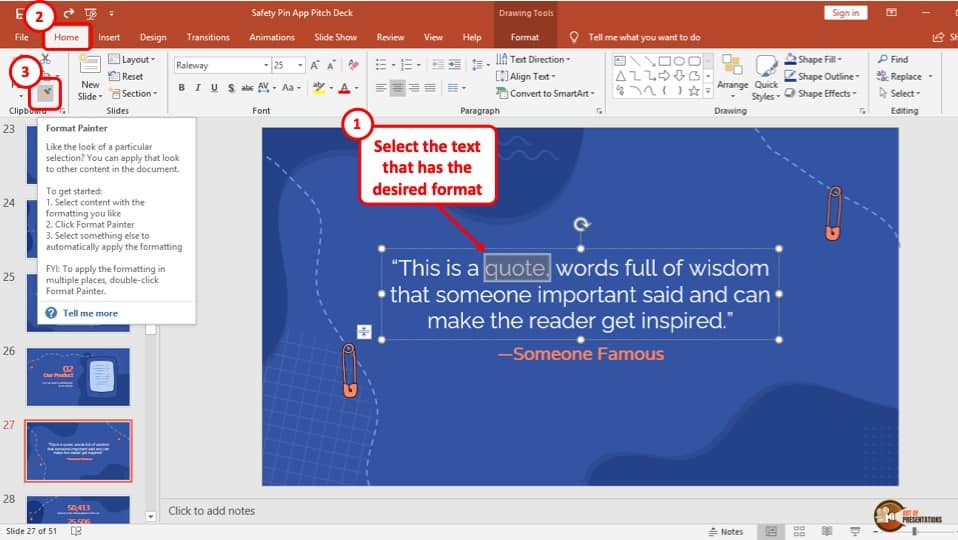
At first, you have to select the text you like the font of. This should not be the text you want to paint over. Now below the “Home” tab, and in the “Clipboard” section, there is a paintbrush icon called the “Format Painter” button. Click on it.
Step 2: Format paint the text.
Your cursor will change into a paintbrush after you click on the “Format painter” button. Now, move the cursor to the text you want to apply the formatting on and click it. It will change to the font of your choice.
This is a single-use format painting because your cursor will change back to normal after one use.
Step 3: Format painting multiple words at a time (optional)
If you want to change the font of multiple texts using the “Format Painter” option, then instead of clicking the icon once, “Double click” on the “Format painter” button.
This time, the cursor will not change back and allow you to format the font of several texts.
Once you are done using the format painter, simply click on the icon again or press the “Esc” key on the keyboard.
13. How to Align Text in PowerPoint?
In this section, I will be describing the different alignments options for text in PowerPoint. I’ve written a detailed article on how to align in PowerPoint where I also talk about aligning objects and shapes with respect to each other and provide tips to save time! So, make sure you check out that article for further details.
Meanwhile, below are step-by-step guides to align text in PowerPoint horizontally or vertically.
Horizontal Align – left, right, centre, justify
The horizontal alignment allows the text to be aligned in the text box on a horizontal axis.
The process of aligning texts in different horizontal styles is described in the simple steps given below:
To change the alignment of text, the first step is to select all the texts inside a “Text box” using your cursor.
Step 2: Choose your desired horizontal alignment
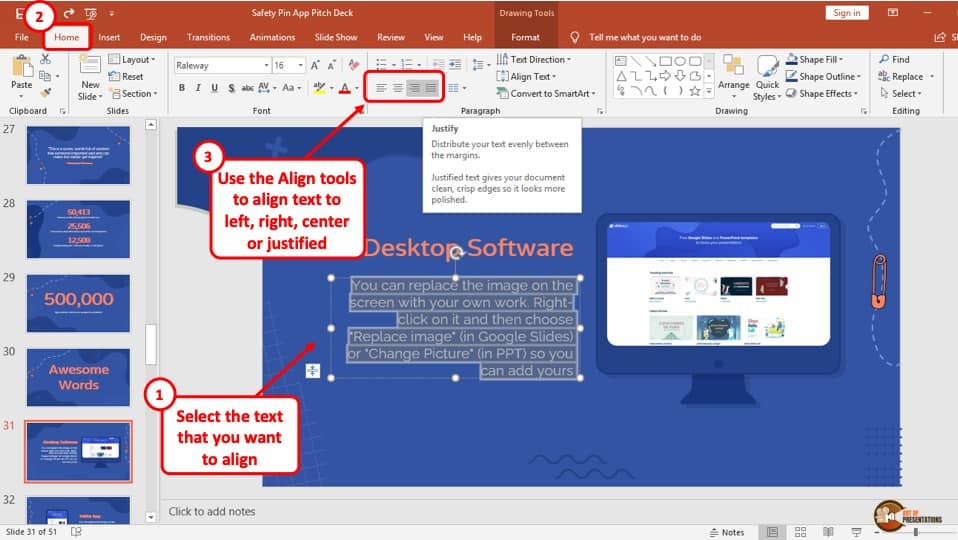
There are four icons made up of lines in the “Paragraph” section of the “Home” tab. From the left, they are “Align Left” , “Centre” , “Align Right” , and “Justify” .
Click on your preferred horizontal alignment to change the text position inside the text box.
Vertical align – Top, bottom, middle
The vertical text alignment will allow you to align the text in the box in a vertical axis with respect to the text box.
The process of aligning texts in different vertical styles is described in the following steps:
The first step is to simply select the text that you want to change the vertical alignment of.
Step 2: Change the Vertical Alignment
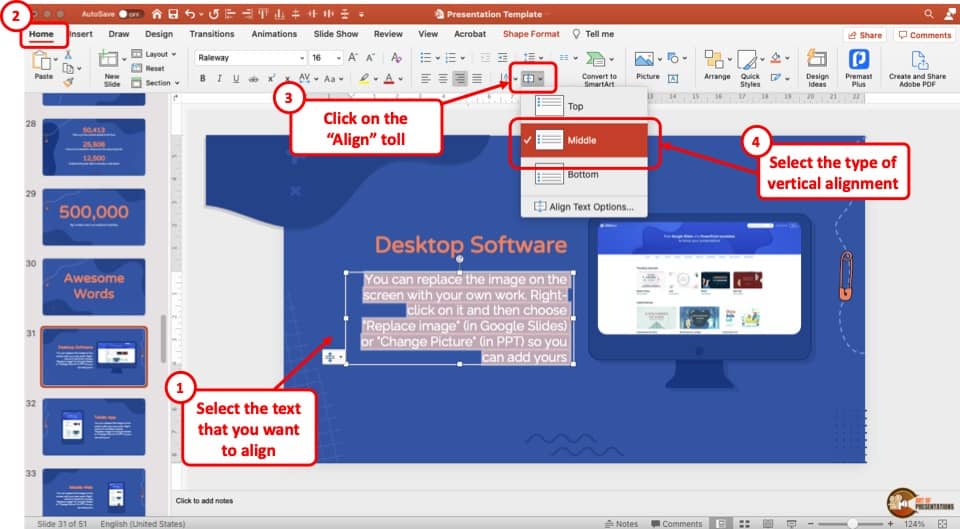
Next, simply go to the “ Home ” ribbon. Then, click on the “Align” Tool as indicated in the image above. From the dropdown, choose the vertical alignment options from “ Top “, “ Middle “, or “ Bottom “.
14. How to Add Superscript and Subscript to Text in PowerPoint?
Using superscript or subscript text style can be especially helpful when creating a presentation for students or when adding an equation.
I wrote a detailed post explaining the steps to superscript or subscript text in PowerPoint (with images). Make sure you check out that article for full details. I’ll share the brief steps below –

- To subscript text in PowerPoint, first, select the text. Then, click on the “ home ” tab, and click on the “ arrow ” button at the bottom right corner under the “ Fonts ” section of the Home ribbon.
- This will open a “ Fonts ” window dialog box. In the window select the “Subscript” text option. Make sure that the box is checked.
- You can also add the “Superscript” using the same process. Just make sure that the box before the superscript text is checked.
15. How to Add Bullet Points or Numbering to Text in PowerPoint?
Here’s how you can add bullet points or numbered list to your text in PowerPoint –
Step 1 – Select the Text
To add bullet points or numbering to text in your PowerPoint presentation, first, you have to select the text or navigate the blinking cursor in the place where you want the bullet point or numbering to be
Step 2 – Add Bullets from the “Home” Ribbon
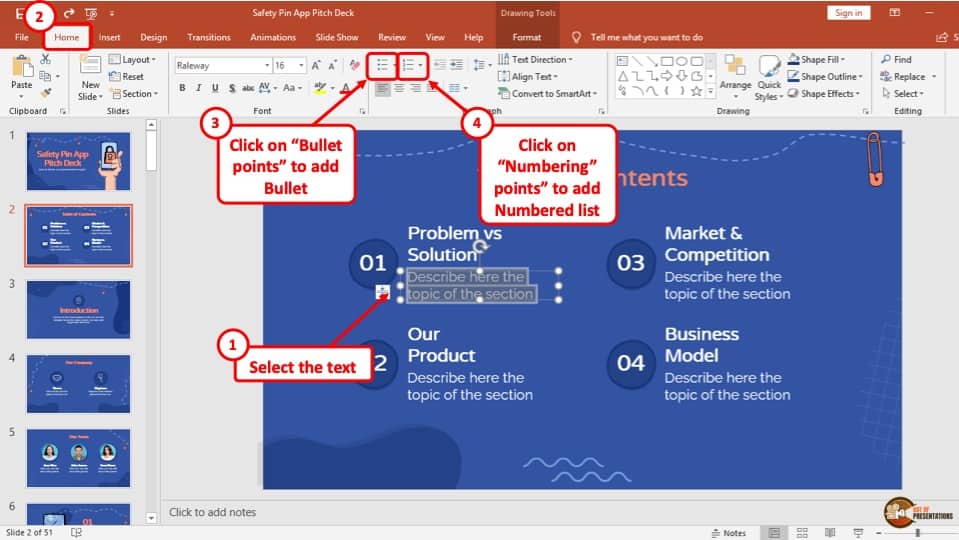
Next, click on the “ Home ” tab. From the “ Paragraph ” section on the home tab, you can choose to add either bullets or numbering in PowerPoint.
You can choose to customize the bullet points if you don’t like the default design. Alternatively, you can also change the bullet style in PowerPoint to create your own design style.
16. How to Add Indent to Text in PowerPoint?
You can also indent text in PowerPoint – meaning you can add some space before the text starts in a new paragraph or a new line. (And no, you don’t need to keep pressing the space bar for that!)
Add or Increase Indent in PowerPoint
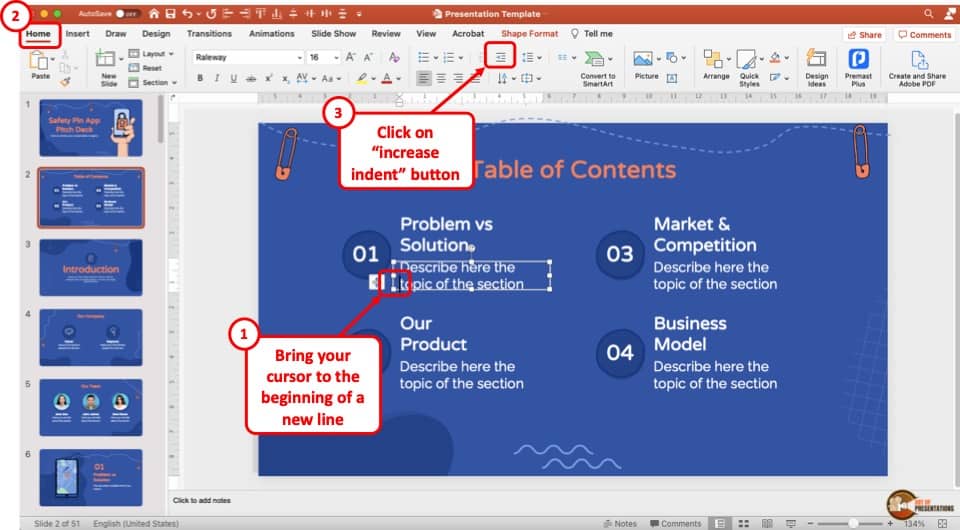
The first step is to move your cursor to the beginning of the paragraph you want to add indent to. It is important to note that the sentence that you want to indent should not be in the middle of the paragraph. Alternatively, you can bring the cursor to the start of a sentence and press “Enter” .
Now, click the icon with lines and an arrow pointing towards the right. This is called the “Increase Indent” button and is used to add or increase an indent level. You can find it in the “Paragraph” section of the “Home” tab. (check the image above for reference)
How to Decrease Indent in PowerPoint?
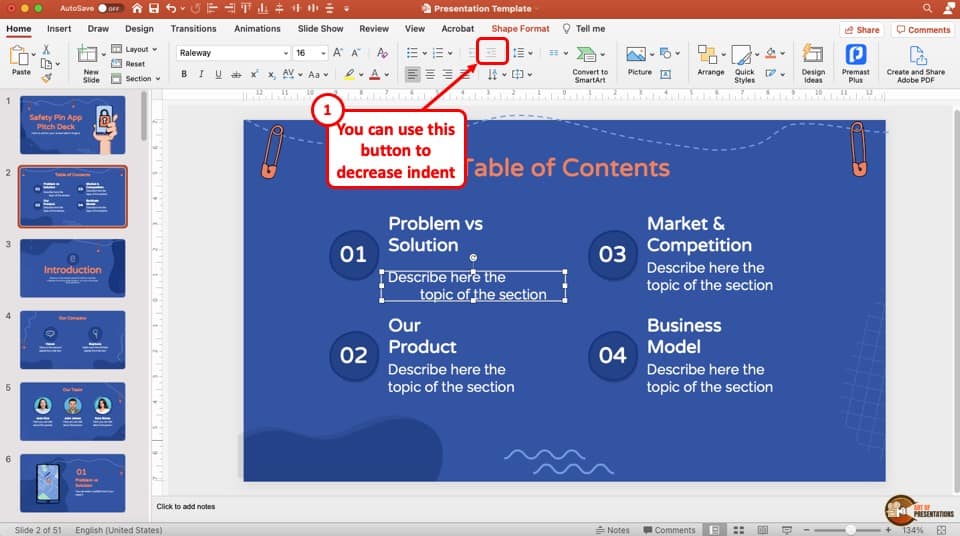
To decrease indent in a paragraph text, click on the button called “Decrease List Level.” The icon will have lines and a left-pointing arrow. It is to the left of the “Increase List Level” icon. Clicking it once will decrease one indent level.
17. Choosing Line Spacing of Text in PowerPoint
Line spacing can help increase or decrease the space between the line of text. You can add a line spacing between lines or between paragraphs. This explanation perhaps requires a detailed article.
[Edit – I’ve written a detailed article on Line Spacing in PowerPoint that highlights the nuances and explains everything in a beginner-friendly manner. Make sure you check it out by click on the hyperlink]
Nevertheless, the basic steps to choosing the line spacing in PowerPoint is described below:
If you want to modify the line space in a single paragraph, at first you have to select the paragraph you want to change the line spacing of using your cursor.
Step 2: Click on the “Line Spacing” button.
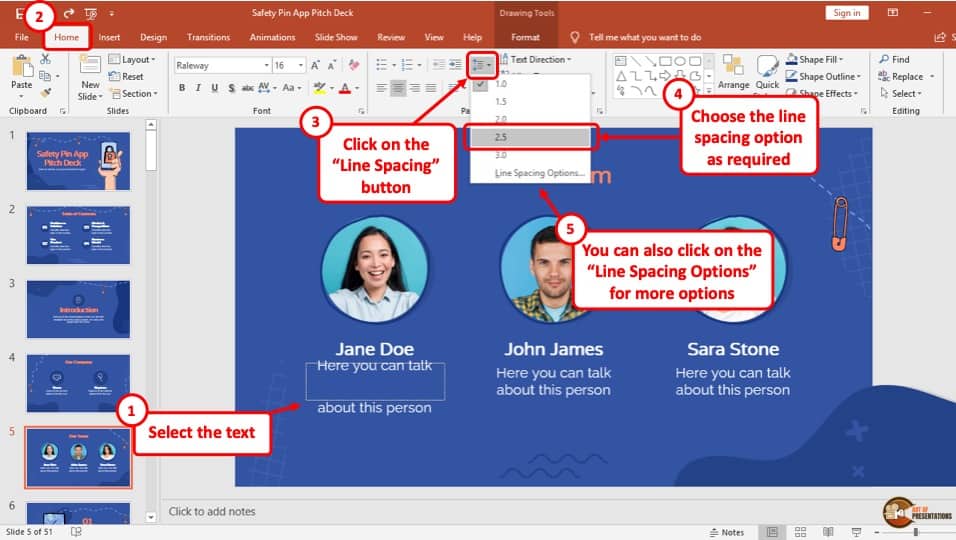
You can find the “ Line Spacing ” button in the “Paragraph” section of the “Home” tab (as showcased in the image above).
After selecting the text, click on the “Line spacing” button to display a drop-down menu. Choose your preferred line spacing and the paragraph will change accordingly.
Step 3: Click on the “Line Spacing Options” button for Advanced Options
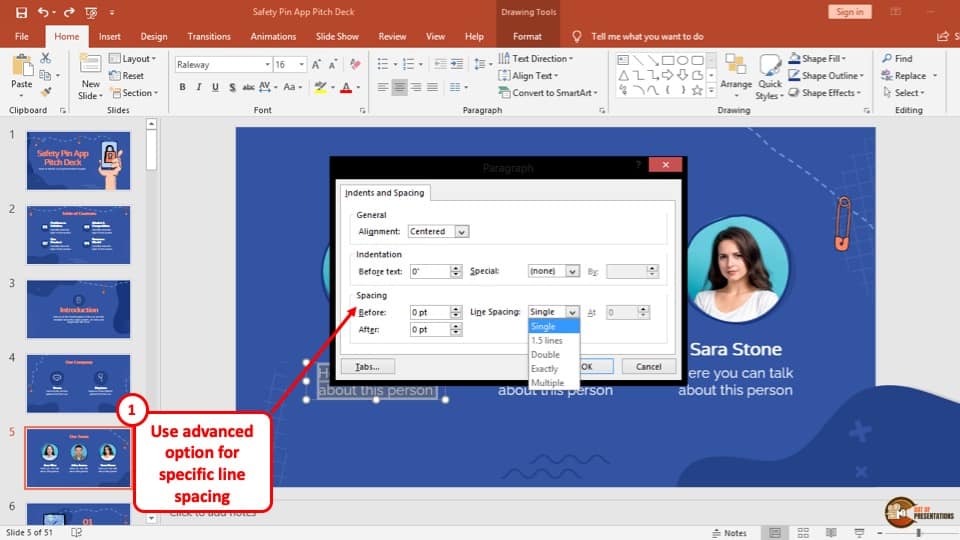
If you want more options to choose from, click on the “Line Spacing Options” button from the drop-down menu. It will open a dialogue box in the middle of the slide. Here, if you want to increase the space above your paragraph, you have to increase the “Before” option.
Or, if you want space after a paragraph, increase the “After” option. These work vice-versa. To change the space between lines, click on the dropdown menu button next to the “Line Spacing” option.
18. How to Add Text in Columns in PowerPoint?
The process of adding text in columns in your PowerPoint presentation is described in 2 easy steps below:
Step 1: Select the text or the text box
At first, select the text where you want to add the columns.
Step 2: Click on the “Add Column” button
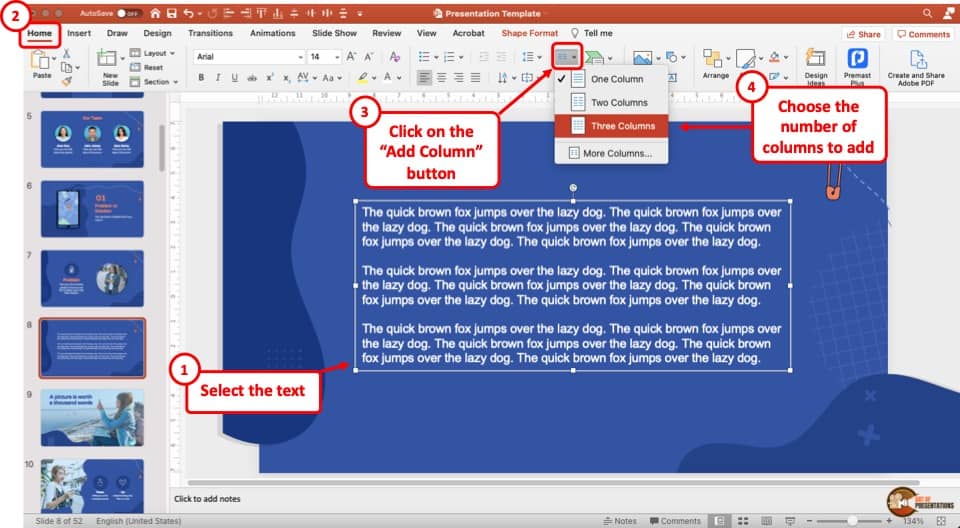
Click on the “ Home Tab “. Then, under the “ Paragraph ” section, click on the “ Add or Remove Column ” button (check out the image above for references). You can usually locate it next to the indent or line spacing buttons. You can also hover over the button and wait for the name of the function to pop-up if you are unsure.
Once the button is clicked, a dropdown menu will appear. From the dropdown, choose the number of columns you would like to add.
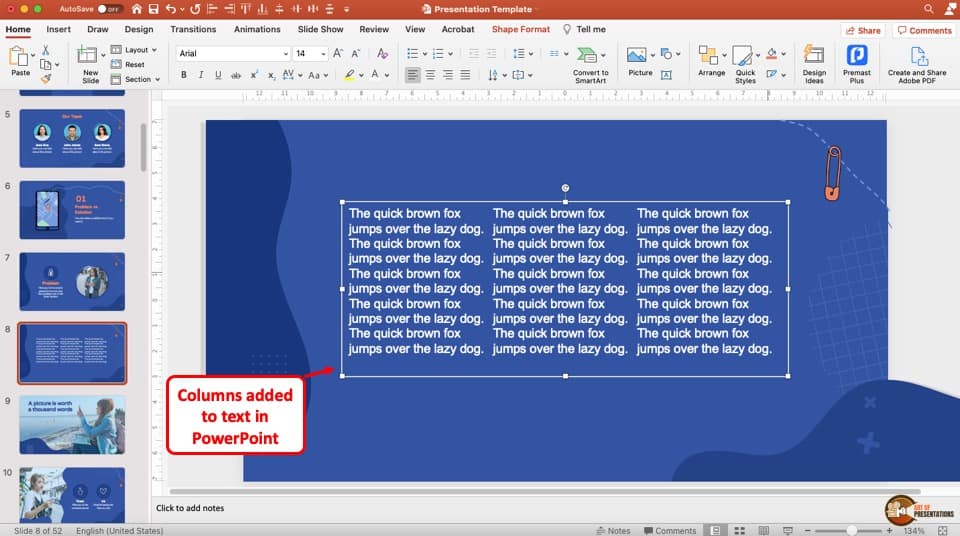
You will notice that the columns have been added to the text immediately!
More PowerPoint Related Topics
- How to Use a Presentation Clicker to Deliver Presentations Effectively!
- How to Crop a Picture in PowerPoint? [Complete Step-by-Step Tutorial!]
- How to Give a Presentation on Zoom? A Helpful Resource!
- How to Convert a PowerPoint to PDF? [A Simple Guide!]
- PowerPoint vs Google Slides: Which is Better? [ULTIMATE Test!]
- How to Change Bullet Style in PowerPoint? A Complete Guide
Credit to Nakaridore (on Freepik) for the Featured Image (further edited) of this Article
17 PowerPoint Presentation Tips to Make More Creative Slideshows [+ Templates]
Published: August 16, 2023
Creating a great PowerPoint presentation is a skill that any professional can benefit from. The problem? It’s really easy to get it wrong. From poor color choices to confusing slides, a bad PowerPoint slideshow can distract from the fantastic content you’re sharing with stakeholders on your team.

That’s why it’s so important to learn how to create a PowerPoint presentation from the ground up, starting with your slides. Even if you’re familiar with PowerPoint, a refresher will help you make a more attractive, professional slideshow. Let’s get started.
How to Make a PowerPoint Presentation
- Presentation Tips
PowerPoint Design
I like to think of Microsoft PowerPoint as a test of basic professional skills. To create a passing presentation, I need to demonstrate design skills, technical literacy, and a sense of personal style.
If the presentation has a problem (like an unintended font, a broken link, or unreadable text), then I’ve probably failed the test. Even if my spoken presentation is well rehearsed, a bad visual experience can ruin it for the audience.
Expertise means nothing without a good PowerPoint presentation to back it up. For starters, grab your collection of free PowerPoint templates below.

10 Free PowerPoint Templates
Download ten free PowerPoint templates for a better presentation.
- Creative templates.
- Data-driven templates.
- Professional templates.
You're all set!
Click this link to access this resource at any time.
Tell us a little about yourself below to gain access today.
No matter your topic, successful PowerPoints depend on three main factors: your command of PowerPoint's design tools, your attention to presentation processes, and your devotion to consistent style. Here are some simple tips to help you start mastering each of those factors, and don't forget to check out the additional resources at the bottom of this post.
A presentation is made up of multiple slides, let's delve deeper into PowerPoint's capabilities.
Getting Started
1. open powerpoint and click ‘new.’.
If a page with templates doesn‘t automatically open, go to the top left pane of your screen and click New. If you’ve already created a presentation, select Open then double-click the icon to open the existing file.


That said, you can still use fun and eccentric fonts — in moderation. Offsetting a fun font or large letters with something more professional can create an engaging presentation.
Above all, be sure you're consistent so your presentation looks the same throughout each slide. That way, your audience doesn't become distracted by too many disparate fonts. Check out this example from HubSpot’s company profile templates:
Interested in this presentation template? Download it for free here.
5. Make sure all of your objects are properly aligned.
Having properly aligned objects on your slide is the key to making it look polished and professional. You can manually try to line up your images ... but we all know how that typically works out. You're trying to make sure all of your objects hang out in the middle of your slide, but when you drag them there, it still doesn't look quite right. Get rid of your guessing game and let PowerPoint work its magic with this trick.
Here’s how to align multiple objects:
- Select all objects by holding down Shift and clicking on all of them.
- Select Arrange in the top options bar, then choose Align or Distribute .
- Choose the type of alignment you'd like.
Here’s how to align objects to the slide:
- Select Align to Slide .
- Select Arrange in the top options bar again, then choose Align or Distribute .
6. Use "Format Object" to better control your objects' designs.
Format menus allow you to do fine adjustments that otherwise seem impossible. To do this, right-click on an object and select the Format Object option. Here, you can fine-tune shadows, adjust shape measurements, create reflections, and much more. The menu that will pop up looks like this:

Although the main options can be found on PowerPoint’s format toolbars, look for complete control in the format window menu. Other examples of options available include:
- Adjusting text inside a shape.
- Creating a natural perspective shadow behind an object.
- Recoloring photos manually and with automatic options.
7. Take advantage of PowerPoint's shapes.
Many users don’t realize how flexible PowerPoint’s shape tools have become. In combination with the expanded format options released by Microsoft, the potential for good design with shapes is readily available. PowerPoint provides the user with a bunch of great shape options beyond the traditional rectangle, oval, and rounded rectangle patterns.
Today’s shapes include a highly functional Smart Shapes function, which enables you to create diagrams and flow charts in no time. These tools are especially valuable when you consider that PowerPoint is a visual medium. Paragraphing and bullet lists are boring — you can use shapes to help express your message more clearly.
8. Create custom shapes.
When you create a shape, right click and press Edit Points . By editing points, you can create custom shapes that fit your specific need. For instance, you can reshape arrows to fit the dimensions you like.
Another option is to combine two shapes together. To do so, select the two shapes you’d like to work with, then click Shape Format in the top ribbon. Tap Merge Shapes .
You’ll see a variety of options.
- Combine creates a custom shape that has overlapping portions of the two previous shapes cut out.
- Union makes one completely merged shape.
- Intersect builds a shape of only the overlapping sections of the two previous shapes.
- Subtract cuts out the overlapping portion of one shape from the other.
- Fragment will split your shape into different parts depending on where they overlap.
By using these tools rather than trying to edit points precisely, you can create accurately measured custom shapes.
9. Crop images into custom shapes.
Besides creating custom shapes in your presentation, you can also use PowerPoint to crop existing images into new shapes. Here's how you do that:
- Click on the image and select Picture Format in the options bar.
- Choose Crop , then Crop to Shape , and then choose your desired shape. Ta-da! Custom-shaped photos.
10. Present websites within PowerPoint.
Tradition says that if you want to show a website in a PowerPoint, you should just create a link to the page and prompt a browser to open. For PC users, there’s a better option.
Third party software that integrates fully into PowerPoint’s developer tab can be used to embed a website directly into your PowerPoint using a normal HTML iframe. One of the best tools is LiveWeb , a third-party software that you can install on your PowerPoint program.
By using LiveWeb, you don’t have to interrupt your PowerPoint, and your presentation will remain fluid and natural. Whether you embed a whole webpage or just a YouTube video, this can be a high-quality third party improvement. To install the add-on, simple head to the LiveWeb website and follow the instructions.
Unfortunately, Mac users don’t have a similar option. A good second choice is to take screenshots of the website, link in through a browser, or embed media (such as a YouTube video) by downloading it directly to your computer.
11. Try Using GIFs.
GIFs are looped animated images used to communicate a mood, idea, information, and much more. Users add GIFs to PowerPoints to be funny or quickly demo a process. It's easy to add GIFs to your slides. To do so, simply follow these steps:
- Download and save the GIF you want.
- Go to the slide you want the GIF on.
- Go to the Home tab, and click either Insert or Picture .
- From the Picture drop-down menu, choose Picture from File .
- Navigate to where you saved your GIF and select it. Then, choose Insert .
- It will play automatically the moment you insert it.
PowerPoint Process
12. keep it simple..
PowerPoint is an excellent tool to support your presentation with visual information, graphics, and supplemental points. This means that your PowerPoint should not be your entire presentation. Your slides — no matter how creative and beautiful — shouldn't be the star of the show. Keep your text and images clear and concise, using them only to supplement your message and authority.
If your slides have dense and cluttered information, it will both distract your audience and make it much more likely that you will lose their attention. Nothing in your slides should be superfluous! Keep your presentation persuasive by keeping it clean. There are a few ways to do this:
- Limit bullet points and text.
- Avoid paragraphs and long quotes.
- Maintain "white space" or "negative space".
- Keep percentages, graphs, and data super basic.
13. Embed your font files.
One constant problem presenters have with PowerPoint is that fonts seem to change when presenters move from one computer to another. In reality, the fonts are not changing — the presentation computer just doesn’t have the same font files installed . If you’re using a PC and presenting on a PC, then there is a smooth workaround for this issue.
Here’s the trick: When you save your PowerPoint file (only on a PC), you should click File , then Options, then open up the Save tab. Then, select the Embed fonts in the file check box under Preserve fidelity when sharing this presentation . Now, your presentation will keep the font file and your fonts will not change when you move computers.
The macOS PowerPoint version has a similar function. To embed your fonts on a Mac, do the following:
- Open up your presentation.
- On the top bar, click PowerPoint , then click Preferences .
- Under Output and Sharing , click Save .
- Under Font Embedding , click Embed fonts in the file.
14. Save your slides as a PDF file for backup purposes.
If you’re still scared of your presentation showing up differently when it’s time to present, you should create a PDF version just in case. This is a good option if you’ll be presenting on a different computer. If you also run into an issue where the presenting computer doesn’t have PowerPoint installed, you can also use the system viewer to open up the PDF. No laptop will ever give you trouble with this file type.
The only caveat is that your GIFs, animations, and transitions won’t transfer over. But since the PDF will only work as a backup, not as your primary copy, this should be okay.
To save your presentation as a PDF file, take the following steps:
- Go to File , then click Save as …
- In the pop-up window, click File Format.
- A drop-down menu will appear. Select PDF .
- Click Export .
You can also go to File , then Export , then select PDF from the file format menu.
15. Embed multimedia.
PowerPoint allows you to either link to video/audio files externally or to embed the media directly in your presentation. You should embed these files if you can, but if you use a Mac, you cannot actually embed the video (see note below). For PCs, two great reasons for embedding are:
- Embedding allows you to play media directly in your presentation. It will look much more professional than switching between windows.
- Embedding also means that the file stays within the PowerPoint presentation, so it should play normally without extra work (except on a Mac).
Note: macOS users of PowerPoint should be extra careful about using multimedia files.
If you use PowerPoint for Mac, then you will always need to bring the video and/or audio file with you in the same folder as the PowerPoint presentation. It’s best to only insert video or audio files once the presentation and the containing folder have been saved on a portable drive in their permanent folder. Also, if the presentation will be played on a Windows computer, then Mac users need to make sure their multimedia files are in WMV format. This tip gets a bit complicated, so if you want to use PowerPoint effectively, consider using the same operating system for designing and presenting, no matter what.
16. Bring your own hardware.
Between operating systems, PowerPoint is still a bit jumpy. Even between differing PPT versions, things can change. One way to fix these problems is to make sure that you have the right hardware — so just bring along your own laptop when you're presenting.
If you’re super concerned about the different systems you might have to use, then upload your PowerPoint presentation into Google Slides as a backup option. Google Slides is a cloud-based presentation software that will show up the same way on all operating systems. The only thing you need is an internet connection and a browser.
To import your PowerPoint presentation into Google Slides, take the following steps:
- Navigate to slides.google.com . Make sure you’re signed in to a Google account, preferably your own.
- Under Start a new presentation , click the empty box with a plus sign. This will open up a blank presentation.
- Go to File , then Import slides .
- A dialog box will come up. Tap Upload , then click Select a file from your device .
- Select your presentation and click Open .
- Select the slides you’d like to import. If you want to import all of them, click All in the upper right-hand corner of the dialog box.
- Click Import slides.

When I tested this out, Google Slides imported everything perfectly, including a shape whose points I had manipulated. This is a good backup option to have if you’ll be presenting across different operating systems.
17. Use Presenter View.
In most presentation situations, there will be both a presenter’s screen and the main projected display for your presentation. PowerPoint has a great tool called Presenter View, which can be found in the Slide Show tab of PowerPoint. Included in the Presenter View is an area for notes, a timer/clock, and a presentation display.

For many presenters, this tool can help unify their spoken presentation and their visual aid. You never want to make the PowerPoint seem like a stack of notes that you’re reading off of. Use the Presenter View option to help create a more natural presentation.
Pro Tip: At the start of the presentation, you should also hit CTRL + H to make the cursor disappear. Hitting the "A" key will bring it back if you need it!
Your Next Great PowerPoint Presentation Starts Here
With style, design, and presentation processes under your belt, you can do a lot more with PowerPoint than just presentations for your clients. PowerPoint and similar slide applications are flexible tools that should not be forgotten. With a great template, you can be on your way to creating presentations that wow your audience.
Editor's note: This post was originally published in September 2013 and has been updated for comprehensiveness.
![Blog - Beautiful PowerPoint Presentation Template [List-Based]](https://no-cache.hubspot.com/cta/default/53/013286c0-2cc2-45f8-a6db-c71dad0835b8.png "format in making powerpoint presentation")
Don't forget to share this post!
Related articles.
![How to Create an Infographic in Under an Hour — the 2024 Guide [+ Free Templates]](https://blog.hubspot.com/hubfs/Make-infographic-hero%20%28598%20%C3%97%20398%20px%29.jpg "format in making powerpoint presentation")
How to Create an Infographic in Under an Hour — the 2024 Guide [+ Free Templates]
![20 Great Examples of PowerPoint Presentation Design [+ Templates]](https://blog.hubspot.com/hubfs/powerpoint-presentation-examples.webp "format in making powerpoint presentation")
20 Great Examples of PowerPoint Presentation Design [+ Templates]
![How to Write an Ecommerce Business Plan [Examples & Template]](https://blog.hubspot.com/hubfs/ecommerce%20business%20plan.png "format in making powerpoint presentation")
How to Write an Ecommerce Business Plan [Examples & Template]

Get Buyers to Do What You Want: The Power of Temptation Bundling in Sales

How to Create an Engaging 5-Minute Presentation
![How to Start a Presentation [+ Examples]](https://blog.hubspot.com/hubfs/how-to-start-presenting.webp "format in making powerpoint presentation")
How to Start a Presentation [+ Examples]

120 Presentation Topic Ideas Help You Hook Your Audience
![How to Create the Best PowerPoint Presentations [Examples & Templates]](https://blog.hubspot.com/hubfs/Powerpoint%20presentation.jpg "format in making powerpoint presentation")
How to Create the Best PowerPoint Presentations [Examples & Templates]

The Presenter's Guide to Nailing Your Next PowerPoint
![How to Create a Stunning Presentation Cover Page [+ Examples]](https://blog.hubspot.com/hubfs/presentation-cover-page_3.webp "format in making powerpoint presentation")
How to Create a Stunning Presentation Cover Page [+ Examples]
Marketing software that helps you drive revenue, save time and resources, and measure and optimize your investments — all on one easy-to-use platform
- All about AI
- Google Bard
- Inflection AI Pi Chatbot
- Anthropic Claude
- Generative AI
- AI Image Generation
- AI Regulation
- AI Research
- Large Language Models (LLM)
- Surface Pro
- Surface Laptop
- Surface Book
- Surface Duo
- Surface Neo
- Surface Studio
- Surface Hub
- Surface Pen
- Surface Headphones
- Surface Earbuds
- About WinBuzzer
- Follow Us: PUSH, Feeds, Social
- Write for Us
- Cookie Policy and Privacy Policy
- Terms of Service
How to Insert a GIF in PowerPoint and Loop It
We show you how to insert a GIF in PowerPoint, as well as how to source them and stop them from looping infinitely.

Table of Contents:
Adding GIFs to your PowerPoint presentation can transform it from a standard slideshow to a dynamic, engaging, and memorable experience for your audience. Whether you’re aiming to entertain with memes, illustrate a point with a quick UI demonstration, or simply add some life to your slides, knowing how to incorporate GIFs effectively is a valuable skill.
GIF for PowerPoint: An Animated Picture for Your Presentation
Microsoft makes it quite easy to add a GIF to PowerPoint, but you may have to do things differently depending on where it’s from and how you want it to display. If you don’t want your GIF to loop endlessly, for example, you’ll have to make some adjustments in a GIF splitter program. We cover all of this in this guide.
How to Insert a GIF in PowerPoint From Your PC
This method is straightforward if you already have a GIF saved on your computer and wish to add it to your PowerPoint presentation. It involves a few simple clicks within PowerPoint’s interface.
Finding GIFs for PowerPoint on the Web
If you don’t have a GIF ready but know you want to add one to your presentation, you can find a plethora of GIFs online. This section will guide you through finding the perfect GIF for your presentation from various sources.
Using PowerPoint’s Insert Tool
Explore giphy for gifs, explore tenor for gifs, how to make a powerpoint gif loop a certain number of times.
Sometimes, you might want a GIF to loop only a certain number of times rather than continuously. This can help prevent the GIF from distracting your audience from the main content of your presentation.
How to Insert GIFs directly from Your Keyboard on Windows 11 or Windows 10

FAQ – Frequently Asked Questions About PowerPoint and GIFs
Can i add sound to a gif in powerpoint.
Directly adding sound to a GIF in PowerPoint is not supported, as GIFs are image files and do not store audio data. To achieve a similar effect, you can insert an audio file separately via “ Insert ” > “ Audio ” and synchronize the audio playback with the GIF animation on your slide. This requires manual adjustment of timing to ensure they play in sync.
How can I make a GIF the background of a slide in PowerPoint?
To use a GIF as a slide background, first insert the GIF using the “ Insert ” > “ Pictures ” option. Then, right-click on the GIF and select “Format Picture” . Under the “Format Picture” menu, choose “Fill” > “Picture or texture fill” and then select the GIF from your files. Adjust the sizing and positioning options as needed to cover the entire slide. Remember, PowerPoint does not offer a direct “ set as background ” option for GIFs, so this workaround is necessary.
Is it possible to insert a GIF using PowerPoint on a Mac?
Yes, inserting a GIF in PowerPoint on a Mac follows a process similar to that on Windows. Click on “ Insert ” in the top menu, choose “ Picture “, then “Picture from File…” to navigate your files and select the GIF you wish to add. Once selected, you can resize and reposition the GIF on your slide as needed, just like on Windows. The compatibility and functionality remain consistent across both platforms.
Can I edit a GIF directly in PowerPoint?
PowerPoint’s capabilities for directly editing GIFs are limited to resizing, repositioning, and formatting options such as adding a border or shadow. For more advanced edits like cropping, changing animation speed, or editing the content of the GIF itself, you’ll need to use an external GIF editor. Once edits are complete, you can reinsert the updated GIF into your PowerPoint presentation via the “ Insert ” tab.
How can I convert a video to a GIF for my PowerPoint presentation?
To convert a video clip into a GIF for use in PowerPoint, you’ll need to use a video-to-GIF converter tool, which can be found online (e.g., EzGIF.com). Upload the video file to the converter, set your preferred start and end times for the GIF, and choose any other settings like size or frame rate. Once converted, download the GIF to your computer. You can then insert it into your PowerPoint presentation following the steps for inserting images.
What’s the best way to find high-quality GIFs for my presentation?
High-quality GIFs can be found on popular platforms such as GIPHY or Tenor, which offer extensive libraries of GIFs on various subjects. Use specific and relevant keywords for your search to find the most suitable GIFs. Consider the resolution and size of the GIFs in relation to your presentation needs. When downloading, ensure the file is of a high enough quality to look good on large screens without being too large to keep your presentation file size manageable.
Do GIFs increase the file size of the PowerPoint presentation significantly?
Yes, adding GIFs can significantly increase the file size of your PowerPoint presentation, especially if you use multiple or high-resolution GIFs. This can affect the performance and loading times of your presentation. To mitigate this, consider optimizing your GIFs using GIF compression tools available online before inserting them into your PowerPoint. Additionally, think about the necessity of each GIF and its contribution to your presentation to avoid overloading your slides with unnecessary media.
How can I align a GIF perfectly in the center of a slide?
After inserting a GIF, you can align it perfectly in the center of a slide by selecting the GIF and then going to the “ Format ” tab. Click on “Align” in the Arrange group, and then select “Align Center” and “Align Middle” sequentially. This ensures the GIF is centered both horizontally and vertically on the slide. If “ Align ” is grayed out, make sure you’ve clicked on your GIF to select it, and that the “Snap objects to grid” option under PowerPoint options is enabled.
Is it possible to insert multiple GIFs on a single slide?
You can insert multiple GIFs on a single PowerPoint slide by repeating the insertion process for each GIF you want to include. However, it’s important to carefully plan the layout of your slide to avoid clutter and ensure each GIF serves a purpose and enhances your communication. Consider the size and placement of each GIF, and use PowerPoint’s alignment tools to maintain a professional and organized appearance.
Can I use GIFs in Microsoft PowerPoint Online?
Yes, Microsoft PowerPoint Online supports the insertion of GIFs in a similar manner to the desktop version. You can insert a GIF by choosing “ Insert ” > “ Pictures ” > “ This Device ” if you have the GIF saved locally, or use “Online Pictures” to search for and insert GIFs directly from the web. Note that some features might be more limited in the online version compared to the desktop application.
Why does my GIF not animate in PowerPoint?
If your GIF does not animate in PowerPoint, first ensure that you’ve inserted it as a picture via the “ Insert ” tab and not as an object or background. Also, check that the GIF plays outside of PowerPoint to ensure the animation works. PowerPoint’s view mode does not display animations, so switch to “ Slide Show ” mode to preview animations. If the issue persists, your PowerPoint version might not fully support GIF animations, or the GIF file might be too large or corrupted.
Can I change the transparency of a GIF in PowerPoint?
PowerPoint does not support changing the transparency of GIF files directly within the program due to the nature of the GIF format. If you need to make a GIF transparent, you must use an external image editing program that supports transparency editing in GIFs. Edit the GIF to adjust its transparency, save the changes, and then reinsert the GIF into your PowerPoint presentation.
How can I make sure my GIFs don’t distract from my presentation’s message?
To ensure GIFs don’t distract from your message, choose GIFs that complement your content and adhere to a theme consistent with your presentation’s topic. Use GIFs sparingly and strategically place them to attract attention to key points without overwhelming your audience. Moreover, consider the timing and context of each GIF within your presentation to enhance understanding rather than detract from it.
Are there any PowerPoint add-ins for managing GIFs?
There are several PowerPoint add-ins designed for managing and enhancing multimedia content, including GIFs. These add-ins offer features such as GIF search within PowerPoint, easy GIF insertion, and in some cases, even GIF editing capabilities. You can explore the Microsoft Office Add-ins store online to find tools that meet your specific needs. Keep in mind that the availability and functionality of these add-ins may vary.
Can I preview a GIF animation in the editing mode of PowerPoint, or do I need to start the slideshow?
To preview GIF animations as they will appear during your presentation, you generally need to initiate a slideshow using the “ Slide Show ” tab or by pressing F5. While in the normal editing view, PowerPoint shows the GIF as a static image. Some newer versions of PowerPoint might display a brief animation when the GIF is selected or inserted, but for a full preview of how it will look to your audience, viewing the GIF in slideshow mode is necessary.
Related: How to Add Music / Audio to PowerPoint Slides

Related: How to Embed a YouTube Video in PowerPoint

- animated picture
- Desktop Operating Systems
- GIF for PowerPoint
- gif for presentation
- gifs for presentations
- how to add gif to powerpoint
- how to insert gif in powerpoint
- Microsoft 365
- Microsoft Office
- Microsoft PowerPoint
- Microsoft Windows
- Operating Systems
- PowerPoint GIF
- Presentation Software
Recent News
Discord to Introduce Advertisements and In-Game Reward in a Strategic Revenue...

AT&T Confirms Data Breach Impacting 70 Million Customers
Subscribe to WinBuzzer on Google News

How To Add Video or Audio to Google Slides and Microsoft PowerPoint
Google Slides offers an excellent platform to infuse style and vibrancy into your routine workplace presentations. Moreover, it serves as a versatile tool for educational settings, seamlessly adaptable for students across different age groups. Brimming with an array of graphics, animation tools, and immersive features, Google Slides empowers users to enhance their presentations. Additionally, the capability to incorporate personal audio and video content further enriches the slideshow experience. ( Via )
Microsoft PowerPoint, Google Slides, and the Benefits of Adding Videos or Audio to your Presentations
Microsoft PowerPoint, like Google Slides, is a powerful tool for creating engaging presentations. One notable advantage of PowerPoint is its widespread use in business environments, offering compatibility with the Microsoft Office suite and seamless integration with other applications. Additionally, PowerPoint provides a wide range of design options, including templates, themes, and customization features, allowing users to create visually appealing presentations tailored to their needs.
Incorporating videos or audio into your PowerPoint or Google Slides presentations can significantly enhance their effectiveness and audience engagement. Videos and audio serve as dynamic multimedia elements that can convey information more effectively than text or static images alone. They help break the monotony of slideshows. They are extra ways to capture the audience’s attention and create a more immersive and memorable experience.

Furthermore, adding videos or audio allows presenters to demonstrate concepts, provide examples, or share testimonials more compellingly and persuasively. Whether it’s showcasing product features, explaining complex processes, or sharing customer testimonials, multimedia elements can add depth and credibility to your presentation.
Users can embed video or audio files directly into their slides or link to external sources for playback. Additionally, PowerPoint provides options for customizing playback settings, such as autoplay, looping, and timing, to ensure a seamless and synchronized presentation.
How To Add Audio in Google Slides
If you’re eager to enhance your Google Sheets presentations with captivating audio and visuals, this guide is tailored just for you. Here’s how to seamlessly incorporate these attention-grabbing elements:
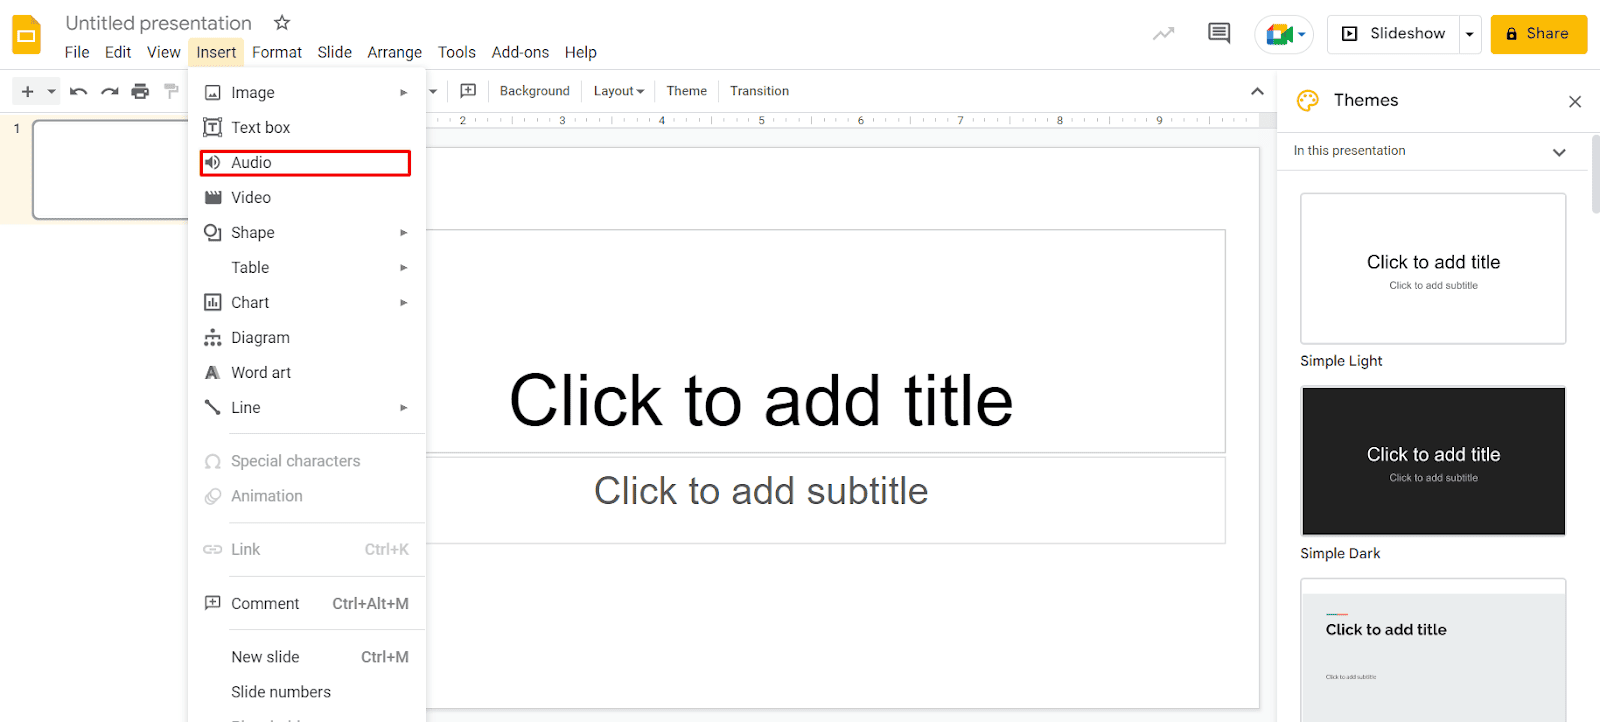
Adding audio to Google Slides:
- Ensure that the audio file you intend to use is stored in your Google Drive under the same Google account. Google Slides supports MP3 and WAV audio formats.
- Open Google Slides and sign in to your account. Access the presentation where you wish to include the audio and navigate to the specific slide where you want it placed.
- Select “Insert” from the menu and then choose “Audio.”
These simple steps enable you to effortlessly integrate audio files into your Google Slides presentations, enriching them with engaging auditory elements.
- Once you’ve located the desired audio file, simply select it and click on the “Select” button located at the bottom of the window. This action confirms your choice and inserts the audio file into your Google Slides presentation.
- Once inserted, the audio file will be visible on your slide. You have the flexibility to select and drag it to any desired location within the slide.
- Upon insertion, the Format Options sidebar will automatically open. In the “Audio Playback” section, customize the playback settings according to your preferences.
– Start Playing: Choose between “On Click” or “Automatically” to determine when the audio playback should commence.
– Options: Adjust the volume using the slider. Additionally, utilize the checkboxes to enable optional settings such as hiding the playback icon (applicable for automatic playback only), enabling loop playback, and halting playback upon slide advancement.
Once you’ve finalized the playback settings for your audio, you can close the Format Options sidebar. To access the sidebar again later, you can follow any of these methods:
- Right-click on the audio icon and select “Format Options.”
- Click on the audio icon and choose “Format Options” from the top toolbar.
- Select the audio icon and navigate to “Format” > “Format options” in the menu.
Unlike Microsoft PowerPoint, Google Slides currently lacks an audio recording feature. However, you can still incorporate audio narration by creating the narration externally and uploading it as described above.
How to Add Video in Google Slides

To add a video to your Google Slides presentation, you have several options available. Whether it’s a YouTube video, a URL link, or a video stored in your Google Drive, here’s how you can incorporate it seamlessly:
- Step 1: Sign in to Google Slides and navigate to the specific slide in your presentation where you intend to insert the video.
- Step 2: From the menu, click on “Insert” and then select “Video.”
- Step 3: In the pop-up window, located at the top, select the desired location for your video file: either by searching on YouTube, entering a URL, or choosing from Google Drive.
Once you’ve found the video you wish to use, simply select it and click the “Select” button to proceed.
- Step 4: Once inserted, the video will appear on your slide, allowing you to freely drag it to any desired location. Additionally, you can resize the video by dragging any of its corners or edges.
- Step 5: Upon insertion, the Format Options sidebar will open, enabling you to customize the video playback settings.
– Play: Choose between “On Click,” “Automatically,” or “Manually” to determine the starting point for video playback.
– Start At and End At: Specify the specific segments of the video you wish to play by entering the start and end times or using the “Use Current Time” option.
– Mute Audio: If you prefer not to play the video’s audio, simply check the box labeled “Mute Audio.”
- Step 6: After completing the customization of your video’s playback settings, simply close the Format Options sidebar. To access the sidebar again at a later time, you can follow these steps:
- 1. Right-click on the video and select “Format Options.” 2. Click on the video and choose “Format Options” from the top toolbar. 3. Select the video and navigate to “Format” > “Format options” in the menu.
Unlike documents in Google Docs, Google Slides offers the flexibility to incorporate audio and video elements into your presentations. If these multimedia components enhance your slideshow, don’t hesitate to include them for a more engaging and dynamic presentation!
Gizchina News of the week
How to add audio on microsoft powerpoint.

To add audio to your Microsoft PowerPoint presentation, follow these detailed steps:
- Before you begin, ensure that your audio file is in a compatible format such as MP3 or WAV.
- Make sure the audio file is saved in a location where it can be easily accessed.
- Launch Microsoft PowerPoint and open the presentation to which you want to add audio.
- Go to the slide where you want to insert the audio.
- Click on the “Insert” tab at the top of the PowerPoint window.
- In the “Media” group, select “Audio.”
- Choose “Audio on My PC” if the audio file is stored locally, or select “Online Audio” to insert audio from an online source such as OneDrive or YouTube.
- Navigate to the location where your audio file is saved.
- Select the audio file and click “Insert.”
- Once the audio is inserted, a speaker icon will appear on the slide.
- Click on the speaker icon to select it.
- Go to the “Playback” tab that appears on the PowerPoint ribbon.
- Set the playback options such as “Start” and “Stop” to control when the audio should begin and end.
- Choose whether the audio should play automatically or on click.
- Adjust volume settings and other playback options as needed.
- Preview the slide to ensure the audio plays as intended.
- Test the presentation in slideshow mode to verify that the audio syncs correctly with the slide content.
- Once you are satisfied with the audio placement and settings, save your PowerPoint presentation.
- Share your presentation with others, ensuring that they have access to the audio file if necessary.
- Keep in mind any copyright restrictions if using audio from third-party sources.
By following these steps, you can effectively add audio to your Microsoft PowerPoint presentation, enhancing the overall experience for your audience.
How to Add Video in Microsoft PowerPoint
Adding video to your Microsoft PowerPoint presentation can elevate your slides to new heights by engaging your audience with multimedia content. Here’s a comprehensive guide on how to seamlessly integrate video into your PowerPoint slides:
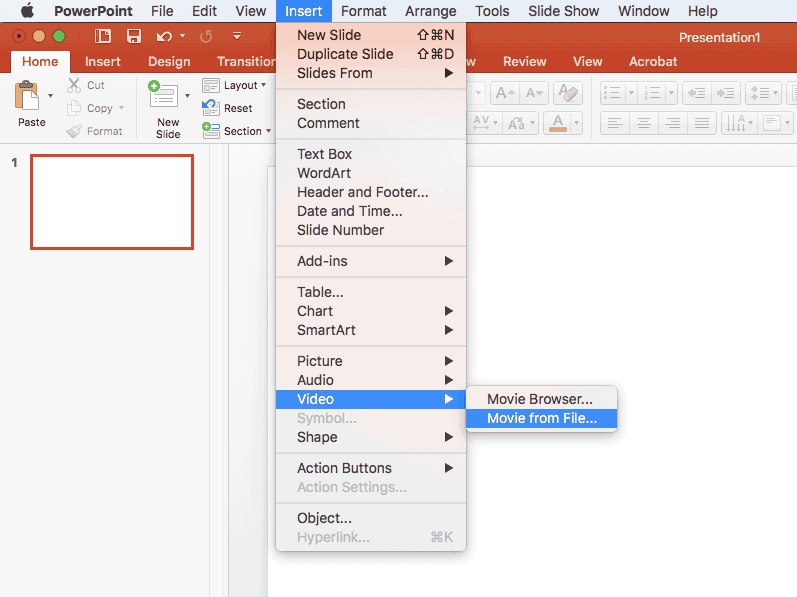
- Prepare Your Video: Before adding the video to your presentation, ensure that it’s in a compatible format. PowerPoint supports various video file formats such as .mp4, .mov, and .avi. Also, consider trimming or editing the video to fit the desired length and content.
- Open Your PowerPoint Presentation: Launch Microsoft PowerPoint and open the presentation in which you want to add the video.
- Navigate to the Slide: Go to the slide where you want to insert the video. Click on the slide in the slide thumbnail view on the left side of the screen.
- Insert Video: Click on the “Insert” tab in the PowerPoint ribbon at the top of the screen.
- Online Video: Insert a video from an online source such as YouTube. Enter the video’s URL in the dialog box and click “Insert.”
- Video on My PC: Insert a video saved on your computer. Navigate to the location of the video file, select it, and click “Insert.”
- Adjust Video Size and Position: After inserting the video, you can resize and reposition it on the slide as needed. Click and drag the corners or edges of the video to resize it. To move the video, click and drag it to the desired location on the slide.
- Start Automatically: Set the video to play automatically when the slide appears.
- Loop until Stopped: Configure the video to loop continuously until manually stopped.
- Rewind After Playing: Automatically rewind the video to the beginning after it finishes playing.
- Preview and Test: Once you’ve inserted the video and adjusted its settings, preview the slide to ensure that the video plays correctly. Click the “Slide Show” button in the bottom-right corner to enter presentation mode and test the video playback.
- Save Your Presentation: After adding the video, save your PowerPoint presentation to preserve the changes. Click on the “File” tab in the PowerPoint ribbon and select “Save” or “Save As” to save the file to your desired location.
By following these steps, you can seamlessly integrate video into your Microsoft PowerPoint presentation, enhancing its visual appeal and engaging your audience with multimedia content. Experiment with different video formats, playback options, and slide designs to create dynamic and impactful presentations.
In conclusion, both Microsoft PowerPoint and Google Slides offer powerful tools for incorporating audio and video elements into your presentations, enhancing engagement, and conveying your message effectively.
With Microsoft PowerPoint, you can seamlessly integrate audio files and video clips, allowing for dynamic presentations that capture your audience’s attention. By following the step-by-step guides provided, you can customize playback options and ensure smooth integration of multimedia content into your slides.
Similarly, Google Slides provides users with the ability to add audio and video, offering flexibility and creativity in presentation design. Whether you’re delivering a business pitch, educational seminar, or creative project, Google Slides allows you to enhance your slides with immersive multimedia elements.
By leveraging the capabilities of both platforms, presenters can create engaging and impactful presentations that leave a lasting impression on their audience. Whether you choose Microsoft PowerPoint or Google Slides, incorporating audio and video elements can elevate your presentations and effectively communicate your ideas.
Previous Apple adds a new iPhone and iPad to its "Obsolete" and "Vintage" lists
Next vivo v30 se spotted on google play console, key specifications revealed.
About the author Marco Lancaster Marco is the HARDWARE & OS EXPERT of Gizchina for the past 4 years. He is Fascinated for technology. He is constantly diving into the Software Development Field and is an expert in all kind of Hardware. He is passioned for the Chinese world of Smart Devices and an addict for technology in general.
Related Posts

Best April Fools’ Pranks from Google

Explore the Fresh OneDrive Features for Microsoft 365 Basic Users

Get ready gamers: Reports suggest a new Xbox Series X All-Digital Console is coming soon

Google Chat: New Features to Revolutionize Collaboration and Communication

How To Get Free Access To Microsoft PowerPoint
E very time you need to present an overview of a plan or a report to a whole room of people, chances are you turn to Microsoft PowerPoint. And who doesn't? It's popular for its wide array of features that make creating effective presentations a walk in the park. PowerPoint comes with a host of keyboard shortcuts for easy navigation, subtitles and video recordings for your audience's benefit, and a variety of transitions, animations, and designs for better engagement.
But with these nifty features comes a hefty price tag. At the moment, the personal plan — which includes other Office apps — is at $69.99 a year. This might be the most budget-friendly option, especially if you plan to use the other Microsoft Office apps, too. Unfortunately, you can't buy PowerPoint alone, but there are a few workarounds you can use to get access to PowerPoint at no cost to you at all.
Read more: The 20 Best Mac Apps That Will Improve Your Apple Experience
Method #1: Sign Up For A Free Microsoft Account On The Office Website
Microsoft offers a web-based version of PowerPoint completely free of charge to all users. Here's how you can access it:
- Visit the Microsoft 365 page .
- If you already have a free account with Microsoft, click Sign in. Otherwise, press "Sign up for the free version of Microsoft 365" to create a new account at no cost.
- On the Office home page, select PowerPoint from the side panel on the left.
- Click on "Blank presentation" to create your presentation from scratch, or pick your preferred free PowerPoint template from the options at the top (there's also a host of editable templates you can find on the Microsoft 365 Create site ).
- Create your presentation as normal. Your edits will be saved automatically to your Microsoft OneDrive as long as you're connected to the internet.
It's important to keep in mind, though, that while you're free to use this web version of PowerPoint to create your slides and edit templates, there are certain features it doesn't have that you can find on the paid version. For instance, you can access only a handful of font styles and stock elements like images, videos, icons, and stickers. Designer is also available for use on up to three presentations per month only (it's unlimited for premium subscribers). When presenting, you won't find the Present Live and Always Use Subtitles options present in the paid plans. The biggest caveat of the free version is that it won't get any newly released features, unlike its premium counterparts.
Method #2: Install Microsoft 365 (Office) To Your Windows
Don't fancy working on your presentation in a browser? If you have a Windows computer with the Office 365 apps pre-installed or downloaded from a previous Office 365 trial, you can use the Microsoft 365 (Office) app instead. Unlike the individual Microsoft apps that you need to buy from the Microsoft Store, this one is free to download and use. Here's how to get free PowerPoint on the Microsoft 365 (Office) app:
- Search for Microsoft 365 (Office) on the Microsoft Store app.
- Install and open it.
- Sign in with your Microsoft account. Alternatively, press "Create free account" if you don't have one yet.
- Click on Create on the left side panel.
- Select Presentation.
- In the PowerPoint window that opens, log in using your account.
- Press Accept on the "Free 5-day pass" section. This lets you use PowerPoint (and Word and Excel) for five days — free of charge and without having to input any payment information.
- Create your presentation as usual. As you're using the desktop version, you can access the full features of PowerPoint, including the ability to present in Teams, export the presentation as a video file, translate the slides' content to a different language, and even work offline.
The only downside of this method is the time limit. Once the five days are up, you can no longer open the PowerPoint desktop app. However, all your files will still be accessible to you. If you saved them to OneDrive, you can continue editing them on the web app. If you saved them to your computer, you can upload them to OneDrive and edit them from there.
Method #3: Download The Microsoft PowerPoint App On Your Android Or iOS Device
If you're always on the move and need the flexibility of creating and editing presentations on your Android or iOS device, you'll be glad to know that PowerPoint is free and available for offline use on your mobile phones. But — of course, there's a but — you can only access the free version if your device is under 10.1 inches. Anything bigger than that requires a premium subscription. If your phone fits the bill, then follow these steps to get free PowerPoint on your device:
- Install Microsoft PowerPoint from the App Store or Google Play Store .
- Log in using your existing Microsoft email or enter a new email address to create one if you don't already have an account.
- On the "Get Microsoft 365 Personal Plan" screen, press Skip For Now.
- If you're offered a free trial, select Try later (or enjoy the free 30-day trial if you're interested).
- To make a new presentation, tap the plus sign in the upper right corner.
- Change the "Create in" option from OneDrive - Personal to a folder on your device. This allows you to save the presentation to your local storage and make offline edits.
- Press "Set as default" to set your local folder as the default file storage location.
- Choose your template from the selection or use a blank presentation.
- Edit your presentation as needed.
Do note that PowerPoint mobile comes with some restrictions. There's no option to insert stock elements, change the slide size to a custom size, use the Designer feature, or display the presentation in Immersive Reader mode. However, you can use font styles considered premium on the web app.
Method #4: Use Your School Email Address
Office 365 Education is free for students and teachers, provided they have an email address from an eligible school. To check for your eligibility, here's what you need to do:
- Go to the Office 365 Education page .
- Type in your school email address in the empty text field.
- Press "Get Started."
- On the next screen, verify your eligibility. If you're eligible, you'll be asked to select whether you're a student or a teacher. If your school isn't recognized, however, you'll get a message telling you so.
- For those who are eligible, proceed with creating your Office 365 Education account. Make sure your school email can receive external mail, as Microsoft will send you a verification code for your account.
- Once you're done filling out the form, press "Start." This will open your Office 365 account page.
You can then start making your PowerPoint presentation using the web app. If your school's plan supports it, you can also install the Office 365 apps to your computer by clicking the "Install Office" button on your Office 365 account page and running the downloaded installation file. What sets the Office 365 Education account apart from the regular free account is that you have unlimited personal cloud storage and access to other Office apps like Word, Excel, and Outlook.
Read the original article on SlashGear .

- Insert WordArt Article
- Add a hyperlink to a slide Article
- Create a PowerPoint presentation from an outline Article
- Check spelling in your presentation Article
- Create and format a table Article
- Insert a linked Excel chart in PowerPoint Article
- Add slide numbers, page numbers, or the date and time Article
- Set text direction and position in a shape or text box Article

Create a PowerPoint presentation from an outline
If you've already jotted down an outline of your presentation in Word and now need a quick way to add it to your slides, you can import a Word outline into PowerPoint.

Create an outline in Word
Select View > Outline . This automatically generates an outline and opens the Outlining tools:
If your document has headings (any heading levels from H1-H9), you’ll see those headings organized by level.
If your document doesn’t have headings and subheadings yet, the outline will appear as a bulleted list with a separate bullet for each paragraph or body text. To assign or edit headings, heading levels, and set up your document structure:
Select a bulleted item. Or press the Ctrl key to select several lines.
In the Outline Level box, select a heading Level 1 for slide titles, Level 2 for bullet points on that slide.
When finished or to edit your document, select Close Outline View .
If you need help creating an outline, see Create an outline in Word .
Save an outline in Word
To save your document, select Save , name your file, and then select Save once more. Select Close to close your document.
Note: Your Word document must be closed to insert it into a PowerPoint presentation.
Import a Word outline into PowerPoint
Open PowerPoint and select New Slide > Slides from Outline .
In the Insert Outline dialog box, find and select your Word outline and select Insert .
Note: If your Word document contains no Heading 1 or Heading 2 styles, PowerPoint will create a slide for each paragraph in your content.
Guidelines for importing an outline
PowerPoint can import an outline in .docx, .rtf, or .txt format.
If your outline is a Word document Apply a heading format to any text you want to include in a slide. For example, if you apply the Normal style to a block of text, Word won't send that text to PowerPoint.
If your outline is a .txt file Use indentation to indicate heading levels. Any unindented lines of text will become titles of new slides.
For PowerPoint to successfully convert your outline to slides, you must follow these guidelines:
If your outline is a Word document:
Apply a heading format to any text you want to include in a slide. For example, if you apply the Normal style to a block of text, Word won't send that text to PowerPoint
Save the Word document as an .rtf file. In PowerPoint for macOS, you can only import Word documents that are saved in Rich Text Format. Click File > Save As , and in the File Format box, select Rich Text Format (.rft) ).
If your outline is a .txt file: Use indents to indicate heading levels. Remember that any un indented lines of text will become titles of new slides.
Insert outline text into a PowerPoint presentation
In a new PowerPoint presentation file, click the first slide. Or, in an existing presentation file, click the slide that you want the outline to appear after.
On the Home tab, click the arrow next to New Slide , and then click Outline .

Locate the outline file (.rtf or .txt) that you want to insert, and then double-click it or click Insert .
New slides are inserted in the presentation based on the text in the outline file you selected. You are now ready to edit the slides and the presentation as you see fit.
Creating a presentation from an outline isn't support in PowerPoint for the web. It requires a desktop version of PowerPoint.

Need more help?
Want more options.
Explore subscription benefits, browse training courses, learn how to secure your device, and more.

Microsoft 365 subscription benefits

Microsoft 365 training

Microsoft security

Accessibility center
Communities help you ask and answer questions, give feedback, and hear from experts with rich knowledge.

Ask the Microsoft Community

Microsoft Tech Community

Windows Insiders
Microsoft 365 Insiders
Was this information helpful?
Thank you for your feedback.
IMAGES
VIDEO
COMMENTS
To do that, simply go up to the Home tab and click on New Slide. This inserts a new slide in your presentation right after the one you were on. You can alternatively hit Ctrl+M on your keyboard to insert a new blank slide in PowerPoint. To learn more about this shortcut, see my guide on using Ctrl+M in PowerPoint.
When you're putting your own deck together, you'll certainly need to add slides and format them in different ways. In order to make a new slide appear in your presentation, first select the slide that you'd like your new slide to follow. Then click Home and choose New Slide. From there, you can choose your desired layout, and start ...
Select the text. Under Drawing Tools, choose Format. Do one of the following: To change the color of your text, choose Text Fill, and then choose a color. To change the outline color of your text, choose Text Outline, and then choose a color. To apply a shadow, reflection, glow, bevel, 3-D rotation, a transform, choose Text Effects, and then ...
Here are the different options available for reformatting: Colors: Changes all the colors used in your presentation, as well as the color options available in the color picker. Fonts: Changes all the headings and body fonts used in the presentation. Effects: Changes the appearance (shading, border, etc.) of objects in your presentation. Background Styles: Choose the background style for the ...
Get your main point into the presentation as early as possible (this avoids any risk of audience fatigue or attention span waning), then substantiate your point with facts, figures etc and then reiterate your point at the end in a 'Summary'. 2. Practice Makes Perfect. Also, don't forget to practice your presentation.
Create a presentation. Open PowerPoint. In the left pane, select New. Select an option: To create a presentation from scratch, select Blank Presentation. To use a prepared design, select one of the templates. To see tips for using PowerPoint, select Take a Tour, and then select Create, . Add a slide.
Tips for creating an effective presentation. Tip. Details. Choose a font style that your audience can read from a distance. Choosing a simple font style, such as Arial or Calibri, helps to get your message across. Avoid very thin or decorative fonts that might impair readability, especially at small sizes. Choose a font size that your audience ...
2. Navigate up to the Parent Master Slide. Once in the Slide Master View, on the left hand side of your screen, select the Parent Slide, or largest slide, on the left. This is where you want to add the Formatting Guides to take advantage of the three placement advantages discussed below. Advantage #1: They show up everywhere.
Microsoft PowerPoint is a presentation design software that is part of Microsoft 365. This software allows you to design presentations by combining text, images, graphics, video, and animation on slides in a simple and intuitive way. Over time, PowerPoint has evolved and improved its accessibility to users.
1. Open PowerPoint. Click or double-click the PowerPoint app icon, which resembles an orange box with a white "P" on it. This will open the PowerPoint templates page. If you don't have a Microsoft Office 365 subscription, you can use the website instead of the desktop app.
We've got the steps you need as an introduction to PowerPoint writing. Now let's get into the writing process that leads to a professional PowerPoint presentation! 1. Research for Your Presentation. Before you can write your presentation, you need to do some research. Here are the steps to take: Step 1.
A good presentation needs two fonts: a serif and sans-serif. Use one for the headlines and one for body text, lists, and the like. Keep it simple. Veranda, Helvetica, Arial, and even Times New Roman are safe choices. Stick with the classics and it's hard to botch this one too badly.
Here's another one of our top PPT tips: tap into Envato Elements' unlimited stock photo library. People are more likely to take you seriously if your presentation is visually appealing. Users view attractive design as more usable. Similarly, they'll view a more attractive PowerPoint as more effective. 11.
Then, launch Microsoft PowerPoint. From your title slide, type the text you want to appear. Right-click the text placeholder and select "Format Shapes" from the "Shortcut Menu." Once the "Format Shape" pane opens, click "Text Options" and select the "Picture or texture fill" option from the "Text Fill" section.
2. Use the Outline View. One other way to structure a PowerPoint presentation in the editing mode is to use Outline View. You can choose it from the VIEW tab. This view doesn't display sections, but it shows the title and main text of each slide, which can give you a quick overview of the presentation contents.
6/ Engage Emotionally. Connect emotional levels with your audience by appealing to their aspirations, fears, desires, or values. They help create a deeper connection and engagement from the very beginning. Make sure your introduction is concise and to the point. Avoid unnecessary details or lengthy explanations.
Step 1: Go to the "Insert" tab. The third tab from the right in the ribbon is the "Insert" tab. Click on the "Insert" tab to access the "WordArt" option. Step 2: Click on the "WordArt" button. Now, on the "Text" section of the "Insert" tab is a leaning "A" icon which is the "WordArt" button.
Create a blank presentation. Open PowerPoint. Select one of the Blank Presentation and start typing. Note: Microsoft 365 subscribers will find Design Ideas based on the words you type. You can browse and select a new look.
Getting Started. 1. Open PowerPoint and click 'New.'. If a page with templates doesn't automatically open, go to the top left pane of your screen and click New. If you've already created a presentation, select Open then double-click the icon to open the existing file. Image Source.
Ensuring your template and message aligns strengthens your presentation's storytelling. 5. Consider the length of your presentation. The duration of your presentation should be incorporated in your template decision making. Longer presentations may benefit from a clean and organized template that aids in maintaining audience attention.
Canva's alternative presentation maker has an intuitive graphs and charts tool to help you turn your numbers into awesome pieces of data visualization. Open the charts folder and start creating your own bar, line, pie, doughnut charts, or pictograms. You can also create circuit diagrams, organizational charts, and even mind maps.
With Visme's Presenter Studio, you can record your presentation and share it with your audience. Record your screen, audio, and video, or switch off your camera for an audio-only presentation. Present asynchronously on your own time, at your own pace. Let your colleagues watch it at their convenience. Create Your Presentation.
Here's how you can use action buttons in PowerPoint. Go to the Insert tab in the ribbon. Click on Shapes and scroll all the way down till you see Action Buttons. Choose any one, and click and drag on your slide to create the button. You can hold Shift while clicking and dragging to create an evenly sized shape.
Open "Insert Images". Navigate to the " Insert " tab on the PowerPoint ribbon and select " Images > Pictures > This Device… " to open your file explorer and choose a GIF. Select Your ...
First, select the table cell that's to the left or the right of where you want to add a new column PPT. You'll now see a Layout tab appears at the end of the ribbon. Here is where you'll see the option to choose Insert Left or Insert Right to add a new column. You can place your new column where you'd like.
The Insert tab allows you to add visual appeal to your slides. Select Insert > Shapes and in the drop-down select the shape. Select Insert > Icons and in the drop-down select the icon. Select Insert > SmartArt and in the gallery tap the layout for the SmartArt graphic you want. Select Insert > Chart and tap the chart type then double-click the ...
12:30 p.m. - 1:30 p.m. Create a basic PowerPoint presentation and practice your presentation skills. Learn how to format text, insert graphics, alter colors, and more. Instructor: Chris Curiale.
Go to the slide where you want to insert the audio. Insert Audio: Click on the "Insert" tab at the top of the PowerPoint window. In the "Media" group, select "Audio.". Choose "Audio ...
Install and open it. Sign in with your Microsoft account. Alternatively, press "Create free account" if you don't have one yet. Click on Create on the left side panel. Select Presentation. In the ...
Import a Word outline into PowerPoint. Open PowerPoint and select New Slide > Slides from Outline. In the Insert Outline dialog box, find and select your Word outline and select Insert. Note: If your Word document contains no Heading 1 or Heading 2 styles, PowerPoint will create a slide for each paragraph in your content.