Subject Explorer
School Subjects
Math & Science
Business & Technology
Electives & Health
Board & Administration
Teaching & Learning
Audio/Video Lectures
Books & Documents
Classifieds
Jobs & Resources
Discussions
Language & Literature

Practice Projects for Microsoft Word

Word 9 Table
In this practice project for Word, students create a document with a title and table. The table has two columns that have different font alignment and incluces various fonts. …

Word 8 Formatting Text
In this practice project for Word, students create a document using a different size and color font for the title than the rest of the paragraph. …

Word 7 Bullets
In this practice project for Word, students create a document with two different types of bullets showing points and subpoints. …

Word 6 Letter
In this practice project for Word, students create a letter. Included in the letter is a heading on the right, indented paragraphs, and the closing and signiture near the middle of the document. …

Word 5 Text And Outline
In this practice project for Word, students create a document that contains several paragraphs of text and also includes an outline with key points and subpoints. …

Word 4 Modified Text
In this practice project for Word, students create a document with the heading on the right, a boldfaced, centered title, and indented paragraphs. The document is double-spaced. …
Word 3 Basic Text
In this practice project for Word, students create a document with the heading on the right, a boldfaced title that is centered, and several paragraphs that are indented. …

Word 22 Preset Headings
In this practice project for Word, students create a document using the preset headings to create a title bar. The document has different alignment and font, blanks, and a short outline. …

Word 21 Formatting Options
In this practice project for Word, students create a document that shows some different effects that can be used with the same font. …

Word 20 Numbered List
In this practice project for Word, students create a document that includes a centered title followed by a numbered list. …

Word 2 Heading 2
In this practice project for Word, students create a document that has a centered title, a heading in the upper right corner, and indented paragraphs. …

Word 19 Advanced Table
In this practice project for Word, students create a document with a table showing a school schedule. The blocks in the table are different sizes and will take individual work within the blocks to …

Word 18 Columns
In this practice project for Word, students create a document with a header and two colomns. The columns include boldfaced and italic font and different alignment. …

Word 17 Columns
In this practice project for Word, students create a document with two identical columns in landscape orientation. Included in each are indented lines and different alignment and font. …

Word 16 Lesson Notes Handout
In this practice project for Word, students create a document like a student handout. This includes an outline with several levels, blanks for students to write on, and different font. …

Word 15 Lesson Notes
In this practice project for Word, students create a document with a header and two outlines. Students are asked to use the automatic numbering and outlining features in Word. They must use different …

Word 14 Table
In this practice project for Word, students create a scoresheet using a table. Students must use different sizes, colors and styles of font, including different alignment. …

Word 13 Outline
In this practice project for Word, students create an outline using the automatic outline in Word, including many levels of subpoints. …

Word 12 Formatting
In this practice project for Word, students create a document with a centered title in all capitals, the first letter of each word slightly larger than the rest. Throughout the document the font is …

Word 11 Formatting
In this practice project for Word, students create a document similar to a test or quiz. They must include points and subpoints, blanks, boldfaced text, tabs, and spacing. …
Resource Type:
Pass it on:
Leave a Reply

22 Best Basic Microsoft Word practice exercises for beginners

Microsoft Word Exercises for Practice: – This article is very important for a basic computer course, for college and school students learning Microsoft Word online and offline. In this, you will get the best ideas on how to learn and practice Microsoft Word. And you can explore the capabilities of Microsoft Word as a business software in this post.
The best way to learn anything is by doing exercises and creating samples of existing materials from experts. It’s ok that you know about Bold, Italic, Page Layout, Insert Menu, View options, etc. but it’s great if you can use such options in creating anything in Microsoft Word.
I mean tools are the same, but the field, seed, and process are changed. So, Can you do that with the same tools? I know farmers do it daily.
So, let’s explore how to learn Microsoft Word. Microsoft Word Exercises ideas that I think every student around the world should practice.
Microsoft Word practice exercises for beginners:
1. create and design admission/enquiry forms etc..
To create this kind of form, you need to use shapes, text boxes, colors, formatting options, tables, and horizontal lines in MS Word. This is a very good exercise to practice because it will give you an idea of how to use such options practically on various official documents that we use in our daily official life.
These days many people do not create forms and charts usually they download them. That makes the forms boring. And often you see similar kinds of formats in forms. But as a student or teacher or small business owner if you learn to create such forms not only do you expand your thinking and creativity but you can also utilize this ability in business and job.
See a sample in the image below.

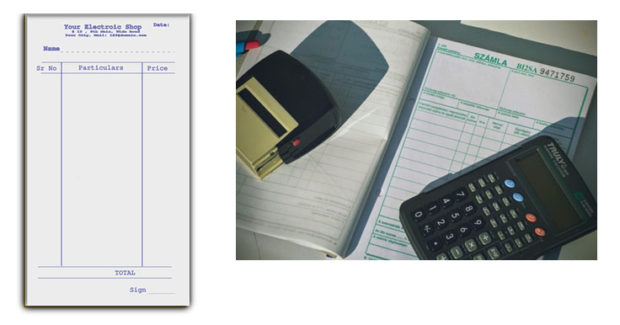
2. Create bills/leaflets/brochures. See the sample below.
Everyone has various designs of bills such as your refrigerator shopping bill, computer bill, electricity bills, and various other kinds of bills. So you can practice in Microsoft Word to create that type of bill format. It’s good for practice in which you will learn the Insert menu option, text adjustment between the table, page size, and text boxes.
3. Design E-book cover pages / Magazine front/ books front/back page using the cover page option in Insert Menu.
This practice is an advance. But try to find the books and magazine cover pages. And try to make it similar in MS Word. Imagine if you’re the designer, how you will design the same content or front page. You will learn while practicing this about the Cover Page option in MS Word or you can design without using that option. The benefit of learning this is about understanding the various practical uses of Microsoft Word in our daily lives.
4. Create Business Cards using Shapes, text, and colors.
People use Adobe Photoshop, Corel Draw, and websites to create business cards nowadays automatically and manually. You can also use that. But it’s about mastering MS Word options and skills. When you create and design anything in Microsoft Word. Your basic computer skills become strong. That helps you in the future when you start working on a Computer or MS Office or MS Word. Also, basic computer skills are very important before doing any degree course in IT. So, Design the business cards similarly you see in the below sample picture.

This is an advanced exercise, but if you do it and create cards then the options you’ve learned during your computer courses in MS Word remain forever in your brain.
Related: Importance of MS Word in Education
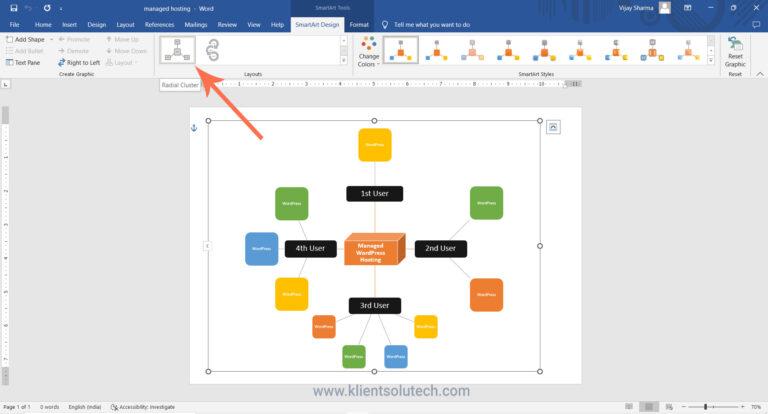
5. Use smart art and create organizational charts and showcase relations:
Smart Art is one of the favorite options in Microsoft Word. Smart art is used to draw diagrams that are used to showcase the content visually that will be easy to understand and manage. As you see below the smart art image Hierarchy Diagram is used to create an organizational chart or structure of the Telecom company.
This is the best method to understand and teach certain things to students, teachers, parents, and companies. You will see such organizational charts in the company’s office and government head offices.

Radial Cluster:
I have created this radial cluster diagram and organizational chart using Smart Art in Microsoft Word to showcase the difference between Managed WordPress Hosting and Shared Hosting” in one of the latest published posts. You can practice and create a similar chart to showcase the relation or useability differences.
Structural Chart:

I hope that you can see (if not zoom in the browser using (Ctrl+ + ) both WordPress hosting and shared hosting smart images that are created in Microsoft Word.
When you practice MS Word Option to create the above diagram or any other, you get many problems. Those problems were not there while you were learning MS Word. These are the problems such as font size adjustment, lines adjustment, etc. colors, shape adjustment, etc. when you use tools or Word applications to communicate your point of view.
So, when you solve these problems by yourself or with the help of your computer course instructor it will be great for your computer knowledge and MS Office skills. Because when you solve the problem you learn very important working lessons in MS Word. This is why you’re learning.
Related: Steps to create a simple business plan using templates in Word App
6. Make book content page or index page
This is another idea in which you need to create an index or content page of the book. In this process, you will learn about the first-line indent, hanging indent, and the perfect use of the ruler bar in Microsoft Word.
And also about a page number, and a hyperlink (if it is an eBook). You can discuss this article with your computer teachers, to allow us or provide us with similar things to practice on.

7. Try to create a similar Header and footer that you’re seeing in the Book
This is the most important option and thousands of students find it difficult to use the header and footer. It’s easier to learn header and footer one time but if you’re not practicing it in various ways or the things such as books header and footer, it’s tough for you to explain it to others.
That’s why I am suggesting you try using the different styles of header and footer. And you will get such an example from the books.

8. Insert the Image into the shape
This is a little easy. But you must know easier things more than difficult things. Because in interviews especially related to IT, people ask easier questions than difficult ones.
So, practicing even on small things is also beneficial. You don’t know when it will be helpful for you in the future.
So, insert an image into the shape. Take and draw a shape from the Illustration menu, place it on a page a little higher in size, and then double-click on the shape. Go to the shape fill option and click on the picture. As an example, you can see the following image.

Related: – Top 10 powerful uses of Microsoft Word.
9. Practice hyperlinking and creating links between Word document texts to D: /, Play songs from Microsoft Word text, and create links between internal and external files.
This is the most important option in Microsoft Word. Most of the processes on the internet contain links. The hyperlink is the starting point in which you learn how things are connected.
It’s also a great option for Web Designers or web designing teachers to teach “How website links work” by using the hyperlink as an example.
As you can see in the image below, I am displaying the connection between the play song text to the location of the song.
Now you need to select the text in which have written the play song and then insert a hyperlink (Ctrl+K) and in the hyperlink address, put the path of the song. After that press, the Ctrl button and click on the blue link, so now any song that you selected will start playing.

Here is my complete article based on the Hyperlink option: – Hyperlink Example within Microsoft Word Document
10. Design a Happy Birthday Message by using Word Art and print it.
I think it’s the easiest thing for you. You can use the Word Art option for this. You can create the best wishes message in MS Word. After that, you can print. And give it to the person. It’s about creating small things at home. This is also a good way to make kids interested in learning the computer.
Also good for students and kids to create fun things and print or give them as a gift to parents. So, they will enjoy your creativity.

11. Create a chart and show the product price comparison between years:
The chart option is very important in Microsoft Word and Excel. However, the use of the chart option and any other option in MS Word depends on the demand for a certain content type.
For example, you’re writing a book or making notes about something in which you have to write and explain the price comparison between 3-4 years. Then you can use the chart for visualizations to analyze the data.
In visual format or the chart, it’s easier for people to understand, what you mean. Also, it gets more views or focus than the content.

So, try to create the chart you’re seeing in the above image.
12. Get the newspaper and see the text-based advertisement and Design
Design and create text or image-based advertisements that you saw in the newspaper. Designing such an advertisement will be a very beneficial role for Microsoft Word students or people learning Advanced Microsoft Word skills. Advertisement designs contain high-quality images, text, and layouts. And these designs are created by experts. When students practice expert material and create similar or better than that.
I think that movement is great for learners and teachers. So, try to create as many as you like. It will make you master MS Word. And I think doing exercises after completing the class topic is the best way to learn MS Word.

13. Take a double-column book or newspaper and design or create a similar paragraph style in the Word document .
Not all often type or create content in a double column. I know computer teachers can teach you such options. But they will not be able to explain the deepest or professional uses of such options for certain reasons.
So, I will suggest that you use the column option and find the newspaper similarly as you see below and create or type the text as you’re seeing in the newspaper. And if you’re having a problem, ask your teachers. So, when your teachers teach you how to do that thing or this thing, it will be great for your knowledge.
14. Create a letterhead or identity card of any company or institution that you have and insert the Watermark with that company name in the document.

You can create an identity card, visiting card or birthday card in MS Word. As you’re seeing below this is an example of cards and letterheads. But you can find such things. And practice your MS Word knowledge in creating an identity card, and letterhead.
This will give you an idea of how to adjust the text in different shapes and areas. Also, this is a good exercise in which you learn after printing, what size you need to adjust on the page. And when you do that, you learn very precious things in MS Word.
In this video tutorial, you will get basic ideas to create a letterhead. You will get ideas to insert letterhead content in the header and footer, you will also learn how you can use watermarks in letterhead, and how to print and adjust content on the page. The video tutorial is in Hindi, but even if you’re not familiar with the Hindi language, you can still learn and watch it for practice ideas:
Step by Step Guide to create printable letterhead in Microsoft Word and Google Docs
15. Decorate a Word document with a page border, and content border, add patterns, and write beautiful text in it.
This is the easiest page layout option, in which you can learn about page borders in MS Word, text borders, color or shading on the page, and pattern.
These options are very beautiful when you’re creating eBooks, making notes, and doing anything that requires the following type of style. See the image below and try to create something similar to this one.

16. Insert Images and Practice on Format Menu and Image Options.
You can use image options and style to decorate, retouch, and adjustment of colors and brightness in MS Word. As you can see, I have created various styles and image effects. These are easy to create.
But to learn more advanced effects later in other professional software, you need to learn and practice such things during your basic computer course.

17. Insert a template or download the new template in Microsoft Word from the Internet and edit those templates with your content.
There are 100+ templates almost for anything in the Microsoft Word Template option. The top benefit of using the template is that if you don’t know how to create or design a certain thing then you can just download the template and replace the existing text with your text. And it’s done.
This is the most important option that you should learn because it’s tough when you don’t know how to design or create anything, so try to practice on 10+ templates and see what it will look like.

Related: Uses and features of Microsoft Word.
18. Practice Typography
Write 10 lines or 10 sentences and then change the font, style, color, and size of each sentence. make each one different from than previous and next..
Fonts are the face of the text. The following image displays various fonts and styles. Just create similarly. During the practice, you will learn which font will be better for the specific text. Just write 10 lines and differentiate each one.

19. Create a Tenant management form in Hindi or your native language.
We use computers or technology mainly for two reasons the one is Innovation and the second is problem-solving. There are various ways of solving problems using computers. Some problems are solved immediately or some take time. For example, you can create an accounts management software to manage business incoming, outgoings, cash flow, balance, and taxes.
Similarly, there are software and mobile apps to manage tenants. I have created this form for my office space owner. He wanted a simple solution that they could follow and manage easily. They are not that much familiar with apps and other digital methods. I told them about digital options. But they want something that can be taken care of easily and also send tenants’ details for police verification when needed.
So we created the following form and this is also an example of immediate problem-solving using a computer and Microsoft Word. Now after printing one copy of this, they can photocopy it as per the number of tenants they want to manage.

So as beginners, you can try to create a similar form by using the Table feature in Microsoft Word. For the best practice 1st create and decide on columns on rough physical paper and the details that you want. You can create a better form than this and I expect that from you.
And for Hindi or your native language, even if you do not have Hindi font or French or Spanish font on your computer or in Microsoft Word. You can use Google Translate for this, convert the word into Hindi or Spanish, and then copy and paste it into the form table column.
20. Practice to design a brochure for an event
When you try creating this brochure design in Microsoft Word, you’ll learn basic and advanced techniques. This includes using image effects, grouping shapes, adding colorful bullets, and creating textures. These skills are valuable, especially if you plan to work with Word or as a virtual assistant. But even as a Word beginner, practicing these exercises is essential for building your Word skills.

Here you can watch a free video tutorial to learn brochure design : Brochure Design Practice in Microsoft Word | Word Exercise for Beginners | Hindi Tutorial
21. Learn and Practice creating business card designs in Microsoft Word
Today, there are plenty of software options available for creating business cards, such as online tools, Adobe InDesign, Corel Draw, Photoshop, Canva, and more. However, making a printable business card may seem straightforward but does involve some technicalities and creative flair.
As a student, it’s beneficial to tackle challenging and intricate design tasks in Microsoft Word, like this business card project. This practice will help you strive for excellence and mastery of Word skills. Consider it your 21st exercise towards becoming a Word expert.
Here you can watch a complete and detailed video tutorial on this: How to Create Modern Business Card Design in MS Word | Step-by-Step Detailed Tutorial
22. Practice to create a professional-looking certificate design
Practicing certificate design and Microsoft Word is essential because it empowers you with valuable digital skills that are increasingly relevant in today’s technology-driven world. By honing your proficiency in Microsoft Word, you not only gain the ability to create professional certificates but also enhance your competence in document formatting, layout design, and image manipulation. These skills have broad applications across various personal and professional tasks, making you more adaptable and capable in a digital environment.
Furthermore, practicing certificate design offers you a practical avenue for skill development while producing tangible outcomes. It allows you to create certificates for courses, achievements, or even for your own business, helping you develop an eye for aesthetics, attention to detail, and the ability to produce polished documents. Overall, this practice not only enhances your digital competence but also provides you with a versatile skill set that can significantly benefit your personal and professional growth.
By creating and practicing below certificate design below, you will be able to explore various design options to create a professional-looking certificate. This is just a sample but along with this design, you can take it’s design to the next level.

If you want to learn how you can do it please follow this step tutorial: How to create a professional-looking certificate design in Word | Step-by-Step Tutorial in Hindi
I think if you practice Microsoft Word by working on these exercises then it will be enough to make you above average among all the students around the world doing basic computer courses or learning Microsoft Word.
Because after learning Microsoft Word, you have to work with professionals or in companies. And almost all official works are related directly and indirectly to the above exercises.
So, this is the best method to learn Microsoft Word by doing exercises. And this is about practical knowledge.
I hope these Microsoft Word Exercises ideas will be helpful for you. To learn more visit: Top 10 Basic and Advanced Microsoft Word skills
How useful was this post?
Click on a star to rate it!
Average rating / 5. Vote count:
No votes so far! Be the first to rate this post.
We are sorry that this post was not useful for you!
Let us improve this post!
Tell us how we can improve this post?
7 thoughts on “22 Best Basic Microsoft Word practice exercises for beginners”
good practical please send more practical in winword. Thanks
These are good Practical exercises. Please send list of practicals of MS Word in Vocational IT NSQF level-1 subject code-402 class IX
please send a book which covers exercises like this
Great content! Thanks for putting this out there!
This is very nice
I have recently joined a Private Computer classes at the age of 53. Can you guide me through WORD, EXCEL, POWERPOINT & INTERNET
Is it possible for you send step by step Assignments for all the above 4 courses, so that I can evaluate whether I am learning properly or not ?
Hi, That’s a very good concern as a student “whether I am learning properly or not” I think 80% students ignore this. I will contact you by email. Age is not a problem. I expect you have strong reason or specific task or goals to learn all these three + internet in this age. Yes, I can evaluate through giving you assignment and testing it.
Leave a Comment Cancel reply
Save my name, email, and website in this browser for the next time I comment.
14 Best Steps on How to Make an Assignment on MS Word

Nowadays, it is very common for students to complete their assignments using Microsoft Word. Thus, they look up how to make an assignment on MS Word. Because of the numerous options provided by MS Word, it might be difficult for a beginner to handle. All you have to do is become familiar with MS Word’s options before moving on to the assignment.
Here in this blog, we will explain 14 best steps you need to follow in order to know how to make an assignment on MS word.
How to make an assignment on MS word
Table of Contents
Yes, we understand that completing an assignment is challenging for most students. Because some of them are worried about completing the task like write my paper , and even if they aren’t worried, they don’t know how to use Microsoft Word effectively, which can be disastrous for many. Similarly, we are publishing this blog to teach you how to make an assignment in Microsoft Word.
Yes, we understand that completing an assignment is challenging for most students. Because some of them are worried about completing the task, and even if they aren’t worried, they don’t know how to use Microsoft Word effectively, which can be disastrous for many. This blog is being published to teach you how to make an assignment in Microsoft Word.
1. Setting the layout of the page for your assignment
On the Toolbar, select the Page Layout tab. Likewise, Page Setup options will appear.
2. Set Margins
Set the margins as follows (Standard measure for the margin):
- Bottom: 2.5cm
- Left: 2.5cm (or 3.2cm)
- Right: 2.5cm (or 3.2cm)
3. Setting Orientation of the page
- Orientation: Portrait
4. Setting Size
- Set to A4 unless otherwise specified.
5. Setting styles
Go Back to the Home tab, You will find the Styles options in the right of the toolbar you will need to use these steps to set the headings and paragraph text for your work.
6. For Headings
Always use the first three headings (Heading 1,2 and 3)
- H1: Arial 14 pt bold
- H2: Arial 12 pt bold, italics
- H3: Arial 10.5-11 pt bold
And the text type should be Normal text
- Times New Roman 12 pt (or equivalent)
7. To set the headings styles for your work, you will have to
- Click the small Styles icon/button.
- Select/highlight the style to modify (e.g. ‘H1’), and then right-click >Modify. Likewise, the Modify Style dialog box will appear.
- Under Formatting, You can change the font style and size as per your need.
- Click OK.
8. Setting up your assignment as the one document
Also, your Work, including the title page and references ( not the Assignment Attachment form*), must be aggregated as a single word (.docx) report.
Therefore, it is simpler to make one record, embed your significant headings, and enter the content from that point. But, if you decide to make separate documents while setting up your task (for example, a different record for references), you will need to copy and paste the final contents into the one-word document and finalize the formatting there.
*The assignment attachment structure is either submitted electronically as a different document or attached to a submitted printed copy.
If you face any issues related to PowerPoint or find it difficult to complete your PowerPoint homework, use our PowerPoint PPT Homework Help by Experts .
9. Inserting section breaks, page breaks, and page numbers
The document has two sections
Section 1 Contains
- The title page
- Table of contents
Section 2 Contains
- The remainder of the assignment.
There are then page breaks within each section i.e
(e.g. between ‘Abstract’ and ‘Table of contents’; ‘Conclusion’ and ‘References’).
To insert the Section break (i.e. make two sections)
- Position your cursor at the end of the Table of contents. (Just have this as a heading; the actual table will be added at the end.)
- From the toolbar at the top of your document, open the Page Layout tab and select Breaks>Section Breaks>Next Page. Under Section break types, select ‘Next page’. This has now divided the assignment into two sections.
Now to insert the page breaks
- Place your cursor at the foot of the title (cover) page.
- Select the Page Layout tab>Breaks>Page Breaks>Page. This has now created a page break between the title page and Abstract.
- Place the cursor at the foot of the Abstract page and repeat to make the break between the Abstract and Table of contents.
- Place a page break between the Conclusion in the next section.
10. Now to add the page numbers
For section 1:.
- Place your cursor within the title page. Click on the Insert tab and then select Page Number in the Header & Footer set of options.
- Select Top of Page>Plain Number 3 (‘right’ alignment). Do not close the Header and Footer just yet.
- Check the box for Different First Page. (This will remove the page number from the title page.)
- In the Header & Footer group of options to the left of the toolbar, select Page Number>Format Page Numbers. Select i, ii, iii .. from the Number format
- Drop-down list. Under Page numbering, click the Start at the radio button (if not already activated) and select i. Click OK.
- Close the Header and Footer. [This will paginate slightly differently from the example, with Abstract on page ii. ]
For section 2:
- Go to the start of section 2 (i.e. beginning at the ‘Introduction’) and double click on the existing page number. This will open the Header settings options.
- In the Header & Footer options section on the toolbar, select Page Number>Format Page Numbers.
- Make sure the ‘Show number on the first page is selected (i.e. the box is ticked).
- Select 1, 2, 3 from the Number format drop-down list. Under Page numbering, Click on the Start at the radio button and set the start on page 1.
11. Inserting the Table of contents
- Move the cursor under the ‘Table of contents’ heading.
- Check the checkboxes for ‘Show page numbers’ and ‘Right align page numbers’.In the (last) Show levels box, set it to either just ‘1’ (i.e. list only the heading 1 level headings) or ‘2’ (to show both H1, and H2 headings).
- To update the table anytime, right-click on the table and it’s almost done.
12. The title page
Follow these steps as the model for your work:
- Assignment title: Arial 28 pt, italics, centered
- (Assignment number): Arial 18 pt, italics, centered
- Other details: Times New Roman 14 pt, left-justified; single tab spacing for items on the one line.
13. Word count
Show the word count properly for the body of your assignment, because it’s’ important.
- Place your cursor on the Introduction title, hold the Shift key down, and got to the end of the Conclusion.
- And then Tools>Word Count and record the number of words.
14. Spelling and Grammar Check
Always keep an eye on spelling and sentence structure and Before you get a printed copy of your task,
What you have to do is
- Run the word spell and sentence structure, and carefully look at your Work. (Tools>Spelling and Grammar.)
- Ensure the Dictionary Language is set to English (Australia, UK, Canada).
Get the Best Excel Assignment Help Now
6 Tips On How To Make an Assignment First Page Best
8 Best Steps On How to Write An Assignment Report
4 Tips on How to Write an Assignment Introduction
6 Tips on How to Make An Assignment For High School
To this end, now you know the 14 best steps on how to make an assignment on MS Word in detail. Many times students are worried about their assignments but we are here to assist you with all your problems. You can contact our experts anytime if you have an issue with MS Office assignment help.
As a result, Our computer science assignment help experts are available for you to provide help 24/7.
Related Posts

How to Hire someone to do my Statistics Homework for Me?
Students ask to do my statistics homework for me. Although there are many online tutors or statistics homework service providing websites available to help you…

How to Get Good Grades in Exams Tips by Experts
Here in this blog, Codeavail professional experts will help you to understand how to get good grades in Exams. Notice that not all the material…
9 Microsoft Word Tips to Edit Your College Assignment Faster
Struggling to edit your college assignments efficiently? Here are some useful Microsoft Word tips to accelerate your editing process and save time.
Assignments at the college and university levels are research-heavy, and you’re often expected to produce write-ups with a significant number of pages. Just when you think you’re done with producing the required word count, the next step is equally challenging and time-consuming: editing.
From keyboard shortcuts to simple, built-in features such as Find and Replace and the automatic table of contents, here are several tips you can use to edit and format your college assignment more efficiently in Microsoft Word.
1. Leave Paragraph Spacing as Your Last Step
Let’s first start on the right track. When you have a 3,000-word essay or report ahead, it’s tempting to set double-spacing when you only write a few sentences or a paragraph at most. It gives the comforting illusion that you have done more work than you actually have.
But to be more efficient at the final editing stage, it’s best to leave paragraph spacing as your last step. This way, you save time because you don’t have to scroll up and down much more than you need to while navigating through different sections and pages of your text.
2. Learn to Utilize Keyboard Shortcut Keys
Keyboard shortcuts make editing and formatting much faster compared to using a mouse. For example, when you use your mouse to select some words, you’ll probably miss a letter or two and have to re-highlight, or overshoot and include a period when you don’t need to.
In this case, you can select text accurately by using Ctrl + Shift , and the left and right arrow keys in Windows. There are many more Microsoft Word keyboard shortcuts that will enable you to get most editing done on the keyboard, without having to switch to your mouse or trackpad. Don’t underestimate the amount of time you save with this method!
3. Hide the Headers and Footers
When you’re reading through a continuous body of text, the blank headers and footers may feel disruptive. To have a smoother reading and editing experience, hide the headers and footers to join all the pages together.
Hover your cursor over the gray space between your current page and the next, then double-click. When you need to use the headers and footers in Microsoft Word again, unhide them by hovering your cursor over the page separator line and double-click.
4. Collapse the Headings and Subheadings
For long report-style assignments, you’ll likely split your content into headings and subheadings. As you move from one section to the next, or jump between sections to rewrite and edit, make it easier to scroll through your text by collapsing the headings.
Hover over the heading title, then click the triangle icon that appears next to it to hide the content. If you want to hide all headings at once, right-click on any heading, and select Expand/Collapse > Collapse All Headings .
5. Automatically Sort References by Alphabetical Order
The works cited list is an essential section in any higher education assignment and is usually sorted by alphabetical order. You’ve likely added references to the list as you cite them in your essay, but when it comes to sorting at the end, it’s unfeasible and time-consuming to sort them manually. You can simply sort them automatically in Microsoft Word.
Select all your references and go to the Home tab. Under the Paragraph section, click the Sort icon (A and Z, with a downward arrow). In the Sort by field, choose Paragraphs . In the Type field, select Text . Then, select Ascending and click OK . The list will now be sorted by alphabetical order.
However, you might notice a couple of outliers. For example, when some references start with symbols instead of a letter, they will all likely be pushed to the very top. These are the few ones you’ll then need to manually reinsert into your list correctly.
6. Use Find and Replace to Avoid Spelling Mistakes
Whether they’re textbooks or journal articles, every student has probably encountered authors with surnames that are a little tricky to spell. Typing the name over and over for each in-text citation is prone to human error. To avoid misspellings, you can use Find and Replace.
First, use a unique abbreviation as a placeholder when you write your assignment. I recommend including a number in this abbreviation. This is because if your abbreviation only consists of letters, there’s a chance that this short combination of letters may have appeared elsewhere, as a part of a word, in your essay.
Once you’re done with the body content, it’s time to replace the abbreviation with the actual surname. In the Home tab, click Replace in the Editing tab. In the Find what field, type your abbreviation. In the Replace with field, type the actual author's name. Then, click Replace All . All your abbreviations will now be replaced with the correct author surname.
7. Insert Your Picture Into an Invisible Table
If you haven’t quite got the hang of formatting pictures in Microsoft Word, here’s a simple alternative that helps guarantee your image won’t cause your text to break up at weird places: insert your picture into an invisible table.
Go to the part of the text where you want your picture to appear. Press Enter to go to a new paragraph. Head to the Insert tab, click Table , and select one box to create a 1x1 table. With the cursor inside your table, click Pictures > Insert Picture > This Device to upload your picture into the document.
You can resize your picture within the table. Once you’re satisfied, highlight the table, go to the Table Design tab, click Borders > No Border . The black table border will then disappear. Your picture now appears to be perfectly fitted between two paragraphs of text.
8. Have an Overview of Multiple Page at Once
When you’re almost done editing, it’s best to scroll through all the pages to make sure there are no odd blank pages, separate sections, or incorrect image displays. But if you have more than 20 pages worth of content, scrolling through that much content quickly is just dizzying.
Instead, go to the View tab. In the Zoom section, click Multiple Pages . This zooms out your Microsoft Word document , so you can view two or three pages at once. You can also click the Zoom slider at the bottom right to zoom out even more and view more pages at once.
9. Automatically Create a Table of Contents
One of the final assignment components is the table of contents. If you’ve been manually keying in each heading, typing a line of periods that end with the heading’s corresponding page number, and double-checking the said page number yourself, it’s time to let Microsoft Word handle the task.
First, make sure you have applied the correct style to your headings. You can check this by clicking on each heading and see which style is selected in the Home tab. Then, number the pages of your Microsoft Word document .
Finally, go to the blank page where you want to insert your Table of Contents. Head to the References tab, click on Table of Contents , and select one of the Automatic Tables . Microsoft Word instantly generates a table of contents for you.
Improve Your Editing Process in Microsoft Word
By applying the above tips, you can revise your assignment more quickly and effectively without burdening yourself with eye fatigue. Cut down on the excessive scrolling and other manual tasks that can be done automatically by Microsoft Word.
Plus, saving time on editing means you have even more time to proofread and review your essays thoroughly, enabling you to produce higher-quality essays and reports.

Want to create or adapt books like this? Learn more about how Pressbooks supports open publishing practices.
Word Practice 1

Here is a video demonstrating the skills in this practice. Please note it does not exactly match the instructions:
Complete the following Practice Activity and submit your completed project.
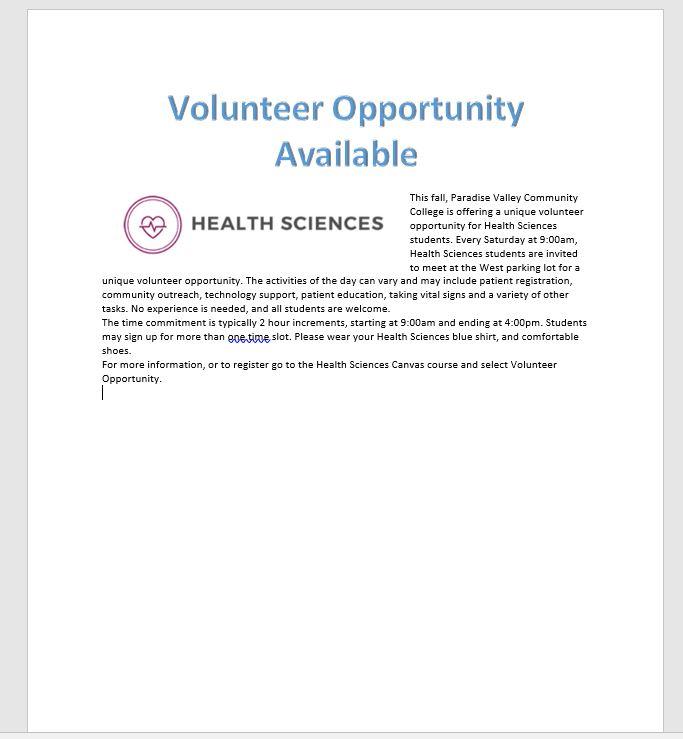
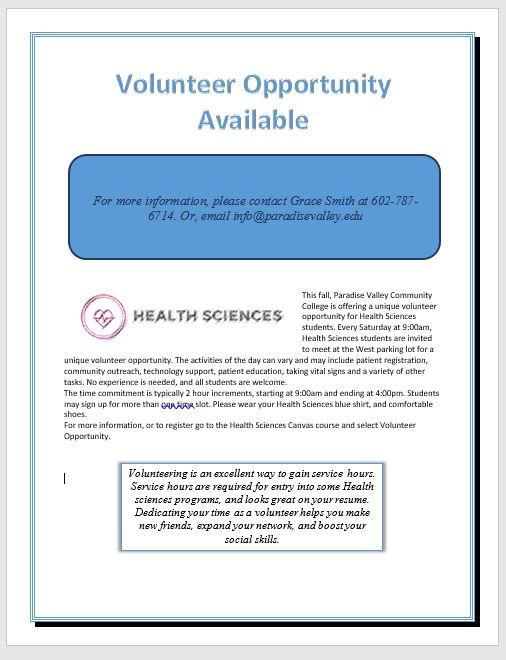
For our first assignment in Word, we will create a flyer to be printed or posted online. The flyer will advertise a volunteer opportunity for Health Sciences students at Paradise Valley Community College. Key skills in this practice are inserting text and pictures, textboxes, formatting text and footers.
- Start Word. Click Blank Document .
- Show formatting marks by navigating to the Home Tab, Paragraph Group, and selecting the Show/Hide icon. This is a Toggle Button . This means it has two modes, on and off. To turn it on, click it once, to turn it off, click it again.
- Show the ruler by navigating to the View tab, Show Group, and selecting the Ruler Check Box . A Check Box is a type of input control . A checkboxes value is only included in the submitted data if the checkbox is currently checked. In other words, when the box is checked, the value is included.
- Navigate to the File Tab to enter Backstage View. In backstage view, select File, then Save As. Click the Browse button. In the Save As dialog box , navigate to your file structure from the previous chapter, then open the Word folder. In the Name field, type Yourlastname_Yourfirstname_Word_Practice_1 as the file name, and then save.
- Type Volunteer Opportunity Available and press Enter twice.
- Type the following text: This fall, Paradise Valley Community College is offering a unique volunteer opportunity for Health Sciences students . Press spacebar.
- Navigate to the Insert Tab, Text group, and choose the Object arrow. Then choose text from file. In the Insert File dialog box, browse to the location where you saved the files from Canvas. Select the file Text_Word_Practice1. Click OK. The text will automatically update your document.
- Select all of the text in the document. On the Home Tab, Font Group, ensure the Font is Calibri and font size is 12.
- Select the title, Volunteer Opportunity Available, including the paragraph mark. On the Home Tab, Font Group, select the arrow next to Text Effects and Topography . In the third row, third column, a pply the Fill: Blue, Accent color 5; Outline: White, Background color 1; Hard Shadow: Blue, color 5 text effect.
- With the title still selected, change the font size to 36.
- On the Home Tab, Paragraph Group, choose Center to align the title centered on the page.
- On the Home Tab, Font Group, change the font color to Blue, Accent 1 for the title.
- With the title still selected, on the Home Tab, in the Font Group, choose the arrow next to the Text Effect and Typography icon. Apply a Shadow and under Inner, click Inside: Right text effect.
- Position the insertion point at the beginning of the paragraph that begins with This Fall.
- On the Insert tab, Illustrations group, choose Pictures . Navigate to your saved files from Canvas and choose the HSPicture_Word_Practice1 image.
- Be sure the picture is selected, and apply the Square text wrapping option.
- Using the sizing handle at the lower right hand corner of the picture, drag up and to the left until the bottom of the graphic is aligned at approximately 3.5 inches on the vertical ruler.
- Click Undo to return the picture to its original size. The Undo icon is located in the quick access toolbar in the upper left hand corner.
- On the Picture Tools, Format tab, in the size group, change the shape width to 4”.
- On the Quick Access Toolbar , click the Save icon. Then, compare your document to the image below.
- Ensure the picture is still selected. Display the Layout dialog box by selecting the Layout Options shortcut menu, then choose see more. In the Layout dialog box for the picture, make sure the Position tab is selected.
- Set the horizontal alignment to Left, relative to Margin.
- Set the vertical alignment to Top, relative to Line. Select OK to close the dialog box.
- With the picture selected, apply the Soft Edges 10 Point picture effect. This is on the Picture Tools Format Tab, Picture Styles group, under Picture Effects, Soft Edges.
- With the picture selected, on the Picture Tools, Format tab, in the Adjust Group choose the Artistic Effects arrow. Apply the Pastels Smooth artistic effect. Dese lect the picture .
- On the Design Tab, in the Page Background Group, select Page Borders. Add a page border selecting the:
- Shadow setting
- Triple Lines style
- Blue, Accent 1 color
- Whole document
- Position the insertion pointer at the blank paragraph below the title and press Enter six times.
- On the Insert Tab, in the Illustrations group, choose Shapes . Insert a Rounded Corners Rectangle shape at the left margin at approximately 1.5 inches on the top ruler. Click once to insert a 1-inch by 1-inch Rounded Rectangle, or use the drag and drop feature.
- On the Drawing Tools, Format Tab in the Size group, Change the shape height to approximat ely 1.8 and the shape width to 6.4.
- Select the Rectangle shape and type the following text: For more information, please contact Grace Smith at 602-787-6714. Or, email [email protected]
- Italicize the text, change the font to Calibri and increase the font size to 16. Deselect the text.
- Select the same text as above and explore the mini-toolbar , by clicking the Font Color button arrow and under Theme Colors, click on Blue, Accent 5, Darker 50%.
- With the shape still selected, go to the Drawing Tools, Format Toolbar, the Shape Styles Group. Select the arrow next to Shape Outline and under Theme Colors, click on Blue, Accent 5, Darker 50%. Change the weight to 3pt.
Compare your document to the image below.

- Using the keyboard shortcut CTRL+END , navigate to the end of your document. If your keyboard does not have these keys, click to put your insertion point after the period on opportunity. Hit enter 3 times.
- Your insertion point should be approximately at the 8” mark on the side ruler. On the Insert tab, in the text group, click the arrow next to the textbox and draw a text box at approximately the 1”mark on the vertical ruler. Draw a text box by dragging down to create a text box that is approximately 1.5 inches high by 4.5 inches wide. Type the following in the text box: Volunteering is an excellent way to gain service hours. Service hours are required for entry into some Health sciences programs, and looks great on your resume. Dedicating your time as a volunteer helps you make new friends, expand your network, and boost your social skills.
- Select and Drag the textbox, by clicking and holding on the outer edge, until the horizontal green alignment guide displays above the first blank paragraph mark and the vertical green alignment guide displays in the center of the page. To be more precise:
- In the Layout dialog box on the Position Tab for the text box set the horizontal alignment to Centered, relative to Margin.
- Set the Vertical alignment by typing .25 in the Absolute position box and selecting Below Paragraph .
- On the Size tab, type 1.5 in the Absolute Height box and 4.5 in the Absolute Width box. Then, click OK.
- With the textbox still selected, on the Drawing Tools, Format Tab, in the Shape Styles group Apply the Colored Outline – Blue, Accent 1 shape style.
- Under Shape Effects , apply the Offset Center outer shadow shape effect to the text box.
- Select the text in the text box, change the font size to 13 italics, and center the text.
- Save the document. Compare your document to the image below.
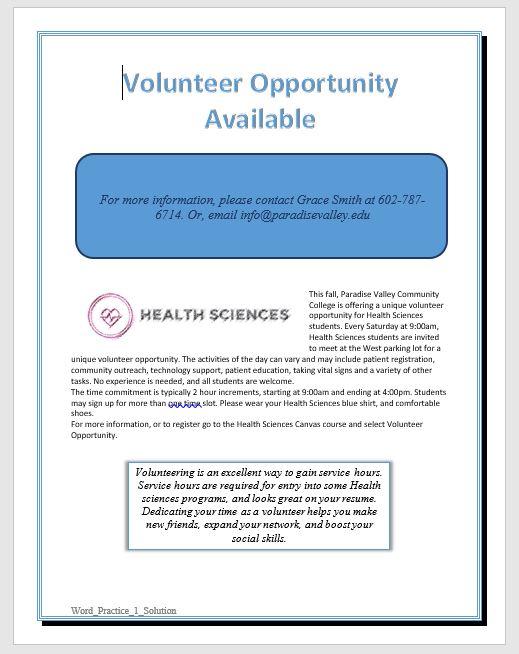
- On the Insert tab, in the Header & Footer Group, choose Edit Footer. On the Header & Footer Design Toolbar, in the Insert Group, choose Document Info. Use Document Info to insert the file name in the footer. Select the File Name Field . The File Name should display in the lower left hand footer of the document. Do not type it in, rather use the Document Info Field.
- In Backstage view, click on Show All Properties, and type the following:
- In the Tags box: trainee, flyer, internship
- In the Subject box: Your course name and section number
- In the Author box: Your first and last name
- Turn off formatting marks. As a reminder, formatting marks are on the Home Tab, Paragraph Group.
- Take a moment to compare your document to the image below and make any modification based on what you have learned.
- Using Find and Replace, (Home tab | Editing | Replace), change all instances of pvcc and Paradise Valley to spscc or South Puget Sound.
- Zoom in to view the document in a larger size. Zoom is located in the lower right hand corner of the Word window.
- Save again, and ensure you have your file saved in a safe location. Take note of that location because you will need to find your file to upload it for grading.
- Submit the file for grading per your instructor’s instructions.
A starting point for creating a new document in Microsoft Word
Characters that display on the screen but do not print, indicating where the Enter key, the Spacebar, and Tab key were pressed, also called non printing characters
A button that can be turned on and off by clicking it once to turn on, and clicking again to turn it off
A small box which can be clicked to indicate a check is turned on or off to indicate an on or off response
Allows the user specify the drive, directory, and name of a file to save their file
Decorative formats, such as shadowed or colors that make text stand out
Images or graphics that are stored locally on a computer or flash drive and can be uploaded to a document to add visual interest
The manner in which text displays around an object
Located above the Ribbon (top-left) and provides access to commonly used features and commands, such as Save and Undo/Redo, and is customizable
Picture formatting options that control the manner in which text wraps around a picture or other object
Formats applied to images that make pictures resemble sketches or paintings
A decorative border that appears outside the margins on each page and can be solid, dashed, or an artistic style
Lines, arrows, starts, banners, ovals, rectangles, and other basic shapes with which you can illustrate an idea, a process or a workflow
Appears whenever you right-click text in Word, Excel or PowerPoint and provides a quick-access version of the Font group on the Home tab, plus a few extra buttons from other groups
Allows you to apply preset colors and effects to quickly change the appearance of your shape
Allows you to change the outline color, weight (thickness), and style of a the outline surrounding a shape
One or more keys used to perform a menu function or other common functions
A moveable, resizable container for text or graphics
A green vertical or horizontal line that displays when you are moving or sizing an object to assist with proper placement
A grouping of coordinating effects that can be applied to a shape including shadows, glows, reflections, soft edges, bevels, and three-dimensional (3-D) rotations
Placeholders that store and display data, and can perform simple tasks like returning the page number or current date and time
Any word, phrase, or number string related to the file that may help you locate the file later
Intro to Microsoft Office Copyright © 2021 by Abby Rusu & Maricopa Millions is licensed under a Creative Commons Attribution 4.0 International License , except where otherwise noted.
Share This Book
- Create a document Article
- Add and format text Article
- Design and edit Article
- Share and collaborate Article
- Set up your mobile apps Article
- Learn more Article

Create a document
Create a document in word for the web.

With Word for the web running in your web browser, you can:
Create documents to add and format text, images, and page layouts.
Get to your documents from your computer, tablet, or phone.
Share and work with others, wherever they are.
This Quick Start is for Word for the web. For the desktop version of Word for Windows, see the Word Quick Start .
For Word on a Mac, see the Office for Mac Quick Start Guides and Word for Mac Help .
Create and open a document
Go to office.com/login and select Word .

Rename a document
Select the title at the top and type a name.
Your changes are saved automatically in Word for the web.

Note: If you can’t edit the name, you might be in Reading View . Select Edit Document > Edit in Browser .

Need more help?
Want more options.
Explore subscription benefits, browse training courses, learn how to secure your device, and more.

Microsoft 365 subscription benefits

Microsoft 365 training

Microsoft security

Accessibility center
Communities help you ask and answer questions, give feedback, and hear from experts with rich knowledge.

Ask the Microsoft Community

Microsoft Tech Community

Windows Insiders
Microsoft 365 Insiders
Was this information helpful?
Thank you for your feedback.

Sep 21, 2022
Facilitate collaboration by assigning tasks in Word
Rubba Ashwas
- Add our blog to your RSS feed reader" href="/rss/blog.xml" data-bi-name="RSS Subscription" data-bi-id="rss_feed" data-bi-bhvr="120" data-bi-socchn="RSSSubscription" title="Microsoft 365 Insider Blog RSS" target="blank" class="d-inline-block">
Hi, Office Insiders! My name is Rubba Ashwas and I’m a Product Manager on the Word team. I’m excited to share that you can now assign tasks with @mentions in documents in Word for Windows and Word for Mac!
Assign tasks
This feature allows you and your team to conveniently create and assign tasks directly from within your Word document using @mentions in comments. The people you assign the tasks to will receive email notifications, letting them know they need to take action.
Many of you have enjoyed using the feature in Word for the web. We’re thrilled to now be bringing it to Word for Windows and Word for Mac.
How it works
- Open an existing document saved to OneDrive or SharePoint.
- Highlight the text that contains the information you want to comment on and select the New Comment button,

- Write your comment and type @ followed by the name of the team member you want to tag.
- Select the Assign to check box to convert your comment into a task.
- Click the blue arrow or press Ctrl + Enter to post your comment.
Scenarios to try
- Reassign a task: Type @ followed by the name of the team member you want to reassign the task to in the response field, select the Reassign to check box, and then click the blue arrow or press Ctrl + Enter . The person to whom you reassigned the task will be notified via email that they’ve been assigned the task.

- Resolve a task: Hover over the circle at the top of the comment and click the Resolve task button.

- Reopen a resolved task: In the right-hand margin or in Comments pane, click the comment that was closed, and then click the Reopen button.

Availability
This feature is available in Word for the Web, and to Insiders running the following Beta Channel builds:
- Windows: Version 2206 (Build 15321.10000) or later
- Mac: Version 16.66 (Build 22090700) or later
Don’t have it yet? It’s probably us, not you.
Features are released over some time to ensure things are working smoothly. We highlight features that you may not have because they’re slowly releasing to larger numbers of Insiders. Sometimes we remove elements to further improve them based on your feedback. Though this is rare, we also reserve the option to pull a feature entirely out of the product, even if you, as an Insider, have had the opportunity to try it.
We are actively working on this feature, and your feedback is key to guiding future improvements. You can submit comments by clicking Help > Feedback. Please tag your feedback with #AssignTasks so that we can easily find input about the feature.
Learn what other information you should include in your feedback to ensure its actionable and reaches the right people. We are excited to hear from you!
Sorry, JavaScript must be enabled to use this app.

Understanding Assignments
What this handout is about.
The first step in any successful college writing venture is reading the assignment. While this sounds like a simple task, it can be a tough one. This handout will help you unravel your assignment and begin to craft an effective response. Much of the following advice will involve translating typical assignment terms and practices into meaningful clues to the type of writing your instructor expects. See our short video for more tips.
Basic beginnings
Regardless of the assignment, department, or instructor, adopting these two habits will serve you well :
- Read the assignment carefully as soon as you receive it. Do not put this task off—reading the assignment at the beginning will save you time, stress, and problems later. An assignment can look pretty straightforward at first, particularly if the instructor has provided lots of information. That does not mean it will not take time and effort to complete; you may even have to learn a new skill to complete the assignment.
- Ask the instructor about anything you do not understand. Do not hesitate to approach your instructor. Instructors would prefer to set you straight before you hand the paper in. That’s also when you will find their feedback most useful.
Assignment formats
Many assignments follow a basic format. Assignments often begin with an overview of the topic, include a central verb or verbs that describe the task, and offer some additional suggestions, questions, or prompts to get you started.
An Overview of Some Kind
The instructor might set the stage with some general discussion of the subject of the assignment, introduce the topic, or remind you of something pertinent that you have discussed in class. For example:
“Throughout history, gerbils have played a key role in politics,” or “In the last few weeks of class, we have focused on the evening wear of the housefly …”
The Task of the Assignment
Pay attention; this part tells you what to do when you write the paper. Look for the key verb or verbs in the sentence. Words like analyze, summarize, or compare direct you to think about your topic in a certain way. Also pay attention to words such as how, what, when, where, and why; these words guide your attention toward specific information. (See the section in this handout titled “Key Terms” for more information.)
“Analyze the effect that gerbils had on the Russian Revolution”, or “Suggest an interpretation of housefly undergarments that differs from Darwin’s.”
Additional Material to Think about
Here you will find some questions to use as springboards as you begin to think about the topic. Instructors usually include these questions as suggestions rather than requirements. Do not feel compelled to answer every question unless the instructor asks you to do so. Pay attention to the order of the questions. Sometimes they suggest the thinking process your instructor imagines you will need to follow to begin thinking about the topic.
“You may wish to consider the differing views held by Communist gerbils vs. Monarchist gerbils, or Can there be such a thing as ‘the housefly garment industry’ or is it just a home-based craft?”
These are the instructor’s comments about writing expectations:
“Be concise”, “Write effectively”, or “Argue furiously.”
Technical Details
These instructions usually indicate format rules or guidelines.
“Your paper must be typed in Palatino font on gray paper and must not exceed 600 pages. It is due on the anniversary of Mao Tse-tung’s death.”
The assignment’s parts may not appear in exactly this order, and each part may be very long or really short. Nonetheless, being aware of this standard pattern can help you understand what your instructor wants you to do.
Interpreting the assignment
Ask yourself a few basic questions as you read and jot down the answers on the assignment sheet:
Why did your instructor ask you to do this particular task?
Who is your audience.
- What kind of evidence do you need to support your ideas?
What kind of writing style is acceptable?
- What are the absolute rules of the paper?
Try to look at the question from the point of view of the instructor. Recognize that your instructor has a reason for giving you this assignment and for giving it to you at a particular point in the semester. In every assignment, the instructor has a challenge for you. This challenge could be anything from demonstrating an ability to think clearly to demonstrating an ability to use the library. See the assignment not as a vague suggestion of what to do but as an opportunity to show that you can handle the course material as directed. Paper assignments give you more than a topic to discuss—they ask you to do something with the topic. Keep reminding yourself of that. Be careful to avoid the other extreme as well: do not read more into the assignment than what is there.
Of course, your instructor has given you an assignment so that he or she will be able to assess your understanding of the course material and give you an appropriate grade. But there is more to it than that. Your instructor has tried to design a learning experience of some kind. Your instructor wants you to think about something in a particular way for a particular reason. If you read the course description at the beginning of your syllabus, review the assigned readings, and consider the assignment itself, you may begin to see the plan, purpose, or approach to the subject matter that your instructor has created for you. If you still aren’t sure of the assignment’s goals, try asking the instructor. For help with this, see our handout on getting feedback .
Given your instructor’s efforts, it helps to answer the question: What is my purpose in completing this assignment? Is it to gather research from a variety of outside sources and present a coherent picture? Is it to take material I have been learning in class and apply it to a new situation? Is it to prove a point one way or another? Key words from the assignment can help you figure this out. Look for key terms in the form of active verbs that tell you what to do.
Key Terms: Finding Those Active Verbs
Here are some common key words and definitions to help you think about assignment terms:
Information words Ask you to demonstrate what you know about the subject, such as who, what, when, where, how, and why.
- define —give the subject’s meaning (according to someone or something). Sometimes you have to give more than one view on the subject’s meaning
- describe —provide details about the subject by answering question words (such as who, what, when, where, how, and why); you might also give details related to the five senses (what you see, hear, feel, taste, and smell)
- explain —give reasons why or examples of how something happened
- illustrate —give descriptive examples of the subject and show how each is connected with the subject
- summarize —briefly list the important ideas you learned about the subject
- trace —outline how something has changed or developed from an earlier time to its current form
- research —gather material from outside sources about the subject, often with the implication or requirement that you will analyze what you have found
Relation words Ask you to demonstrate how things are connected.
- compare —show how two or more things are similar (and, sometimes, different)
- contrast —show how two or more things are dissimilar
- apply—use details that you’ve been given to demonstrate how an idea, theory, or concept works in a particular situation
- cause —show how one event or series of events made something else happen
- relate —show or describe the connections between things
Interpretation words Ask you to defend ideas of your own about the subject. Do not see these words as requesting opinion alone (unless the assignment specifically says so), but as requiring opinion that is supported by concrete evidence. Remember examples, principles, definitions, or concepts from class or research and use them in your interpretation.
- assess —summarize your opinion of the subject and measure it against something
- prove, justify —give reasons or examples to demonstrate how or why something is the truth
- evaluate, respond —state your opinion of the subject as good, bad, or some combination of the two, with examples and reasons
- support —give reasons or evidence for something you believe (be sure to state clearly what it is that you believe)
- synthesize —put two or more things together that have not been put together in class or in your readings before; do not just summarize one and then the other and say that they are similar or different—you must provide a reason for putting them together that runs all the way through the paper
- analyze —determine how individual parts create or relate to the whole, figure out how something works, what it might mean, or why it is important
- argue —take a side and defend it with evidence against the other side
More Clues to Your Purpose As you read the assignment, think about what the teacher does in class:
- What kinds of textbooks or coursepack did your instructor choose for the course—ones that provide background information, explain theories or perspectives, or argue a point of view?
- In lecture, does your instructor ask your opinion, try to prove her point of view, or use keywords that show up again in the assignment?
- What kinds of assignments are typical in this discipline? Social science classes often expect more research. Humanities classes thrive on interpretation and analysis.
- How do the assignments, readings, and lectures work together in the course? Instructors spend time designing courses, sometimes even arguing with their peers about the most effective course materials. Figuring out the overall design to the course will help you understand what each assignment is meant to achieve.
Now, what about your reader? Most undergraduates think of their audience as the instructor. True, your instructor is a good person to keep in mind as you write. But for the purposes of a good paper, think of your audience as someone like your roommate: smart enough to understand a clear, logical argument, but not someone who already knows exactly what is going on in your particular paper. Remember, even if the instructor knows everything there is to know about your paper topic, he or she still has to read your paper and assess your understanding. In other words, teach the material to your reader.
Aiming a paper at your audience happens in two ways: you make decisions about the tone and the level of information you want to convey.
- Tone means the “voice” of your paper. Should you be chatty, formal, or objective? Usually you will find some happy medium—you do not want to alienate your reader by sounding condescending or superior, but you do not want to, um, like, totally wig on the man, you know? Eschew ostentatious erudition: some students think the way to sound academic is to use big words. Be careful—you can sound ridiculous, especially if you use the wrong big words.
- The level of information you use depends on who you think your audience is. If you imagine your audience as your instructor and she already knows everything you have to say, you may find yourself leaving out key information that can cause your argument to be unconvincing and illogical. But you do not have to explain every single word or issue. If you are telling your roommate what happened on your favorite science fiction TV show last night, you do not say, “First a dark-haired white man of average height, wearing a suit and carrying a flashlight, walked into the room. Then a purple alien with fifteen arms and at least three eyes turned around. Then the man smiled slightly. In the background, you could hear a clock ticking. The room was fairly dark and had at least two windows that I saw.” You also do not say, “This guy found some aliens. The end.” Find some balance of useful details that support your main point.
You’ll find a much more detailed discussion of these concepts in our handout on audience .
The Grim Truth
With a few exceptions (including some lab and ethnography reports), you are probably being asked to make an argument. You must convince your audience. It is easy to forget this aim when you are researching and writing; as you become involved in your subject matter, you may become enmeshed in the details and focus on learning or simply telling the information you have found. You need to do more than just repeat what you have read. Your writing should have a point, and you should be able to say it in a sentence. Sometimes instructors call this sentence a “thesis” or a “claim.”
So, if your instructor tells you to write about some aspect of oral hygiene, you do not want to just list: “First, you brush your teeth with a soft brush and some peanut butter. Then, you floss with unwaxed, bologna-flavored string. Finally, gargle with bourbon.” Instead, you could say, “Of all the oral cleaning methods, sandblasting removes the most plaque. Therefore it should be recommended by the American Dental Association.” Or, “From an aesthetic perspective, moldy teeth can be quite charming. However, their joys are short-lived.”
Convincing the reader of your argument is the goal of academic writing. It doesn’t have to say “argument” anywhere in the assignment for you to need one. Look at the assignment and think about what kind of argument you could make about it instead of just seeing it as a checklist of information you have to present. For help with understanding the role of argument in academic writing, see our handout on argument .
What kind of evidence do you need?
There are many kinds of evidence, and what type of evidence will work for your assignment can depend on several factors–the discipline, the parameters of the assignment, and your instructor’s preference. Should you use statistics? Historical examples? Do you need to conduct your own experiment? Can you rely on personal experience? See our handout on evidence for suggestions on how to use evidence appropriately.
Make sure you are clear about this part of the assignment, because your use of evidence will be crucial in writing a successful paper. You are not just learning how to argue; you are learning how to argue with specific types of materials and ideas. Ask your instructor what counts as acceptable evidence. You can also ask a librarian for help. No matter what kind of evidence you use, be sure to cite it correctly—see the UNC Libraries citation tutorial .
You cannot always tell from the assignment just what sort of writing style your instructor expects. The instructor may be really laid back in class but still expect you to sound formal in writing. Or the instructor may be fairly formal in class and ask you to write a reflection paper where you need to use “I” and speak from your own experience.
Try to avoid false associations of a particular field with a style (“art historians like wacky creativity,” or “political scientists are boring and just give facts”) and look instead to the types of readings you have been given in class. No one expects you to write like Plato—just use the readings as a guide for what is standard or preferable to your instructor. When in doubt, ask your instructor about the level of formality she or he expects.
No matter what field you are writing for or what facts you are including, if you do not write so that your reader can understand your main idea, you have wasted your time. So make clarity your main goal. For specific help with style, see our handout on style .
Technical details about the assignment
The technical information you are given in an assignment always seems like the easy part. This section can actually give you lots of little hints about approaching the task. Find out if elements such as page length and citation format (see the UNC Libraries citation tutorial ) are negotiable. Some professors do not have strong preferences as long as you are consistent and fully answer the assignment. Some professors are very specific and will deduct big points for deviations.
Usually, the page length tells you something important: The instructor thinks the size of the paper is appropriate to the assignment’s parameters. In plain English, your instructor is telling you how many pages it should take for you to answer the question as fully as you are expected to. So if an assignment is two pages long, you cannot pad your paper with examples or reword your main idea several times. Hit your one point early, defend it with the clearest example, and finish quickly. If an assignment is ten pages long, you can be more complex in your main points and examples—and if you can only produce five pages for that assignment, you need to see someone for help—as soon as possible.
Tricks that don’t work
Your instructors are not fooled when you:
- spend more time on the cover page than the essay —graphics, cool binders, and cute titles are no replacement for a well-written paper.
- use huge fonts, wide margins, or extra spacing to pad the page length —these tricks are immediately obvious to the eye. Most instructors use the same word processor you do. They know what’s possible. Such tactics are especially damning when the instructor has a stack of 60 papers to grade and yours is the only one that low-flying airplane pilots could read.
- use a paper from another class that covered “sort of similar” material . Again, the instructor has a particular task for you to fulfill in the assignment that usually relates to course material and lectures. Your other paper may not cover this material, and turning in the same paper for more than one course may constitute an Honor Code violation . Ask the instructor—it can’t hurt.
- get all wacky and “creative” before you answer the question . Showing that you are able to think beyond the boundaries of a simple assignment can be good, but you must do what the assignment calls for first. Again, check with your instructor. A humorous tone can be refreshing for someone grading a stack of papers, but it will not get you a good grade if you have not fulfilled the task.
Critical reading of assignments leads to skills in other types of reading and writing. If you get good at figuring out what the real goals of assignments are, you are going to be better at understanding the goals of all of your classes and fields of study.
You may reproduce it for non-commercial use if you use the entire handout and attribute the source: The Writing Center, University of North Carolina at Chapel Hill
Make a Gift
Paper and report design and layout templates
Pen perfect looking papers and reports every time when you start your assignment with a customizable design and layout template. whether you want your paper to pop off the page or you need your report to represent your data in the best light, you'll find the right template for your next paper..

Perfect your papers and reports with customizable templates
Your papers and reports will look as professional and well put together as they sound when you compose them using customizable Word templates . Whether you're writing a research paper for your university course or putting together a high priority presentation , designer-created templates are here to help you get started. First impressions are important, even for papers, and layout can make or break someone's interest in your content. Don't risk it by freestyling, start with a tried-and-true template. Remember, though: Papers and reports don't have to be boring. Professional can still pop. Tweak your favorite layout template to match your unique aesthetic for a grade A package.
Synonyms of assignment
- as in lesson
- as in appointment
- More from M-W
- To save this word, you'll need to log in. Log In
Thesaurus Definition of assignment
Synonyms & Similar Words
- responsibility
- undertaking
- requirement
- designation
- appointment
- authorization
- installment
- installation
- destination
- emplacement
- investiture
- singling (out)
Antonyms & Near Antonyms
- dethronement
Synonym Chooser
How does the noun assignment contrast with its synonyms?
Some common synonyms of assignment are chore , duty , job , stint , and task . While all these words mean "a piece of work to be done," assignment implies a definite limited task assigned by one in authority.
When is it sensible to use chore instead of assignment ?
While the synonyms chore and assignment are close in meaning, chore implies a minor routine activity necessary for maintaining a household or farm.
When is duty a more appropriate choice than assignment ?
Although the words duty and assignment have much in common, duty implies an obligation to perform or responsibility for performance.
When might job be a better fit than assignment ?
The synonyms job and assignment are sometimes interchangeable, but job applies to a piece of work voluntarily performed; it may sometimes suggest difficulty or importance.
When could stint be used to replace assignment ?
In some situations, the words stint and assignment are roughly equivalent. However, stint implies a carefully allotted or measured quantity of assigned work or service.
When can task be used instead of assignment ?
The meanings of task and assignment largely overlap; however, task implies work imposed by a person in authority or an employer or by circumstance.
Thesaurus Entries Near assignment
assignments
Cite this Entry
“Assignment.” Merriam-Webster.com Thesaurus , Merriam-Webster, https://www.merriam-webster.com/thesaurus/assignment. Accessed 6 Apr. 2024.
More from Merriam-Webster on assignment
Nglish: Translation of assignment for Spanish Speakers
Britannica English: Translation of assignment for Arabic Speakers
Subscribe to America's largest dictionary and get thousands more definitions and advanced search—ad free!

Can you solve 4 words at once?
Word of the day.
See Definitions and Examples »
Get Word of the Day daily email!
Popular in Grammar & Usage
The tangled history of 'it's' and 'its', more commonly misspelled words, why does english have so many silent letters, your vs. you're: how to use them correctly, every letter is silent, sometimes: a-z list of examples, popular in wordplay, the words of the week - apr. 5, 12 bird names that sound like compliments, 10 scrabble words without any vowels, 12 more bird names that sound like insults (and sometimes are), 8 uncommon words related to love, games & quizzes.

- Search the community and support articles
- Microsoft Teams
- Teams for education
- Search Community member
Ask a new question
Deleting, cloning and un-sharing documents randomly between Word and Teams (Word and Teams going crazy)
I've wrote a short and long version with more and less detail. (the short verison is after Current: )
Recently I had an assignment where I was given a word document (in a microsoft teams assignment) that I needed to download and save as a new file on my chromebook in which I had done.
This new document Is the one I was working on outside of teams (in word online) and I had completed. It was required that I had shared this with my teacher and he could access this document at all times. For the entire time, this was working no problem and the document was shared with him.
When It comes to submitting the word doc, It doesn't allow me to attach my file as It appears I have been working on word document that was actually the one already attached to the assignment, despite the fact that I had downloaded it and saved it as a new document. Despite this, no problems seemed to occur when turning in...
First issue :
The issue arrose when undoing the turn in on the assignment, it was left buffering for hours leaving the turn in again button loading while I was not able to change anything about the assignment, wasn't able to add to the assignment in any way (inside of teams). While the assignment in teams was linked (I assume the same one as it updates with the same changes I make on my document outside of teams) I was working on the document in word ( this was shared with the teacher as It needed to be). These changes were not updating the document in the assignment despite It having done before, but this wasn't too much of an issue yet.
Second issue:
Then around 8 hours later, the assignment randomly became accessable, 7 hours after the time it was due (luckily my teacher was understanding and did not punnish me for this). I decided to open it up and this is where it went haywire, I realised just now the updates I had made in the word document was not in this document (they were meant to be the same document as I only had one at this time). From this point, I decide to inform my teacher that I couldn't make changes to the document, I emailed him the changes that I had made before (between when my assignment was due and when the loading "bug" had happened) and sumbitted the assignment with the un-updated work.
Third & Worst issue:
I then talk to my teacher in person and am told to take the assignment and undo the turn in. This is where the major problem happens. I notice every time I open the document from the teams assignment a new one is created (a new one of an exact copy of the un-updated version, that my teacher is now not shared with). I then notice when I try to open the word document that is outside of teams and all I see is an error message, "Sorry, something went wrong" followed by "Item does not exist, It may have been deleted by another user." Not long after, the flood of cloned documents dissapear and I'm left with just two documents in my word both tiled the same thing.
One is an accessable and editable version of the un-updated document that has was not shared with my teacher (I believe he needs to have been in the document since day one to check the history, but not sure). The other doc is an un-editable version same way it would appear if you opened a submitted document inside of teams (just viewing) This one I cannot see if he is shared with (or at least I don't know how), this document is also a version of the older document.
It's now 26hours overdue and I'm left without my original document so nothing which he had been shared with since day one is now accessable, I have no proof of history despite before the second un-submittion having a document which had been shared since day one. I have no clue how any of this happened just because I wanted to undo the turn in to add a few extra sentences before submitting at 3pm.
I have screenshots of proof not that I can submit screenshots, but it could possibly be useful to recover the original document.
The correlation ID for the "Sorry, something went wrong" is: bf4b19al-c0bf-3000-196b-abd1a122b5ca incase that helps.
Short verison:
There was a document I had and submitted into teams, this document (that was shared with my teacher) had trouble when I tried ot undo my turn in twice, once where it was stuck in a loading state for several hours and again when I had to undo submit to update the document. First I noticed many clones appearing, then my original document was deleted and I was somehow stuck with two un-updated ones, one which I didnt even have editing rights for and neither were shared with my teacher for some reason. I have lost access to the original shared & up to date document and am left with no proof that I have done the work myself despite him having seen the work and being able to acess the document yesterday just fine.
Im not sure if all the details are included in the short version, but it should sum up everything.
Apologies for the long and complicated script, there is a lot of details that had to be included in this report, I have tried to input as much detail as possible just to clear any confusion. I've never made a report in microsoft before so I don't know how this works, but If you can ask questions as I haven't made somehting clear, I'll be on all day to clear it up, please if you could reply ASAP that would be much appreciated as this is well overdue and I'm usure of the time I have been allowed. Thanks for the support
I most likely left out details, but I tried to get down everything I can remember. I don't know how any of these issues happened as I'm not the most Microsoft savvy guy.
I'm trying to get back my original document that was shared with him, I've checked my OneDrive and it's not in the history at all and never was (I was able to access it in word, but wasn't in my onedrive by the looks of it)
Edit: The document I have now IS shared with the teams page Owners, but not shared with my teachers account (under people). I have copy and pasted the up to date text into the new document as I had sent Him the updated text in a prior email.
I am waiting to submit this document as I don't believe he has the history for it as he hasn't been shared this document. I'm not sure if he has access to it as it doesn't have his name under people, only the teams page Owners (which he is a part of) is shared with under groups in the manage acess page.
I don't have a way to contact him now to see if he has the doc as school is off for 5 days over the long weekend.
I'm now left with a doc which I believe is equal to the one that was upto date, but like I said before, hasn't been shared with his outlook account since day one.
Also, I'm not sure if the only reason I needed to have the document shared since day one was because of the history, that is just my assumption.
Thank you for reading, please suggest actions I can take.
- Subscribe to RSS feed
Report abuse
- Independent Advisor
Hello Ulysses, I'm Ibhadighi and I'd happily help you with your question. In this forum, we are Microsoft consumers just like yourself. Your situation sounds incredibly stressful and complicated, but let's try to simplify the steps you can take to address this issue: 1. Document Everything: Keep all evidence of your work and communication with your teacher, including the screenshots you mentioned and any emails or messages that discuss the assignment and the issues you've encountered. 2. Create a New Document: Since you've already copied and pasted the updated text into a new document and shared it with the team page owners, ensure this document is as close to the final version as possible. Make sure it's properly named to indicate it's the latest version. 3. Communicate with Your Teacher: Even though school is out for the next few days, send an email to your teacher explaining the situation in detail. Include: - A summary of the issues you faced with Microsoft Teams and Word. - Mention the steps you've taken to resolve the issue (e.g., creating a new document and sharing it with the team's page owners). - Attach or link the new document in your email. - Express your willingness to provide any additional information or take further steps to resolve the issue. 4. If possible, reach out to your school's IT department with the correlation ID you provided (bf4b19al-c0bf-3000-196b-abd1a122b5ca) and explain the technical issues you've experienced. They might be able to recover the original document or provide additional insights into what went wrong. 5. To prevent similar issues in the future, consider: - Saving and backing up your work in multiple locations (e.g., an external hard drive, cloud storage like Google Drive). - Confirming the submission process and any specific requirements with your teacher well ahead of deadlines. 6. Request an Extension: Given the technical difficulties and your proactive approach to resolving them, request an extension for your assignment if you haven't already. Your teacher's understanding of the situation so far suggests they might be accommodating. This situation highlights the challenges of working with digital documents and the importance of clear communication, especially when technical issues arise. Hopefully, these steps will help you navigate this situation and prevent similar issues in the future. I hope this helps. Best Regards, Ibhadighi
1 person found this reply helpful
Was this reply helpful? Yes No
Sorry this didn't help.
Great! Thanks for your feedback.
How satisfied are you with this reply?
Thanks for your feedback, it helps us improve the site.
Thanks for your feedback.
Replies (2)
Question info.
- Assignments
- Norsk Bokmål
- Ελληνικά
- Русский
- עברית
- العربية
- ไทย
- 한국어
- 中文(简体)
- 中文(繁體)
- 日本語
IMAGES
VIDEO
COMMENTS
Are you a student or a teacher struggling with creating assignments in MS Word? Look no further! In this video, we'll provide you with a comprehensive guide ...
Word 11 Formatting. ★★★★★. Kendall Myers November 15, 2017. In this practice project for Word, students create a document similar to a test or quiz. They must include points and subpoints, blanks, boldfaced text, tabs, and spacing. …. 1 2.
3. Design E-book cover pages / Magazine front/ books front/back page using the cover page option in Insert Menu. This practice is an advance. But try to find the books and magazine cover pages. And try to make it similar in MS Word. Imagine if you're the designer, how you will design the same content or front page.
Switch to Editing view: click Edit Document > Edit in Word for the web. Type and format text, add pictures, adjust the layout of the page, and more. For more advanced editing, click Open in Word. Work together on the same doc. To work together in Word for the web, you edit a document as you normally would.
Who this book is for. Microsoft Word Step by Step (Microsoft 365 and Office 2021) is designed for use as a learning and reference resource by people who want to use Word to create and edit documents, and who want to make use of the many features that help users achieve an attractive and professional result.
13. Word count. Show the word count properly for the body of your assignment, because it's' important. Place your cursor on the Introduction title, hold the Shift key down, and got to the end of the Conclusion. And then Tools>Word Count and record the number of words. 14. Spelling and Grammar Check.
From keyboard shortcuts to simple, built-in features such as Find and Replace and the automatic table of contents, here are several tips you can use to edit and format your college assignment more efficiently in Microsoft Word. 1. Leave Paragraph Spacing as Your Last Step. Let's first start on the right track.
For our first assignment in Word, we will create a flyer to be printed or posted online. The flyer will advertise a volunteer opportunity for Health Sciences students at Paradise Valley Community College. Key skills in this practice are inserting text and pictures, textboxes, formatting text and footers. Start Word. Click Blank Document.
Learn how to set up your assignment formatting in Microsoft Word. Includes: margins, font style and size, line spacing, line indents, header, headings and r...
View and navigate your assignments (educator) Manage assignments on a mobile device. Grade, return, and reassign assignments. Delete an assignment in Microsoft Teams. Learn how to create, edit, and turn in assignments using the Assignments app in Microsoft Teams for Education. Tips for due dates, grading rubrics, and adding files, too.
Templates for college and university assignments. Include customizable templates in your college toolbox. Stay focused on your studies and leave the assignment structuring to tried and true layout templates for all kinds of papers, reports, and more. Category. Color. Create from scratch. Show all.
With Word for the web running in your web browser, you can: Create documents to add and format text, images, and page layouts. Get to your documents from your computer, tablet, or phone. Share and work with others, wherever they are.
How it works. Open an existing document saved to OneDrive or SharePoint. Write your comment and type @ followed by the name of the team member you want to tag. Select the Assign to check box to convert your comment into a task. Click the blue arrow or press Ctrl + Enter to post your comment.
Here are some common key words and definitions to help you think about assignment terms: Information words Ask you to demonstrate what you know about the subject, such as who, what, when, where, how, and why. define—give the subject's meaning (according to someone or something). Sometimes you have to give more than one view on the subject ...
Paper and report design and layout templates. Pen perfect looking papers and reports every time when you start your assignment with a customizable design and layout template. Whether you want your paper to pop off the page or you need your report to represent your data in the best light, you'll find the right template for your next paper.
In this video we will learn about how we can use ms word for university assignments and how to make assignments in ms word in perfect and easy way to get exc...
MS Word is a popular word-processing program used primarily for creating documents such as letters, brochures, learning activities, tests, quizzes and students' homework assignments. There are many simple but useful features available in Microsoft Word to make it easier for study and work.
Synonyms for ASSIGNMENT: task, job, duty, project, mission, chore, responsibility, function; Antonyms of ASSIGNMENT: dismissal, discharge, firing, expulsion ...
Download Free Cover Page Templates. Explore our collection of 23 beautifully designed cover page templates in Microsoft Word format. These templates feature captivating colors and layouts that are sure to make a lasting impression. Simply click on the preview image of each template and download it for free.
How to make an assignment on MS Word on PC or Laptop easily.To make an assignment attractive, good & acceptable you must have to follow these simple steps.1....
For this assignment, you will format a document with a table and an image. Follow the directions below. If you get stuck on a step, review previous lessons and you can make use of some of the skills you learnt in Internet Research to browse the web for some solutions. Download the report document and open it in Microsoft Word.
A homework assignment is a task assigned by educators as an extension of classroom work typically intended for students to complete outside of class. Written exercises, reading and comprehension activities, research projects, and problem-solving exercises are a few examples of homework varieties. However, the primary goal remains the same: to ...
السلام عليكمIn this video I've completely tried to show that how can we use MS Word and how to make assignments in MS Word in very easy way. If you are a beg...
3. Communicate with Your Teacher: Even though school is out for the next few days, send an email to your teacher explaining the situation in detail. Include: - A summary of the issues you faced with Microsoft Teams and Word. - Mention the steps you've taken to resolve the issue (e.g., creating a new document and sharing it with the team's page ...