Create an assignment data lookup rule
Automatically assign a record using Data Lookup and Record Matching.
Role required: assignment_rule_admin or admin
- \n Navigate to All > System Policy > Rules > Assignment Lookup Rules . \n
- \n Select New . \n
- \n Select Submit . \n
The rule assigns incidents to the values in the Assignment Group and Assigned To fields based on the values selected in the Category , Subcategory ,\n Configuration Item , or Location fields. A valid assignment lookup rule requires at least one matcher field and one setter field.

Assignment Data Lookup
- Assignment rules module
- Data lookup rules
- Precedence between data lookup, assignment, and business rules
- Workflow assignments
- Create an assignment rule
- Baseline assignment rules example
The Snowball
A ServiceNow Blog & Newsletter
How To Assign Roles To A User In ServiceNow
Users, Groups and Roles in ServiceNow All ServiceNow Admins need to have a solid understanding of how these 3 inter-related pieces of the platform work together. If you’re still a beginner, check out how to …
Written by: Team Snowball
Published on: August 18, 2021
Buy The 'ServiceNow Developer Manual' Here!

Buy The " ServiceNow Developer's Manual " Now
We've packed over a decade of ServiceNow Development advice, into a single e-book.
The Snowball will contribute 5% of your purchase to remove CO₂ from the atmosphere.
Table of Contents
Users, Groups and Roles in ServiceNow
All ServiceNow Admins need to have a solid understanding of how these 3 inter-related pieces of the platform work together. If you’re still a beginner, check out how to create a user in ServiceNow .
If you don’t have a proper grasp of how users, groups and roles fit together, you’re going to be wasting a lot of time manually updating them when you don’t have to.
While we always try to automate as much as possible in our day to day operations, there will always be manual setup required, especially when new teams start using the platform.
Master a couple simple concepts and save time to perform other work. It’s super important to understand how users in the system have different levels of access, how that access is granted and how it’s easily managed.
When you work at an organization with thousands of users with varying roles, things can get incredibly complicated quickly as far as provisioning users and their many different levels of access. If access is not properly adhere to, you risk exposing data to those who shouldn’t be seeing it – which can cause people to lose respect for ServiceNow.
To see what access a role grants a user, check out the ACL’s. Roles are connected to ACL’s and ACL’s determine what a user can and cannot see.
Thankfully, it doesn’t have to be so difficult for ServiceNow Admins to properly manage group and role allocation.
Let’s review how users, groups and their roles all work together.
Assign Roles To A User Directly? Not The Best Idea
The most important concept that new admins have to understand is the following:
There are users, who are members of groups, who inherit the roles of the groups that they are a member of.
While assigning a role directly to a user will “work”, it’s not scalable and isn’t a best practice. You can create a role for a single user in certain circumstances, but why would you assign it to them directly?
It won’t allow for a future admin, or yourself, to come back to that user in a few months and recall exactly what you were trying to accomplish.
If you’re a ServiceNow Admin, try to get a better understanding of how these 3 pieces of the platform work together, and you’ll end up saving yourself a lot of time in the long run.
If you want to give a role to a user directly, there’s probably a better idea that will scale in the future.
It’s almost never a good idea to apply a role to a user directly. While there are always corner cases in ServiceNow, it’s likely safe to say that it’s just not a good idea.
Instead, create a group and add the user to that group. Then assign role(s) to that group. This will allow for proper group management down the road. And you’ll never to remember what roles you allocated to a certain user.
Assign Roles To A Group Instead – This Scales
Role Required : admin
Whether you manage your groups locally in ServiceNow or via LDAP (or another centralized 3rd party) – you can attach a role directly to a group.
It is preferred to not manage groups directly in ServiceNow.
But if we are managing group membership in ServiceNow, we need to make sure that we have orchestration and automation in place to write back to Active Directory so both systems are kept in sync.
When you want to properly allocate a role to a group, navigate directly to the group record in ServiceNow. Then out of box, there should be a Related List at the bottom of the form that is titled “Roles”.
Say for example you have a Change Management Approvers group. This would usually be the “approval_user” role. To see what the “approval_user” role granted a user access to, go and check out the related ACL’s connected to that role.
This CAB Group consists of a select group of IT Managers that at times, is changing members because it’s an Active Directory group.
If you have the group in ServiceNow and you assign it a approval role, and the group is managed in Active Directory – then your job is done from a scalability perspective.
For example, to allocate the “approval_user” role to the “CAB Approval” group.
There should be an edit button here, as shown below.

Go ahead and start typing this into the Slush Bucket and find the correct role. Move the role from the left to the right side and Save the form.

At this point, you have taken a role and granted it to all of the group members.
This would specifically mean that at this time, all of the members are inheriting the approval role.
And if a user leaves that group, then they are no longer inheriting the role.
Roles are only granted to the users who are in the group that has the role.
So while this group exists in ServiceNow, you have properly set it up from an access perspective.
What Do You Think About This Article?

[…] If you’d like to better understand how to properly manage users, groups and roles – check out this post. […]
About Team Snowball
ServiceNow – Test Your Connection Speed To Environment
The servicenow priority matrix – impact and urgency.
- ServiceNow Consulting Services
- ServiceNow IT Workflows
- ServiceNow Customer Workflows
- ServiceNow Employee Workflows
- Hyperautomation
- ServiceNow Implementation Services
- ServiceNow Integration Services
- ServiceNow Managed Services
- ServiceNow for Manufacturing Industry
- Digital Transformation In Banking
- Digital Transformation In Insurance
- Digital Transformation in Wealth & Asset Management
- Digital Transformation in Life Sciences
- Digital Transformation in Hospitals
- Digital Transformation for Payers
- Data Migration Utility
- 360 Degree Business Assessment
- ServiceNow Dx Support
- Service Automate
- Rome Release
- Case Studies
- News Events
- Infographic
- Thought Leadership
Handling Assignment Rules in ServiceNow
In ServiceNow, if one is looking for automatic assignments then he can rely on the instance’s ability to assign the tasks automatically to different users and groups depending on the specified conditions. In order to achieve this, ServiceNow has the following modules:
- Assignment Lookup Rules
- Assignment Rules
Assignment Lookup Rules:
This module appears under the ‘System Policy application’ menu. This table is basically generated out of the box as its definition is provided in the ‘Data Lookup Definition’ table in the instance, specifically for field assignments in the incident table. Assignment lookup rules mainly provide the functionality of changing any field value and not just the assignment fields.
Assignment Rules:
This module appears under the ‘System Policy application’ menu. It helps to automatically assign the tasks to a particular user or a particular group using the assigned_to and assignment_group fields respectively, depending on the specified set of conditions. One can define these assignment rules readily for their desired table.
Following are the steps for defining the assignment rule:
- Navigate to System Policy -> Assignment -> New

- From the above figure, one can see that the dot-walking can also be done in the condition builder field. Just select the ‘Show Related Fields’ option in the condition and then select the appropriate attribute.
- Further, in the ‘Assign To’ tab, select the appropriate user and group to whom the task is to be assigned.
If two assignment rules conflict, then the assignment rule with the lowest execution order runs first. The lower the execution order, the higher is the precedence.
Distinguishing Factors between the Data Lookup Rules and Assignment Rules:
Precedence among the assignment rule and business rule:.
In certain circumstances, the business rules gain precedence over the assignment rules.
The business rules and assignments rules run in the following order:
- All the ‘before record insert’ business rules having order less than 1000.
- First and foremost, assignment rule with lowest execution order and matching condition.
- All the ‘before record insert’ business rules having order more than 1000.
- All the ‘after record insert’ business rules.
We are pretty sure that this blog must have given an overview of dealing with Assignment Rules in ServiceNow.
Any comments\suggestions are most welcome. We have posted further blogs as well on other topics and will frequently come back with something innovative.
Share This Story, Choose Your Platform!
ServiceNow: Building Powerful Workflows by Tim Woodruff, Ashish Rudra Srivastava, Martin Wood
Get full access to ServiceNow: Building Powerful Workflows and 60K+ other titles, with a free 10-day trial of O'Reilly.
There are also live events, courses curated by job role, and more.
Setting the Assignment group with Assignment Rules
Assignment Rules are a simpler alternative to Data Lookup. While Data Lookup is very powerful, allowing you to set any field, it does involve a quite a bit of configuration, including creating a new table.
In contrast, an Assignment Rule uses the simpler condition builder to specify when it should run. If it matches, then it'll either populate the Assigned to and Assignment group fields with a hardcoded value, or you can use a script. We have got the group we want to use in a property, so this option is perfect. Follow these steps:
- Name : Assign to External Team
- Table : Maintenance [x_hotel_maintenance] ...
Get ServiceNow: Building Powerful Workflows now with the O’Reilly learning platform.
O’Reilly members experience books, live events, courses curated by job role, and more from O’Reilly and nearly 200 top publishers.
Don’t leave empty-handed
Get Mark Richards’s Software Architecture Patterns ebook to better understand how to design components—and how they should interact.
It’s yours, free.

Check it out now on O’Reilly
Dive in for free with a 10-day trial of the O’Reilly learning platform—then explore all the other resources our members count on to build skills and solve problems every day.

The Now Platform® Washington DC release is live. Watch now!
ServiceNow Community servicenow community
- English (US)
- English (UK)
- Portuguese (Brazilian)
- ServiceNow Community
- Service Management
- Service Management forum
ACL - Restrict Groups by User Roles (Script)
- Subscribe to RSS Feed
- Mark Question as New
- Mark Question as Read
- Float this Question for Current User
- Printer Friendly Page

- Mark as New
- Report Inappropriate Content
03-05-2018 08:07 AM
- All forum topics
- Previous Question
- Next Question

03-05-2018 08:19 AM
03-05-2018 10:29 AM
03-05-2018 07:46 PM

- Update and Delete Entries from MRVS in Service Management forum 4 weeks ago
- Add user to multiple groups after individual manager approval in a workflow in Service Management forum 12-13-2023
- Reference Qualifier with Script Include in List Collector Variable - not returning value in Service Management forum 12-07-2023
- Using group sys id in client script. Want to Convert group sys id into System Properties in Service Management forum 07-22-2023
- How can I restrict a field to accept alphanumeric values - first 2 characters use alphabets? in Service Management forum 02-23-2023

Advance Your Career

What Is A Business Rule In ServiceNow?
Welcome to the complete guide for business rules in ServiceNow! Whether you're new to ServiceNow development or looking to brush up on your knowledge, we've got you covered in the guide below.
Introduction to Business Rules
As a ServiceNow developer, it is important to understand how to create and utilize business rules. You may be given a requirement to automatically close child tasks when a parent record is cancelled, or to create an event that triggers an email notification when a record moves to a certain state. Business rules are one of the tools used to accomplish these things. Business rules allow you to define what happens within ServiceNow when some database action occurs to a record. The use cases for business rules are seemingly endless, which is why it is critical for developers to understand how they work. In this article we will dive into what a business rule is, how to use them, and other helpful tips to help developers unleash the power of the business rule.
What is a Business Rule
Business rules are server-side code that execute in ServiceNow when a specific action is performed on a record. A business rule can be configured to run for one or more of the following database operations: Insert , Update , Query , and Delete . Basically, they are a way for developers to automate what happens to a record when one of the above actions occurs. Business rules don’t necessarily need scripting, however in most cases you will find that scripting is required in order to get the desired results. Business rules have access to many server-side APIs, including the GlideSystem , GlideDateTime , and GlideRecord classes. For developers to use business rules to their full potential, it would be wise to familiarize yourself with these APIs.
NOTES: Insert links to the cheat sheets for GlideSystem, GlideDateTime, GlideRecord is we have them.
“When” to run a Business Rule
A business rule can be configured to run at different “times” in relation to the action performed on the record. This can be achieved using the When field.
The When field is a select box that contains 4 different options: Before , After , Async , and Display . Each business rule is configured with only one of these options. Let’s discuss further what each of these options actually means.
Before business rules will execute after a record is saved/submitted/updated and before a database operation is performed.
After business rules will execute after a record is saved/submitted/updated and after a database operation is performed.
Async business rules work in a similar way to After , however Async rules will execute asynchronously (hence the name) meaning that they will not run immediately after the record is submitted. Rather, ServiceNow will create a scheduled job which will run when the system has bandwidth. Most of the time users will not be able to notice the difference between After and Async, but there are some performance implications to be aware of where sometimes using Async is the better option.
Finally, Display business rules execute before a record is displayed to an end user. Display business rules can be used along with the g_scratchpad object to send data from the server to the client. You could then utilize that g_scratchpad object in a client script (typically an onLoad) to access data that normally would not be available client-side.
The When field works along with the database operations discussed in the previous section to specify exactly when a business rule will execute. One example of this is a business rule can run after a record is inserted or updated. Another example is a business rule that runs before a record is queried . As we can see, there can be only one value for When but you can have multiple database operations selected. Being aware of this will allow you to get the most out of your business rules.
There is one more thing to mention about When. The Advanced checkbox must be selected on the business rule form in order for the When field to be visible. Then you will be able to make changes to the field. If the value for this field is not changed, then the business rule will be a before business rule by default.
Configuring a Business Rule
Now let’s take a look at the business rule form and discuss how to configure it. The following screenshot is a business rule form without the Advanced checkbox selected.

Notice that the When field is not visible, and that there are two tabs available ( When to run and Actions ). The next screenshot shows the form with the Advanced checkbox selected.

With the Advanced checkbox selected there are more options available to configure on the form. On the When to run tab there are two new fields visible: When and Order . There is also a new tab on the form labeled Advanced.
Let’s point out some important fields on the business rule form. Besides Advanced , in the top section we see several fields including Name and Table . It is always a good idea to give your business rule (or anything really in ServiceNow) a name that will indicate what the functionality of the rule is. The Table field defines which table the business rule will execute on.

On the When to run tab we have several key fields for business rules. The majority of these we discussed in detail previously. Here we see the When field which contains the four options of Before , After , Async , and Display .
This business rule is populated with the default value of before. On the right-hand side we see four checkboxes where we can specify the database operations Insert , Update , Query , and/or Delete . As previously mentioned, you can select one or more of these options. Filter Conditions allow you to add more granular conditions to specify when the business rule will run. If you are using a filter condition, it must evaluate to true for the business rule to execute.

The Actions tab has a few useful fields as well, especially if you want to create a business rule that doesn’t use scripting. Set field values allows you to set as many field values as you wish without the use of scripting.
If the Add message checkbox is selected, another field will appear which will allow you to enter a message that will be displayed to the user at the top of the screen when the business rule executes.
The Abort action checkbox is useful if you wish to abort the database operation when the conditions of the business rule are met. This field can be used along with a message to cancel an operation and let the user know why the action was aborted.

The final tab on the business rule form is the Advanced tab. This is where all the scripting for a business rule takes place. In the Condition field you can use JavaScript to define a more complex filter condition for the business rule. Just like the Filter Condition field, the Advanced Condition must evaluate to true for the business rule to execute. This field can also be used along with the Filter Condition field mentioned earlier.
It is important to note that the Filter Condition will be evaluate before the Advanced Condition , and if you are using both, both must evaluate to true for the business rule to run .
The Script field is where you can write code using JavaScript to define the functionality of the business rule. The Script field has access to the current and previous objects. Developers will need to use scripting for any functionality that cannot be achieved using the available fields on the business rule form. We will look at an example of this next.
Business Rule Example
Let’s say we are given the requirement that when a requested item is moved to a state of Closed Incomplete, all the open catalog tasks associated with that requested item should also be closed with a state of Closed Incomplete, and a work note is added to the task stating it was automatically closed. The following example shows how to accomplish this using a business rule.
Business Rule form configuration

The above screenshot shows the conditions for which this business rule will run. As we can see this business rule had been configured to run on the Requested item table with the Advanced checkbox selected. This business rule will execute after a record is inserted or updated. We’ve also added a filter condition where this rule only executes when state the changes to Close incomplete.
Script Field

This screenshot shows the contents of the script field. The script contains a GlideRecord query where we look up all active child catalog tasks for the current requested item that triggered this business rule. Next, we loop through the matching records, set the state of the catalog task to Closed incomplete, and add a message in the work notes.
It is important to take note of the line that contains grTask.update() . The update() method is needed whenever you are updating records that are NOT the record that fired the business rule. If you forget to do this, the intended updates to the other records will not happen.
Some Business Rule Best Practices
There are several best practices around business rules. One best practice to keep in mind is to avoid using Before business rules when updating records on a different table. In the example above, our script was updating catalog task records when a change occurred on the requested item table. If this was a Before business rule, ServiceNow would have updated the child records (catalog task) before the parent (requested item) was submitted to the database. Sometimes this can cause issues. Once the current (requested item) record is updated, there may be other rules triggered that effect the same child (catalog tasks) records. This can yield unexpected (and confusing) results such as looking like your code never executed when it actually did but was overridden by some other rule. It’s always a good idea to use an After business rule when making changes to records a table besides the current one.
Another best practice is do NOT use current.update() in a business rule script. This should be avoided as it is not necessary and can cause issues in the system. A scenario where developers typically think they need this is in a Before business rule to commit the updates to the current record in a script. However, the current record will be updated automatically when the business rule executes, making current.update() redundant. Additionally, depending on the type of business rule configured, using current.update() could create an infinite loop, generate errors in the system, and cause other sorts of performance issues. Simply do not use current.update() in any business rule and you’ll be fine.
One last thing to note - if you notice that your business rule isn't triggering, this may be due to a script using setWorkflow . If there is another script using setWorkflow(false), then it could be preventing your business rule from running.
Configuring business rules is an essential skill for a ServiceNow developer. This article touched upon the basics in order to get you started. There are countless use cases and topics for business rules to add to your developer toolkit. As always, we encourage you to continue learning and expand your knowledge. Happy coding!
Looking for something else? Check out our other posts below!
- GlideRecord Cheat Sheet
- Release / Version Cheat Sheet
- Exam Study Guides
- How To Export Your Favorites (before a clone)
How To Script In Flow Designer
- How To Call A Script Include From A UI Action
- How To Call A Script Include From A Business Rule
- What Is A Client Script In ServiceNow?
Interested in making more money as a ServiceNow developer? We're here to help. We're launching a set of courses, 1:1 mentorship and a community to help you increase your earnings.
To learn more, sign up here: make more money as a servicenow developer.

How To Get Certified In ServiceNow

How To Move Updates Between Update Sets In ServiceNow

How To Add A Hyperlink To A Notification In ServiceNow
.jpg)
How To Dot-Walk Inside of a Client Script in ServiceNow

What Is A UI Policy In ServiceNow
© Snowycode 2022. All rights reserved.
Your browser or one of your plugins is not allowing JavaScript to be run. This is a bummer since the ServiceNow Developers Site is dynamic and depends on JavaScript to function. If you want to visit this site, please disable the plugin, activate this site for JavaScript or use another browser.
Declarative Actions in ServiceNow: The COMPLETE Guide
Declarative Actions (DA’s for short) have been around for quite a while now. Although trusty UI Actions are still going strong, and apply across all interfaces – including Next Experience-based ones, Declarative Actions are much more flexible, powerful, and can be used in many additional locations in Next Experience-based interfaces.
I’ve often found DA’s a little confusing. Part of this comes from that flexibility and power, but part also probably comes from the fact that they were originally created circa the Orlando release and originally designed for use with the legacy Agent Workspace. Since then though they have grown to primarily support and work with new Next Experience-based interfaces.
This article focuses exclusively on Declarative Actions as they work with new Next Experience-based interfaces; think anything created or editable in UI Builder – like CSM Configurable Workspace, or Service Operations Workspace.
There are a few tables and other aspects of DA’s that apply only to the legacy Agent Workspace. I have intentionally omitted these for simplicity as it is unlikely going forward you’ll need to do much with these.
With more-and-more Next Experience-based UI’s being released, I decided recently to deep-dive into DA’s to fully understand how they work, and to be able to share my learnings. Although there are a lot of guides out there, there was nothing totally comprehensive which entirely completed the puzzle for me. I hope this article will complete the puzzle for you.
Declarative Action Basics
What are declarative actions.
Think of Declarative Actions as an upgrade to UI Actions .
UI Actions have been around forever in ServiceNow and let users perform actions from lists and forms. Furthermore, they allow developers and admins to define new actions so they can tailor the way that out-of-box lists and forms work without editing their UI code.
Historically, ServiceNow was all about lists and forms in the Core UI. That meant users mainly interacted with lists of records – like a list of incidents. When the user clicked on a record in a list they were taken to a detailed form view of that record. UI Actions were designed for UI’s based around this paradigm. There was also the occasional “workbench” interface, however those were entirely bespoke and rigid and didn’t offer a standard way to add elements to the interface.
Admins could add UI Actions to the top or bottom of a form, and adjust how they’re presented to users – for example, as a link, or within a menu. They could also do the same at the top or bottom of a list, and have users take action on many records at a time.

But things are changing. There are many new Next Experience-based UIs like Workspaces, Playbooks, and Catalog Wizards. Plus, users can build their own custom Next Experience-based UIs. UI Actions don’t work well with these new types of UIs because they’re so heavily based around the concept of lists and forms.
That’s where Declarative Actions come in. They’re more flexible and work with any style of UI, whether it be a list, or a form, or a playbook, or a catalog wizard. They are the future of performing actions in ServiceNow.
It’s important to stress though that UI Actions still have their place. While you can do everything that UI Actions do with Declarative Actions in Next Experience-based UI’s, Declarative Actions don’t work in the Core UI.
This means for example if you want to create an “Assign to Me” button on the Incident incident table, if you did that with Declarative Actions that button would only appear when viewed through a Next Experience-based UI – it wouldn’t appear in the Core UI.
This might be fine – your users might solely be using the Next Experience-based UI, and will never use the Core UI. However if you want parity of functionality between the two interfaces, it’s still worth leveraging UI Actions, and they can work in harmony on lists and forms. Some Next Experience components like the Action Bar have functionality to display UI Actions alongside Declarative Actions.
What Types Are There?
While UI Actions only support lists and forms, DA’s are designed with much more flexibility and thus can support many places in the interface that one may want to add actions to.
As of writing the following DA types exist, which display in the areas of the interface as noted.
When developers at ServiceNow are building out-of-box components they can enable them to support DA’s. This means that as new components and interfaces are developed and released there is the possibility that even more types will become available.
In most cases there’s a 1-to-1 relationship between a component which supports DA’s, and a DA type. For example, List -type DA’s always appear in the List component. However there are other cases where a single component supports multiple different types of DA. For example the Playbook component can have Playbook , Playbook Stage and Playbook Card -type DA’s appear in it.
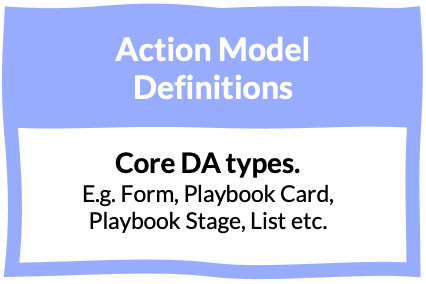
Each of these different types of a DA can be found in the Action Model Definitions sys_declarative_action_model_definition table.
What Can They Do?
Executing a DA is usually done by clicking on it – for example, clicking on a button. What path the execution of a DA follows when it is executed is referred to as how it is “implemented”.
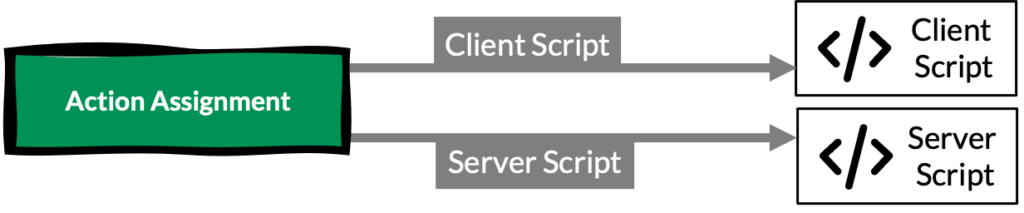
There are three different ways a DA can be implemented in Next Experience-based interfaces:
- Client Script – to execute a UI Action-style script on the client-side .
- Server Script – to execute a UI Action-style script on the server-side .
- UXF Client Action – to dispatch an action in a Next Experience-based UI for handling by an event handler in UI Builder.
There are other ways a DA can be implemented, however they are only relevant to the legacy Agent Workspace interface and so I’ve intentionally omitted them from this article
An example scenario of a DA implemented as a Client Script might be where you want some kind of browser action to be performed – like each of the items selected in a list to be opened in a new browser tab, a web request to be made to determine a value for a field, or some kind of interaction with the GlideForm or GlideList API’s.
An example scenario for a DA implemented as a Server Script on the other hand might be where you want to add an “Approve” button at the top of a form to update a related approval record. Because it’s a related record you’re updating, the GlideForm API won’t really be useful (as it only knows about the current record). This action requires some additional queries of the approval table, and that is usually best done on the server-side.
The Server Script and Client Script implementation types should be very familiar and easy to understand coming from the world of UI Actions. Similar to UI Actions, deciding whether to choose to implement your DA as a Server Script or a Client Script is really up to you and the considerations of your use case.
DA’s implemented as a UXF Client Action however are very different to the world of UI Actions. What can be done with these is very much down to the page that they are appearing on as they simply dispatch actions with a payload, and those actions need to be handled by the UI Builder page itself.
For example, a record page might have an event handler on it to support opening a record’s form in a sub-tab, or in a modal dialog. An extreme example might be a podcast player page that has an event listener to allow a specified audio file to be started playing from a certain point. It’s really up to what the page and it’s event handlers allow to be done – and don’t worry, I’ll be covering event handlers later in this article.
It’s worth noting that although the execution of a Client Script and UXF Client Action starts on the client-side, that doesn’t mean they can’t trigger something to happen on the server-side as well. This could be done in a Client Script through a GlideAJAX request, or in a UXF Client Action through the event hander triggering the execution or refresh of a data resource.
Who Creates Them?
There are three different personas that have a role in the creation of Declarative Actions and determining what they have the capacity to do.
Component Author
Developers at ServiceNow create the components that DA’s can be presented inside. They also determine what type of DA’s will show up in their components (creating new Action Model Definitions if necessary), and what contextual data can be passed along from the component to the DA. Let’s call this persona the Component Author .
Page Author
Whether they be the developers of ServiceNow, or partners, or customers, the Page Author persona creates pages in UI Builder that leverage DA-enabled components. For example, a Page Author might create a record page that has the Action Bar component on it, which hosts Form -type DA’s.
The Page Author will also build into their pages capabilities that they want to allow be triggered by DA’s implemented as UXF Client Actions . For example, they can ensure an event handler is setup on their page so that DA’s can trigger a modal to open, or for a specific tab in the sidebar to be selected, or a specified audio file to start playing.
For those capabilities they build into the page they also know exactly what data is required by them. In the case of the modal, perhaps they built some kind of behaviour to automatically close the modal after a set number of seconds and they want to allow DA’s to specify that timeout value. The Page Author can create payload records to do this, which will help Declarative Action Authors by giving them a template to start from when defining the data that will be provided by their Declarative Action – and don’t worry, I’ll be covering payloads later in this article.
Declarative Action Author
As with UI Actions, the whole point of Declarative Actions is to allow additional functionality to be added by developers and admins without requiring they edit the code of the UI itself. This means developers and admins shouldn’t need to make changes to a page to be able to add actions to it. Making changes to a page not only requires edit access (which even admins may not have the rights to) but also makes upgrades harder, and so this architecture principle of Declarative Actions is a good one.
When developers and admins are defining DA’s and placing them on specific parts of the UI, they are taking on the role of the Declarative Action Author .
The Page Author and the Declarative Action Author may in some cases actually be the same person. For example, what’s the point of a Page Author creating a record page with no actions able to be performed on it out-of-box? They will likely of course want to create some DA’s that come out-of-box with their page (such as a “Save” button). In this case they will be performing the role of both the Page Author and the Declarative Action Author .
However, later on another developer or admin can come along and take on just the role of Declarative Action Author by adding their own Declarative Actions to that page – without requiring the page to be edited and therefore not requiring taking on the role of a Page Author as well.
For DA’s implemented as a UXF Client Script , what the Declarative Action Author can do is limited by what the Page Author has already done on the page. For example, the Declarative Action Author cannot create a DA which performs an action if the Page Author hasn’t created a page which allows for that action to happen.
Giving Declarative Actions Context
A Declarative Action being provided with context is critical to ensure that it can perform useful operations. For example, in the earlier scenario of an “Open in new tab” button at the top of a list, what use would it be if it didn’t know which of the items in the list were selected?
In the case of a DA implemented as a Server Script or Client Script , this context is provided to those scripts in the same ways that UI Actions are – via the current object (and in some situations the parent object) in the case of a Server Script , or the GlideForm and GlideList API’s in the case of a Client Script .
However on the client-side, DA’s have a lot of additional functionality when it comes to context. This makes sense because the GlideList and GlideForm API’s are predictably very list and form based API’s, and additional context is needed with the expanded types such as Playbook Card or EVAM that DA’s offer.
Each DA type has different contextual data that can be provided to it on the client-side. It makes sense that a List -type DA would be provided with context about what records in the list are selected, but it doesn’t make sense that a Form -type DA would be given that same context.
Some other examples of useful context:
- A Field -type DA appears as a button next to a field. The name of the field, its current value, and the table and sys ID of the record that the user is viewing that field on would all be useful contextual data to have.
- A Playbook Card -type DA can appear as a button at the bottom of a card that represents an activity in a process. The name of the activity, the associated record’s table and sys ID, and the status of the activity would all be useful contextual data to have.
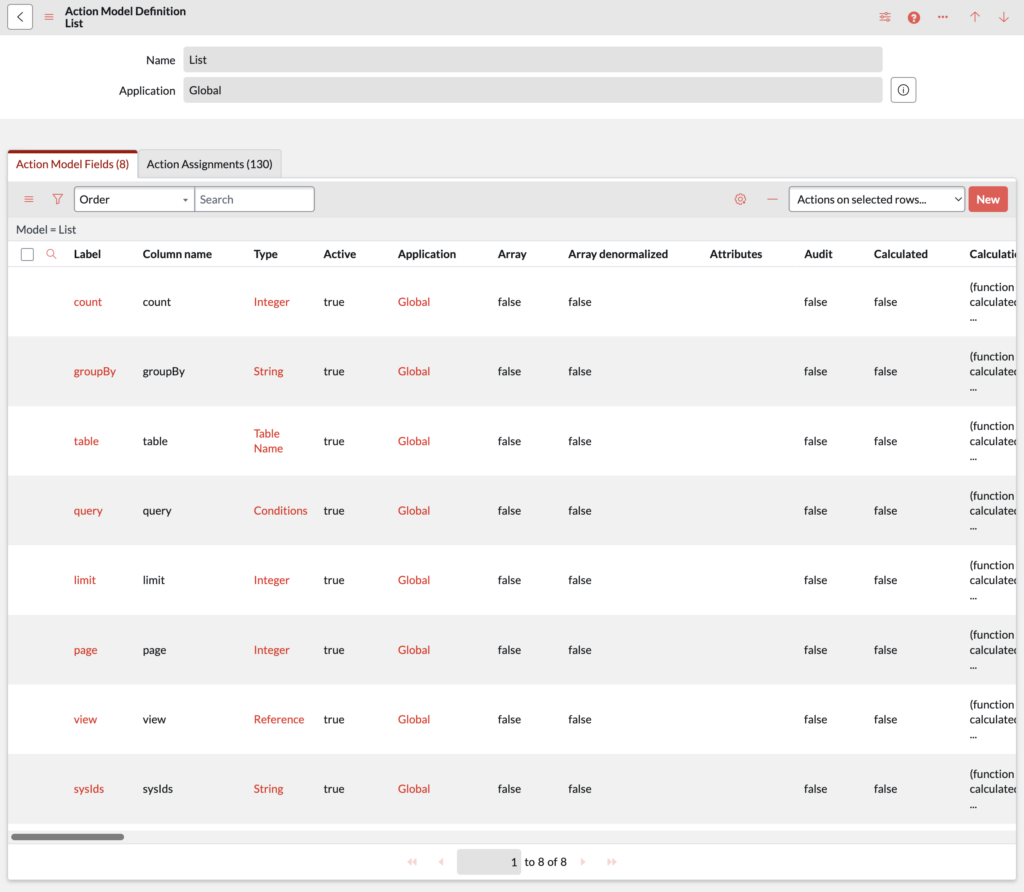
Definitions of this contextual data are stored in the Action Model Fields sys_declarative_action_model_field table, which is directly related to the previously mentioned Action Model Definitions table that stores the core DA types.
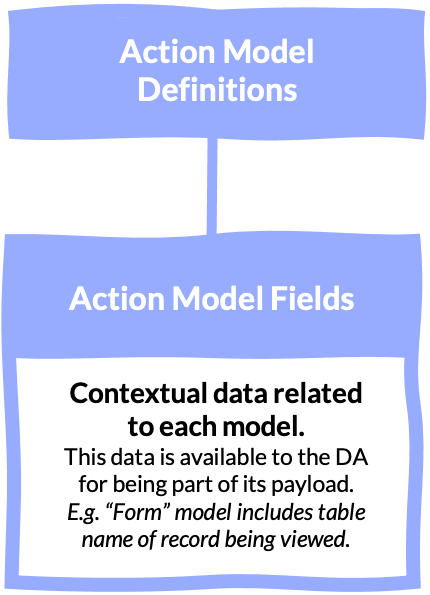
The Action Model Fields table is also shown as a related list on the Action Model Definition form, allowing you to see exactly what contextual data is available to each DA type.
It’s important to understand that this additional contextual data is not available to the “script” fields of DA’s implemented as a Client Script or Server Script . These both operate in the same way as UI Actions, with context supplied through current (and in some situations parent ) on the server-side, and GlideList and GlideForm API’s on the client-side.
However the additional contextual data is available to the Client Conditions and Scripted Client Conditions fields of all DA’s regardless of how they are implemented, so it certainly can have some use for all implementation types. It’s primarily useful for DA’s implemented as a UXF Client Action though as you will see later on in this article.
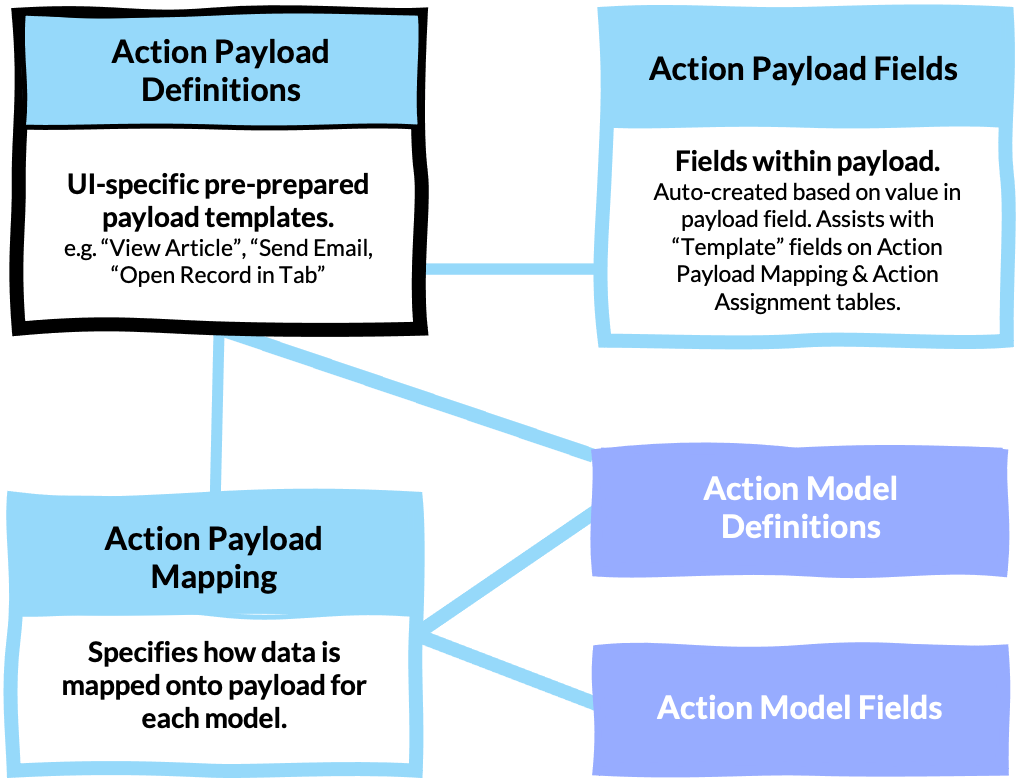
Pre-Prepared Payloads
As mentioned earlier, a task that the Page Author needs to do when creating a page in UI Builder is to hook up event handlers to determine what capabilities the page has that Declarative Action Authors can leverage for their DA’s which are implemented as a UXF Client Action . I’ll cover later in this article how this is done, however what these actions are is of course not static across all pages but is instead determined by the page itself and what its purpose is.
Some examples might be that a record page requires the ability to open another record in a sub-tab, or open a modal, and for an extreme example a podcast player page would need the ability to start an audio file playing.
Each of these different actions that can be performed on the page requires different data to be sent to it. Navigating to another record would require the table name and the sys ID of the record to navigate to. For an action that plays an audio file, you’d probably need to supply the URL of the audio file, and perhaps a timecode for where in the audio file to start playing from.
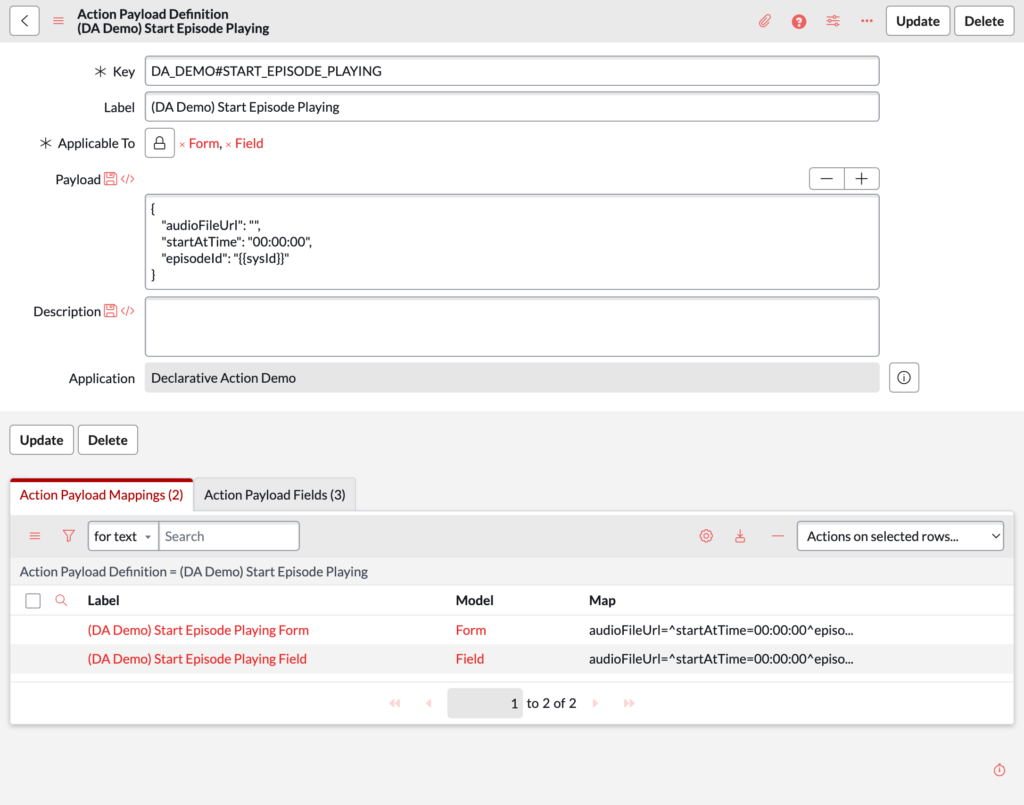
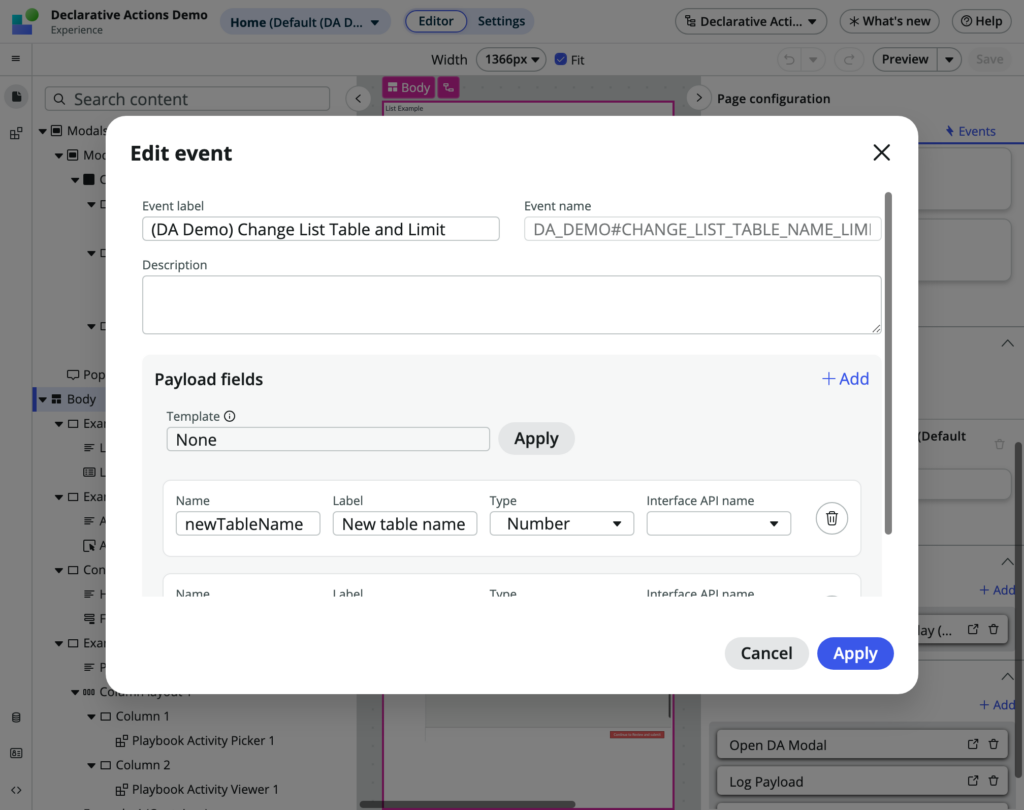
Because these actions on a page are defined and controlled by the Page Author , that persona is also best placed to create Action Payload Definitions sys_declarative_action_payload_definition . These are essentially pre-prepared templates of the data that’s expected to be sent to the event handler on the UI Builder page. It’s in this table that you define the models that the payload supports, as well as a template of the payload in JSON object format.
For example, in the scenario where a Page Author is creating a podcast player page, the action which plays the audio file might have in the payload field of its Action Payload Definition the following:
The purpose of each of the properties here should be self-explanatory based on their name, however their values are worth noting.
- The audioFileUrl property has an empty value, meaning that unless the Declarative Action Author overrides it when they use this payload, this property on the payload will be an empty string.
- The startAtTime has a value of 00:00:00 . This will be the default value, but again the Declarative Action Author can override it if they want to.
- The episodeId property has a value of {{sysId}} . Being in double-curly braces makes this a placeholder for contextual data from the DA type. For example, a Form -type DA has an Action Model Field with the name sysId , so if this payload were used in a DA in the Action Bar this placeholder would be replaced by the sys ID of the record being viewed. Again, this will just be the default value and it can be overridden by the Declarative Action Author if they want.
You will notice various Action Model Field records of type “Data Object” and “JSON”. An example of these is variables on the Catalog Wizard type, and currentUser on the Form type. These you are able to dot-walk with, so for example if you had a variable called ordered_by appearing in the catalog wizard, you could access it by using the {{variables.ordered_by}} placeholder.
Upon creating an Action Payload Definition record, the different properties of the JSON in the payload field will be automatically extracted and for each of them a record in the Action Payload Fields sys_declarative_action_payload_field table will be created.

This table can mostly be ignored as it is used simply to power interfaces you’ll see later on to override the template values within the JSON template when a Declarative Action Author is actually creating a DA.
For each model the payload supports, a record in the Action Payload Mapping sys_declarative_action_payload_mapping table will also be created.
Again, this table can be ignored as it doesn’t seem to serve any purpose other than perhaps assisting with the back-end functioning of the DA configuration and runtime behaviour of which Page Authors and Declarative Action Authors do not need to be concerned with.
Creating & Assigning Declarative Actions
The core table at the heart of the Declarative Actions concept is the Action Assignment sys_declarative_action_assignment table. This is the place that Declarative Action Authors will create actual DA’s and set their core attributes such as:
- The model of the DA – i.e. the type of their DA e.g Form , Field , Playbook Card etc.
- The label – i.e. what text appears on the button.
- The conditions for it appearing – what types of records should it appear on, for which roles.
- How it is implemented – i.e. Client Script , Server Script , or UXF Client Action .
The table name Action Assignment being the place to create DA’s may be a little confusing, especially since there’s an Action Definitions sys_declarative_action_definition table and the term “definitions” is used elsewhere in the DA data model to be the place where you create/define things.
However, this Action Definitions table is only relevant to how DA’s appear in the legacy Agent Workspace and is not involved in any way for Next Experience-based interfaces so it is safe to ignore it and consider the Action Assignment table as being the core table for creating/defining DA’s.
For Vancouver-and-earlier releases of ServiceNow it’s important to never visit the Action Assignment table directly when creating new DA’s. This is because the Model field on the Action Assignment form (where the type of DA is set) is hidden by default and set automatically depending on the module and list you navigated to the form through.
When creating a DA you should thus navigate to the table via the relevant module in the Application Navigator for that type and then press the New button on that list. These are as follows:
Depending on the type of DA and how it is implemented, there will be various additional things to configure via this record. For example, for Field -type DA’s, what types of fields or specific fields should it appear on and what icon should appear on the button? For DA’s implemented as a UXF Client Action , what is the Action Payload Definition that should be dispatched when the button is pressed?
Furthermore, in addition to the configuration options directly on the Action Assignment record there are also a number of related tables that that control how and under what scenarios a DA of certain types appear & behave.
These supplementary tables only really need to be worried about if you are dealing with a DA of the relevant types listed in the table above. Each of them have their own use case related configuration, for example for the UX Form Layout-related tables these allow UI Actions and Declarative Actions to be positioned alongside each other, and control the visibility of these items for different users and groups.

Handling the Action
Now that we’ve covered what needs to be done to get a Declarative Action to display, the equally important task of course is setting what happens when the Declarative Action is triggered. As previously mentioned, the “Implemented as” field of the Action Assignment record will determine this, but let’s go into detail on how the different implementation methods work in further detail.
Client Script & Server Script
Selecting that a DA is implemented as a Client Script or Server Script will reveal the relevant script field on the form. The scripting environment here is almost exactly like the relevant UI Action type, with context supplied through current (and in some situations parent ) on the server-side, and GlideList and GlideForm API’s on the client-side.
This is quite a simple concept, as triggering the Declarative Action just runs a script, and that script operates in a way that anyone used to server-side and client-side UI Actions should be familiar with.
UXF Client Action
A much more new concept though is the way that a DA that’s implemented as a UXF Client Action works.
The Action Payload Definition selected on the Action Assignment record via its Specify client action field will generate the structure of the JSON payload of the action. Let’s reuse the example from before of the action that plays an audio file:
The default values of that payload will be used, and any placeholders will be replaced with the contextual data of the Action Model Field with that name for the relevant Action Model Definition .
For example, if we used that Action Payload Definition for a DA appearing in an Action Bar component, it might end up like this:
Notice that the {{sysId}} placeholder has been replaced by the actual sys ID of the record.
With the payload generated, it can be overridden on a per- Action Assignment basis using the Payload Map field on the Action Assignment record.
For example, we could select audioFileUrl from the dropdown, and set its value to be the URL of an MP3 file, and do the same for startAtTime and set its value to be 00:01:00 .
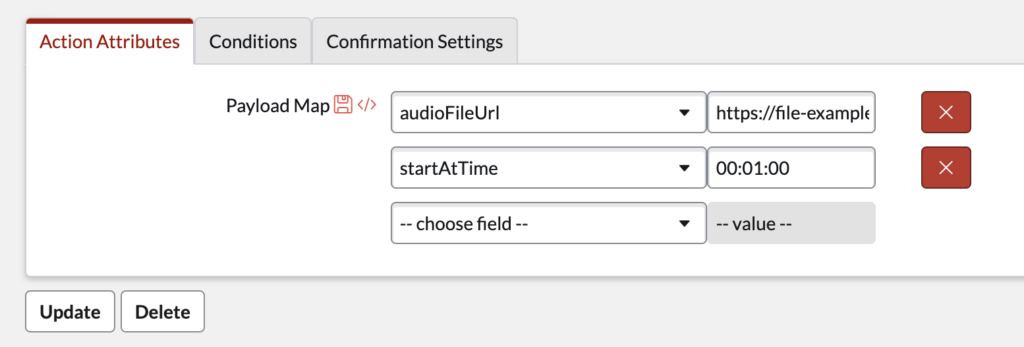
Doing so would give us a payload like this:
Notice that the episodeId property is still on the JSON. This is because the Payload Map field is overriding the values, rather than creating a whole new payload.
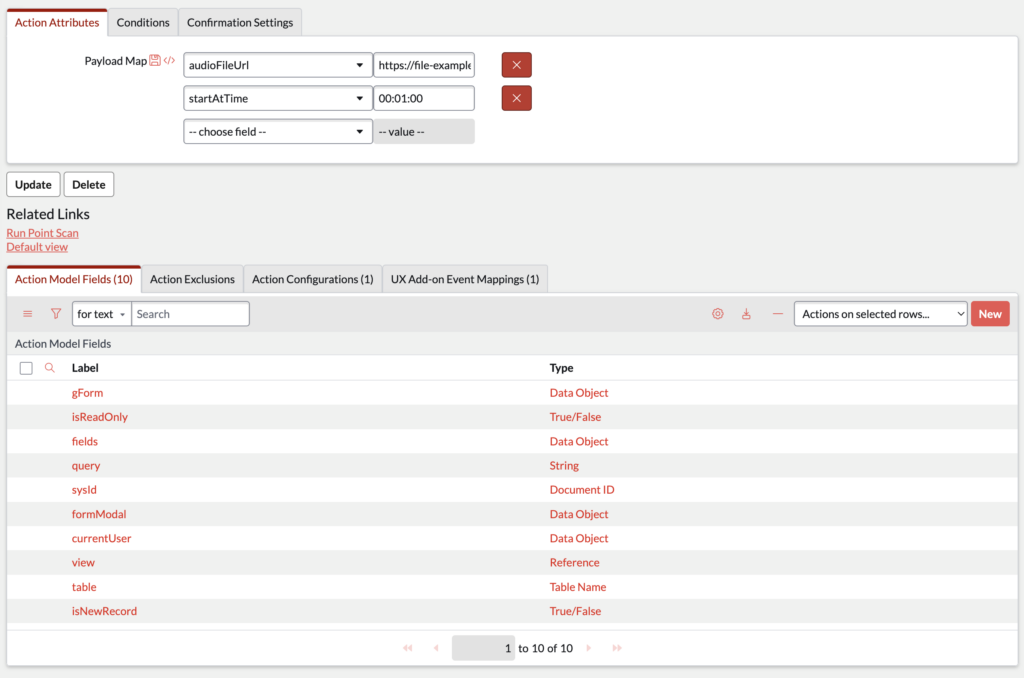
We also have still have access to the values from the Action Model Fields in the Payload Map here too, and we can use the same double-curly bracket notation to refer to these fields, for example: {{isNewRecord}} . Helpfully, the Action Model Fields available for that particular DA type will be shown in a related list at the bottom of the form, allowing easy reference to the contextual data available when using double-curly brackets.
To illustrate how this payload is built you can refer to the following diagram:

Add-on Event Mappings
So where does the payload actually go? How does it influence and cause something to actually happen on a Next Experience-based interface like a specific modal dialog appearing, or a specific audio file to start playing at a specific point. That’s where the UX Add-on Event Mapping sys_ux_addon_event_mapping table comes in.
UX Add-on Event Mapping records are for a Declarative Action Author to explicitly say that for a certain instance of a component on a specific variant of a page, which of the handled events on a that page should be dispatched when a specific Declarative Action is triggered.
There are 5 fields on this table that are crucial for these records:
- Source Declarative Action – the Declarative Action being being triggered (i.e. the Action Assignment ).

- Target Payload Mapping – instructions for how the payload of the Declarative Action is mapped onto the properties of the handled event on the page. For example, the payload’s episodeId property might be mapped onto the idOfEpisodeToPlay property of the handled event being targeted.
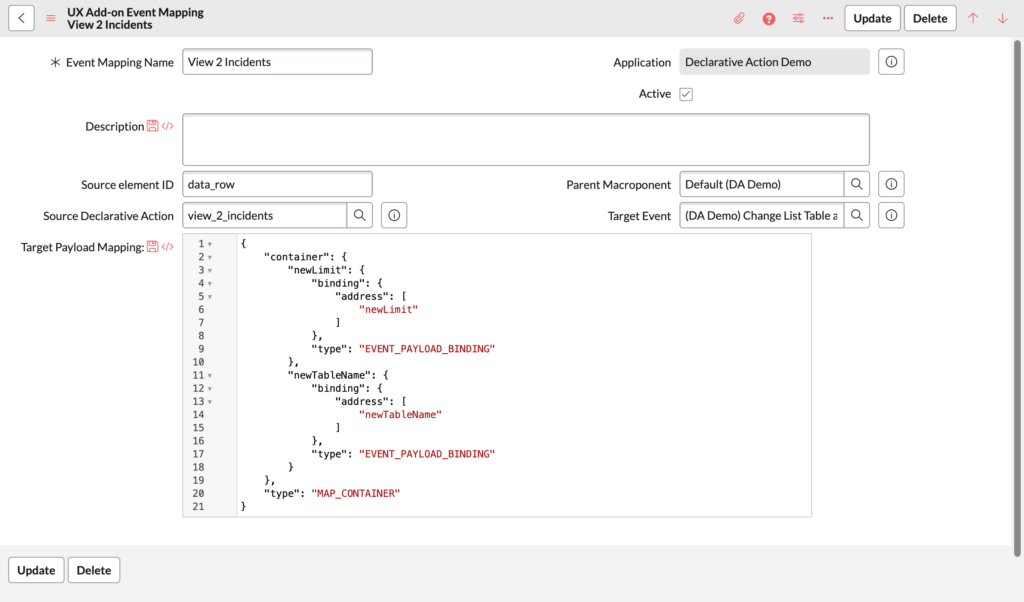
While the first 4 fields are pretty easy to understand, the Target Payload Mapping field looks a little scary, right? Thankfully, in UI Builder there’s a UI that assists with creating and modifying UX Add-on Event Mapping records.
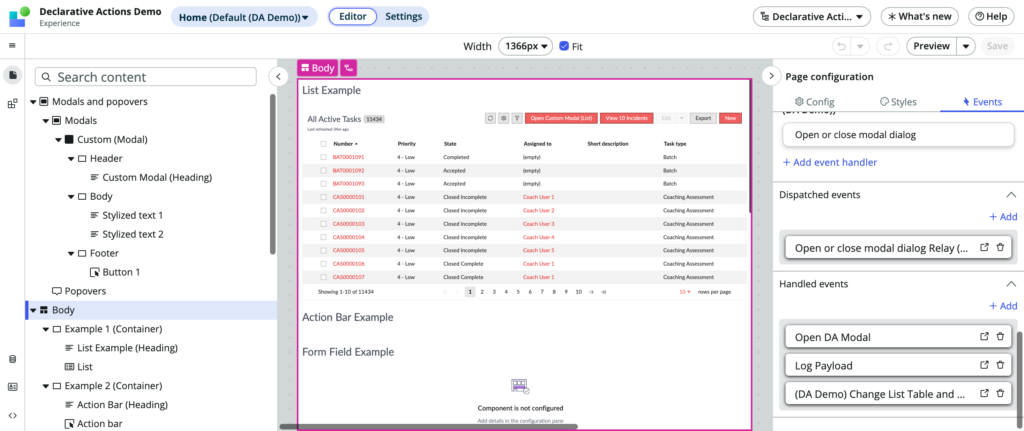
If you open the page that you want to hook your Declarative Action up to you can select from the content panel the e.g. a List component, and then in the configuration panel on the Config tab, at the bottom you’ll see a link labelled Configure declarative action mappings .
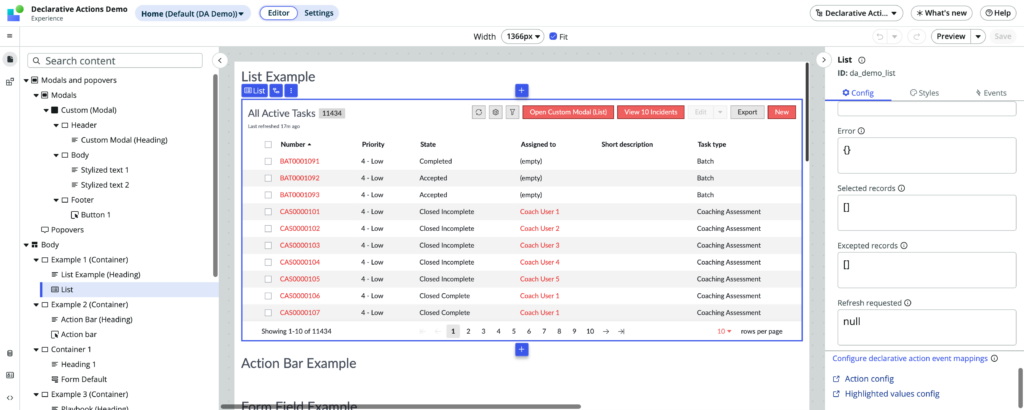
When you click it, a modal dialog will appear allowing you to create and edit UX Add-on Event Mapping records.
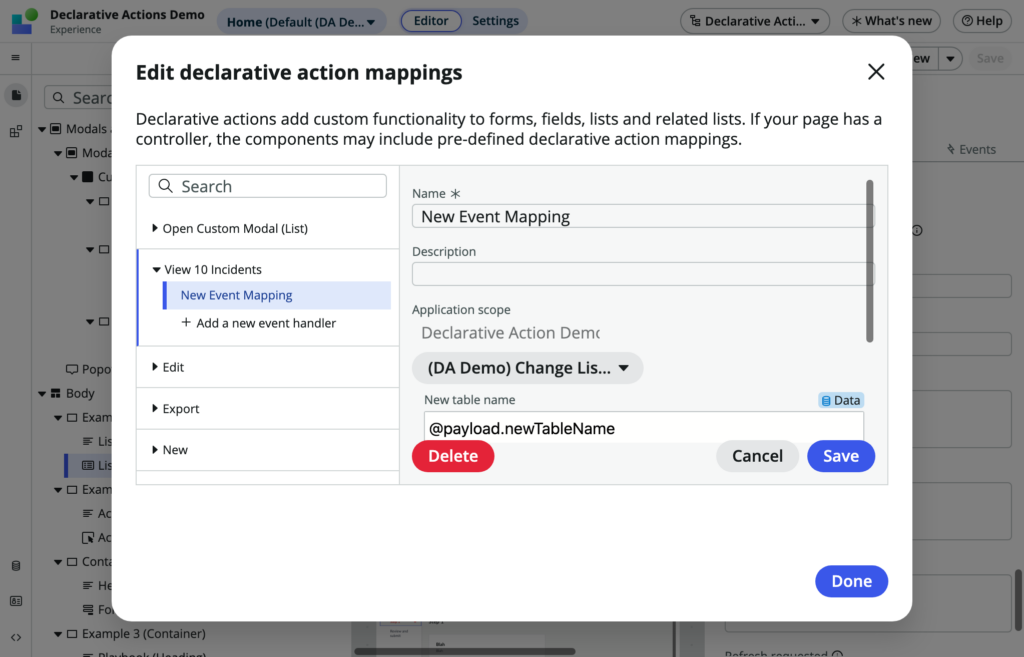
Because you’re on a specific page, and you clicked a specific component on it, that informs the values of the Parent Macroponent and Source element ID fields. The panel on the left lets you see which Declarative Actions could be dispatched by this component, and allows you to choose the relevant one to be the Source Declarative Action .
The dropdown in the middle allows you to select which handled event of the page is the Target event , and finally the fields below that allow you to use a regular UI Builder binding scheme to easily create the JSON that will be put into the Target Payload Mapping field. For example, to map a payload’s episodeId property onto an idOfEpisodeToPlay property of a target handled event, you would see a field here called something like “ID of Episode to Play” (or whatever the label of the idOfEpisodeToPlay property is) and you would set that to @payload.episodeId – @payload in this case is referring to the payload of the Declarative Action.
Handled Events
While the Declarative Action Author is creating Declarative Actions and mapping those actions to handled events on the page, the Page Author is responsible for the page itself, what events it handles, and what happens when those handled events occur.
UX Add-on Event Mapping records can only be associated with events that are listed in the Handled Events field of the macroponent of the page variant. This can be viewed from the UX Macroponent Definition record itself:
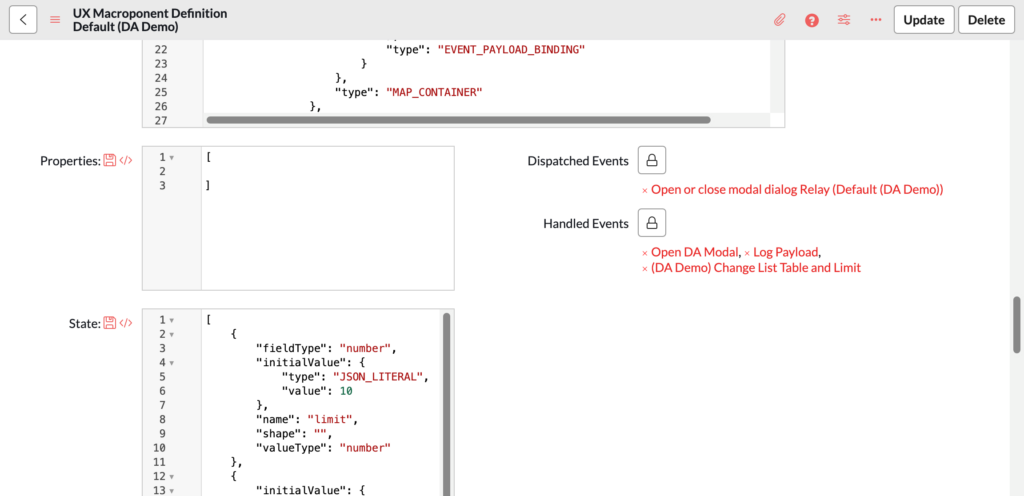
Handled events are UX Event sys_ux_event records and can be created directly in that table themselves, then manually associated with the page via this Handled Events field.
Handled events can also be viewed directly in UI Builder by selecting Body from the content panel , and in the Events tab of the configuration panel scrolling to the bottom to see the Handled events section:
From the Handled events section you can edit existing handled events, or define new handled events.
The above creates and/or associates a handled event with the page, and once that’s done the Page Author can specify what happens when those handled events occur.
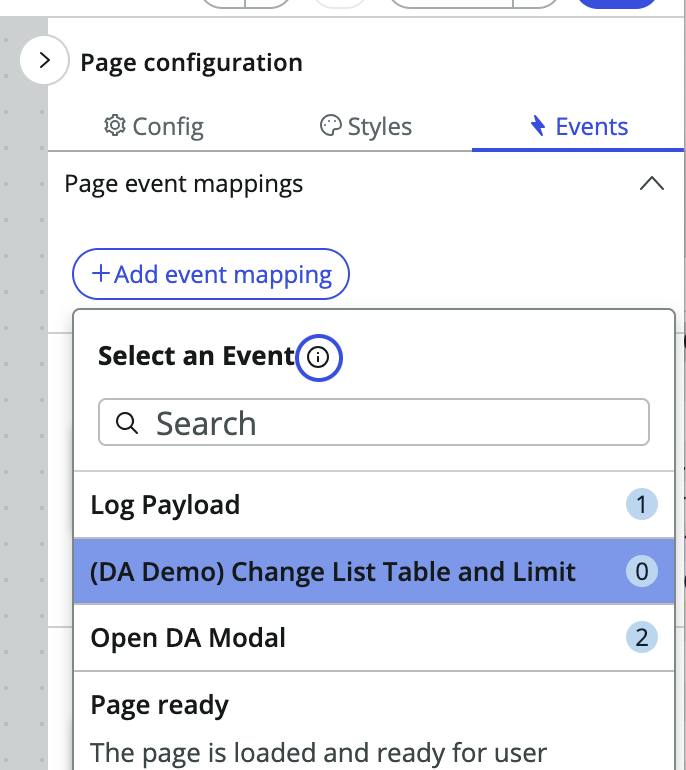
Scrolling to the top of the Events tab of the configuration panel , with the handled event now associated with the page we will be able to create event mappings for it. If we click the + Add event mapping button the handled event will appear in the dropdown list.
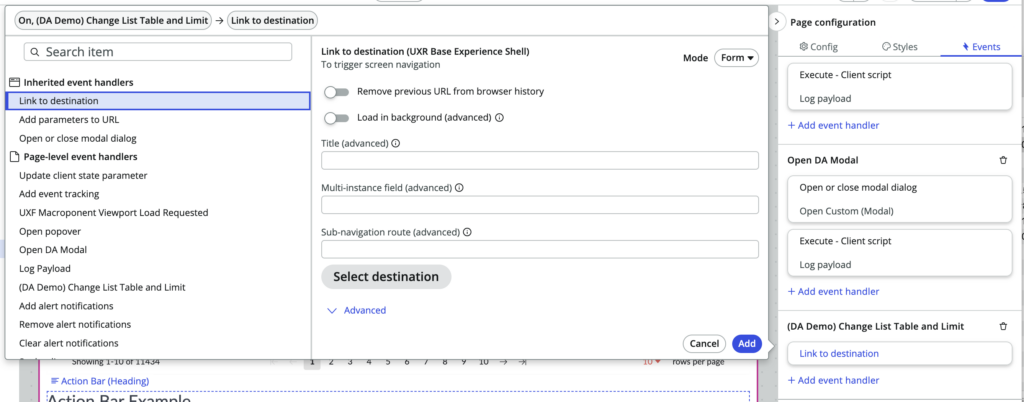
Clicking it will make that event appear in its own section, and we can click the Add event handler link to open up the event mapping dialog to do things like link to a particular destination, open a modal, perform operations on a data resource, or anything else that can be done in UI Builder via events.
To illustrate the way this is set up, please refer to the following diagram:
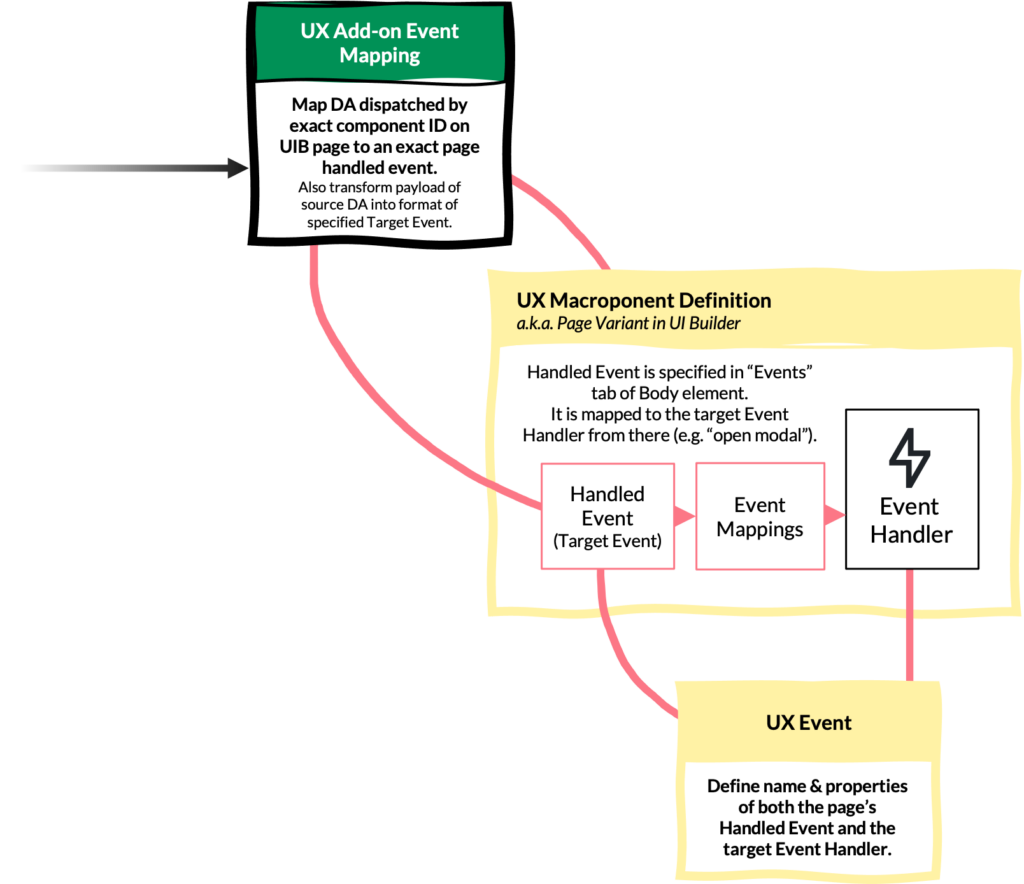
As mentioned in the section about personas, a Page Author is likely to be creating these event mappings on the page first – e.g. open a modal dialog, or start playing an audio file. Then at a later date a Declarative Action Author will come along and create their Declarative Actions, and map them to the handled events of the page.
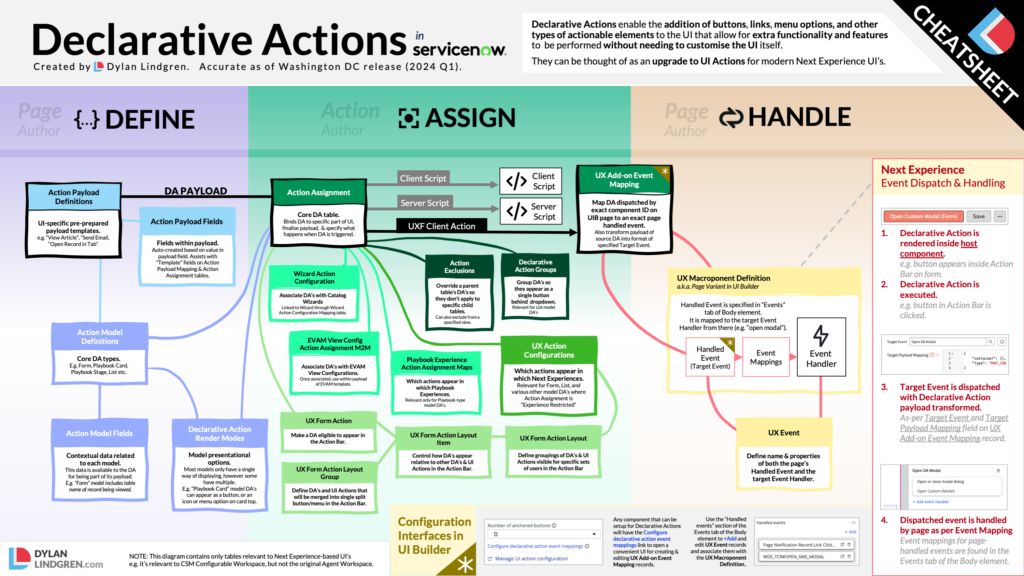
Declarative Action Cheatsheet
Instead of having to read this article every time you want a refresher on Declarative Actions in ServiceNow, I created this handy single page cheatsheet to describe what the purpose of each table is, its relationship to other tables, and the general persona responsibilities for the tables. It also covers some tips on event dispatch and handling, and the configuration interfaces available in UI Builder.
Sample Application
I’ve published a sample application to Github to show examples of what these various Declarative Actions look like when setup. You can find it on Github at dylanlindgren/declarative-actions-demo . If you fork the repo into your own Github account you will be able to import the fork of the repo into your instance using ServiceNow Studio .
I hope this article has helped you to understand Declarative Actions in ServiceNow.
Please leave a comment below if you have any feedback on this article, and follow me on X at x.com/dylanlindgren to keep in touch!
COMMENTS
Loading... Loading...
Loading... Loading...
Create an assignment data lookup rule - Product Documentation: Vancouver - Now Support Portal.
Contact us: https://www.facebook.com/SNow-Knowledge-154868872024336/1. What is Assignment Rule?2. Use cases with live demonstration.
If you want to support me then by me a coffee- https://www.buymeacoffee.com/saaswnowThis is ITSM Implementation Mock Training. In this tutorial you will lear...
When you want to properly allocate a role to a group, navigate directly to the group record in ServiceNow. Then out of box, there should be a Related List at the bottom of the form that is titled "Roles". Say for example you have a Change Management Approvers group. This would usually be the "approval_user" role.
One can define these assignment rules readily for their desired table. Following are the steps for defining the assignment rule: Navigate to System Policy -> Assignment -> New. Fill in the appropriate details. The below figure is for reference: From the above figure, one can see that the dot-walking can also be done in the condition builder field.
The core platform team is responsible for the day-to-day management and maintenance of the Now Platform. This team provides overall strategic direction, ongoing administration, and extends ServiceNow as a strategic platform across the business. Here is a list of our recommended roles and responsibilities (there may be others not listed here).
How search works: Punctuation and capital letters are ignored. Special characters like underscores (_) are removed. Known synonyms are applied. The most relevant topics (based on weighting and matching to search terms) are listed first in search results.
If it matches, then it'll either populate the Assigned to and Assignment group fields with a hardcoded value, or you can use a script. We have got the group we want to use in a property, so this option is perfect. Follow these steps: Navigate to System Policy > Rules > Assignment, and click on New. Use the following values, and Save.
I have a requirement where I need to restrict the Assignment Groups by Roles. For example, a fulfiller has the role " Field Services ", when he/she edit the Assignment Groups field in an Incident or Requested Item, only groups with this "Field Services" role will be listed. As far as I know the better (safer) way to do it is with ACL.
Viewing Roles in the App Dashboard. In the Security section of the App Home tab, each role appears on its own card. In the example, there are three roles for the Suggestion Box application: sb_admin, sb_reviewer, and sb_suggester.Click a role's card to open the role for editing in a new App Engine Studio tab.
With the Advanced checkbox selected there are more options available to configure on the form. On the When to run tab there are two new fields visible: When and Order.There is also a new tab on the form labeled Advanced.. Let's point out some important fields on the business rule form. Besides Advanced, in the top section we see several fields including Name and Table.
Here is a video on task assignment rules, data lookup rules, and the order of their execution in ServiceNow.📒 ServiceNow CSA Exam Guide 2022 - https://bit.l...
The following steps provide examples showing how this example can be improved to prevent the Client Script from running unnecessary code. Covered in this section: General Cleanup. Keep the isLoading Check (onChange Client Scripts Only) Keep the newValue Check. Add the newValue != oldValue Check.
Business Rules are server-side logic that execute when database records are queried, updated, inserted, or deleted. Business Rules respond to database interactions regardless of access method: for example, users interacting with records through forms or lists, web services, or data imports (configurable). Business Rules do not monitor forms or ...
For Vancouver-and-earlier releases of ServiceNow it's important to never visit the Action Assignment table directly when creating new DA's. This is because the Model field on the Action Assignment form (where the type of DA is set) is hidden by default and set automatically depending on the module and list you navigated to the form through.