- Online Text to STL
- 3D Printed Soldering Helper
- 3D Printed Coin Vault
- 3D Printed FLARE GUN (PROP/REPLICA) MULTI PART
- 3D Printed Mini Container with PET Bottle Cap Size

TEST 3D PRINTS
Easy & Fun Things to 3D Print

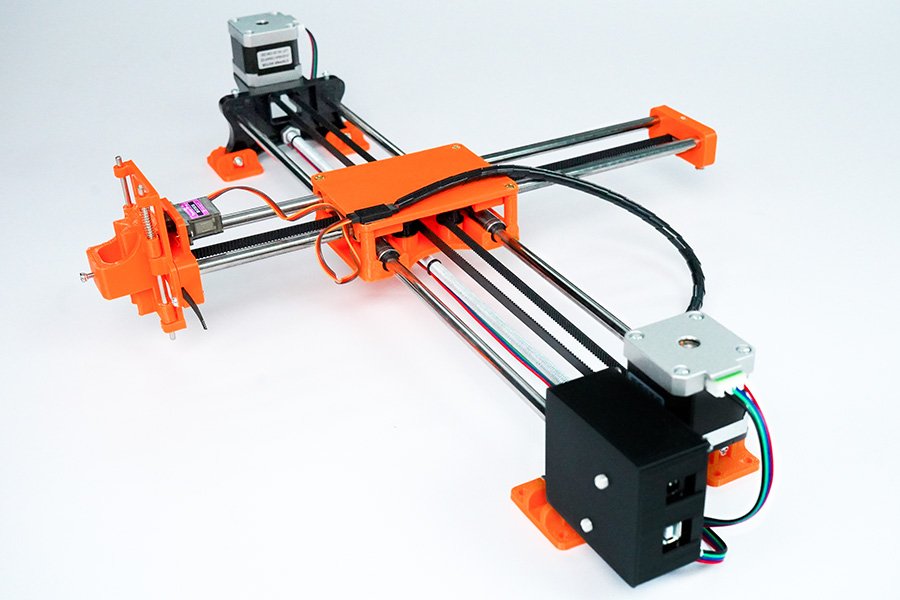
How To Make DIY Pen Plotter / Homework Writing Machine at Home
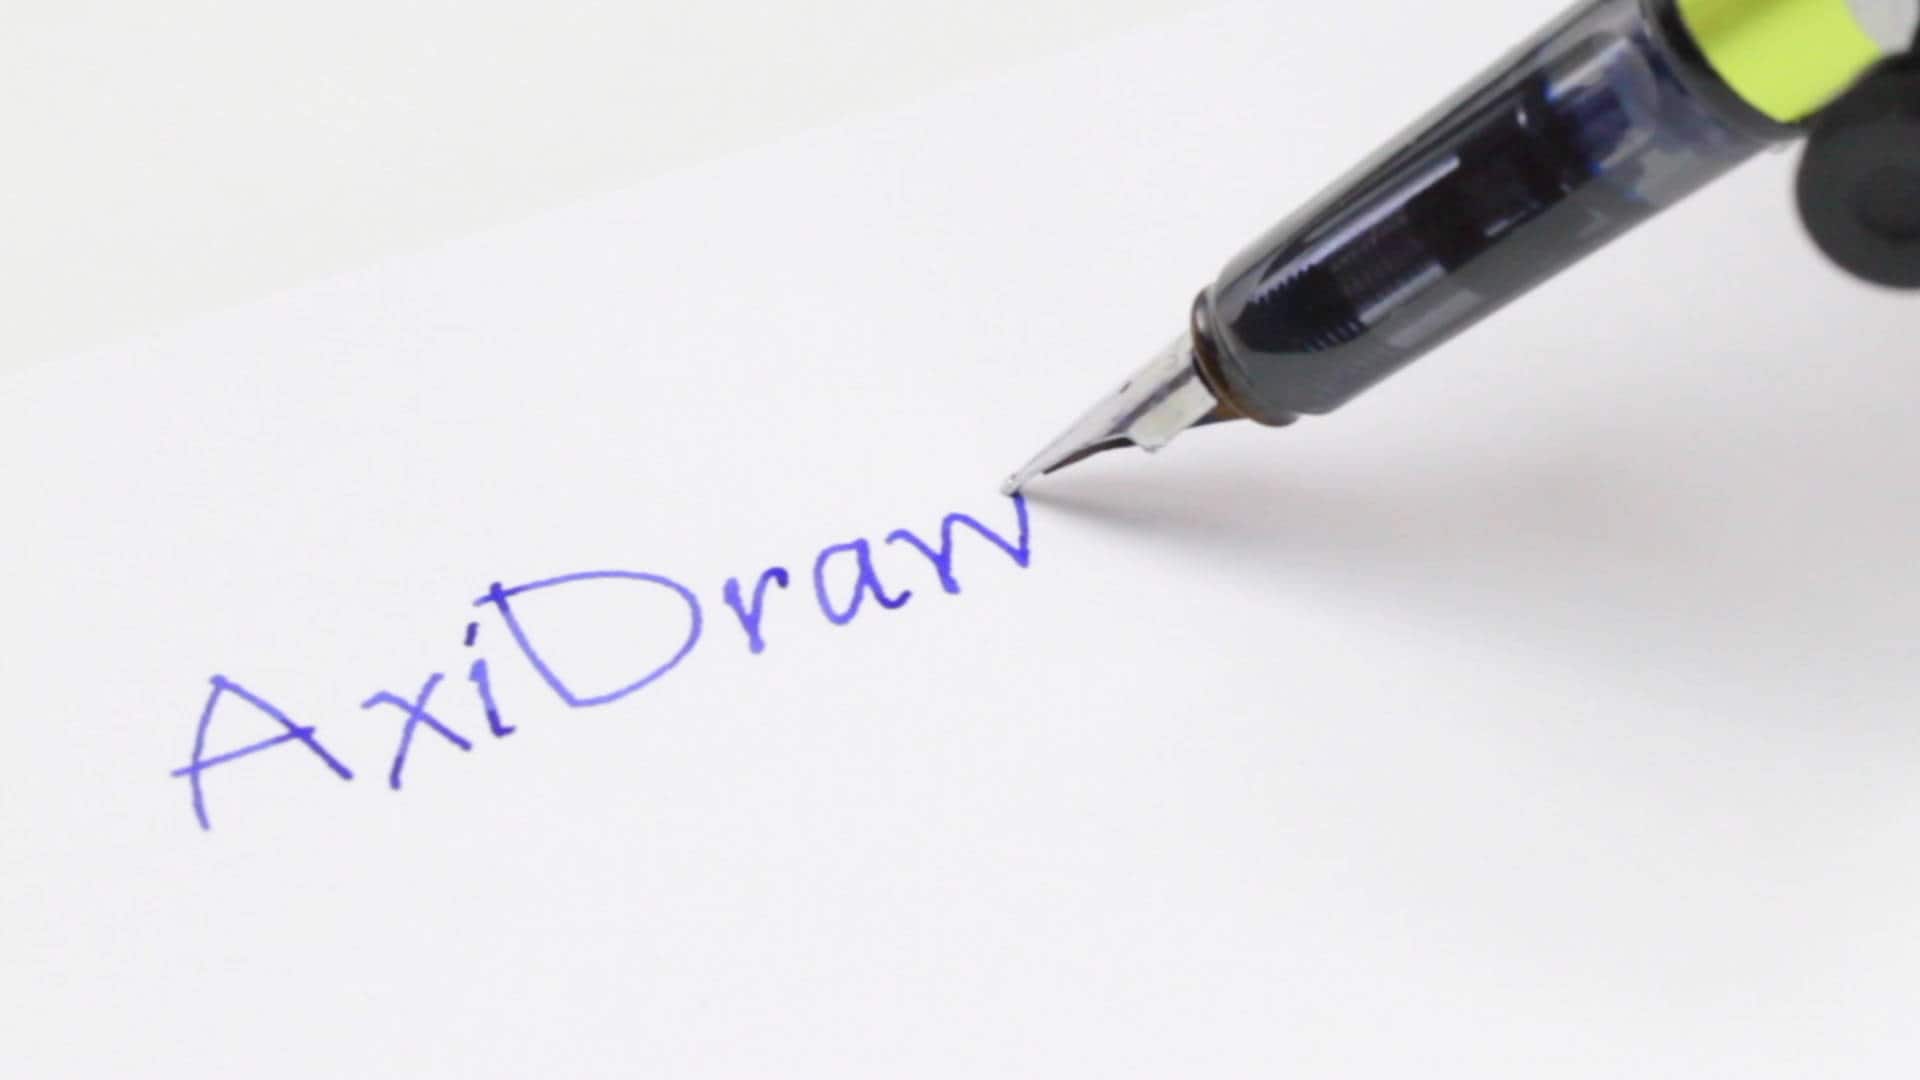
This Drawing Robot/Pen Plotter/Drawing Machine is similar to the commercially available AxiDraw. It is powered by an Arduino Uno controller, uses a CNC Shield, and GRBL firmware.
The cost to build the Drawing Robot is between $75 and $100 depending on where you buy your parts and whether you already own some of the parts such as the Arduino.
Parts and Materials Required
- 2 x Nema 17 Stepper Motors
- 2 x Linear Rod M8 x 450mm for X Axis
- 2 x Linear Rod M8 x 350mm for Y Axis
- 2 x Linear Rod 3mm for Z Axis (you can get it from old CDROM)
- 1 x Threaded Rod M8 x 480mm
- 8 x LM8UU Bearings
- 1 x Servo Sg90
- 1 x Spring 5m (from ball point pen)
- 2 x GT2 Pulley, 16 teeth
- 5 x Bearing 624zz
- 1 x 2000mm GT2 belt
- 1 x Arduino Uno
- 1 x CNC Shield
- 2 x A4988 Stepper driver with heatsink
- 6 x Jumpers
- 1 x 12V 2A Power Supply
- 4 x 5/16in-18
- 13 x Phillips M3-0.5 x 16mm
- 4 x Phillips M3-0.5 x 6mm
- 5 x Phillips M4-0.7x 35mm
- 1 x Hex M3-0.5 x 20mm
- 4 x 5/16in washer
- 4 x M3 washers
3D Printing
- Download the files from Thingiverse
- Open the 3D models in Cura or any other slicer(Sli3er, Simplify 3D, etc.)
- Use 75% infill on all the parts (An infill of 70 – 100% will work as well)
- Printed all the parts with 0.10 – 0.20 mm layer height
- Printed with Hatchbox Red PLA
- Use supports on the Penholder, Slider, X_Support_L and the X_Support_R
Note: The longest part took around 9hrs and the shortest took 30 minutes to print
3D Printed Parts

Cut your Linear Rods
Use a measuring tape and sharpie to mark the spots where the rods need to be cut
- Use a vise to hold the rods in place when you cut them
- Remember that you need (2) 350mm and (2) 450mm long linear rods
- On the threaded rod, mark your cutting point at 470mm

Assemble the X-Axis (Linear/Threaded Rods)
Take the (2) 450mm linear rods and insert them into either x-support part
- Use may need to use a round file to smooth out the holes that you insert them in
- Also, you can use a rubber mallet to help insert the rods
Now take the threaded rod and insert it in the hole below. Feed a 5/16in washer and 5/16in nut on both sides of the x-support part

Assemble the X-Axis (Bearings)
Now you want to push the LM8UU bearings into their place on the top and bottom clamshell (The top and bottom clamshell take (4) bearings each)
Take (4) 624zz bearings and push them through the 3D-printed idler pulleys. Leave the 5th bearing for later when you assemble the Y-axis

Assemble the X-Axis (Carriage)
- Get (4) M3-0.5 x 20mm screws, (4) M3 nuts, (4) M3 washers and (4) 624zz bearings with the idler pulleys installed
- Take one screw and feed a washer through it, the washer will rest on the bearing. The nut will be at the bottom of the carriage, which will secure the bearing in place

Assemble the X-Axis (X-Support)
- Slide the clamshell through the 450mm (X-axis) linear rods
- Use a rubber mallet again to attach the last X-support on the linear rods
- Make sure that the rods stick out equally on both sides
- Slide the other end of the threaded rod through the hole on the X-support
- Put on the last set of nuts and washers to hold the X-support in place
- Now that the X-axis is complete, you can use (2) Phillips M3-0.5 x 16mm screws per X-support to help keep the linear rods from sliding

Assemble the X-Axis (Stepper Motors)
- Use an appropriate sized allen wrench to attach the 16 teeth pulleys on the stepper motor shafts
- Flipping the entire chassis around will make it easier to attach the stepper motors
- Use (8) M3-0.5 x 6mm screws and a Phillips screwdriver to attach the (2) stepper motors
Assemble the Y-Axis (Clamshell)
(Optional if you have problems keeping belt on bearings)
- Grab (4) M4-0.5 x 35mm screws and (4) M4 nuts
- Make sure that you have the (4) idler pulleys ( Download from Thingiversa ) and the (4) washers printed
- Insert the washers in between the two clamshells, with a screw in between
- Screw the top and bottom clamshells together

Assemble the Y-Axis (Y- Back/Front)
- Take the (2) 350mm linear rods and insert them the Y-back piece by using a rubber mallet
- Get (1) M4-0.5 x 35 screw, (1) M4 nut and the 5th 624zz bearing
- Get (2) M3-0.5 x 16 screws to secure the linear rods
- Slide in the bearing when inserting the screw through the Y-back piece
- Slide the the linear rods/Y-back piece through the LM8UU bearings and attach the Y-front piece using a rubber mallet

Assemble the X-Y Axis (Belt)
- Use a pair of needle nose pliers to help guide the GT2 belt more easily through the clamshell
- Take the two ends of the belt and slide them through the “teeth” on the Base Slider
- The belt should be tight and not loose
- Note that once the GT2 belt is on, it is normal for the clamshell not to move easily
Belt Diagram

Assemble the Z-Axis
- Get (2) 3mm linear rods and the following 3D printed parts (Slider, Pen Holder, Base Slide, 3MM Metric Thumb Screw)
- Get (1) Hex M3-0.5 x 20mm screw and the Metric Thumb Screw and push them together. Use superglue to keep it together.
- Get (3) M3-0.5 x 16mm screws which you will use the secure the Base Slide to the Y-Front part. You may need to use (3) M3-0.5 nuts in order to hold it in place
- Push the Slider and Pen Holder together to make one piece
- Now take that new part and the (2) 3mm linear rods and slide the rods through the holes. Place a small spring in between the two parts so there is a little bit of pressure to lift the Slider. You may need to cut the spring a bit until there is an adequate amount of pressure on the slider.

Step By Step Video
The Original Instructions by Henry Arnold Jonathan K
- 3D Printed Hairy Lion →
12 thoughts on “ How To Make DIY Pen Plotter / Homework Writing Machine at Home ”
i constructed all the machine but when i press X+ the both X and Y axis are moving what is the problem
double check the steppers wiring
Have you solved it? I have the same problem with my machine, when I press X+, it’s necessary both motors move at same time, but, only one of them move…
Did you solve this problem?
Same problem how to solve ,?
Is it true that you didn’t use the microswitches in the final design?
Hello how to co figurę this machine to RUN on GRBL. What I mean is that GRBL interprets commands for x axis and y axis independently and if I look on your belt diagram it looks like both Motors have to run at the same time in order to move the carriage along y axis… How did you do that?
Have you solved it?
Thank you, thank you. It’s a very good built.
Is it possible to modify it to draw using brush ang oil based paint ?
Could you please tell what software/plug in and which version do you use to generate g-code for this machine?
Hello, what is the width of your belt? 6mm or 10mm? Thanks!
Leave a Reply Cancel reply
Your email address will not be published. Required fields are marked *
Save my name, email, and website in this browser for the next time I comment.

- Search for:
No products in the cart.
Return to shop
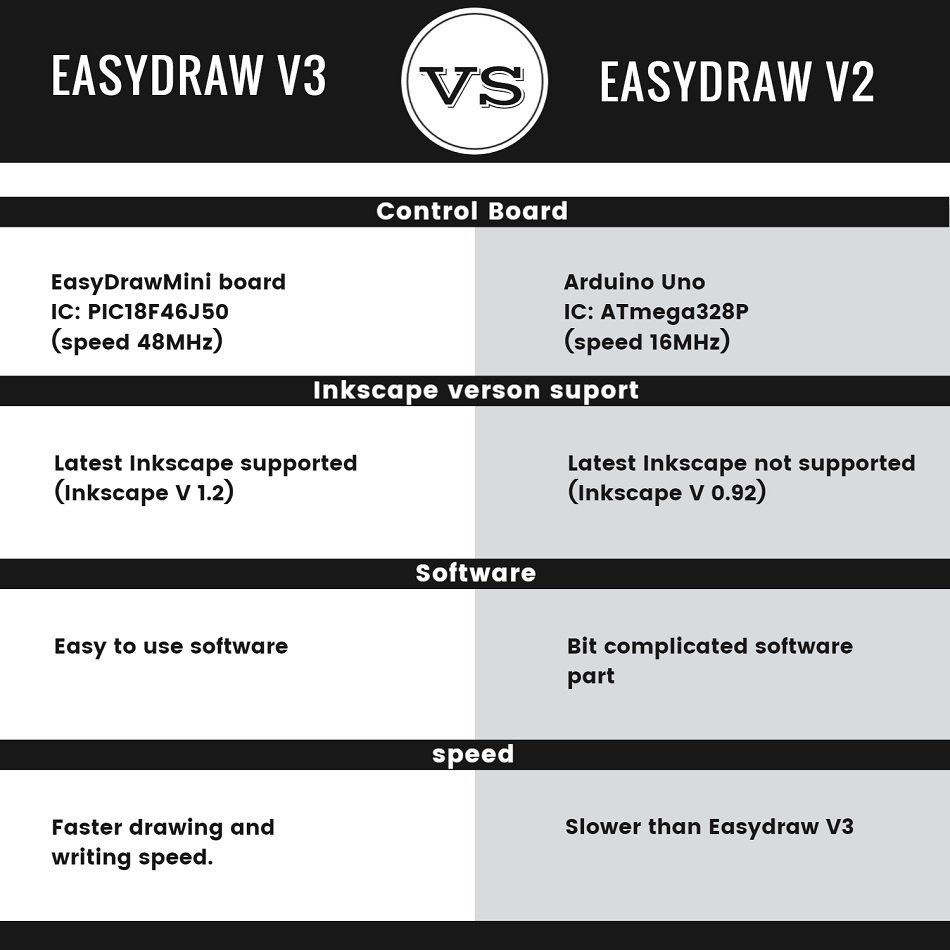
EasyDraw V3 Writing and Drawing Machine (FULLY ASSEMBLED)
₹ 9,190.00 (inc GST)
- Description
- Additional information
- Reviews (25)
EasyDraw V3 run the Axidraw inkscape extension with the Maker Q EasyDrawMini control board which is a very easy and straight forward software part and have more features than the EasyDraw V2 with 4xidraw extension and Arduino.
Software tutorial video timestamps
0:00 – Intro 0:09 – Software installation 0:55 – Setting page size 1:13 – Outline drawing 2:45 – Pause, resume and stop 3:08 – Shading 4:52 – Single line drawing 5:20 – Single line from photo of text 5:45 – Multy colour shading 7:21 – Signature 9:40 – Outline text 10:23 – Text with shading 11:00 – Handwriting style text 12:06 – Multy colour text 14:29 – Writing on ruled paper 15:59 – Adding fonts 17:12 – Drawing portrait 19:16 – Colour portrait 20:32 – Increasing speed 21:14 – Reset settings
Software Downloads :
Installation.
- The installer is an executable, named “AxiDraw_391.exe”; Unzip, open, and run it.
For recent macOS, 10.13, up through macOS 13 Ventura
Our primary release of the AxiDraw software is available for Inkscape 1.2, and works under macOS 10.11 through macOS 13 Ventura, and both Intel and Apple Silicon architectures.
More product information:
All parts are printed in ABS plastic in 70 °C heated chamber which makes the 3d printed layer very strong.
PLA parts are bad its brittle and break easily and lose strength after few months and the glass transition temperature of PLA is very low so if we place the parts under the sun or inside a parked car under the sun. the parts will slowly melt and deform and become unusable.
All of the above problems are solved by using ABS plastic. ABS is tricky to print its printed in a special water-cooled actively heated 3dprinter.
It will be fully assembled and plugged and play, just connect the USB cable to the PC or laptop and power adaptor to the machine. and install the software and start drawing or writing
MAX DRAWING ARE : 24 X 30 CM
The machine comes with 3 month’s warranty. In case any parts get damaged contact us via WhatsApp / PH: 8590094244 we will send replacement parts without any cost and guide you to fix it.
After the warranty, you have to pay for the parts. ( all parts will be available )
Delivery will take 5-8 woriking days
Applications: EasyDraw V3 is an extremely versatile machine, designed to serve a wide variety of everyday and specialized drawing and writing needs. You can use it for almost any task that might normally be carried out with a handheld pen.
It allows you to use your computer to produce writing that appears to be handmade, complete with the unmistakable appearance of using a real pen (as opposed to an inkjet or laser printer) to address an envelope or sign one’s name. And it does so with precision approaching that of a skilled artist, and — just as importantly — using an arm that never gets tired.
25 reviews for EasyDraw V3 Writing and Drawing Machine (FULLY ASSEMBLED)

A ishek D – 23/07/2023

Suraj G. – 05/08/2023
it’s good

Sayanth kP – 14/08/2023

Amartya Sharma – 19/08/2023
Good quality. Best quality product. Totally satisfied with performance. Service and guidance from Maker Q is very good. They’re very humble, gentle and supportive and always available for you.

sekharsambit92 – 27/10/2023
Good quality. Nice product as expected nice service also a great day having this product easy to use.. love from odisha

Sayeed Maskati – 09/11/2023

Akash Gavad – 17/11/2023
There is minute vibration during writing in 100% speed. other than that the machine is very useful and easy to use.
Rishi TS – 21/11/2023
received in 4 days and the product works perfectly

YASH TAPASE – 03/12/2023

Piyush Mishra – 05/01/2024

Ritesh Nayak – 14/01/2024
It works as I expected. Support is very helpful and the setup instructions are very helpful. I recommend this product!

Abhishek Bohra – 28/01/2024
I recently had the pleasure of using this fantastic product, and I must say it has exceeded my expectations in every way. The features are not only robust but also user-friendly, making it accessible for both tech-savvy individuals and those less familiar with the intricacies of technology.
What truly sets this product apart is the outstanding support service. The team behind it is not only knowledgeable but also incredibly responsive. I encountered a minor issue and reached out to the support team. To my delight, they promptly addressed my concerns and provided a solution that was easy to implement.
The commitment to customer satisfaction is evident in every interaction, and it’s clear that the team is dedicated to continuously improving the product. Their responsiveness and expertise have made my experience with this product a positive and seamless one.
In a world where customer support often falls short, this team stands out as a shining example of how it should be done. Kudos to the entire team for their hard work and commitment to excellence. I look forward to continued use of this product and witnessing its future developments.
Keep up the fantastic work, and thank you for providing such an exceptional product and support service!

Adarsh P. – 01/02/2024
Excellent machine for drawing writing and for for making detailed sketches

AJAY CHAUHAN – 01/02/2024

ashish jain – 02/02/2024
best machine
Varun Dhakad – 19/02/2024
I placed an order for the plotter, and after seven days, the product arrived. Upon opening the package, I noticed that the black box was broken. I contacted Maker Q regarding this issue and proceeded to return the product. Subsequently, Maker Q shipped a replacement product, which functioned flawlessly. However, this whole process took 15 days.

Mitali Sharma – 01/03/2024
Good quality. There team is very helpful

Shashank Sanjay – 03/03/2024
EXCELLENT TECHNICAL INSTRUMENT & VERY USEFUL FOR STUDIES

sagar – 16/03/2024

Raghavendra Gunturi – 21/03/2024
Item was excellent but delivery was a little delayed. But overall the experience was great. Working very fine . Results were too good .

Anonymous – 21/03/2024

Ankit Kumar Kumar – 23/03/2024
Please give me dbot software link

RITESH CHOUGULE – 23/03/2024

Lilesh – 31/03/2024
Very good machine

Afra Shahi – 14/04/2024
Good quality

Only logged in customers who have purchased this product may leave a review.
Related products
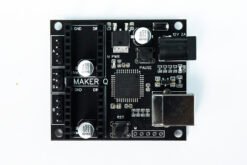
EasyDraw V3 Control board
Username or email address *
Password *
Remember me Log in
Lost your password?
Email address *
Your personal data will be used to support your experience throughout this website, to manage access to your account, and for other purposes described in our privacy policy .
This is a game built with machine learning. You draw, and a neural network tries to guess what you’re drawing. Of course, it doesn’t always work. But the more you play with it, the more it will learn. So far we have trained it on a few hundred concepts, and we hope to add more over time. We made this as an example of how you can use machine learning in fun ways. Watch the video below to learn about how it works, and
Built by Jonas Jongejan, Henry Rowley, Takashi Kawashima, Jongmin Kim, Nick Fox-Gieg, with friends at Google Creative Lab and Data Arts Team.
Simple, modern, and precise pen plotters
Axidraw machines work with a variety of writing instruments, including permanent markers and fountain pens. the unique writing head extends beyond the base of the machine, making it possible to write or draw on almost any flat surface. axidraw is the real deal: designed, manufactured, and supported in usa, and backed by exclusive software for realistic handwriting and automation..
Watch the video >
AxiDraw Models

Compact and popular
- 8½ × 11” / A4 Plot Area
- Sturdy aluminum construction
- Our most popular model

AxiDraw V3/A3
Larger plot area.
- 11 × 17” / A3 Plot Area
- Extended feet for stability

AxiDraw SE/A3
Special edition.
- CNC milled solid aluminum base
- Additional accessories included
Additional AxiDraw models and accessories are available at Evil Mad Scientist
Where to buy AxiDraw
AxiDraw machines are available for purchase directly from Evil Mad Scientist as well as from select distributors:

Frequently Asked Questions
The AxiDraw is a pen plotter, which is a type of simple robot. Its sole function is to guide a pen (or other implement mounted in the pen holder) along the set of vector lines, curves, and paths that you ask it to follow. Everything that the machine is ultimately capable of, such as drawing graphics, writing text, or signing documents, are expressions of this basic function. It is capable of drawing essentially anything that can be composed from a set of lines.
In practice, this is much like using a traditional printer, except that you need to take care that your documents are made of paths, rather than pixels.
The AxiDraw is an extremely versatile machine, designed to serve a wide variety of everyday and specialized drawing and writing needs. You can use it for almost almost any task that might normally be carried out with a handheld pen.
AxiDraw does not require proprietary pens or ink: you can use your own pens, chosen within certain guidelines.
AxiDraw can hold most types of pens and similar instruments up to 5/8" (16 mm) diameter. (A larger XL Pen Clip is available as well to fit larger pens.)
Good choices for pens to use include fountain pens, permanent markers, liquid-ink rollerball pens, technical pens, small-bodied whiteboard markers and other writing and drawing instruments that do not require significant downward pressure. While we refer to writing and drawing instruments as “pens” to be concise, other instruments such as automatic pencils (particularly with soft lead), chalk, charcoal, and brushes can also work well in many cases.
You can read more about pen choices in our documentation here .
AxiDraw does not require special paper; you can use almost any kind and size of paper. (You can even use all kinds of things that are not paper.)
The XY travel (printable area) of the AxiDraw V3 is just over that of both US letter (8½ × 11”) and A4 paper sizes. The larger size models have about twice this travel.
You can work with any size of paper up to the size of the travel area. You can write directly onto small pieces like business cards (or a whole array of them), medium size pieces envelopes and note cards, or sheets of paper.
You can also work with paper larger than the travel area. The unique design of the AxiDraw features a drawing head that extends beyond the body of the machine, making it possible to also draw on flat objects bigger than the machine itself. For example, you can set it right on top of a box to write an address. You can even set it on top of a poster board, chalkboard, or whiteboard to draw graphics in place.
For most applications, the standard-size AxiDraw V3 is the best choice. It's compact so that it fits on your desk more easily, and has enough plotting area to cover any size up to 8½ × 11” / A4.
The larger AxiDraw V3/A3 has twice the plotting area and is perfect for people who need to plot larger items, or to fit two smaller items — like two US Letter or A4 pages side by side, or a sheet of paper plus an envelope.
The Special Edition AxiDraw SE/A3 has the same plotting area as the V3/A3, but features a heavy, rigid base CNC machined from a solid block of Aluminum. It's our top-of-the-line machine, and includes a few nice accessories as well.
Available AxiDraw accessories include alternate pen holders, a tripod mount, a rigid mount that can be used instead of the pen slide, extended feet, extra clip easels, and magnetic workholding easels. You can find them listed here at Evil Mad Scientist.
AxiDraw requires a reasonably modern computer (Mac, Windows, or Linux) with an available USB port and internet access to download software.
Mac requirements: MacOS 10.7 or newer
Windows requirements: Windows 7 or newer
Linux requirements: Recent versions of Ubuntu and similar widely-supported distributions work well. If you are using an obscure or "challenging" distribution, we'll still do our best to help you out.
No. All standard AxiDraw models (V3, V3/A3, SE/A3) come complete, assembled, tested, and ready to use.
If you get a head start by reading the user guide and installing the software, you can be up and plotting five minutes after opening the box.
If you prefer a model that requires assembly, there is now also AxiDraw MiniKit 2 which comes as a kit.
Internet access is required only for downloading software and for access to online documentation.
Internet access is not required while preparing files or using AxiDraw.
A universal-input plug-in power supply is included with the AxiDraw. It accepts worldwide 100 V - 240 V input, and has a US/Canada style plug. For other regions, an inexpensive plug shape adapter will be needed.
No. Most users just make a file or drawing and plot it.
(That said, programming interfaces are available for those who are interested in them.)
You do not need to purchase any additional software to use AxiDraw.
AxiDraw is normally controlled through a set of extensions to Inkscape, the excellent, popular and free vector graphics program. Basic operation is much like that of a printer driver: you import or make a drawing in Inkscape, and use the extensions to plot your text or artwork. It's all handled through a straightforward graphical user interface, and works cleanly on Mac, Windows and Linux.
Yes, and we highly encourage you to do so. Reading the manual is a great way to determine if AxiDraw is a good fit for you.
The AxiDraw V3 family user guide is available for download here .
Unlike a (raster-based) inkjet or laser printer, the time that it takes a plotter to print a page is not fixed. Rather, it depends on the length of distance that the pen has to travel. The AxiDraw typically moves at about the speed of a human hand, depending on your settings, and the plotting time varies accordingly.
This question is much like asking how long a human takes to write or draw on a piece of paper: Addressing an envelope might typically take a minute or two, but complex artwork can potentially be a matter of hours. Such is the case as well for AxiDraw.
Yes. The speed of the AxiDraw is adjustable, depending on your tradeoff between faster completion and higher precision. AxiDraw can move quite quickly (faster than a human normally can) when making large strokes with a wide-tipped marker, but even a (human) calligrapher will slow down for higher neatness. The wedding invitation text in our video should give you a decent idea of typical writing speed when going for higher neatness; that example is a little slower than people normally write.
Yes! The best way to do that is by directly capturing your signature as you sign it, for example on a phone or tablet screen. That way, the AxiDraw can replay it just in the same way that you wrote it. Capturing a signature is covered in our documentation on handwriting, here .
We also have exclusive utilities, available to AxiDraw owners, that can add handwriting-like "defects" to your text. Text laid out in perfectly even rows (like what you get with a handwriting font in MS word) always looks a little too "robotic" to be handwriting.
No, not in the way that you might hope.
Yes, you can scan handwritten text, trace it with a bitmap tracing tool, and plot it. This is straightforward, and your AxiDraw will be more than happy to comply. (AxiDraw will plot the paths that you provide to it.)
However, and with only rare exceptions, automatic tracing of scanned handwriting creates a somewhat unpleasant imitation of handwriting, and we do not recommend this approach as part of any workflow.
You can read more about tracing scans in our documentation, here . (In brief: there are excellent ways to use the AxiDraw to reproduce handwriting, but starting with a scan is not one of them.)
Not at present, but it is something that we are looking into.
Some AxiDraw users do use various types of paper handling machines — sometimes printers with built-in paper feeders and sometimes commercial solutions. Professional print shops and companies that make equipment for them have many different ways of moving pieces of paper from point A to point B.
More commonly, for small scale use, AxiDraw users manually swap out paper clipped to small clipboard easels or use larger-size AxiDraw units that allow multiple pages to fit within the print area.
Yes; you can see a few examples here .
The key issues that you need to be aware of is that the fabric generally needs to be held taut, and you need to choose markers that don't easily catch on the fabric. It is likely that with care and experimentation you will be able to make it work.
Calligraphy is not the same in any sense as (for example) simply using computer fonts or plotting a drawing. Calligraphy generally involves individually sculpted letter shapes, and in many cases pen movements that are far more complex than AxiDraw can provide.
That said, some calligraphers do use AxiDraw for low-end busywork (say, addressing hundreds of place cards), saving some wear on their wrists and presumably passing along some of the cost savings.
The AxiDraw is designed for moving a pen, not a carving or cutting tool. It does not have the type of rigidity that you need for carving, nor the ability to apply significant downward force.
That said, a number of people have experimented with it. Here is one notable project, using the AxiDraw for cutting cardstock and vinyl.
AxiDraw can be used with whatever fonts are on your computer, so long as the text is converted to paths before plotting.
We have developed a special-purpose software application called AxiDraw Merge , which is a mail merge solution for AxiDraw.
Once you are set up with it, AxiDraw Merge can automatically (1) populate a template with data sourced from a CSV file, (2) render the text into handwriting-like stroke-based fonts, (3) add intentionally variations so that text does not lie upon straight lines, and (4) plot the document. It can also merge and plot subsequent pages upon a button press or after a time delay.
AxiDraw Merge is available to AxiDraw owners at no additional cost.
The AxiDraw is designed to work on flat surfaces, and we do not test them in the vertical orientation. That said, quite a few AxiDraw users have mounted theirs to the wall without apparent difficulty.
One issue to consider is that the AxiDraw's pen holder normally rests the pen on the writing surface by its weight alone. On the wall, you'll need an alternative to gravity for lowering the pen. The typical solution is a rubber band.
(1) We maintain a large and growing library at the AxiDraw Wiki Page , our central documentation site for all things AxiDraw. Our documentation is clear and comprehensive, with special sections to help you get up and running quickly.
(2) We have support forums for the AxiDraw, here .
(3) Most importantly: We're the designers and manufacturers of the AxiDraw, and we're here to help! Please don't hesitate to contact us directly.
AxiDraw does not have a duty cycle limit. You can run it all day long if you like.
The AxiDraw is designed to be serviceable for a long life. Components such as the drive belt, rolling wheels, ball bearings, and stepper motors can all be replaced in the unlikely event that it should become necessary. (And, those parts are actually available if you need them.)
One component on the AxiDraw is considered expendable and may need regular replacement in heavy duty (e.g., industrial) settings. The small pen-lift servo motor does wear out over time but is inexpensive ($9) and straightforward to replace. For heavy duty applications, you may wish to keep a spare on hand. We do also offer a performance upgrade option to a long-lasting brushless pen-lift servo motor , which also gives the AxiDraw a major speed boost.
No. While AxiDraw is most commonly controlled through a set of extensions to Inkscape, there are other methods of plotting including the command-line interface (CLI).
Many AxiDraw users do their design work in other programs, and use Inkscape as their "page setup" screen for plotting.
For real-time plotting in response to user input and for certain other generative applications, you can plot directly within Processing .
AxiDraw machines are designed, manufactured, and tested right at our facility in Sunnyvale, California.
Demos are available by appointment at our shop in Sunnyvale, CA. Please contact us to request an appointment.
We're open M-F, 12-6, and closed on US postal holidays.
The AxiDraw has two precision stepper motors in its base. Together, they drive a single looped belt that moves the carriage around in the XY plane. The high-performance linear stages feature custom-designed wheels that roll smoothly on custom aluminum extrusions, specially designed for high stiffness and light weight.
The pen-lift stage uses a separate mechanism: a smaller third motor, combined with a precise low-friction linear stage, serves to lift the pen off of the page.
In addition to the popular AxiDraw models listed above we do make a few other standard sizes, as well as custom-sized and custom-configured AxiDraw machines.
One notable version is the compact AxiDraw MiniKit 2 which comes as a kit.
If you need a compact AxiDraw that is not a kit, we do make an AxiDraw V3/B6 (with plot area of 190 × 140 mm, or 7.48 × 5.51 inches) that is available by special order.
We also make larger format and customized AxiDraw machines to order, including the AxiDraw SE/A2 and SE/A1 with plot area of 594 × 432 mm (23.4 × 17 inches) and 864 × 594 mm (34 × 23.4 inches), respectively. These larger machines typically require a custom shipping quote.
No; we do not offer any printing services.
Please contact us and ask; we're here to help.
Support Resources
Our AxiDraw documentation wiki is a continually growing library of resources for getting started with the AxiDraw, including a thoroughly detailed PDF user guide , support forum, a number of tutorials on specialty topics, and links to additional resources.
Personal support: We're here to help!
Having an issue? Need to know where to find something in the manual, or how to do something that isn't in the manual? Want to ask us about your application before deciding to purchase?
If so, please don't hesitate to contact us directly. Our goal is to provide personal, competent service both as you get set up and running, and for as long as you have your AxiDraw.

Embed the widget on your own site

Drawing Robot/Pen Plotter/Drawing Machine is an Open Hardware version of the famous machine AxiDraw which it is a pen plotter, capable of wr
Make DIY Homework Writing Machine at Home
Step 1: parts and materials required, step 2: 3d printing, step 3: assemble the x-axis, step 4: assemble the x-axis bearing, step 5: assemble the y-axis.
- Step 6: Assemble the X-Y Axis (Belt
Step 7: Assemble the Z-Axis
Step 8: electronics, step 9: software, step 10: drawing machine at work.
- Comments (8)

Things used in this project
- Buy from Newark
- Buy from store.arduino.cc
- Buy from Adafruit
- Buy from Arduino Store
- Buy from CPC

Software apps and online services

Hand tools and fabrication machines

Drawing Robot/Pen Plotter/Drawing Machine is an Open Hardware version of the famous machine AxiDraw which it is a pen plotter, capable of writing or drawing on almost any flat surface. It can write with pens, permanent markers, pencils, and other writing implements to handle an endless variety of applications.
Its unique design features a writing head that extends beyond the machine, making it possible to draw on objects bigger than the machine itself. The biggest advantage of the machine is that it can be placed over the book because of the core XY extending design of the machine.
This Drawing Robot/Pen Plotter/Drawing Machine is similar to the commercially available AxiDraw. It is powered by an Arduino Uno controller, uses a CNC Shield, and GRBL firmware
The cost to build the Drawing Robot is between $75 depending on where you buy your parts and whether you already own some of the parts such as the Arduino.
You can find all of my projects on https://www.diyprojectslab.com/
Maximum drawing area 24 * 30 CM.
Thank You NextPCB
This project is successfully completed because of the help and support from NextPCB. Guys if you have a PCB project, please visit their website and get exciting discounts and coupons.
Free shipping 0$ PCB Prototype: https://www.nextpcb.com/pcb-quote?act=2&code=Romeo...
Thanksgiving Christmas lucky draw 100% win: https://www.nextpcb.com/christmas-lucky-draw?code...
2 x Nema 17 Stepper Motors Amazon.com
2 x Linear Rod M8 x 450mm for X Axis Amazon.com
2 x Linear Rod M8 x 350mm for Y Axis Amazon.com
2 x Linear Rod 3mm for Z Axis (you can get it from old CDROM)
1 x Threaded Rod M8 x 480mm8 x LM8UU Bearings Amazon.com
1 x Servo Sg901 x Spring 5m (from ball point pen) Amazon.com
2 x GT2 Pulley, 16 teeth Amazon.com
5 x Bearing 624zz Amazon.com
1 x 2000mm GT2 belt Amazon.com
1 x Arduino Uno Amazon.com
1 x CNC Shield Amazon.com
2 x A4988 Stepper driver with heatsink Amazon.com
6 x Jumpers Amazon.com
1 x 12V 2A Power Supply Amazon.com
- 4 x 5/16in-18
- 13 x Phillips M3-0.5 x 16mm
- 4 x Phillips M3-0.5 x 6mm
- 5 x Phillips M4-0.7x 35mm
- 1 x Hex M3-0.5 x 20mm
- 4 x 5/16in washer
- 4 x M3 washers
Download the files from Thingiverse
Open the 3D models in Cura or any other slicer.
Use 75% infill on all the parts (An infill of 70 – 100% will work as well)
Printed all the parts with 0.10 – 0.20 mm layer height
Printed with PLA
Use supports on the Penholder, Slider, X_Support_L and the X_Support_R
Note: The longest part took around 10hrs and the shortest took 30 minutes to print
PLA is fine for this design. I print at 200C on BuildTak. None of the parts require rafts or brims. I suggest supports only for the pen holder and the Z axis end plate which is standing up.
Remember that you need (2) 350mm and (2) 450mm long linear rods
Take the (2) 450mm linear rods and insert them into either x-support part
- Use may need to use a round file to smooth out the holes that you insert them in
- Also, you can use a rubber mallet to help insert the rods
Now take the threaded rod and insert it in the hole below. Feed a 5/16in washer and 5/16in nut on both sides of the x-support part
Now you want to push the LM8UU bearings into their place on the top and bottom clamshell (The top and bottom clamshell take (4) bearings each)
Take (4) 624zz bearings and push them through the 3D-printed idler pulleys. Leave the 5th bearing for later when you assemble the Y-axis
Assemble the X-Axis (Carriage)
- Get (4) M3-0.5 x 20mm screws, (4) M3 nuts, (4) M3 washers and (4) 624zz bearings with the idler pulleys installed
- Take one screw and feed a washer through it, the washer will rest on the bearing. The nut will be at the bottom of the carriage, which will secure the bearing in place
Assemble the X-Axis (X-Support)
- Slide the clamshell through the 450mm (X-axis) linear rods
- Use a rubber mallet again to attach the last X-support on the linear rods
- Make sure that the rods stick out equally on both sides
- Slide the other end of the threaded rod through the hole on the X-support
- Put on the last set of nuts and washers to hold the X-support in place
- Now that the X-axis is complete, you can use (2) Phillips M3-0.5 x 16mm screws per X-support to help keep the linear rods from sliding
- Take the (2) 350mm linear rods and insert them the Y-back piece by using a rubber mallet
- Get (1) M4-0.5 x 35 screw, (1) M4 nut and the 5th 624zz bearing
- Get (2) M3-0.5 x 16 screws to secure the linear rods
- Slide in the bearing when inserting the screw through the Y-back piece
- Slide the the linear rods/Y-back piece through the LM8UU bearings and attach the Y-front piece using a rubber mallet
Step 6: Assemble the X-Y Axis (Belt)
- Use a pair of needle nose pliers to help guide the GT2 belt more easily through the clamshell
- Take the two ends of the belt and slide them through the “teeth” on the Base Slider
- The belt should be tight and not loose
- Note that once the GT2 belt is on, it is normal for the clamshell not to move easily
- Get (2) 3mm linear rods and the following 3D printed parts (Slider, Pen Holder, Base Slide, 3MM Metric Thumb Screw)
- Get (1) Hex M3-0.5 x 20mm screw and the Metric Thumb Screw and push them together. Use superglue to keep it together.
- Get (3) M3-0.5 x 16mm screws which you will use the secure the Base Slide to the Y-Front part. You may need to use (3) M3-0.5 nuts in order to hold it in place
- Push the Slider and Pen Holder together to make one piece
- Now take that new part and the (2) 3mm linear rods and slide the rods through the holes. Place a small spring in between the two parts so there is a little bit of pressure to lift the Slider. You may need to cut the spring a bit until there is an adequate amount of pressure on the slider.
ELECTRONICS
I prefer you can use Arduino uno CNC Shield
Ready to your all circuit
1) 4pcs A4988 Stepper Motor Driver
2) Expansion Board A4988 Driver
3)Arduino UNO First of all take hit sink and stick on A4988 motor Driver.
4pcs A4988 Stepper motor driver connect on expansion board A4988 driver module, then connect the arduino with expansion board and connect all wiring The shield also has a built-in micro stepping control - meaning that instead of using full steps or half steps like a large CNC would do, we can make the motors move by 1/16 or 1/32 of a step to make the laser move with the maximal precision possible. However, the motors will consume more electricity: they will get hot quicker.
To use the micro stepping modes, short some of the mode pins together. Different combinations give different resolutions. Take a look at the chart for the different configurations possible. When the shield is programmed, add the A4988 drivers to it and wire up the rest of the electronics.
To find the coils of the stepper motors, use a multimeter. If there's resistance between the two wires, you have a coil. On the schematic, the coils are represented by two wires of the same color.
Inkscape which is the graphics design software (draw or import graphics)
Inkscape MI GRBL Extension (convert graphics to G-Code)Universal G Code Sender (sends the G-Code to the robot causing drawing motion)GRBL which is the Arduino firmware (programmed into the Arduino Uno)
Arduino: https://www.arduino.cc/en/software
Universal G-code sender: https://winder.github.io/ugs_website/...
Inkscape: https://inkscape.org/release/inkscape..
4xiDraw & km laser: https://drive.google.com/file/d/1YO8-...
Processing: https://processing.org/download/
drawing to G-code processing: https://drive.google.com/file/d/1PIFx...
watch video for full setup
hookup_QLVR1z3Ob1.jpg

DIY Projects Lab
Related channels and tags.

- home automation
Homework Machine Drawing - Printable Art Lesson Plan
Also included in
Description
DESCRIPTION
- 5 page PDF printable art worksheet
- Homework Machine Drawing Prompt - instant printable art worksheet for the art room, the classroom, homeschooling or remote learning
- Students use their imagination to design a Homework Machine
- Good for a stand alone drawing project
- Use as an introduction to a larger art project or as a stand alone art activity.
- Use printable art worksheets as work for fast finishers or even for sub lessons .
- You may also like these Instant Art and Art History Printable Worksheets:
Cut and Colour your own Masterpiece: Frida Kahlo
Cut and Colour your own Masterpiece: Picasso Faces
Cut and Colour your own Masterpiece: Van Gogh's Sunflowers
Cut and Colour: Robots
Don’t miss out on freebies, flash sales and more!
Follow me on TPT
Find me on Instagram
Follow me on Pinterest
All graphics are created by Kerry Daley (c) 2021
T erms and Conditions Copyright © Kerry Daley. All rights reserved by author. This product is to be used by the original downloader only. Copying for more than one teacher, classroom, department, school, or school system is prohibited. This product may not be distributed or displayed digitally for public view. Failure to comply is a copyright infringement and a violation of the Digital Millennium Copyright Act (DMCA). Clipart and elements found in this PDF are copyrighted and cannot be extracted and used outside of this file without permission or license. Intended for classroom and personal use ONLY.
printable art worksheet, printable art activity,
printable art worksheet for kids, drawing worksheet for kids
homework machine printable art worksheet
printable art project
art projects for kids, drawing prompt
Questions & Answers
Kerry daley.
- We're hiring
- Help & FAQ
- Privacy policy
- Student privacy
- Terms of service
- Tell us what you think
We will keep fighting for all libraries - stand with us!
Internet Archive Audio

- This Just In
- Grateful Dead
- Old Time Radio
- 78 RPMs and Cylinder Recordings
- Audio Books & Poetry
- Computers, Technology and Science
- Music, Arts & Culture
- News & Public Affairs
- Spirituality & Religion
- Radio News Archive

- Flickr Commons
- Occupy Wall Street Flickr
- NASA Images
- Solar System Collection
- Ames Research Center

- All Software
- Old School Emulation
- MS-DOS Games
- Historical Software
- Classic PC Games
- Software Library
- Kodi Archive and Support File
- Vintage Software
- CD-ROM Software
- CD-ROM Software Library
- Software Sites
- Tucows Software Library
- Shareware CD-ROMs
- Software Capsules Compilation
- CD-ROM Images
- ZX Spectrum
- DOOM Level CD

- Smithsonian Libraries
- FEDLINK (US)
- Lincoln Collection
- American Libraries
- Canadian Libraries
- Universal Library
- Project Gutenberg
- Children's Library
- Biodiversity Heritage Library
- Books by Language
- Additional Collections

- Prelinger Archives
- Democracy Now!
- Occupy Wall Street
- TV NSA Clip Library
- Animation & Cartoons
- Arts & Music
- Computers & Technology
- Cultural & Academic Films
- Ephemeral Films
- Sports Videos
- Videogame Videos
- Youth Media
Search the history of over 866 billion web pages on the Internet.
Mobile Apps
- Wayback Machine (iOS)
- Wayback Machine (Android)
Browser Extensions
Archive-it subscription.
- Explore the Collections
- Build Collections
Save Page Now
Capture a web page as it appears now for use as a trusted citation in the future.
Please enter a valid web address
- Donate Donate icon An illustration of a heart shape
The homework machine
Bookreader item preview, share or embed this item, flag this item for.
- Graphic Violence
- Explicit Sexual Content
- Hate Speech
- Misinformation/Disinformation
- Marketing/Phishing/Advertising
- Misleading/Inaccurate/Missing Metadata
![[WorldCat (this item)]](https://archive.org/images/worldcat-small.png "[WorldCat (this item)]")
plus-circle Add Review comment Reviews
Better World Books
DOWNLOAD OPTIONS
No suitable files to display here.
IN COLLECTIONS
Uploaded by station05.cebu on November 9, 2020
SIMILAR ITEMS (based on metadata)
Homework Machine

Introduction: Homework Machine

The homework machine is an interactive tool to collect homework. It's a machine that stands in a class room. The kids can put there homework into the mouth of the machine. The kids have to do some teamwork, some of them operate the inside of the machine and others are watching thrue the window to guide the homework into the right direction. The homework can end in 1 of the 4 compartments with there own achievements. The homework machine is a stimulating and a fun way to make homework and collect it.
ideas, concepts, drawings, pictures, videos, documents, posters, comments, mock-up scale models, prototypes and machines that are developed in the context of MyMachine are the property of MyMachine vzw.
Unauthorized use and/or duplication of this material without express and written permission from MyMachine vzw is strictly prohibited. MyMachine vzw is a social profit organization that fosters creativity, entrepreneurship, open education and STEM in education.
www.mymachineglobal.org
Step 1: Body Base Plate

1) Used materials :
- MDF (A) : base plate 900*500*15 mm
- MDF (B) : 3 shelfs 500*170*15 mm
- MDF (C): beam 40*500*15 mm
- Wood connectors
- Nuts and bolts
3) Saw a corner off :
- MDF (B) : 15*40 mm => 15 mm in width, 40 mm in length of 1 corner.
- Apply this step for all 3 pieces
4) Construct :
- Screw and glue MDF (C) on 1 side of the base plate MDF (A)
- Line out the MDF (B) shelfs over the length of the base plate MDF (A). A schelf on every 22.5 cm.
- Screw and glue the shelfs (B)
- Reinforce the shelfs with wood connectors to the base plate (A)
- Attach the wheels to the plate ( 80*80 mm from corner)
Step 2: Right Body Plate (wood)

1) Used materials:
- MDF 100 x 120 x 1,5 CM
- Drill 46 mm & 32 mm
3) Saw the right body plate:
- MDF, saw the right body plate in the next dimensions: Height base plate – highest peak = 100 CM Height start mouth till base plate 70 CM, distance to rear end 120 CM Height back 75 CM
4) Drilling 3 holes:
- Drilling 3 holes of 46 mm at the top of the plate. measured from the bottom right, straight up and then sideways. See the picture above.
5) Drilling 6 holes:
- Drilling the 6 other holes of 32 mm in the plate. measured from the bottom right, straight up and then sideways. Distance B-C = 13, distance A-b = 9. See the picture above.
6) Saw the 4 doors:
- Line out the 4 doors on the bottom line. 16 x 16 CM.
- Screw them back in with hinges.
Step 3: Left Body Plate (perspex)

3) Saw the left body plate:
- Saw the right body plate in the next dimensions:
Height base plate – highest peak = 100 CM
Height start mouth till base plate 70 CM, distance to rear end 120 CM
Height back 75 CM
The same as in step 2.
Step 4: Front Plate (wood)

- MDF 530 mm * 790 mm * 15 mm
- MDF 60 mm * 740 mm * 15 mm
3) Saw the MDF plates in the right dimensions.
Step 5: Polygonal Holders (right)

- 4 x MDF (100mm*100mm*15mm)
3) Saw 3 polygonal holders with in the middle a hole diameter 46 mm and 1 with diameter 32 mm.
The holders are in the places where you can not rotate the axes.
Step 6: Polygonal Holders (left)

- 12 x MDF (100mm*100mm*15mm)
3) Saw 6 polygonal holders with in the middle a hole diameter 46 mm.
Saw 6 polygonal holders with in the middle a hole diameter 32 mm.
Wherever there are holes or holders placed at the right side, there are holders placed with the same dimensions on the left perspex side.
Attach the holders with screws to the perspex.
Step 7: Hollow Profiles for Peripherals

1) Used Materials:
- 4 x insulation foam (or others)
- Contact glue
3) Cut off 3 pieces (length = 200 mm and a diameter of 80 mm)
Glue the profiles onto the perspex side and the MDF side at the correct dimensions.
Step 8: Axes

- 3 wooden cylinders (length = 540 mm and diameter 40 mm)
- 3 wooden cylinders (length = 500 mm and diameter 40 mm)
- 5 wooden cylinders (length = 650 mm and diameter 25mm)
- 1 wooden cylinder (length = 500 mm and diameter 25mm)
- The axes can be covered witch all kinds of materials: we use a paint roller, gloves, insulation foam and a wooden plate.
3) The foam, paint roller, gloves, PVC and the wooden plate are glued or screwed to the axes.
Step 9: Handle Wheel

- 3 x MDF plate 250mm*250mm*15mm
- Standard wooden handle
3) Make a circle witch a diameter 220 mm. Use a saw and a sander to become the correct dimensions of the circle.
Screw the handle to the circle.
Step 10: Teeth and Tongue

- MDF plate 520mm*110mm*8mm
- MDF plate 520mm*100mm*8mm
- Flexible foam
3) Saw the shape of the teeth out of the MDF plate. (see image for dimensions)
Finisch with sandpaper.
Cut out a tongue from the flexibel foam by using a box cutter.
Glue the tongue to the lower teeth.
Step 11: Assemble Body

2) Screw and glue the left body plate(perspex)and the right body plate (MDF) to the base plate.
Screw the front plate to the left, right and base plate.
Step 12: Assemble Other Components

2) The axes are disposed between the holders and thrue the holes. (blue on the image)
The wheels are screwed and glued to the axes of the conveyors. (green on the image)
The teeth are screwed and glued to the body (yellow on the image)
Step 13: Conveyors

The conveyor belts are tensioned between the thickest axes.
We use bicycle tires as conveyor belts.
Step 14: Make Back

We stretch an orange rope between the two sides as reinforcement.
On the ropes we put a cardboard.
Step 15: Final Result

Step 16: Product Is Use
Recommendations.

Making Time Contest

For the Home Contest

Make it Resilient

- College Football
- Soccer (North America)
- World Football (Europe)
- Pro Wrestling
- Buffalo Bills
- Miami Dolphins
- New England Patriots
- New York Jets
Baltimore Ravens
- Cincinnati Bengals
- Cleveland Browns
- Pittsburgh Steelers
- Houston Texans
- Indianapolis Colts
- Jacksonville Jaguars
- Tennessee Titans
- Denver Broncos
Kansas City Chiefs
- Las Vegas Raiders
Los Angeles Chargers
Dallas cowboys.
- New York Giants
- Philadelphia Eagles
- Washington Commanders
- Chicago Bears
- Detroit Lions
- Green Bay Packers
- Minnesota Vikings
- Atlanta Falcons
- Carolina Panthers
New Orleans Saints
- Tampa Bay Buccaneers
- Arizona Cardinals
- Los Angeles Rams
- San Francisco 49ers
- Seattle Seahawks
- Fantasy NFL
- Watch The NFL
Sports. Honestly. Since 2011
5 teams that could draft “throwing machine” prospect.
- April 20, 2024
- Anthony Palacios

Here are five teams that could draft “Throwing Machine” Prospect and FSU product quarterback, Jordan Travis in this year’s NFL Draft. The top-1000 overall recruit in 2018 spent one year with Louisville before transferring to Florida State, barely seeing any action in his debut season. Travis took over for the Seminoles mid 2020 with mixed results, before becoming one of the best signal-callers of the program in the ACC. In 2022, he completed 64% of his passes for 3,214 passing yards and touchdowns with just five picks, making him the second-team All-ACC at his position.
Travis has ascended to new heights, becoming the conference’s Player of the Year despite missing the rest of the year with injury. As the Draft is on the horizon, he is earning many comparisons from talking heads and scouts. According to ESPN Jeremy Fowler , Travis earned a scouting comparison to Dallas Cowboys’ Dak Prescott ahead of this year’s draft.
“He reminds me a little bit of Dak Prescott coming out of Mississippi State. Dak wasn’t a refined passer at the time but he got the job done and was a gamer,” he said “This kid has some of that to him.”
According to a scouting report , they described Travis like a machine as a thrower, staying on a line on his drops and being uber-consistent with his delivery. He’s one of the scramblers that has made him one of the most effective players on the field. Travis isn’t Drake Maye, Caleb Williams or J.J. McCarthy but he could still be a top prospect in the later rounds. Here are five teams that could draft Travis.
5 Teams That Could Draft Jordan Travis
The Ravens have one of the best quarterbacks in the league. Lamar Jackson has ensured his job security heading into this season. However, Jackson did miss 10 games over the past seasons so this means adding a high-level backup is important. Travis isn’t going to produce big numbers like Jackson but it’s a better option than the depth they have. It’s not to say Josh Johnson or Malik Cunningham aren’t reliable but adding a dual-threat would be important.
Injury or circumstances may arise for the Ravens so they may play it safe by bringing in at least one quarterback to help Jackson. This potential pick won’t replace Jackson by any means but it provides extra security for an offense that’s been consistent the past two years.
The quarterback position isn’t a need for the team but they’re doing their homework this Draft to see who’s out there. Justin Herbert will still be the starter for the next several years but this doesn’t mean he’ll stay for all those seasons. He has a multi-year contract extension in his pocket but the weapons the team has is insufficient. Wide Receiver is the position they need and if they don’t pick one reliable wideout threat then that could Herbert to crumble.
The Chargers must have reliable weapons for their franchiser to produce results on the field. Herbert missed the remainder of the 2023 season with injury, and Easton Stick was the starter. So this means that drafting Travis wouldn’t be a bad thing but it adds more options for the Jim Harbaugh era.
The Chiefs are loaded in their quarterback room entering this season with a stacked roster of talent. However, Carson Wentz is on a one-year deal backing up Patrick Mahomes this upcoming fall. Adding Travis could stir some competition for the backup position but it provides relief for the team if Mahomes suffers an injury. He isn’t getting younger so adding a talented prospect in the late round wouldn’t hurt the team.
This seems more likely to happen in this year’s draft. According to a report , the Cowboys are urged to add the FSU product as Prescott’s replacement. The comparison between Travis and Prescott isn’t by accident so this high-level draft pick in the late round could intrigue Dallas. There has been yet a deal to be done between Prescott and the organization so adding a dual-threat for insurance is likely.
Travis may have been one of the forgotten prospects in this year’s draft but he could work his way back up if the Saints take a chance on him. Derek Carr is the starter but he hasn’t been able to produce. He could be on the hot seat this year and Travis could be his replacement.

Tory Taylor 2024 NFL Draft Profile
The MVP of the last few Iowa teams, Tory Taylor looks to be the first specialist taken in this year’s draft. Punters are people, too!

AFC Contender May Sign $28 Million Free Agent
Here is how AFC Contender Los Angeles Chargers may sign $28 million free agent and former Carolina Panther, DJ Chark.

Three Dynasty Fantasy Football Sleepers in the 2024 NFL Draft
Last year Puka Nacua and Tank Dell were sleepers that took the dynasty landscape by storm. Who could it be in 2024?

Jalyx Hunt 2024 NFL Draft Profile
Jalyx Hunt was a whale in a koi pond at the FCS level and will end up as the first non-FBS player drafted this year.
Send Us A Message
IMAGES
VIDEO
COMMENTS
Get (1) Hex M3-0.5 x 20mm screw and the Metric Thumb Screw and push them together. Use superglue to keep it together. Get (3) M3-0.5 x 16mm screws which you will use the secure the Base Slide to the Y-Front part. You may need to use (3) M3-0.5 nuts in order to hold it in place.
Step 1: Assembly - Y Axis. Take the 2040mm profile and attach the base plates to both the ends. Use the sliding nuts and m4 bolts to attach the base plates to the profiles. Now turn the profile and attach rubber feet to the bottom slots of the base plates. These rubber feet will hold the machine in place on smooth surfaces.
This is the Version 2.0 of the Arduino Homework Writing Machine - 2D CNC Plotter. this version comes with a lot of upgrades from the previous one, which incl...
Make DIY Homework Writing Machine at Home: Drawing Robot/Pen Plotter/Drawing Machine is an Open Hardware version of the famous machine AxiDraw which it is a pen plotter, capable of writing or drawing on almost any flat surface. It can write with pens, permanent markers, pencils, and other wr…
In this video we make homework writing machine using Arduino uno and stepper motors.This writing machine can be used for writing and drawing in science proje...
Get (2) 3mm linear rods and the following 3D printed parts (Slider, Pen Holder, Base Slide, 3MM Metric Thumb Screw) Get (1) Hex M3-0.5 x 20mm screw and the Metric Thumb Screw and push them together. Use superglue to keep it together. Get (3) M3-0.5 x 16mm screws which you will use the secure the Base Slide to the Y-Front part.
Step 2: Make Y Axis Slider. Take two 42 cm long 8 mm threaded rods, 8 mm nuts, and the stepper motor holder after all the 3D-printed parts have been completed printing. Then, as shown in the picture, passing this threaded road from the bottom holes in the stepper motor holder.
Learn- how to make a drawing of homework writing machine for student using arduino nano micro controllerFull Details - https://techboystoys.com/152-2/ Compon...
Get (1) Hex M3-0.5 x 20mm screw and the Metric Thumb Screw and push them together. Use superglue to keep it together. Get (3) M3-0.5 x 16mm screws which you will use the secure the Base Slide to the Y-Front part. You may need to use (3) M3-0.5 nuts in order to hold it in place.
1. Download and run the AxiDraw software installer for Windows: Download link (21 MB ZIP archive) The installer is an executable, named "AxiDraw_391.exe"; Unzip, open, and run it. 2. Download and install Inkscape version 1.2 from the download page at Inkscape.org. (Most users will want the 64-bit version and the "MSI" installer.)
This is a game built with machine learning. You draw, and a neural network tries to guess what you're drawing. Of course, it doesn't always work. But the more you play with it, the more it will learn. So far we have trained it on a few hundred concepts, and we hope to add more over time.
AxiDraw machines work with a variety of writing instruments, including permanent markers and fountain pens. The unique writing head extends beyond the base of the machine, making it possible to write or draw on almost any flat surface. AxiDraw is the real deal: Designed, manufactured, and supported in USA, and backed by exclusive software for ...
Make DIY Homework Writing Machine at Home. Drawing Robot/Pen Plotter/Drawing Machine is an Open Hardware version of the famous machine AxiDraw which it is a pen plotter, capable of wr. Intermediate Full instructions provided 15 hours 20,272. Things used in this project . Hardware components:
Learn: How to make a drawing of homework writing machine step by step making process for a student using Arduino UNO and L293D modules.Components Required:1....
DESCRIPTION5 page PDF printable art worksheetHomework Machine Drawing Prompt - instant printable art worksheet for the art room, the classroom, homeschooling or remote learningStudents use their imagination to design a Homework MachineGood for a stand alone drawing projectUse as an introduction to a...
Step 4: Unscrew Stepper Motor. Open one screw on sliding shaft and 2 screw on stepper motor. Disassemble stepper motor and sliding parts from one rectangle. Remove all circuit of sliding part and cut middle part of this sliding part. Now you have 2 PCs of plastic part.Combine both plastic object and stick with FeviQuik.
EXTREMELY VERSATILE MACHINE, Designed to Serve a Wide Variety of Everyday and Specialized Drawing and Writing Needs. You Can Use it For Almost Any Task That Might Normally be Carried Out with a Handheld Pen. Use Your Computer to Produce Writing that Appears to be Handmade, Complete with the Unmistakable Appearance of Using a Real Pen (as ...
printdisabled; internetarchivebooks. Contributor. Internet Archive. Language. English. 146 pages ; 22 cm. Four fifth-grade students--a geek, a class clown, a teacher's pet, and a slacker--as well as their teacher and mothers, each relate events surrounding a computer programmed to complete homework assignments. Accelerated Reader AR-ATOS 4.8.
Easydraw v3 purchase link :https://shopmakerq.com/product/easydraw-v3-writing-and-drawing-machine-fully-assembled/Hello, friends this time I have amazing CNC...
1-48 of 67 results for "homework writing machine robot" Results. Check each product page for other buying options. Price and other details may vary based on product size and colour. WEDRAW Educational, Eggy Tech, STEM, Robot Toys for Kids, 3-8 Years Old, Learn Drawing , Counting , Math Numbers , English Letters and Spelling Words Multi ...
The homework can end in 1 of the 4 compartments with there own achievements. The homework machine is a stimulating and a fun way to make homework and collect it. c.2007 All. ideas, concepts, drawings, pictures, videos, documents, posters, comments, mock-up scale models, prototypes and machines that are developed in the context of MyMachine are ...
Here are five teams that could draft "Throwing Machine" Prospect and FSU product quarterback, Jordan Travis in this year's NFL Draft. The top-1000 overall recruit in 2018 spent one year with Louisville before transferring to Florida State, barely seeing any action in his debut season. Travis took over for the Seminoles mid 2020 with mixed ...
Hey, guys welcome back to my channel, This is a robot that can draw all kinds of pictures and also write your homework. Also known as a 2d CNC PLOTTER machi...
घर पर बनाए होमवर्क लिखने वाली मशीन | how to make CNC Plotter at home AXIDRAW DRAWING MACHINE XY PLOTTER ( full assemble machine 👇👇👇 ...