
Task management in Microsoft 365

Easily manage tasks across Microsoft 365
Access and update your tasks as you work, no matter which app you’re using.
See your tasks where you work
Stay focused and productive wherever you go. See your tasks across your lists as you move between apps and devices.
Manage tasks and work with Microsoft 365
Stay on top of all your tasks
View all your tasks from Microsoft To Do and Microsoft Planner with Tasks in Microsoft Teams. Plus, create tasks from Teams messages and publish tasks from corporate to frontline workers.

Convert emails to tasks
Flag emails or drag them into the Microsoft To Do pane to create and manage tasks directly in Outlook for the web.
Focus on what matters
Keep track of individual tasks in Microsoft To Do using intelligent features to collect, prioritize, and accomplish what’s most important.

Get more work done as a team
Manage team tasks with Planner. Build Kanban boards, add content-rich tasks, get visual status, and collaborate within Planner or Tasks in Microsoft Teams.

Collaborate on shared Microsoft 365 documents
Use @mentions within comments in Word, Excel, and PowerPoint to create and assign tasks. 1 Receive an email notification when you’re assigned a task, see a preview of the document, and reply directly from Outlook.

Get the most out of task management in Microsoft 365

Manage all your tasks in Microsoft Teams
Bring together your individual tasks from Microsoft To Do and team tasks from Planner and manage them all in one place with Tasks in Microsoft Teams.

Align tasks from corporate to the frontline
Plan centrally, manage regionally, and execute locally—all with one task management tool that provides real-time visibility across all your frontline locations.

Choose the right tool for managing work
Determine the best tool for managing your work—Microsoft To Do, Planner, Tasks in Microsoft Teams, Microsoft Lists, or Microsoft Project—with our when-to-use guides.

Create tasks from flagged emails
Flag emails in Outlook for the web to add them as tasks in Microsoft To Do and manage them alongside your other tasks using features such as due dates, reminders, and My Day.

See tasks from Planner in Microsoft To Do
Automatically sync your Planner assignments to the dedicated "Assigned to you" list in To Do to manage all your individual tasks in one app.
Read more about task management
Organize your day from start to finish with task management, digital productivity tools to maximize your executive function skills, how task management software can help your teams transition to a hybrid workplace, using task management software to reduce wasted time.
Get best-in-class productivity and task management apps with intelligent cloud services that transform the way you work with Microsoft 365.
Talk with sales
Speak with a sales specialist to learn more. Available M-F 6 AM to 6 PM PT.
1-855-270-0615
- Chat with sales
A sales specialist can help answer your questions. Available M-F 6 AM to 6 PM PT.
Follow Microsoft 365
- Contact sales
Available M-F 6 AM to 6 PM PT.
Assignment fields
The following are the assignment fields in Microsoft Office Project. For more information, click a field name.
Actual Cost fields
Actual Finish fields
Actual Overtime Cost fields
Actual Overtime Work fields
Actual Start fields
Actual Work fields
ACWP fields
Assignment Delay fields
Assignment Units fields
Baseline Cost fields
Baseline Finish fields
Baseline Start fields
Baseline Work fields
Baseline1-10 Cost fields
Baseline1-10 Finish fields
Baseline1-10 Start fields
Baseline1-10 Work fields
BCWP fields
BCWS fields
Confirmed fields
Cost fields
Cost Rate Table fields
Cost Variance fields
Cost1-10 fields
Critical fields
Date1-10 fields
Duration1-10 fields
Enterprise Cost1-10 fields
Enterprise Date1-30 fields
Enterprise Duration1-10 fields
Enterprise Flag1-20 fields
Enterprise Number1-40 fields
Enterprise Resource Outline Code1-29 fields
Enterprise Text1-40 fields
Finish (assignment field)
Finish Variance fields
Finish1-10 fields
Flag1-20 fields
Hyperlink fields
Hyperlink Address fields
Hyperlink Href fields
Hyperlink SubAddress fields
Indicators fields
Leveling Delay fields
Linked Fields fields
Notes fields
Number1-20 fields
Outline Level fields
Overallocated fields
Overtime Cost fields
Overtime Work fields
Peak fields
Percent (%) Work Complete fields
Priority fields
Project fields
Regular Work fields
Remaining Cost fields
Remaining Overtime Cost fields
Remaining Overtime Work fields
Remaining Work fields
Request/Demand (assignment field)
Resource Group fields
Resource ID (assignment field)
Resource Initials fields
Resource Name (assignment field)
Resource Type (assignment field)
Response Pending fields
Start fields
Start Variance fields
Start1-10 fields
Task ID (assignment field)
Task Name (assignment field)
Task Outline Number (assignment field)
Task Summary Name fields
TeamStatus Pending fields
Text1-30 fields
Unique ID fields
Update Needed fields
Work fields
Work Contour fields
Work Variance fields

Need more help?
Want more options.
Explore subscription benefits, browse training courses, learn how to secure your device, and more.

Microsoft 365 subscription benefits

Microsoft 365 training

Microsoft security

Accessibility center
Communities help you ask and answer questions, give feedback, and hear from experts with rich knowledge.

Ask the Microsoft Community

Microsoft Tech Community

Windows Insiders
Microsoft 365 Insiders
Was this information helpful?
Thank you for your feedback.
Using the Assignment Owner Field with Project Online
Background information.
A couple of weeks ago, there was an interesting question in the Project user forum on the Internet. My answer to that question revealed why and how to use the Assignment Owner field in the Microsoft Project desktop application, when used with either Project Online or Project Server. Following is a summary of the user’s problem:
- In the Microsoft Project schedule, the project manager needs to assign resources to tasks, but these resources do not have access to a computer. These resources include people in skilled trades such as electricians, pipe fitters, etc.
- These resources report to a supervisor, who is responsible for collecting task progress from them, and then entering their progress in Project Online.
- On the Tasks page in Project Web App, the supervisor needs to be able to enter progress on the tasks assigned to the resources who report to him.
The solution to this problem is for the project manager to use the Assignment Owner field in the Microsoft Project schedule. However, before the project manager can use this field, he/she must complete a couple of preliminary steps. The first step is to build the project team and to include the supervisor as a part of the team. This step is mandatory and is vitally important to the process.
In Figure 1, notice the project team members shown on the right side of the Build Team dialog in Microsoft Project. In this project team, Dale Howard is the supervisor to whom Cindy McNair, Larry Barnes, and Mickey Cobb need to report their task progress. Even though Dale Howard will not be assigned to any tasks in the project, he must be a part of the project team. This is so that he can be designated as the Assignment Owner for the tasks assigned to Cindy, Larry, and Mickey.
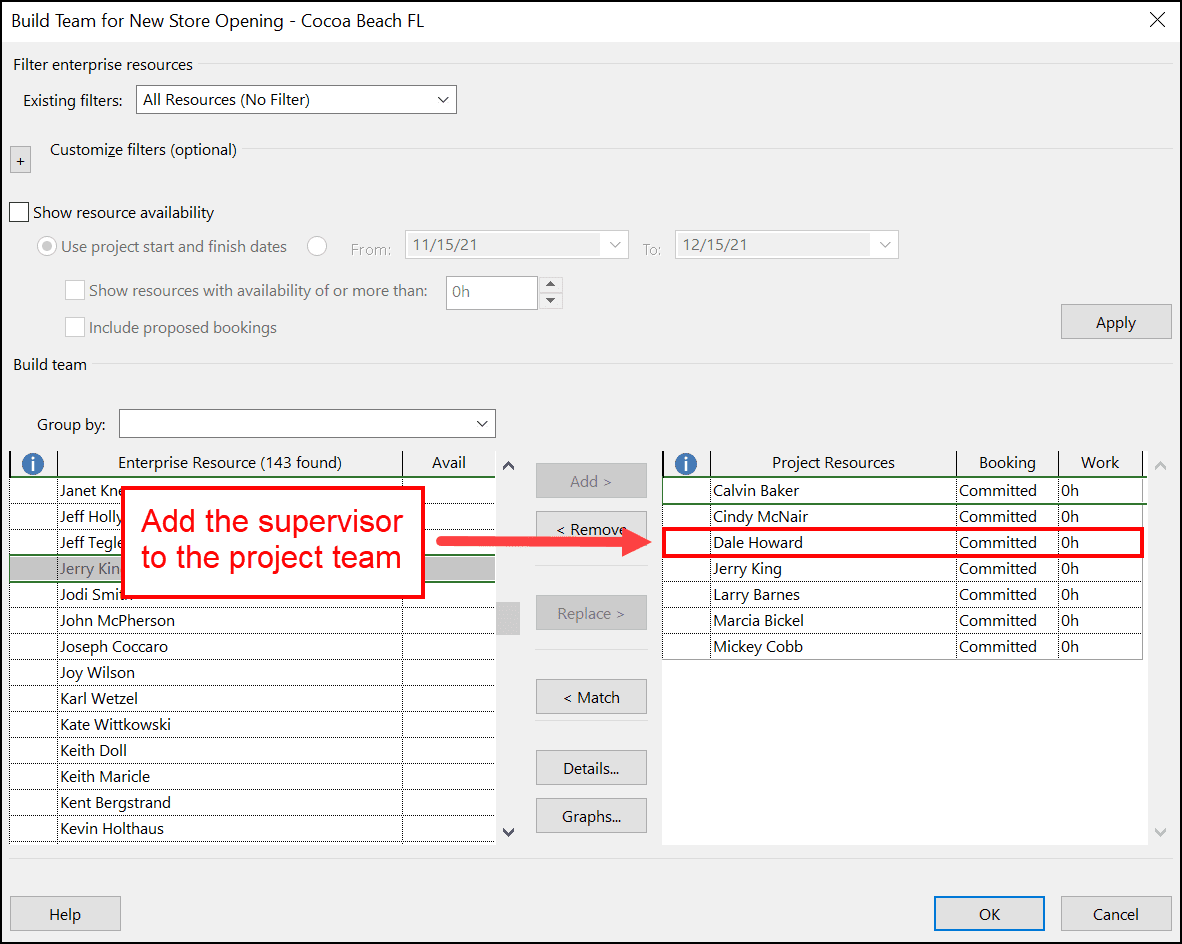
Figure 1: Project team includes the supervisor
The second step in the process is to assign the team members to the tasks on which they will work in the project. Notice in Figure 2 that the project manager has assigned resources to all the detailed tasks in the project schedule. Notice that Dale Howard (the supervisor) is not assigned to any tasks in the project. Remember that he merely serves as the supervisor of Cindy, Larry, and Mickey.
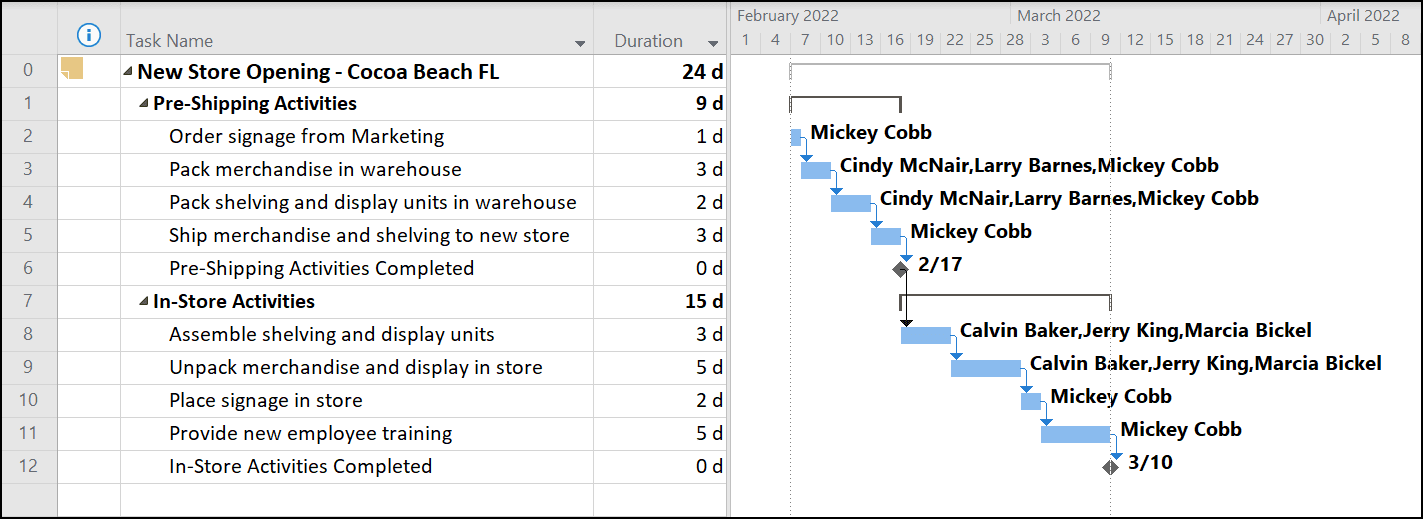
Figure 2: Team members assigned to all detailed tasks
The third step is to assign Dale Howard (the supervisor) as the Assignment Owner for Cindy, Larry, and Mickey. By the way, the Assignment Owner field determines who sees the tasks on the Tasks page in Project Web App. Since Cindy, Larry, and Mickey do not have computers and do not use Project Web App, they should not be the Assignment Owner for their tasks. Instead, Dale Howard needs to be specified as the Assignment Owner for their tasks, so that he can see their tasks on his Tasks page in PWA and enter the task progress that they report to him.
To designate a supervisor as the Assignment Owner for one or more resources, apply the Resource Usage view. Click the column header in the Add New Column virtual column and select the Assignment Owner field in the pick list of available resource fields. Finally, the widen each column in the view, as needed. Notice in Figure 3 that the Assignment Owner value for every task assignment is the same as the name of the resource assigned to the task. This means that Cindy is the Assignment Owner for her tasks, Larry is the Assignment Owner for his tasks, and Mickey is the Assignment Owner for her tasks.
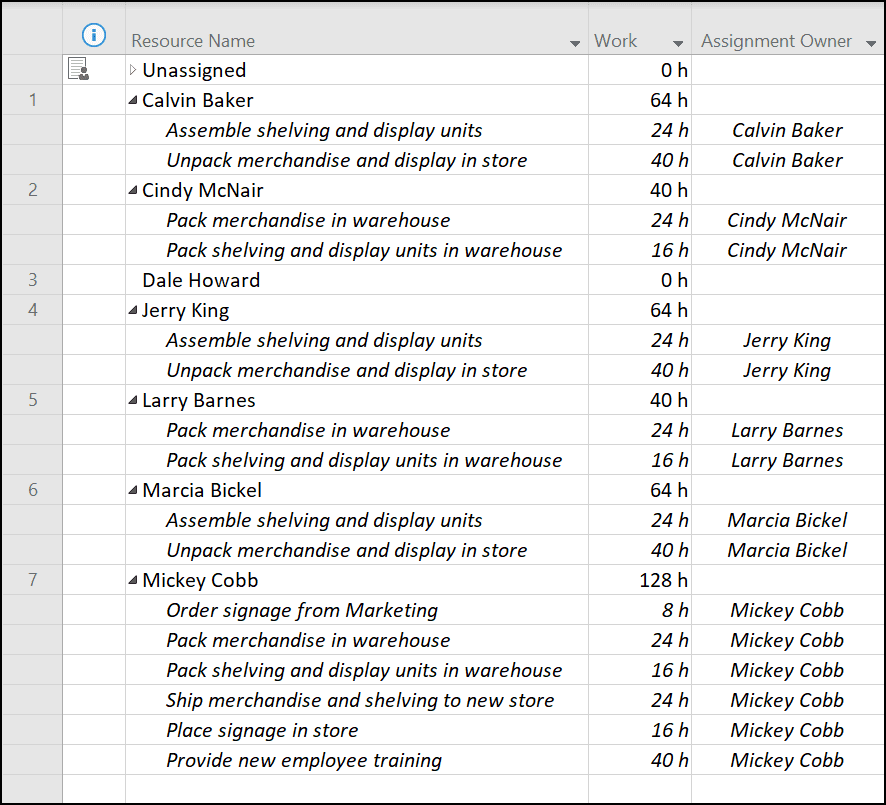
Figure 3: Current Assignment Owners for each task
To change the Assignment Owner value for a task assignment, click the pick list in the Assignment Owner column for the task, and then select the name of the supervisor in the pick list. For example, notice in Figure 4 that the project manager is selecting Dale Howard in the Assignment Owner pick list for the first task assigned to Cindy McNair.
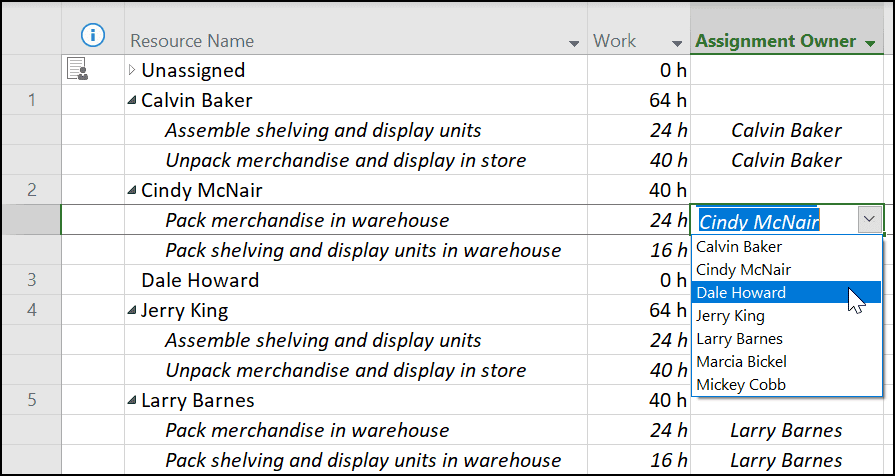
Figure 4: Select the new Assignment Owner for a task assignment
Continue selecting the supervisor as the Assignment Owner for the tasks assigned to each of the resources who report to that supervisor. To speed up this process, you can use the Fill Handle (like the Fill Handle feature found in Microsoft Excel) to fill the Assignment Owner value into successive cells. You can also use Copy & Paste to speed up the process as well. Notice in Figure 5 that the project manager specified Dale Howard as the Assignment Owner for every task assigned to Cindy, Larry, and Mickey.
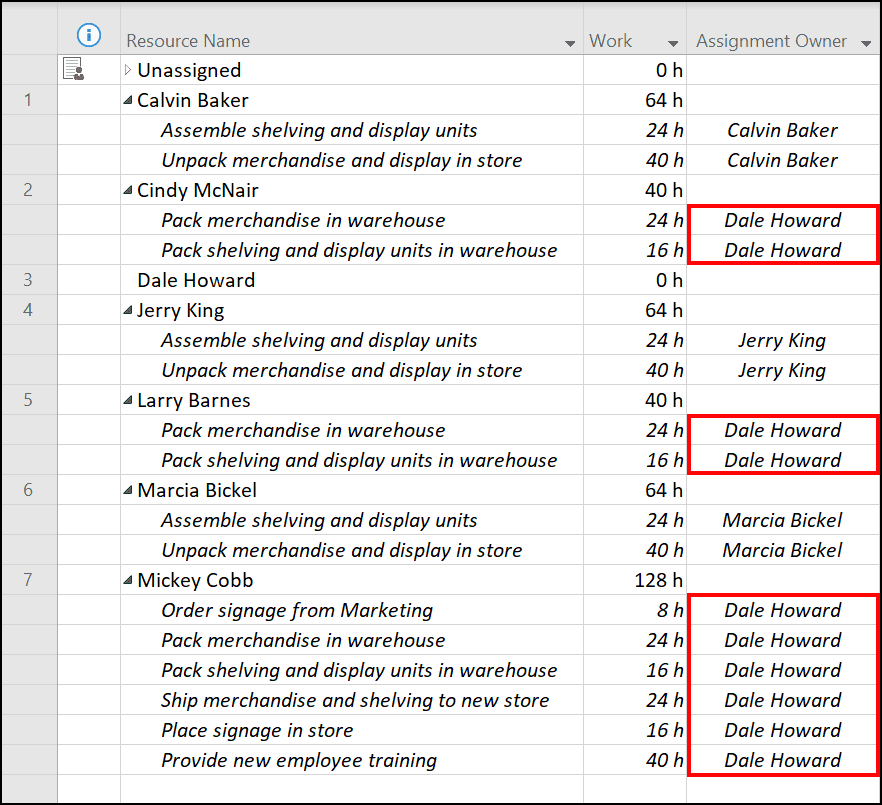
Figure 5: Assignment Owner specified for each task assignment
When the project manager finishes the process of specifying Dale Howard (the supervisor) as the Assignment Owner for the tasks assigned to Cindy, Larry, and Mickey, the project manager then needs to save and publish the latest changes to the project. The act of publishing the project will force the tasks assigned to Cindy, Larry, and Mickey to display on the Tasks page for Dale Howard.
Figure 6 shows the Tasks page in PWA for Dale Howard. The Project Online application administrator set up this “best practice” layout of the Tasks page to support the organization’s default method for reporting progress (% of Work Complete) and to support the needs of supervisors like Dale Howard in the organization. By the way, notice that the Resource Name column displays the name of the resource who is assigned to each task.
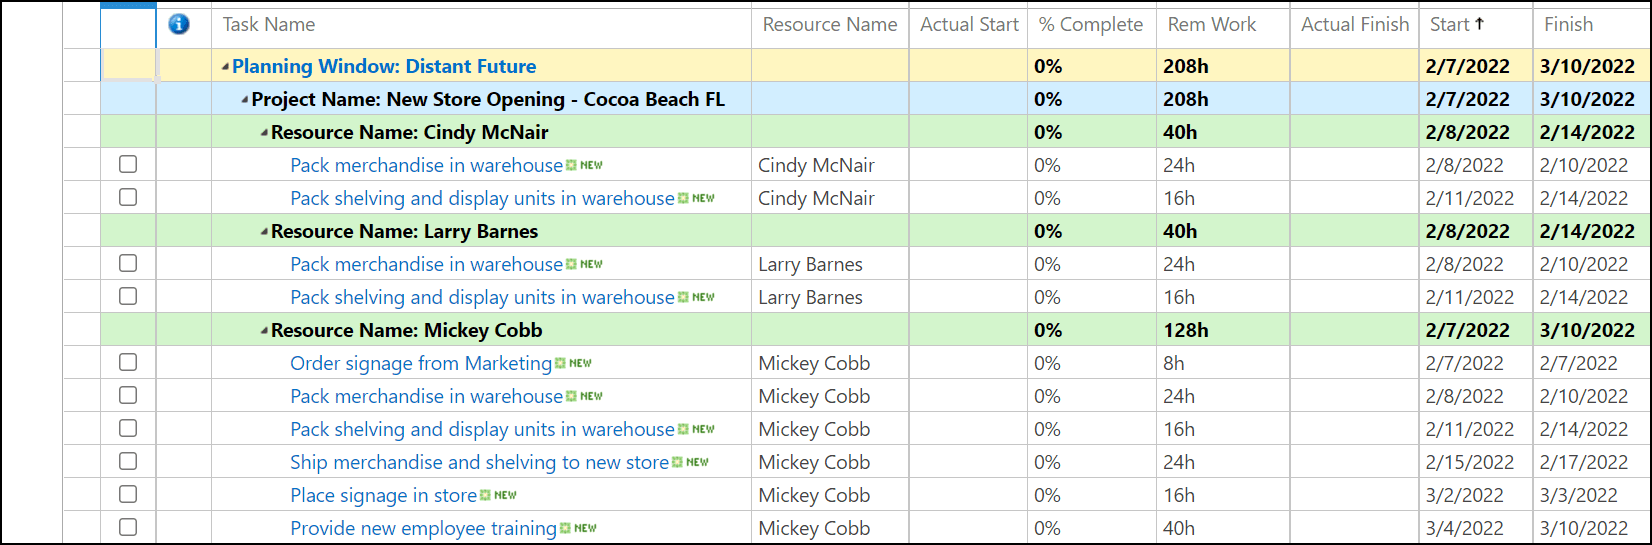
Figure: Tasks page in PWA
Setting Up the Default Assignment Owner
Using the process described previously in this article, project managers would need to manually specify the Assignment Owner values in every project they manage. To eliminate this manual process, the app admin for Project Online or Project Server should specify the Default Assignment Owner value for resources in the Enterprise Resource Pool, wherever needed. In the example used in this article, the app admin would need to specify Dale Howard as the Default Assignment Owner for Cindy McNair, Larry Barnes, and Mickey Cobb.
To begin this process, the app admin should log into Project Web App with Administrator permissions, and then navigate to the Resource Center page in PWA. The app admin should select the checkboxes for names of the resources who need to have their Default Assignment Owner values changed. With the resource names selected, the app admin should click the Bulk Edit button. Figure 7 shows the top half of the Bulk Edit page with the names of Cindy, Larry, and Mickey selected in the Resource Center page.
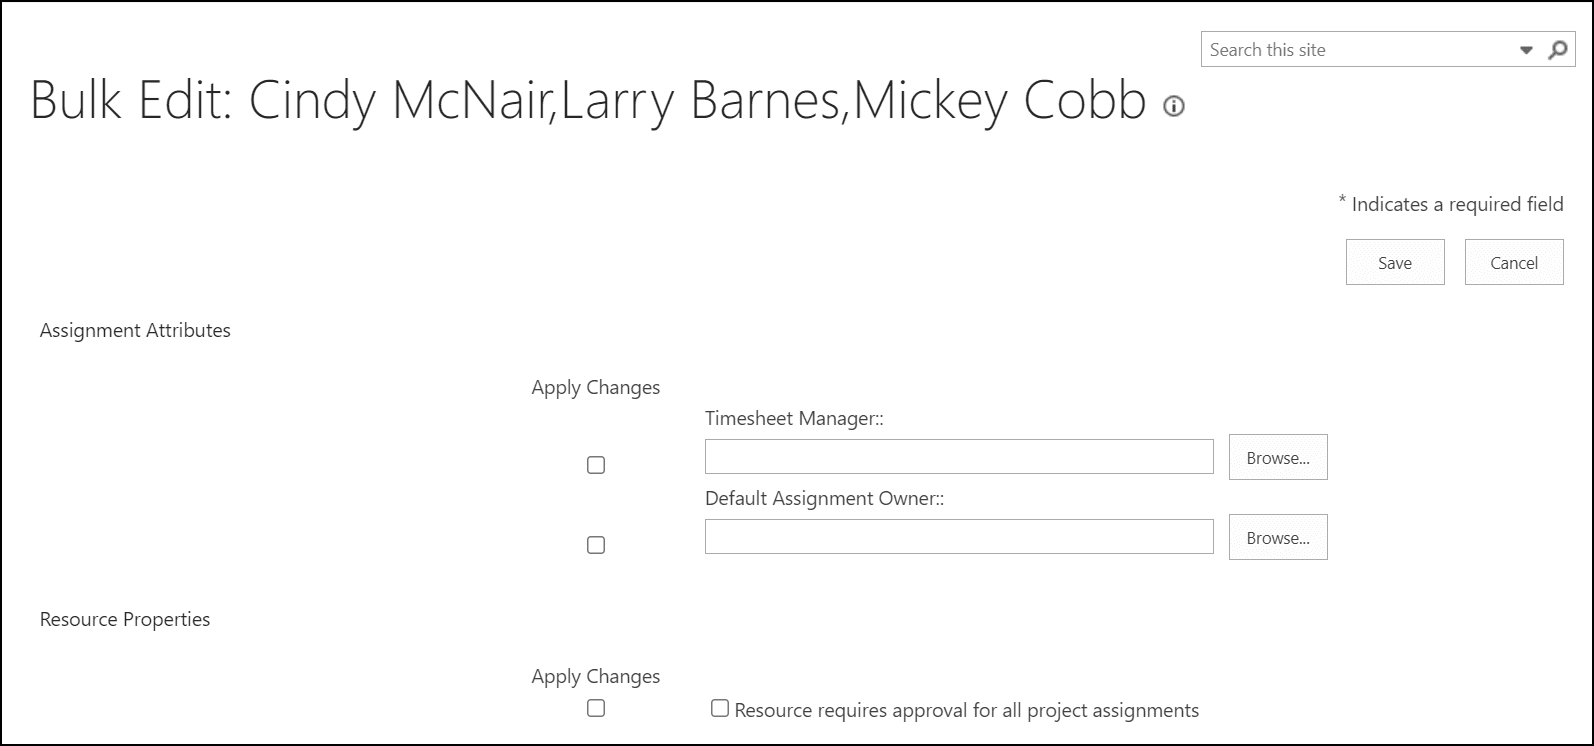
Figure 7: Build Edit Page in PWA
On the Bulk Edit page, the app admin should click the Browse button to the right of the Default Assignment Owner field. Project Web App displays the Pick Resource dialog. In this dialog, the app admin should select the name of the supervisor, which in this case would be Dale Howard, such as shown in Figure 8. After selecting the name, the app admin should click the OK button.
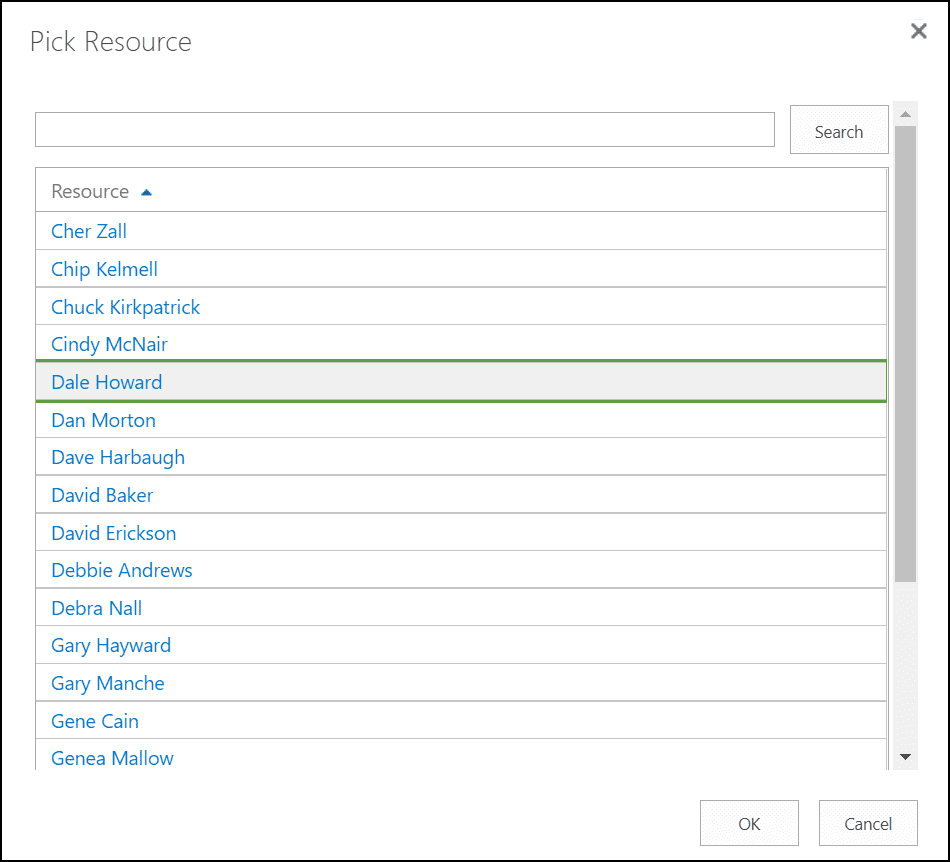
Figure 8: Pick Resource dialog
After the app admin selects a name in the Pick Resource dialog and clicks the OK button, Project Web App updates the Bulk Edit page, such as shown in Figure 9. To finish this process, the app admin must select the Apply Changes checkbox for the Default Assignment Owner field (Project Web App does not select this checkbox automatically), and then click the Save button.
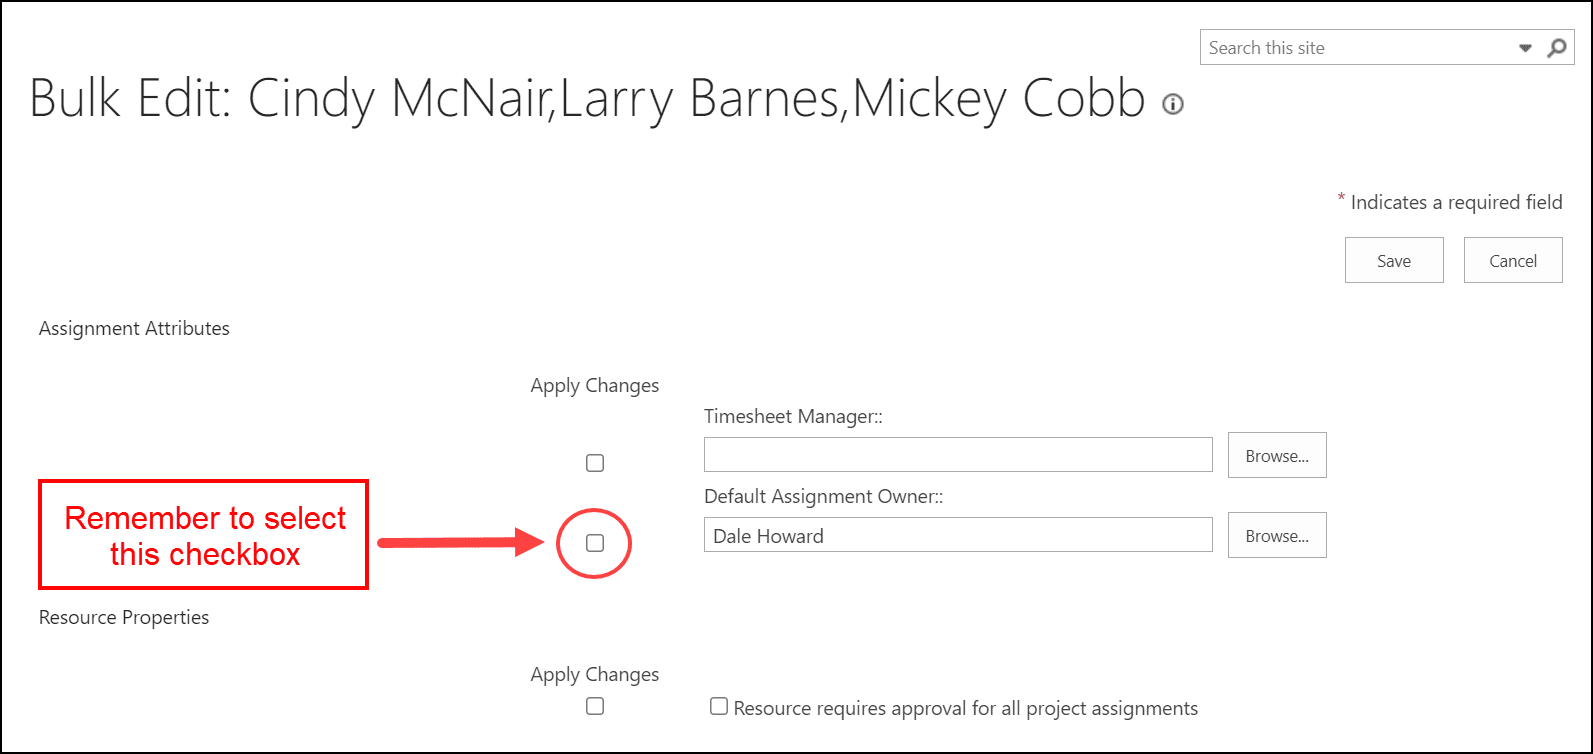
Figure 9: Updated Bulk Edit page
Once the app admin completes the preceding steps, project managers should not need to specify a value in the Assignment Owner field for any of the resources in their project teams for all future projects, thus saving them a lot of time and manual labor.

Leave a Reply Cancel Reply
You must be logged in to post a comment.
Remember Me
Lost Password
Please enter your username or email address. You will receive a link to create a new password via email.
Assignments in Microsoft Project

Assignments in Microsoft Project. Most people use Microsoft Project to see tasks in a ‘Gantt Chart’. Assigning resources to these tasks via the ‘Resource Sheet’ is usually their next step.
Assignment views are required when you want to look at how a particular resource works on a particular task. This is important if the assignment has a different pay rate for the task, or if the work is unequally spread through the duration.
Here is a short video clip on adding resources to tasks and editing assignments and cost table rates.
Adding Tasks and Resources to Microsoft Project
Most people are aware of the following MS Project actions.
Adding tasks to the ‘Gantt Chart’ view, and adding resources into the ‘Resource Sheet’ view. More information can then be obtained by double clicking the task or the resource:
- Double click a task: Task Information – everything about the task
- Double click a resource: Resource Information – everything about the resource
However, it is often necessary to look at how a resource works on just one particular task – this is an assignment. For instance how Sam works on Task B, but not how she works on Task A.
Finding the Assignments in Microsoft Project
To see the assignments, you will need to change to one of the ‘Usage’ views – I recommend the ‘Resource Usage’ view.

Resource Usage View
Now, double-click on an assignment to see ‘Assignment Information’.

Assignment Information
In this dialog box you can change the work profile or contour, and change the cost rate tables.
A good use for this would be if the resource gets paid extra for working off-site, or on certain tasks.
I have a separate blog and video which examines the application of work contours to assignments .
Assignments are about how a resource works on a particular task – not about everything the resource does.
AbleSim Project Management Simulations YouTube Channel
AbleSim have a YouTube channel dedicated to work with Project Management Simulations, Masters Dissertation Support and MS Project.
Subscribe to this channel here!
Project Management Training YouTube Channel
Andrew Bell has a YouTube channel dedicated to Project Management Training with over 10 hours of video arranged by 97 videos in 20 playlists.
Follow 🔔 AbleSim 🔔 on twitter @AbleSim
Join the conversation #pmsim
- Tweets could not be loaded at this time.
Like us on Facebook
- Privacy Overview
- Strictly Necessary Cookies
- 3rd Party Cookies
This website uses cookies so that we can provide you with the best user experience possible.
Cookie information is stored in your browser and performs functions such as recognising you when you return to our website and helping our team to understand which sections of the website you find most interesting and useful.
Strictly necessary cookies should be enabled at all times so that we can save your preferences for cookie settings.
If you disable this cookie, we will not be able to save your preferences. This means that every time you visit this website you will need to enable or disable cookies again.
This website uses Google Analytics to collect anonymous information such as the number of visitors to the site, and the most popular pages.
Keeping this cookie enabled helps us to improve our website.
Please enable Strictly Necessary Cookies first so that we can save your preferences!
- Skip to Content
- Skip to Main Navigation
- Skip to Search

Indiana University Indiana University IU

- Microsoft in Minutes
- Accessibility
- Design and Media
- IU Services
- Productivity
- Research Computing
- Safe IT Practices
- Web Development
- Expand Courses
- PDF Materials
- Recorded Events
- By Title (A-Z)
- By Developer (A-Z)
- Request a Session
- Earn Credentials
- View Partners
- K-12 Teachers
- IU Instructors
UITS IT Training

- Explore Topics
Using Microsoft Planner for group project management
Microsoft Planner is a project management application that helps you organize and track tasks for group and personal projects. This article focuses on how you might use a plan for group projects, but the same concepts can apply to personal projects, too. Planner is part of the Microsoft 365 suite of applications and integrates with other apps like Outlook, Teams, and To Do. Planner lets you create plans, assign tasks, set due dates, monitor progress, and collaborate with your team members. Planner is ideal for managing projects that involve multiple people, tasks, and deadlines, such as a class assignment, a research project, or a work presentation.
Ways to use Microsoft Planner
You can use Microsoft Planner in two different ways: as an integrated component of a team in Microsoft Teams or as a standalone project plan through the Planner application. We will primarily focus on using Planner as a standalone application and not integrated with Microsoft Teams. We will discuss the integration with Microsoft Teams more in-depth in an upcoming article called "Managing and creating Tasks in Microsoft Teams and the Planner app."
Is there an app for that?
As we discussed in the introduction of this series , there is no desktop application for Microsoft Planner. There are Android and iOS applications as well as an integration with Microsoft Teams through the Planner app (formerly Tasks by Planner and To Do). For this article, we will use the online version of Microsoft Planner since the experience of using the web application is remarkably similar to using the Planner app within Microsoft Teams. The Planner web application is accessible from Microsoft 365 at IU and from the Microsoft 365 desktop application.
- To access Microsoft at IU, in a web browser, Navigate to https://microsoft.iu.edu and login .
- To launch Planner, from the Microsoft 365 application, Click the App launcher button, Click the Planner icon
When Microsoft Planner loads, you'll see the Planner Hub. The Hub gives you a snapshot of your plans. If you'd like a more detailed view of a plan, you can pin that plan.

NOTE : This is a training account, so these plans aren't actively in use and will seem empty.
You can see all your plans by clicking Show more in the sidebar or launch a recent or pinned plan by clicking the plan from the Hub. Let's create a standalone plan.
How to create a standalone plan in Microsoft Planner
Standalone plans are useful for planning your personal projects, projects with people who don't all belong to a specific team, or if you'd like to make a plan open to the public.
To create a plan in Planner, follow these steps:
- To create a new plan, Click New plan in the Hub sidebar.
You will see a dialog presenting many different starting points for our plan. You can choose any of these that seem to fit your project to help make the plan creation process easier.

- To select a plan template, Click a plan template
This will open a dialog box where you can enter the details of your plan:

- To give your plan a title, in the Enter plan title field, Type a brief title
Access to standalone plans is controlled by a Microsoft 365 group. If you have an existing group, you can use it to control access, or you can decide not to select a group and let Planner make one for you. You can also make a plan available to all members of an existing team within Microsoft Teams. Public plans are available to everyone with an Indiana University Microsoft 365 account.
- To create a standalone plan, Don't add a value to the Add to existing group (optional) field
The Privacy and Sensitivity dropdown allows you to choose whether your plan is public or private. The default is to create a private plan. If you would like to create a public plan, set the Privacy and Sensitivity field value to Public. We will create a private plan in this example.
- To create your plan, Click Create plan
This will take you to the main page of your plan, where you can start adding tasks and members.

Understanding plan structure in Microsoft Planner
Once you have a plan, it's important to understand how Planner organizes tasks. Unlike Microsoft To Do (we took a brief look at To Do in Using Microsoft Outlook for task management ), Planner doesn't use lists to organize tasks. Instead, task cards are organized in buckets. Another difference between Outlook/To Do and Planner is that secondary organization in Planner isn't tied to your Outlook categories. Instead, you can use labels to the same effect.
Using buckets
Buckets are used to organize tasks by a common theme, such as a project phase, the responsible department, a specific location, or the kind of work involved (e.g., testing, rollout, copy editing, etc.). You can also use buckets to keep track of task status if you need a more robust means than the built-in statuses of not started, in progress, and completed.
Before you begin building buckets, it's important to consider the entire project, and the big picture:
- Does your project have several phases? If so, consider creating a bucket for each phase.
- Does your project involve multiple groups of people? If so, consider creating a bucket for each group.
- Are some tasks performed in a particular location or building? If so, consider making a bucket for each location.
Take the time to consider all the different ways that you could group tasks together in your plan and then pick the most important grouping for the project. For example, if identifying project phases is more important than what department is responsible for a group of tasks, create buckets for project phases instead of departments. Don't immediately discard the other groups, though. We'll talk about what to do with them next.
A task can only be in a single bucket at a time so it's important to pick one theme for your buckets and stick to it.
Creating buckets
Now that you've identified your bucket theme, let's create all the buckets we need to get started. By default, if you chose to create a blank plan, Planner creates a To Do bucket. You can rename or delete this bucket as you wish. Remember, you can add more buckets throughout the life of the project.
- To create a bucket, Click Add new bucket , type the name of the bucket, press Enter
- To rename a bucket, Point to the bucket name , click the More options button (…), click Rename , type the new name , press Enter .
Using labels
Labels can be added to tasks to help differentiate them further. You created your buckets to match the most important task grouping you could imagine. Your labels can match all the other groupings you decided weren't the most important. You can create up to 25 labels, each with their own color. A task can be assigned multiple labels.
Creating labels
Since we don't have a task yet, we can't modify a label. In the next section, once we have a task, we can modify the names of our labels. By default, they're named after their color, e.g., Red, Blue, etc.
How to create and assign tasks in Planner
Now that we have our buckets organized, let's start adding some tasks.
- To add a task to a particular bucket, under the bucket name, Click + Add task

This opens the quick-add dialog within the bucket column:

Simply give your task a name (required), a due date (optional), and an assignee (optional).
- To create the task, Click the Add task button
The task is created:

Adding details to a task in Planner
Once a task is created, you can add details to the task to help you and your collaborators complete the task and keep the project on track without missing any details.
- To add details to a task, Click the task card
The task is opened in its detailed view:

From this view, you can:
- Rename the task by clicking on the task name .
- Assign the task to a person or group of people by clicking Assign . This is tied to the IU global address list, but you can also assign tasks to any member of the plan.
- To edit a label, open the label dropdown and click the edit pencil next to the label you'd like to edit.
- Change the task's bucket in the Bucket dropdown list.
- Set the progress flag using the Progress dropdown list. Options are Not started, In progress, Completed .
- Set the priority of the task in the Priority Options are Low, Medium, Important, Urgent .
- Schedule the task to start on a particular date in the Start date
- Schedule the due date for the task in the Due date
- Set the recurrence interval for the task in the Repeat
- Add a description to describe the task with more detail than the task's title in the Notes
- You can choose to show a task checklist on the card on the plan board by checking the Show on card
- You can choose to show an attachment on the card on the plan board by checking the Show on card
- Comment on the task in the Comments
- See and select suggested attachments from within Microsoft 365.
Once you've filled out the details for a particular task, you will see some additional content appear on the card representing the values of the fields for the task:

One of the most powerful capabilities of Planner is the ability to organize your view tasks based on the values in fields like Priority, Assign, Due date, Progress, etc. Using these fields to keep the status of your tasks up to date is also a great way to communicate the status of your work to a project manager and the rest of your project team. Remember the pinned plan from the Hub? That chart is generated based on activity on tasks within Planner.
When you finish modifying the fields for a task, simply click the X in the upper right corner or click the background away from the card to close the task.
Adding members to a plan
Once you've created your plan, it's important to add your team. When we explore using Planner in Microsoft Teams, we'll talk about how to add a plan to a team, but for a standalone plan, we can add anyone we'd like to the plan.
- To add a plan member, in the top right of the screen, Click the Members menu , type the member's name, username, or email , press Enter

NOTE : This menu is tied to the IU global address list. To invite non-IU members, simply type their Microsoft account email address.
Viewing your tasks with purpose in Planner
Once your project is underway, it's important to be able to navigate Planner to keep tabs on progress, identify stuck tasks, ease the load of overburdened team members, and see your plan in a calendar view (that can be integrated into Microsoft Outlook). Planner also provides several filtering and grouping options to help you get a good picture of your project's progress.
Using Planner views
Let's explore the Planner views first:

- Grid view : This shows every task in a single list similar to how tasks appear in Microsoft To Do. Grid view has additional fields that give you a snapshot of the values of fields like priority, assignment, due date, etc., for every task in your plan. This view excels at adding multiple tasks with details quickly.
- Board view : This is the default view that shows your tasks in columns based on your buckets. You can drag and drop tasks between buckets, edit task details, and filter tasks by labels, assignments, or progress.
- Charts view : This view shows you the statistics and charts of your plan, such as the number of tasks completed, not started, or in progress, the distribution of tasks by bucket, label, or assignment, and the status of each member on your plan.
- To add your plan to your Outlook calendar, click the three dots next to the view tabs and click Add plan to Outlook calendar. This option will add the plan as an additional calendar in your Outlook calendar app.
Using Planner filters
Once you've determined the view that is most optimal to survey your tasks, you can further limit what you see by using the filters.

Filters allow you to define properties of tasks you'd like to see in your current view. For example, if you'd like to only see late tasks, select the Late option in the filters menu. Other useful filters include filtering by assignment, bucket, label, etc. You can even use the Filter menu to filter by a keyword that appears anywhere on the task card.
Grouping tasks in Planner
The last way you can customize your view is by determining how your tasks are grouped. By default, tasks are grouped by Bucket. You can change that grouping by clicking the Group by Bucket menu:

NOTE : Grouping isn't available in Grid view.
This rearranges your tasks into columns based on the option you choose. For example, you can group tasks in columns by progress to see what tasks haven't been started vs. which tasks are in progress or you can group by Assigned to for a quick glimpse at a plan member's task load to easily redistribute the work.
Deleting a plan
If you've been following along, you now have a plan you may not use for another purpose. There are also situations where you may want to delete a plan you created because the project is cancelled, completed, or you were just trying things out and want to start fresh. In any case, you can easily delete a plan from the Plan settings.
- To open the plan's settings, next to the view tabs, Click More. Navigate to other pages related to this plan. (...), Click Plan settings
From here, you can do things like change the plan name or access group, modify your notification settings, and even change the plan background.
- To delete a plan, on the General tab of Plan settings, at the very bottom, Click Delete this plan
To become a master project manager using Microsoft Planner, experiment with various combinations of views, filters, and grouping so you can quickly see the tasks you need to see when you need to make decisions and give status updates to stakeholders. In all these views, filters, and groupings, you can view and modify any task.
Microsoft Planner is a powerful and easy-to-use project management application that helps you organize and track tasks for group and personal projects. You can create plans, assign tasks, set due dates, monitor progress, and collaborate with your team members.
What's next?
We've already covered a lot of ground, but there's still a lot to learn to become a tasks master in Microsoft 365!
So far in this series:
- We looked at the Microsoft 365 task system as a whole in An Introduction to Microsoft 365 Tasks .
- We looked at ways to help you keep track of important tasks from your email using email flagging, due dates, and reminders in Outlook and Microsoft To Do in Using Microsoft Outlook for task management .
- This article: We explored the basic skills you need to use Microsoft Planner to manage group projects efficiently and effectively in Planning group projects with Microsoft Planner .
In the final three articles:
- We will look at how to power up your individual and team notetaking using Microsoft OneNote so you never lose track of a meeting action item again in "Taking meeting notes and creating tasks using Microsoft OneNote".
- We will explore the tools available in Microsoft Teams to create and manage tasks, including the new Microsoft Teams Planner app in "Managing and creating Tasks in Microsoft Teams and the Planner app".
- In the final article, we will put all the skills we've learned together and look at how to use the Microsoft To Do application to organize and plan your individual tasks–including a look into how I use these tools on a daily basis–in "Putting it all together to organize your daily workflow with Microsoft To Do".
Principal Microsoft Adoption Consultant & Principal IT Training Consultant, University Information Technology Services (UITS), Indiana University.
The Microsoft in Minutes column won Best in Category for Computer Newsletter (Print or Electronic) in the 2024 Association of Computing Machinery's (ACM) Special Interest Group on University and College Computing Services (SIGUCCS) Communication Awards .
Microsoft in Minutes appears periodically in The Monitor .
UITS IT Training resources and social media channels
This browser is no longer supported.
Upgrade to Microsoft Edge to take advantage of the latest features, security updates, and technical support.
Assignments object (Project)
- 5 contributors
Contains a collection of Assignment objects for a task or resource.
Using the Assignment Object
Use Assignments ( index ), where index is the assignment index number, to return a single Assignment object. The following example displays the name of the first resource assigned to the specified task.
Using the Assignments Collection
Use the Assignments property to return an Assignments collection. The following example displays all the resources assigned to the specified task.
Use the Add method to add an Assignment object to the Assignments collection. The following example adds a resource identified by the number 212 as a new assignment for the specified task.
Project Object Model
Support and feedback
Have questions or feedback about Office VBA or this documentation? Please see Office VBA support and feedback for guidance about the ways you can receive support and provide feedback.
Was this page helpful?
Coming soon: Throughout 2024 we will be phasing out GitHub Issues as the feedback mechanism for content and replacing it with a new feedback system. For more information see: https://aka.ms/ContentUserFeedback .
Submit and view feedback for
Additional resources
Contribute to the Microsoft 365 and Office forum! Click here to learn more 💡
April 9, 2024
Contribute to the Microsoft 365 and Office forum!
Click here to learn more 💡
- Search the community and support articles
- Microsoft 365 and Office
- Search Community member
Ask a new question
Task assignment owner not working correctly.
I have ran into an interesting problem in Project Web App. I have added an employee as a resource using their full name and company email. After doing so if I click on that resource and click on resource assignments I get multiple tasks across multiple projects that do not have that resource assigned to them. Instead it shows another resource that is unrelated to that employee. I have attempted to delete the resource from PWA and it says they can't be deleted due to being the assignment owner on the tasks. When I view all the tasks it's saying the employee is the owner of it does not list them as the owner or even a resource on the task. I have opened up and tried editing the other resource and that employee is not listed anywhere on that resource as an owner or anything.
I am running in circles and not sure what I am missing.
Report abuse
Replies (1) .
- Volunteer Moderator
AndyR_907 --
Open and check out one of the troublesome projects and then apply the Resource Usage view. Temporarily insert the Assignment Owner column in this view. Examine each of the task assignments to see who is currently set as the Assignment Owner. Change the Assignment Owner value to the resource name, as needed. Then save and publish the project. You will need to do this for each of the troublesome projects. Hope this helps.
Was this reply helpful? Yes No
Sorry this didn't help.
Great! Thanks for your feedback.
How satisfied are you with this reply?
Thanks for your feedback, it helps us improve the site.
Thanks for your feedback.
Question Info
- For business
- Norsk Bokmål
- Ελληνικά
- Русский
- עברית
- العربية
- ไทย
- 한국어
- 中文(简体)
- 中文(繁體)
- 日本語
IMAGES
VIDEO
COMMENTS
In the Gantt Chart, go to the Resource Names column. Click the arrow and pick the people to work on the task. If you don't see the name of the person you want to assign, enter a new name. If you don't see any names in the list, then no one has been added to the project yet. Either enter a new name in the column, or add resources to your ...
Step 1: Add people to your project. Add people to your project. You need to add people as well as other resources before you can assign them to work on tasks. The other resources could include material resources like cement or paint, or cost resources like airfare and dining. Change working days for the project calendar.
Assign tasks. Under Assigned to, select the People icon. The first time you assign a task to someone, you'll be prompted to connect the project to a group. To create a new group, select Create group and then select Create and assign. A pane will appear on the right where you can name your project. Or, to share the project with an existing ...
Outline tasks. Indent and outdent tasks to show hierarchy — that is, to turn your task list into an outline of your project. An indented task becomes a subtask of the task above it, which becomes a summary task. Click View > Gantt Chart. In the Task Name column, click the task you want to indent. Click Task > Indent Task .
In a recent webinar, we delved into the various aspects of resource management and task assignment in Microsoft Project.This article aims to provide a concise summary of the key points discussed during the session. We will explore how to effectively use different views, such as the Gantt chart, and leverage the resource tab to quickly manage, assign, and replace resources.
Group assignments. Tips on grouping. Group tasks or resources by one criterion. On the View tab, in the Task Views or Resource Views group, choose the view you want. To group tasks, select a sheet view such as the Gantt Chart, Task Sheet, or Task Usage view. You can also group tasks in the Network Diagram view.
Rollout of this new Team Assignment feature recently completed in all our production Project Online tenants so thought it about time to do a write up. It isn't turned on by default - so you will not see anything change until you are ready for the new behavior. First, I'll show you where you turn it on. Go to PWA Settings, Task Settings ...
Task assignment in Microsoft Project is a strategic process that involves Project Planning, Task Entry, Resource Allocation, Task Assignment, Task Dependencies and Constraints, Monitoring and ...
The Assignment fields indicate whether the row is an assignment row, rather than a task or resource row. There are several categories of Assignment fields. Data Type Yes/No. Assignment (task field) Entry Type Calculated. How Calculated If the row is an assignment row, the Assignment field contains Yes. If not, the Assignment field contains No.
To create a subtask or a summary task, indent a task below another one. In the Gantt Chart view, select the task you want to turn into a subtask, then select Task > Indent. The task you selected is now a subtask, and the task above it, that isn't indented, is now a summary task. Tip: Select Outdent to move the task back to the level of the ...
Once you have created a new project and assigned the tasks to team members, Click on the three dots, "…" -> Assignments. Unlike in the Grid view, columns aren't configurable. The only visible columns are: Assigned To, Task Name, Assignment Start and Finish date. Supports two methods for grouping: Group by Resource and Group by Task.
It is possible to make unique calendar assignments to individual tasks in a Microsoft Project schedule. ... To view the project calendar assignment select the project tab and project information icon, Figure 2. Figure 2. In the project information dialog, Figure 3, we see that the currently assigned project calendar is the '4×10 Work Week ...
A task with a deadline is scheduled just like any other task, but when a task finishes after its deadline, Project displays a task indicator notifying you that the task missed its deadline. To review or change a task deadline, right-click on the task, click Task Information , then click the Advanced tab. Use the Deadline box.
Before we add a split in task 14, it's a good idea to expand the task bars so it's easier to place the split. The easiest way to do that is to go down to the bottom right corner of the window.
Manage tasks between all Microsoft 365 apps and devices to increase productivity and stay focused—transform the way you work with task management software. ... Planner, Tasks in Microsoft Teams, Microsoft Lists, or Microsoft Project—with our when-to-use guides. Learn more ... Automatically sync your Planner assignments to the dedicated ...
Start fields. Start Variance fields. Start1-10 fields. SV fields. Task ID (assignment field) Task Name (assignment field) Task Outline Number (assignment field) Task Summary Name fields. TeamStatus Pending fields.
In the Microsoft Project schedule, the project manager needs to assign resources to tasks, but these resources do not have access to a computer. These resources include people in skilled trades such as electricians, pipe fitters, etc. ... To change the Assignment Owner value for a task assignment, click the pick list in the Assignment Owner ...
Option 1: Use the Task Information Window. To manage resource assignments for a specific task, double-click anywhere on that task. Here, we are double-clicking on the Resource Names cell, but any cell in that row will do: When the Microsoft Project Task Information window appears, click on the Resources tab:
Assignments in Microsoft Project. Most people use Microsoft Project to see tasks in a 'Gantt Chart'. Assigning resources to these tasks via the 'Resource Sheet' is usually their next step. Assignment views are required when you want to look at how a particular resource works on a particular task. This is important if the assignment has ...
In this Microsoft Project 2013 tutorial, learn how to go about delaying a task or assignment to help with resource over allocation. ... Delaying a task or assignment - Microsoft Project Tutorial
You can designate that the schedule should use the task assignments or associated resource engagements. (By default, project task assignments are calculated within the resource analysis.) To toggle the calculation method, open the schedule in Microsoft Project Professional. Navigate to the Project Information screen and toggle the option marked ...
The Task Form is the easiest way to enter work when assigning resources. Split your screen using the Details choice in the Split group on the View tab. This will show the Task Form in the lower pane. Select the task in the Gantt chart, click the drop down in the Task Form underneath Resource Names.
Re: Project for the web - bulk task assignment. Hello @plyshag , There are ways you can quickly assign resources to a task in Project for the web, but no bulk / mass option in the UI. Some of the easiest approaches to assign resources to a task are below: Using the Board - Group by Assigned to view and just drag the tasks to the resource:
In this article. Gets an Assignments collection representing the assignments for the task. Read-only Assignments.. Syntax. expression.Assignments. expression A variable that represents a Task object.. Support and feedback. Have questions or feedback about Office VBA or this documentation?
Oct 18 2023 09:13 AM. Although Microsoft has released plans to provide a connection between Project for the Web and the To-Do app, the release of this feature has been delayed, and Microsoft has yet to announce when this feature will become available. The key question is whether you can use Project for the Web without the To-Do connection, and ...
You can drag and drop tasks between buckets, edit task details, and filter tasks by labels, assignments, or progress. Charts view : This view shows you the statistics and charts of your plan, such as the number of tasks completed, not started, or in progress, the distribution of tasks by bucket, label, or assignment, and the status of each ...
Using the Assignments Collection. Use the Assignments property to return an Assignments collection. The following example displays all the resources assigned to the specified task. For Each A In ActiveProject.Tasks(1).Assignments. MsgBox A.ResourceName. Next A. Use the Add method to add an Assignment object to the Assignments collection.
Open and check out one of the troublesome projects and then apply the Resource Usage view. Temporarily insert the Assignment Owner column in this view. Examine each of the task assignments to see who is currently set as the Assignment Owner. Change the Assignment Owner value to the resource name, as needed. Then save and publish the project.