- Slidesgo School
- PowerPoint Tutorials

How to Use the Presentation Modes and the Screen Recording Features in PowerPoint

After designing all the slides for your presentation, the next and last step is presenting in front of your audience. In this new Slidesgo School tutorial, you’ll see how the presenter view works and how you can record your presentation .
Presentation Modes
Presentation modes — set up slide show, presentation modes — record slide show.
- There are different presentation modes in PowerPoint, besides the one you can find at the bottom of the screen.
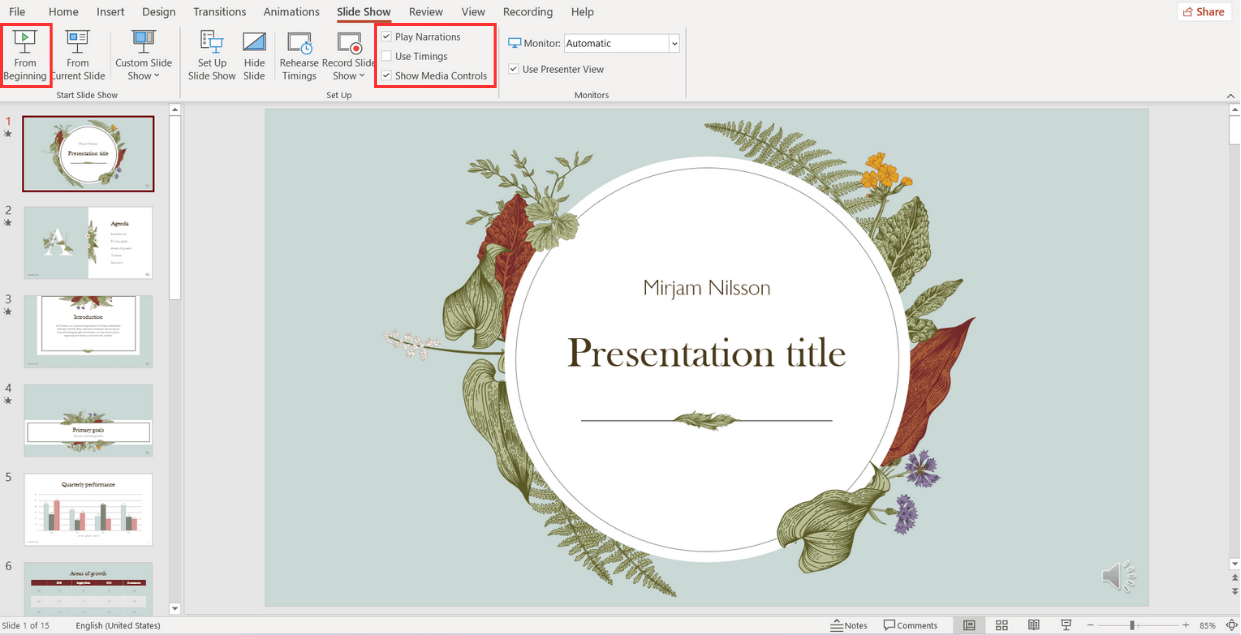
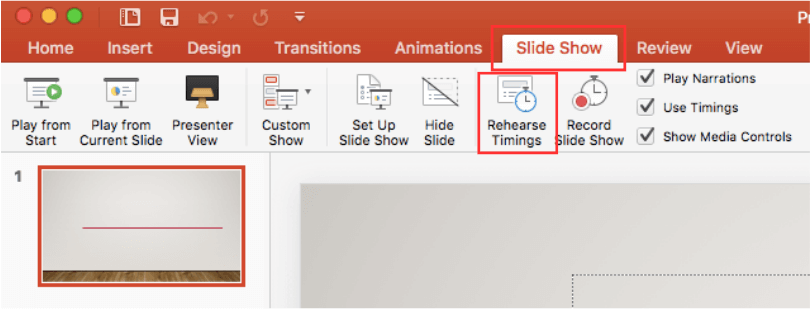
- To access the presentation modes, go to the Slide Show tab.
- The first two options allow you to start the presentation from the beginning or from the currently selected slide.

- If you choose Present Online, an URL will be generated, which you can then share with your potential online viewers. After clicking this button, a new window will open, displaying info about the Microsoft Office online presentation service and a checkbox to enable remote download for your online audience. To enjoy this service, you need an Office 365 account. When you’re ready, click Connect to generate the URL.
- If you choose Custom Slide Show, you can select which slides to display in your presentation. First, create a new custom slide show and select the slides that you want to display. Then, click Add, enter the name of the presentation and click OK. This new custom presentation will appear on the list. Select it and click Show to begin the presentation.
- In the Set Up group you’ll find options to set up the presentation, hide slides, rehearse your presentation and even record it.
- Click Set Up Slide Show to adjust several settings regarding your presentation. You’ll find more information in the next section of this tutorial .
- If you click Hide Slide, the selected slide won’t show up during your presentation. Hidden slides will appear faded out on the list and their numbers will be crossed out.
- If you click Record Slide Show, you’ll be able to record your presentation from the beginning or from the current slide. We’ll go into detail in the last section of this tutorial.
- There are several checkboxes regarding whether to play narrations, use timings and show media controls.

- In the Monitors group you can choose which screen to display your presentation.
- The last group, Captions & Subtitles, is only available in Office 365. You’ll find options to enable subtitles, which will be generated out of your speech (so you’ll need to have a mic). There are settings to change the language and the position of the subtitles.
- Open your presentation in PowerPoint.
- Go to the Slide Show tab.
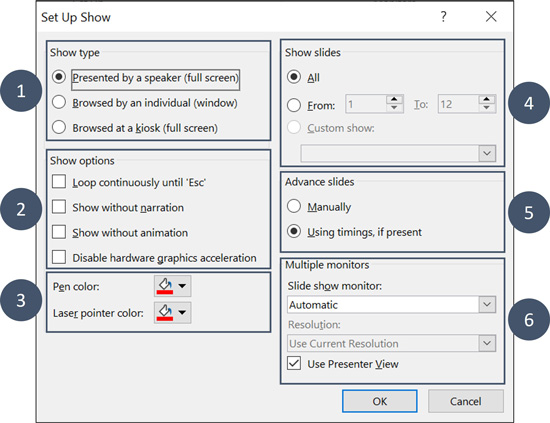
- In the Set Up group, click Set Up Slide Show. A new window will open, where you’ll find several options.
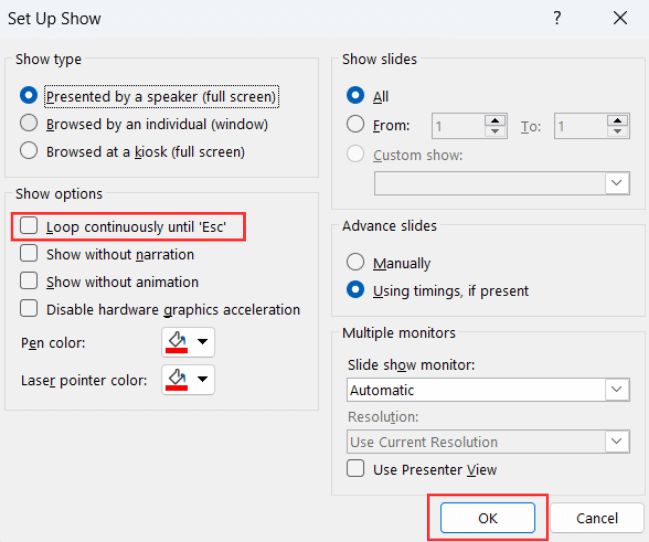
- In the top-left corner, under “Show type”, you can choose whether the presentation will be in fullscreen with speaker notes, windowed, or in fullscreen without speaker notes or the menu bar.

- Under “Show options” you can choose whether to show the presentation without narration or animations, or disable the hardware graphics acceleration (for better performance). You can also set the pen and laser pointer color.

- Under “Show slides”, you can choose which slides to show in your presentation. You can select all of them, a specific range or a custom slideshow.
- There are other settings to determine how to advance slides (manually or using timings), what the resolution will be and whether to use the presenter view.
- Click Record Slide Show. From the drop-down menu, select From the Current Slide or From the Beginning.
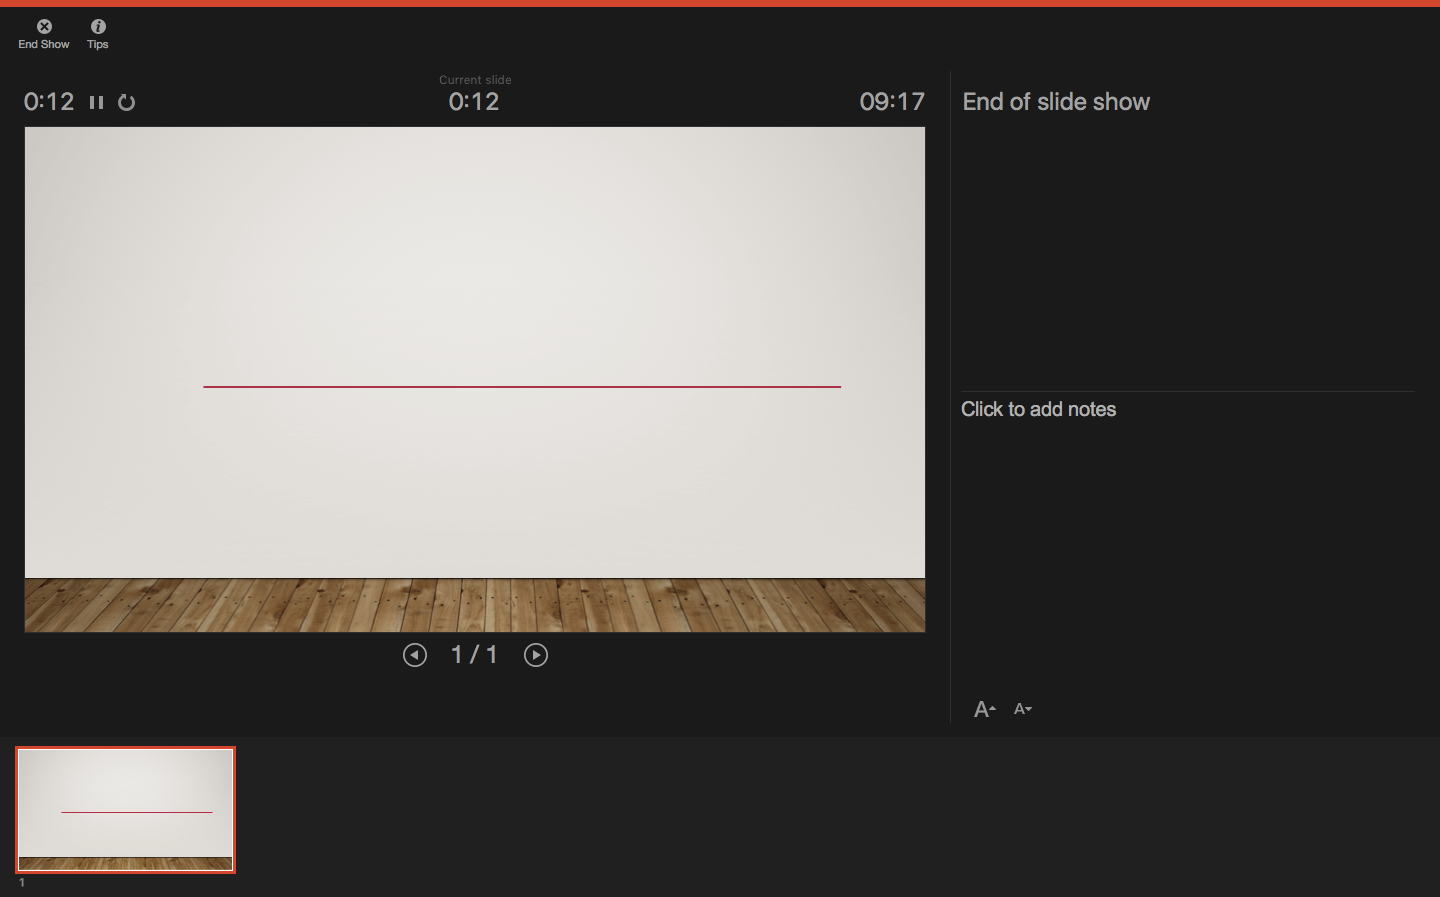
- A new window will open, along with the presentation in fullscreen mode. At the top-left you’ll find a button to start recording.
Do you find this article useful?
Related tutorials.

How to Use the Presenter View in Google Slides
Google Slides, like PowerPoint, has different presentation modes that can come in handy when you’re presenting and you want your slideshow to look smooth. Whether you’re looking for slides only, speaker notes or the Q&A feature, in this new Google Slides tutorial, you’ll learn about these and their respective settings. Ready? Then let’s explore the presenter view!

How to Download Google Slides Templates
When preparing a presentation, many people start panicking because they realize how much time it will take to edit each and every slide. Creating them from scratch, filling them in, looking for pictures, moving the elements...How stressful! But there is a solution that saves you a lot of time. We're sure that you've browsed the internet for templates, or basically, pre-established designs and elements, that can be downloaded for free and can be edited to your liking. Are we right? Then, we have some good news for you!

Discover our collection of printable templates
With the advance of technology, printing has become something that is no longer a necessity. Smartphones have made the paper format less and less frequent, but there are still certain cases in which having physical resources is much more convenient. Whether it's for taking notes, handing out assignments, making worksheets or handing out business cards or invitations, it's necessary to print your customized designs.From now on, in every Slidesgo printable presentation that you download, you will find the instructions for printing on the third slide. Depending on the style, colors or format of each presentation, we will tell you if you can...

How to Add Superscript and Subscript in Google Slides
Let’s take the most famous formula: E=mc^2, Einstein’s relativity equation. It wouldn’t be the same if it was E=mc2, right? Okay, yes, some people write it like that because it’s very famous and it won’t be misunderstood. But technically… It can! This is where the sophistication of superscript or subscript enters the room! Do you know how to write them in equations, copyright brands or even footnotes in your presentations? Let’s figure out how.
How To Get Into Presentation Mode In PowerPoint
Are you looking to take your PowerPoint presentations to the next level?
We will discuss why you should use Presentation Mode, how to enter it, its key features, and how to navigate through your slides.
Key Takeaways:
What is presentation mode in powerpoint.
Presentation Mode in PowerPoint refers to a feature that allows presenters to display their slides in a full-screen view, enhancing the visual impact of their presentation.
This mode is particularly useful during formal presentations, as it eliminates distractions and ensures that the audience’s focus remains on the content being discussed. In Presentation Mode , presenters can navigate through their slides smoothly, interact with their content, and make annotations in real time. One notable advantage of this mode is the Presenter view , where speakers can see upcoming slides, and speaker notes, and even manage time effectively without disrupting the flow of the presentation.
Why Use Presentation Mode in PowerPoint?
Using Presentation Mode in PowerPoint offers numerous advantages, such as creating a more engaging and professional presentation experience for both the presenter and the audience.
Allows for a more engaging and professional presentation
One of the key reasons to use Presentation Mode in PowerPoint is that it allows presenters to deliver a more engaging and professional presentation by providing advanced control over their slides, including features like a laser pointer .
Helps the presenter stay on track and organized
Presentation Mode in PowerPoint aids presenters in maintaining focus, organization, and efficiency throughout their presentation by offering tools like Presenter View, where notes and slide previews can be accessed.
This feature is particularly useful as it allows presenters to keep an eye on upcoming slides while also referring to their speaking notes discreetly, enhancing the flow of the presentation. The ability to adjust display settings such as screen mirroring or extending desktops simplifies the setup process, ensuring that the presentation runs smoothly. The note-taking capabilities within Presentation Mode enable presenters to jot down important points or reminders directly within the application, eliminating the need for external notes and promoting a more organized approach to presenting.
Provides a better experience for the audience
When toggling to Presentation Mode, the display settings undergo a transformation that optimizes the presentation for viewer interaction. The ability to seamlessly swap displays allows the presenter to effortlessly navigate through slides, ensuring a smooth transition between different sections of the presentation. This elegant integration of features not only captivates the audience but also enables a more fluid and engaging delivery of the content. The visual appeal of the slides is enhanced, making it easier for viewers to follow along and grasp the key points being presented.
How to Enter Presentation Mode in PowerPoint?
If you want to ensure a seamless transition into Presentation Mode, it’s essential to set the right display options. First, check your display settings by going to the ‘Slide Show’ tab and clicking on ‘Set Up Slide Show.’ Here, you can choose whether to present your slides on the primary monitor, a secondary monitor, or in a window. Make sure to select the appropriate display mode based on your setup to guarantee a professional and effective presentation.
Step 1: Open your PowerPoint presentation
The first step to enter Presentation Mode in PowerPoint is to ensure that your presentation file is open and ready for display.
Step 2: Click on the ‘Slide Show’ tab in the top menu bar
Once your presentation is open, navigate to the ‘Slide Show’ tab located in the top menu bar of PowerPoint to access presentation controls and features like zooming into specific slides.
Once you’re on the ‘Slide Show’ tab, you’ll find a variety of essential controls that aid in delivering a seamless presentation experience. Here, you can click on ‘From Beginning’ to start the slide show from the very first slide. You can choose ‘From Current Slide’ to begin from the slide you’re currently on.
You’ll notice the ‘Slide Show’ tab offers options to toggle various functionalities like accessing presenter view or setting up custom slide shows. This tab is a hub of useful tools that elevate your presentation delivery.
Step 3: Select ‘From Beginning’ or ‘From Current Slide’ to start the presentation
When you opt for ‘From Beginning,’ your presentation will start from the very first slide, whereas selecting ‘From Current Slide’ allows you to start your presentation from the slide you are currently on. This choice depends on whether you want to begin at the start of the presentation or jump in at a specific point.
What Are the Features of Presentation Mode in PowerPoint?
The features of Presentation Mode in PowerPoint are designed to enhance the presenter’s experience and engage the audience, offering functionalities such as Presenter view with notes, laser pointer integration, and slide previews.
Presenter view with notes allows speakers to refer to their talking points discreetly, ensuring a seamless delivery. The incorporated laser pointer feature permits highlighting key areas on slides, directing the audience’s focus effectively. Slide previews provide a comprehensive overview of the presentation flow, aiding in smoother transitions between topics. The option to hide or reveal slides as needed enhances the element of surprise and control during the presentation, captivating the audience’s attention. These combined features transform the presenter’s performance into a dynamic and engaging experience for all participants.
Full-screen display of slides
Ability to use a laser pointer or pen tool.
Presentation Mode enables presenters to use a laser pointer or a pen tool to highlight key points on slides, enhancing the clarity and impact of their presentation.
Presenter view with notes and slide previews
When utilizing the Presenter view, presenters gain the advantage of accessing notes discretely without them being displayed to the audience, allowing for a more professional and polished delivery. In addition, having a live preview of the upcoming slides enables the presenter to seamlessly transition between points, enhancing the flow of the presentation. Through system preferences or the displays app, customization options such as adjusting the layout to suit individual preferences or toggling between speaker notes and slide previews can be easily configured, providing a tailored experience for each presenter.
Option to hide the presentation controls
In scenarios where presenters are utilizing a two-monitor setup for advanced display configurations, such as showing notes on one screen while presenting on the other, hiding presentation controls on the main display ensures that only the essential content is visible to the audience, maintaining a neat and streamlined appearance.
How to Navigate Through Slides in Presentation Mode?
Use the arrow keys on your keyboard.
Utilize the arrow keys on your keyboard to seamlessly advance through slides in Presentation Mode, ensuring a smooth and controlled flow of your presentation.
Click on the arrows in the bottom left corner of the screen
Users can enhance their presentation experience by utilizing the fullscreen mode . By entering fullscreen, viewers can keep the focus solely on the presentation content, removing any distractions from the surrounding interface elements. This feature is particularly useful when showcasing detailed slides or when presenting to a larger audience, allowing for a more immersive and engaging delivery.
Use the scroll wheel on your mouse
With its responsive nature, the scroll wheel ensures quick and precise movements, enabling presenters to fluidly transition between slides with the utmost ease.
How to Exit Presentation Mode in PowerPoint?
To exit Fullscreen mode in PowerPoint, you can simply press the ‘Esc’ key, the keyboard shortcut that is universally used to escape full-screen views across various applications. This action will promptly take you out of the immersive mode and back to the regular interface.
Step 1: Press the Esc key on your keyboard
Exiting Presentation Mode using the ‘Esc’ key is a simple maneuver that can swiftly transition you back to your familiar workspace. Once you press the ‘Esc’ key, the fullscreen effect will dissolve, and any Speaker Notes you might have been glancing over will no longer dominate your screen, ensuring a seamless flow as you exit the presentation. This action provides an effortless way to shift the focus back to the general view of your PowerPoint, facilitating a smooth continuation of your usual workflow.
Step 2: Click on the ‘End Show’ button on the top left corner of the screen
Step 3: select ‘end show’ from the drop-down menu.
For a more detailed exit process, users can select ‘ End Show ‘ from the drop-down menu within PowerPoint, ensuring a controlled and comprehensive conclusion to their presentation.

Frequently Asked Questions
How do i enter presentation mode in powerpoint.
To enter presentation mode in PowerPoint, click on the Slideshow tab in the top menu and then select “From Beginning” or “From Current Slide” depending on where you want to start your presentation.
Can I customize the way I enter presentation mode in PowerPoint?
Is there a shortcut to enter presentation mode in powerpoint, can i use a different display for presentation mode in powerpoint.
Yes, you can use a different display for presentation mode by going to the Slideshow tab and selecting “Set Up Slide Show.” From there, you can choose to present on a secondary monitor or projector.
How do I exit presentation mode in PowerPoint?
Can i add speaker notes while in presentation mode in powerpoint, similar posts, how to get 3d models in powerpoint, how to record video in powerpoint, how to present in powerpoint on teams, how to emphasize in powerpoint, how to view two slides side by side in powerpoint, how to present a journal article in powerpoint.
Critical PowerPoint Shortcuts – Claim Your FREE Training Module and Get Your Time Back!
How to Present a PowerPoint Slideshow (w/ Shortcuts)
- PowerPoint Tutorials
- Shortcuts & Hacks
- May 11, 2019
There are a variety of ways to start a PowerPoint presention, depending on:
- Where you start your presentation (from beginning or from current)
- Which PowerPoint view you prefer to present in (Slide Show view or Presenter view)
- How comfortable you are with keyboard shortcuts
Why would Microsoft include so many ways to present a presentation? My guess is that everyone learns PowerPoint differently, and has personal presentation styles. The more options you have, the easier your life will be as there will always be a way to start your presentation the way you want to (or jump back into it when you need to).
See all the options below and find the method that works best for you and let the slide show begin !
NOTE: If you are running two presentations side-by-side, each presentation needs to be started as it’s own slide show. To see how to set up two PowerPoint presentations to run side-by-side like this before you start your slide show, read my guide here .
Table of Contents
Start slide show from beginning.

To start a slideshow from the beginning of your presentation using the ribbon, simply.
- Navigate to the Slide Show tab
- Select From Beginning
Selecting From Beginning starts your presentation from the very first non-hidden slide in your presentation, regardless of which slide you are currently inside of your deck.

You can also start your slide from the beginning of your presentation by hitting the Slideshow From Beginning keyboard shortcut, F5 .
Regardless of which method you use, this is the classic way to start your presentation in full screen from your first title slide (regardless of where you are in your slide deck).
Let the slide show begin!
NOTE: To expand your knowledge and learn how to use PowerPoint’s FREE and HIDDEN built-in laser pointer to point things out during your presentation, read my guide here .
Take your PPT skills to the next level
Start slide show from current.

To begin your slide show from the slide you are currently on using the ribbon, simply
- Navigate to the Slide Show tab
- Select From Current Slide
Selecting From Current Slide starts your slide show from whatever slide you are currently on, even if the slide is hidden.

You can also start your slide from the current slide you are on by hitting the Shift+F5 keyboard shortcut.
Because it’s often easiest to catch errors when building your slides in this full screen mode, I highly recommend learning the Shift+F5 shortcut and using it frequently as you build your slides to spot them for errors.
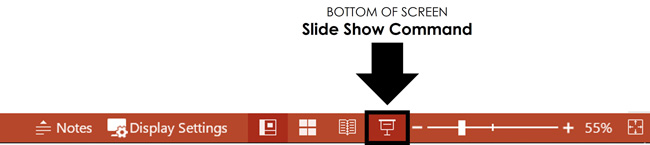
If you don’t want to bother learning the From Current Slide shortcut, you can also start your slideshow by clicking the Slide Show icon at the bottom of your screen.
This is a fantastic way to spot check your slides as you are building them. On top of that, it’s a fast and uncomplicated way to re-start your presentation from where you left off after demoing something on screen.
Start a mini-slide show in PowerPoint
You can also use the following hidden PowerPoint shortcut to run a mini slide show over the top of your current deck.

To run a mini slide show, simply:
- Hold down the Alt key on your keyboard
- With your mouse, click the Slide Show icon
Doing so starts a small slide show of your presentation that you can see below, from the current slide you are on.

Presenter View
The Presenter View is an alternate way to run your presentation in PowerPoint. In this view, your slides are projected on screen, and the details of your presentation are displayed on your computer as pictured below.

The presenter view includes your next (non-hidden) slides that is coming up, your current slide projected on screen, how long you’ve been talking and your speaker notes.

To launch the Presenter View from the beginning of your presentation using your Ribbon, simply:
- Navigate to the Slide Show tab
- Hold down the Alt key on your keyboard
- Click From Beginning
Holding down the Alt key and clicking From Beginning , the Presenter View will launch from the very first (non-hidden) slide in your presentation.

You can also launch the presenter view from the beginning of your presentation at any time by clicking Alt + F5 on your keyboard.
Start Presenter View in PowerPoint From Current Slide

Did you know that you can access different views in PowerPoint by adding keys as you click commands in the PowerPoint ribbon?
To start the Presenter view from your current slide using your Ribbon, simply:
- Hold down the Alt key on your keyboard
- Click From Current Slide
Holding the Alt key and clicking From Current Slide launches the Presenter View from your current slide. So, this is another way you can quickly practice your presentation, see your speaker notes and see what’s coming up next.
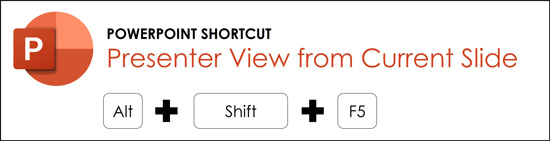
You can also launch the Presenter View from the beginning of your presentation at any time by hitting Alt+F5 on your keyboard.
Showing and Hiding Presenter View
Regardless of which view you start your PowerPoint slide show; you can switch between the two different slide show views without exiting presentation.

To switch between the two slideshow views (while giving your presentation), simply:
- Right-click your slide in whichever presentation view you are currently in
- Select either Show Presenter View or Hide Presenter View
When would you use a feature like this during a presentation? One example is if you want to view your notes without leaving the slide show mode.
NOTE: The letter r for both Show Presenter View and Hide Presenter View is underlined. This means that it is a keyboard shortcut. So, if you want to quickly flip between these two presentation views, you can simply right-click your slide and hit the letter r on your keyboard. Doing so automatically switches the view you are in.
Controlling how your presentation runs
Another way to control how your presentation runs (including the default laser pointer and pen color), is the Set Up Slide Show dialog box.

To open the Set Up Slide Show dialog box, simply:
- Select the Set Up Slide Show command
Doing so, opens all your PowerPoint slide show settings and options as pictured below.
Inside the slide show settings dialog box, you can select:
- How your presentation runs (full screen, window or in kiosk mode).
- Your default pen and laser pointer color options ( see our laser pointer article here ).
- Which slide you want start from, or which slides you want to show. You can also setup a custom show here.
- How your slides progress (manually or using slide timings).
- Which of your computer monitors (or screens) your slide show runs on.
The Set Up Slide Show dialog box is also the secret to running multiple presentations at the same time in PowerPoint. To expand your knowledge and learn how to set this up, read our guide here .
Setup Slide Show SECRET Shortcut

To use the SECRET shortcut to open the Set Up Slide Show dialog box, simply:
- Hold down the Shift key on your keyboard
- With your mouse, click the Reading View icon at the bottom of your screen
This is useful when you need to quickly cycle through lots of PowerPoint presentations and change how those presentations run. Instead of wasting time clicking through the Ribbon, simply hold the Shift key and click the Reading View icon. This is also a friendly conversation starter with a fellow PowerPoint enthusiast at Happy Hour.
NOTE: The color of your Reading View icon might be different than in the picture above, as it is dependent on the Office Theme you selected for PowerPoint.
How to exit a PowerPoint presentation early?

Regardless of how you start your full screen presentation, you can end your presentation at any time by hitting the Esc key on your keyboard.
Hitting Esc immediately takes you out of the PowerPoint presentation mode and back to the normal editing view of your slides, on whatever slide you were last presenting.
Here is how you can use a combination of all the different keyboard shortcuts to spot check and practice your presentation in full screen before you finalize your presentation.
- Hit F5 on your keyboard to start your presentation in full screen from the very first slide in your presentation. You can then use your arrow keys to advance, spot checking your slides for errors.
- When you find an error, simply hit Esc key to return to the normal PowerPoint editing view to fix your slide.
- When you are done, hit Shift + F5 to return the full screen presentation mode from the slide you just updated. You can then continue spot checking your presentation (without having to start over from the beginning).
In this way you can quickly work your way through your slides and practice your presentation, fixing and adjusting your content as you go.
Understanding how to run your presentations is CRITICAL to the success of your presentation. Not only in presenting them live, but also in knowing how to spot check your slides as you build them.
I personally find it easiest to spot check your slides and quickly fix errors by running your presentation in slide show mode (or full screen). The last place you want to discover an error is during your presentation.
Using the commands and shortcuts above, you can quickly start, exit and step back into your slide show. Once you have these commands and features down, you will also look like a whiz during your presentations.
If you enjoyed the depth of this article, you will love our other PowerPoint training courses and free resources. To learn more, visit us here .
🔒 Unlock the PowerPoint Shortcuts Trusted by Industry Leaders KKR, American Express, HSBC, and More!
Join over 114,880 professionals from diverse fields including consulting, investment banking, advertising, marketing, sales, and business development who have supercharged their PowerPoint game with our proven methods.
✅ Customize compelling presentations effortlessly.
✅ Master time-saving techniques for faster deck creation.
✅ Boost your career prospects with top-notch PowerPoint skills.
Get FREE access to the Critical PowerPoint Shortcuts module of our premium training course by entering your name and email below.
DISCLAIMER: PC Users Only!
We respect your privacy and will keep your info safe and confidential.
Related Articles
About the author.

Popular Tutorials
- How to Strikethrough Text (l̶i̶k̶e̶ ̶t̶h̶i̶s̶) in Word, Excel & PowerPoint
- How to Make Animated Fireworks in PowerPoint (Step-by-Step)
- Strikethrough Shortcut (l̶i̶k̶e̶ ̶t̶h̶i̶s̶) for Word, Excel & PowerPoint
- How to Create a Flash Card Memory Game in PowerPoint (Like Jeopardy)
- Keyboard Shortcuts Not Working: Solved
PowerPoint Tutorial Categories
- Strategies & Opinions
- Presentation Design
- Pictures, Icons, Videos, Etc.
- New Features
- Miscellaneous
- Charts & Data Viz
We help busy professionals save hours and gain peace of mind, with corporate workshops, self-paced courses and tutorials for PowerPoint and Word.
Work With Us
- Corporate Training
- Presentation & Template Design
- Courses & Downloads
- PowerPoint Articles
- Word Articles
- Productivity Resources
Find a Tutorial
- Free Training
- For Businesses
We help busy office workers save hours and gain peace of mind, with tips, training and tutorials for Microsoft PowerPoint and Word.
Master Critical PowerPoint Shortcuts – Secure Your FREE Training Module and Save Valuable Time!
⌛ Master time-saving expert techniques.
🔥 Create powerful presentations.
🚀 Propel your career to new heights.
We value your privacy – we keep your info safe.
Discover PowerPoint Hacks Loved by Industry Giants - KKR, AmEx, HSBC!
Over 114,880 professionals in finance, marketing and sales have revolutionized their PPT skills with our proven methods.
Gain FREE access to a full module of our premium PowerPoint training program – Get started today!
We hate spam too and promise to keep your information safe.
You are currently viewing a placeholder content from Facebook . To access the actual content, click the button below. Please note that doing so will share data with third-party providers.
How to Play PowerPoint Slides Automatically

The PowerPoint autoplay feature is an amazing tool for creating slideshows that advance automatically . Self-running PowerPoint presentations are great for leaving in kiosks or publicity booths. You can even show them with recordings or voiceovers to make sure your audience gets the most out of it.
Forget worrying about clicking from slide to slide, today we will teach you how to play PowerPoint slides automatically!

We’ll cover the following topics:
Why should you use the automatic slideshow PowerPoint feature?
- How to Play PowerPoint Slides Automatically without Clicking - Option 1
- How to play slideshow in PowerPoint automatically - Option 2
How to make PowerPoint slides advance automatically with audio
- How to loop slides in PowerPoint
- Check out some experts’ best practices for Automatic slideshows in PowerPoint
How to automatically play PowerPoint presentations across devices
How to play powerpoint slides automatically without clicking on mac, elevate your presentation with professional designs: try 24slides today.
Using the automatic slideshow feature has many benefits . The main one is its practicality; it is a tool you can set up in advance so that you eliminate the need for ongoing attention and your presentation flow is better.
And that’s not all, you can even add voiceovers, recordings, and even laser pointer gestures to make sure your audience gets the most out of your presentation.
It becomes particularly beneficial in the following scenarios:
- Business presentations: An automatically progressing presentation can help you focus on your content without worrying about going slide by slide, which can often be distracting and disrupt your rhythm.
- Publicity: Self-running presentations can be great if you use them for publicity. For example, if you have a kiosk or booth, a self-running PowerPoint slideshow can help you reach more people without them having to speak one-on-one with a salesperson.
- E-Learning: In e-learning modules or training presentations, autoplay can help learners progress through the material while listening to your lecture. However, they can also pause and rewind to go to the specific section they wish to revisit.
- Photo or Video Slideshows: Autoplay is commonly used in photo or video slideshows for events such as weddings or birthdays. It can serve as a background loop, or you can present it at a special moment along with music or narration to enhance the experience.
How to Play PowerPoint Slides Automatically without Clicking: Option 1
There are a couple of different ways to make your slides run automatically, and we'll go over both options. This first option is for when you need a really customized presentation: personalized timing for each slide, voiceovers, or laser pointer gestures .
If this is your case, go ahead with this section, but if you’d like something a bit simpler, proceed to Option 2.
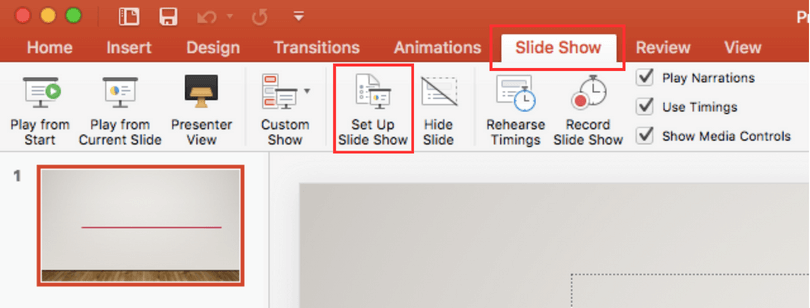
- The first step is to go to the Slide Show Tab. On the Set Up group, you’ll find the Set Up Slide Show option to start customizing your self-running presentation.

- Once the Set Up Show Window opens, deselect the Presented by a speaker option, as it refers to manually advancing your slides, either by clicking or using keys. Next, consider several options for the automatic slideshow:
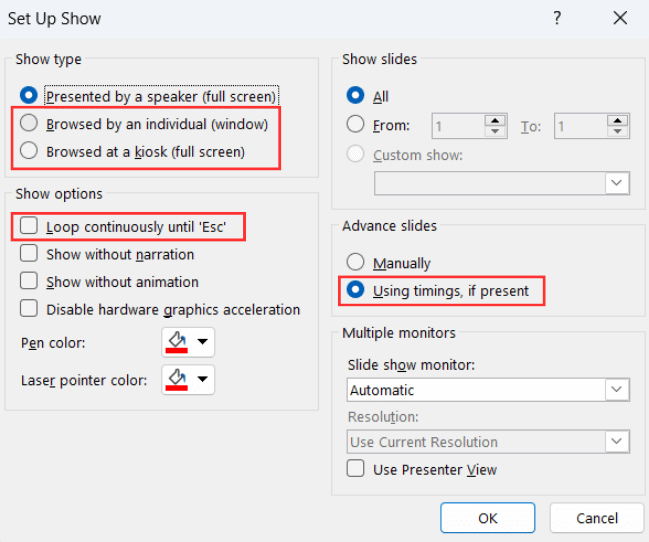
- Browsed by an individual is one choice for creating a self-running PowerPoint presentation. This option permits you to deliver your slides within a window, as opposed to the typical full-screen mode. Ensure that the Use timings, if present option is enabled for this feature to function correctly.
- Another option is the Browsed at a kiosk , which allows you to run a full-screen, continuous slideshow automatically. This option locks in both the looping and timing settings, ensuring that your slideshow will continue until you press the ESC key.
If you’re not sure what option is the best for you, remember you can always select manually the loop and timings option . Try different options with these and try out how your presentation will look like with the different settings.
- The next step is to set your timings. This means defining how much time you want your PowerPoint slideshow to spend on each slide before automatically advancing to the next one.
To set your timings, click on Rehearse Timings , which will allow you to go through your presentation slide by slide, and it’ll record how much time you spend on each one.

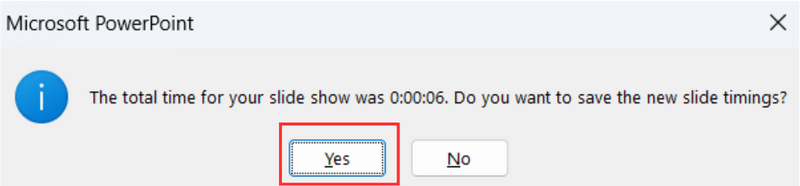
After you finish going through all your slides, a message will pop up to save your timings. Click yes so you can save the time spent on each slide.
How to play slideshow in PowerPoint automatically: Option 2
Let’s take a look at a different way of using the PowerPoint autoplay feature. This option is great if you’re looking for something simple and just want your slides to advance automatically at regular intervals.
- First, open the Transitions Tab and locate the Timing Group.

- Go to the After option and manually add how much time you want to spend on each of your slides.

Select the Apply To All option so all your slides have the same timing.
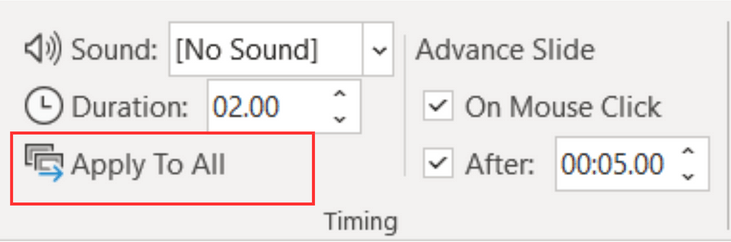
You can also deselect the On Mouse Click option, depending on whether you want to be able to advance your slides by clicking or not.
Adding audio to your automatic PowerPoint is a fantastic feature to enhance your professional image and communicate your content without needing to be present. Let’s take a look at how to do it:
- Go to the Slide Show Tab and select Record Slide Show . Choose Record From Beginning to start with the first slide.
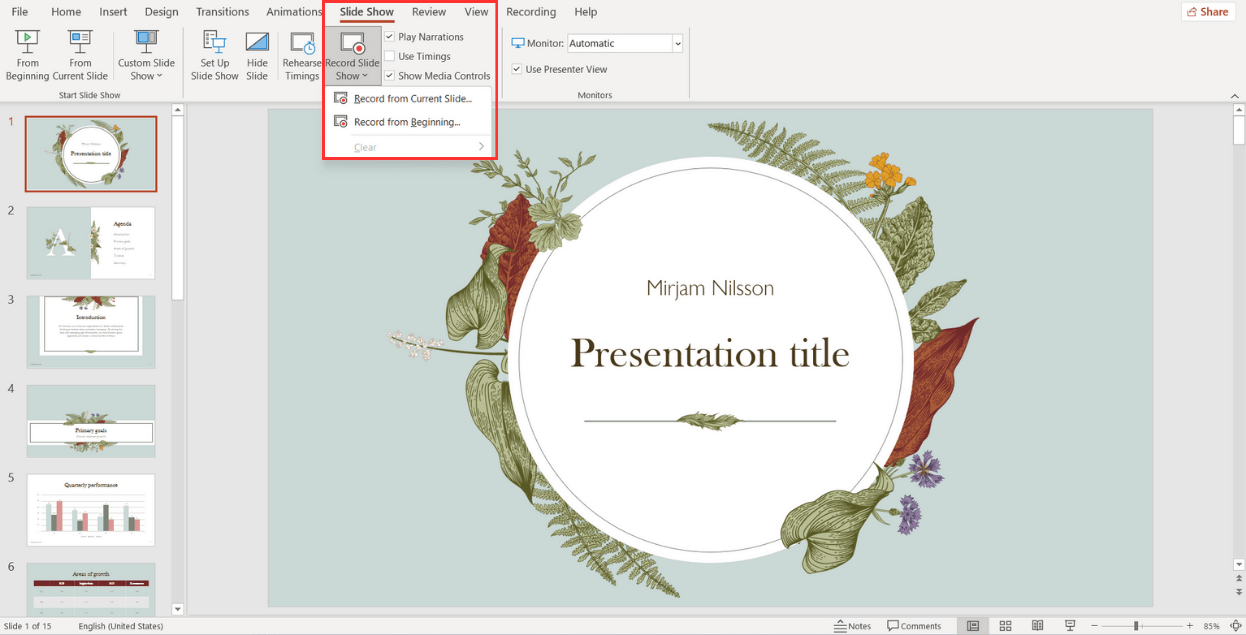
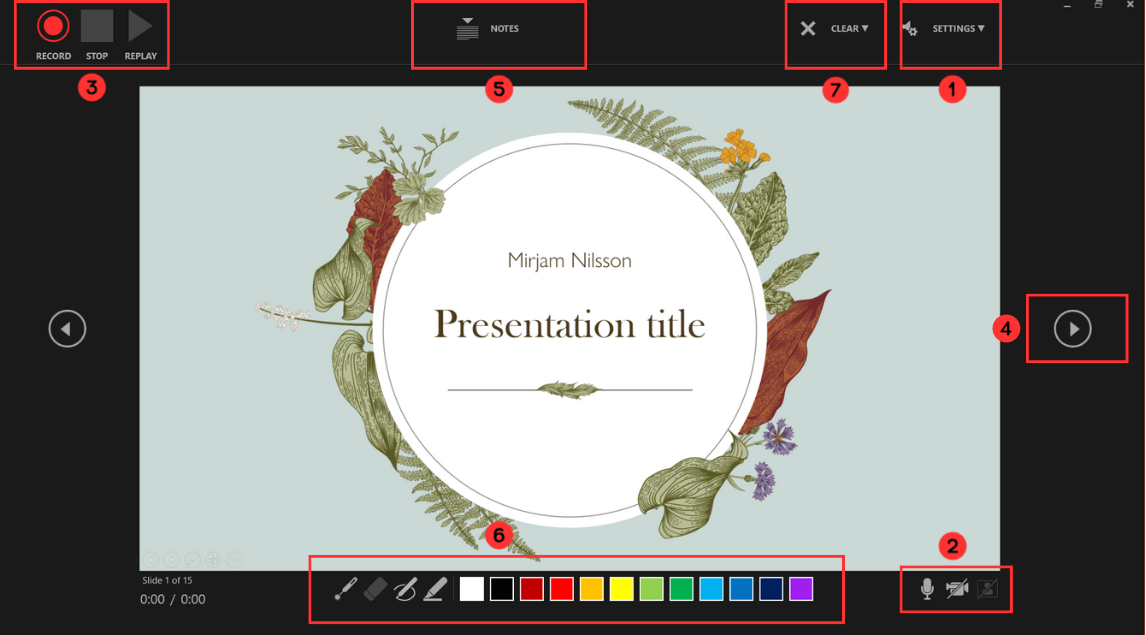
When the fullscreen opens, you will be able to see your first slide along with several options:
- Start in Settings (1) and select the tools you will be using. You have the option to use a microphone, or you can record yourself talking on camera. Choose your microphone and/or camera for recording.
- Next (2) , decide whether you want to have the microphone or camera you selected turned on. You can also choose to have a video preview.
- When you're ready to start recording, go to the top left corner (3) and click Record to start, Stop to pause, and Replay to review how it went.
- Once you finish with a slide, click on the right arrow (4) to move to the next slide.
- If you have Speaker notes in your slides, you can view them in (5) while you record.
- In the Pens and Markers section (6) , you can draw on the screen and make any annotations you want.
- Finally, the Clear option (7) allows you to clear existing recordings on the current slide or on all slides if you are unsatisfied and want to redo your recording.
- Now, to review what you've recorded, go to Set Up and make sure Play Narrations and Use Timings are checked. Then, click on From Beginning to start the presentation.
How to loop slides in PowerPoint
If you want to learn how to loop your slides in PowerPoint, follow these steps:
- Go to the Slide Show tab and select Set Up Slide Show .

- When the Set Up Show window appears, go to the Show options group and tick the Loop continuously until ‘Esc’ option. Don’t forget to click OK to apply the new setup!
And all done! Now, your presentation will loop until you select ‘Esc’.
Check out some expert best practices for Automatic slideshows in PowerPoint
Now that you've learned how to make a PowerPoint slideshow run automatically, we'll give you the secrets to make your presentation stand out . Let's take a look at some insights from our expert designers .
Avoid too much text
Remember that your time per slide is limited , so it is important not to put too much text since your audience will not have time to read it. Try to express your message in the shortest possible text, and if necessary, revise and rewrite it as many times as necessary to synthesize it.
Limit interactive elements
Limit or avoid interactive elements such as hyperlinks that rely on user interaction since they may not function in PowerPoint autoplay mode.
However, if you want your audience or potential clients to take a specific action, consider using a QR code. Only make sure to leave the slide displayed for enough time for them to use it.
Practice, practice, practice
Keep in mind that your speech needs to fit perfectly with your timings for each slide. So, practicing your presentation multiple times is crucial to ensure a seamless and synchronized delivery.
First, go to the Slide Show Tab and select Set Up Slide Show .
- When the Set Up Show Window opens, deselect the Presented by a speaker option and consider the following options to set up your automatic slideshow:
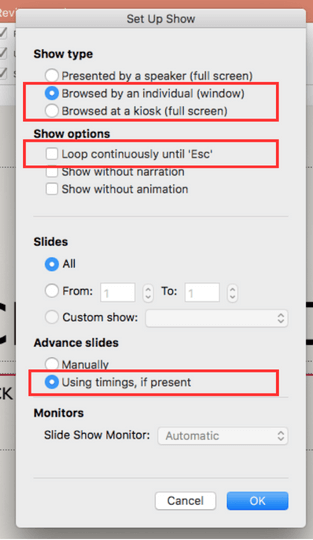
- Browsed by an individual : With this option, you can show your slides within a window instead of the typical full-screen mode. Make sure that the Use timings, if present option is selected.
- Another option is the Browsed at a kiosk : This option locks in both the looping and timing settings, ensuring that your slideshow will continue until you press the ESC key.
- Next, you need to set your timings. This involves determining the duration for each slide so that it advances automatically to the next one when you have finished presenting it.
To set your timings, go to the Slide Show Tab and click on Rehearse Timings.
A window will open, allowing you to go through your presentation slide by slide, and it will record how much time you spend on each one . As you progress through each slide, it will confirm the time spent, and you can either agree or choose to re-record.
After you finish going through all your slides, a message will pop up to save your timings . Click yes so you can save the time spent on each slide.
If you’re looking to create a presentation that truly wows your audience, you might want to consider professional design assistance for your PowerPoint. Lucky for you, we’re here to help. Check out the fantastic designs 24Slides can help you create today!

You might also like
- How to Add a Timer to Your Powerpoint Presentations
- 11 Time-Saving PowerPoint Hacks For Creating Quick Presentations
- How To Loop a PowerPoint Presentation
- Add a PowerPoint Real-Time Clock to Your Presentations
Create professional presentations online
Other people also read

Tutorial: Save your PowerPoint as a Video
How To Convert Google Slides To PowerPoint and Vice Versa

How To Add Animations To PowerPoint
SharePoint Diary
Salaudeen Rajack's SharePoint Experiences!
SharePoint Online: How to Open PowerPoint in Presentation Mode?
Requirement: Open PowerPoint files in slideshow mode in SharePoint Online.
How to Open PowerPoint in Presentation mode from SharePoint Online?
Any link to PowerPoint presentations (PPT, PPTX, or PPSX files) takes users to the Edit mode of the file. Even if the users don’t have permission to edit, SharePoint opens it in edit mode with a banner saying you can’t edit the file. So, How to force slide show mode for PPT’s?
Well, here is the trick to open PowerPoint files in presentation mode: use the below URL format to have PowerPoint open in presentation mode:
https://crescent.sharepoint.com/sites/marketing /_layouts/16/Doc.aspx?sourcedoc= https://crescent.sharepoint.com/sites/Marketing/Branding/SharePoint-Training-Presentation.pptx &action=embedview

This link directly launches the PowerPoint presentation in the slideshow mode in full browser screen!
How about SharePoint On-Premises?
Similarly, in SharePoint On-premises, use the below format to open PowerPoint in presentation mode:
https://Your-Site-URL /_layouts/WopiFrame.aspx?sourcedoc= <path-to-your-ppsx> &action=embedview
Related Posts
- ← Microsoft 365: How to Set the Password to Never Expire?
- SharePoint Online: How to Enable Missing Apps (Picture Library, Announcements, Survey, Etc.) in Communication Sites? →
Salaudeen Rajack
Salaudeen Rajack - Information Technology Expert with Two-decades of hands-on experience, specializing in SharePoint, PowerShell, Microsoft 365, and related products. He has held various positions including SharePoint Architect, Administrator, Developer and consultant, has helped many organizations to implement and optimize SharePoint solutions. Known for his deep technical expertise, He's passionate about sharing the knowledge and insights to help others, through the real-world articles!

5 thoughts on “ SharePoint Online: How to Open PowerPoint in Presentation Mode? ”

It also appears if you have any GIFs the are displayed as static images – any advice?

Thanks for this great article. You are the best. I would like to know if there is a trick to start the presentation in full screen presentation mode so that slides run automatically?
Hey, thanks for that! Very helpful! Spend half a day to get that work and you provided finally the solution!

Too sad, if you have links in your PPT you can’t click these…

Hi Salaudeen,
Thanks for your post. We are experiencing the same problem with PowerPoint presentation links not opening up in slideshow mode – even if “view only”. I have used your URL format and this works to open the PowerPoint in presentation mode but ONLY for those that are logged into SharePoint Online.
We want to share the URL for anyone to view (outside of the organisation too) with the only necessary requirement being a web browser to open it. When the URL is clicked the presentation should open straight into slideshow mode without a need for any log in.
Do you think this is something that is possible? Any advice?
Thanks, Emily
Leave a Reply Cancel reply
Your email address will not be published. Required fields are marked *
Notify me of new posts by email.
Your current User-Agent string appears to be from an automated process, if this is incorrect, please click this link:
Free All-in-One Office Suite with PDF Editor
Edit Word, Excel, and PPT for FREE.
Read, edit, and convert PDFs with the powerful PDF toolkit.
Microsoft-like interface, easy to use.
Windows • MacOS • Linux • iOS • Android

- Articles of PPT
How to Make PowerPoint Full Screen (Step by Step)
Making your PowerPoint presentation full screen is a simple but effective way to create a focused and engaging experience for your audience. By maximizing content visibility and eliminating distractions, you can ensure that your message is received loud and clear.
Whether you're a seasoned presenter or a beginner, this article will walk you through the steps of making your PowerPoint full screen, so you can deliver a polished and professional presentation with ease.
Part1: How to Make PowerPoint Full Screen Easily
Creating a PowerPoint presentation in full-screen mode is a simple process, and I'll provide a step-by-step tutorial below.
Step 1: Open Your PowerPoint Presentation
Launch Microsoft PowerPoint and open the presentation you want to view in full-screen mode.

Step 2 : Enter SlideShow Mode
To enter full-screen mode, you can use any of these methods:
Click on the "Slide Show" tab in the ribbon at the top of the window and then click "From Beginning."
Press the F5 key on your keyboard.
Alternatively, you can press the Shift + F5 keys to start the slide show from the current slide.

Step 3: Navigate Through Your Presentation
While in full-screen mode, you can use various methods to navigate through your slides:
Click your mouse or press the Spacebar or Enter key to advance to the next slide.
Press the Backspace or Left Arrow key to go back to the previous slide.
Use the keyboard's number keys to jump to a specific slide. For example, press "3" to go to slide 3.
Step 4 : End the Slide Show
To exit full-screen mode and return to normal editing mode, you can:
Press the Esc key on your keyboard.
Right-click anywhere on the screen and select "End Show."

And that's it! Your PowerPoint presentation should now be in full-screen mode, and you can easily navigate through your slides using the provided methods.
Part2: How to Make PowerPoint Full Screen on Projector
Making a PowerPoint presentation full screen on a projector is a common requirement for meetings and presentations. Below, I'll provide a step-by-step tutorial on how to achieve this.
Step 1: Connect Your Projector
Connect your projector to your computer using the appropriate cables (HDMI, VGA, etc.). Ensure that both the projector and your computer are powered on.
Step 2: Configure Display Settings
Right-click on your desktop and select "Display settings."
In the Display settings window, you'll see two displays - your computer screen and the projector (or second display).

Make sure the "Multiple displays" dropdown menu is set to "Duplicate" or "Second screen only" depending on your preference. "Duplicate" will mirror your computer screen on the projector, while "Second screen only" will use the projector as the main display.

Step 3 : Open Your PowerPoint Presentation
Launch Microsoft PowerPoint and open the presentation you want to display.
Step 4 : Enter SlideShow Mode
Step 5 : Navigate Through Your Presentation
While in full-screen mode, you can navigate through your slides as explained in Part 1 of this tutorial.
Step 6 : End the Slide Show
By following these steps, you should be able to make your PowerPoint presentation full screen on a projector.
Part3: The Shortcut Key for Starting the Slideshow
Here are the shortcut keys for starting a PowerPoint slideshow from both the beginning and the current slide on both Windows and macOS:
F5: Start the slideshow from the beginning.
Shift + F5: Start the slideshow from the current slide.
Play Slideshow from Beginning:
Shift + Command + Return: Start the slideshow from the beginning.
Fn + Shift + F5: Start the slideshow from the beginning.
Play Slideshow from Current Slide:
Shift + Command + Return: Start the slideshow from the current slide.
These shortcut keys allow you to quickly initiate a PowerPoint slideshow, whether you want to begin from the start or the current slide, and they work on both Windows and macOS platforms.
Part4: Best Alternative — WPS Office

Microsoft Office has been the market leader in office productivity software for decades, offering robust applications such as Word, Excel, and PowerPoint. However, with the rise of cloud-based solutions and the increasing demand for cost-effective options, free alternatives like WPS Office have gained popularity.
Why should you choose WPS Office as an alternative to Microsoft Office?
Here are the answer:.
● Free to use Word, Excel, and PPT. Powerful PDF toolkit
● Rich template store, which contains various free and paid templates for Word, PPT, and Excel
● Rich functions
● The light weight of the product is only 200M, and it occupies a small amount of computer memory. It is suitable for Win7, 10, and 11
● The MAC version of WPS Office is very powerful. Microsoft office ignores the experience of mac users, which can be made up by wps office
● Support online documents (WPS AirPage), multi-person collaborative editing
● WPS office also supports Linux systems, Android, and ios systems. To use WPS office products on different systems, you only need to log in to the same account, and all files can be synchronized
Creating a PowerPoint-like presentation with WPS Office and utilizing features like image-based storytelling, progressive image reveal, comparison slides, and virtual tours is a great way to engage your audience. Here's a step-by-step tutorial on how to make PowerPoint-style presentations with WPS Office:
Step 1 : Open WPS Presentation and creating a New Presentation

Step 2: Create Your Presentation
Create your presentation in WPS Presentation, including your slides, images, and content. You can use the features like image-based storytelling, progressive image reveal, comparison slides, and virtual tour to enhance your presentation as per your requirements.
Image-Based Storytelling
To create image-based storytelling slides:
Insert images into your slides that correspond to different parts of your story.

Add text, captions, or descriptions to explain the images.

Use transitions and animations to make the storytelling engaging.

Progressive Image Reveal
To create slides with progressive image reveals:
Add your main image to the slide.

Duplicate the slide.

On the duplicated slide, use an object (e.g., a shape) to cover part of the image.
Add animations to the object (e.g., "Appear" animation) and set delays for each slide to reveal the image progressively.

Comparison Slides
To create comparison slides:
Use tables or split your slide into multiple sections to show comparisons side by side.

Add text and graphics to highlight the differences or similarities between the elements you're comparing.

Step 3 : Save Your Presentation
After creating your presentation, make sure to save your work to avoid losing any changes. Click on 'File' in the top menu, then select 'Save' or 'Save As' to save your presentation file.

Step 4: Full Screen Mode
To view your presentation in full-screen mode:
Click on the "Slide Show" option in the top menu.
Select "From Beginning" to start the presentation from the beginning.

Step 5: Press "Esc" on your keyboard to exit full-screen mode.
You feel WPS Office is the best choice for you and want to download? Don’t worry, below is step by step how to download WPS Office:
Step 1: Visit the WPS Office website: wps.com .
Step 2: Click “ Free Download” button

Step 3: Select the place you want to save WPS Office -> Save

Step 4: Double click on the WPS Office file in your Download file, click “Run” and follow the on-screen instructions to install

Step 5: After complete, you can enjoy all the power of WPS Office
Use Word, Excel, and PPT for FREE, No Ads.
Edit PDF files with the powerful PDF toolkit.
Microsoft-like interface. Easy to learn. 100% Compatibility.
Boost your productivity with WPS's abundant free Word, Excel, PPT, and CV templates.
Frequently Asked Questions (FAQs)
Q: how to use the presenter view in powerpoint.
A: To use the presenter view in PowerPoint, follow these steps:
Connect your computer to a projector or external display.
Start your PowerPoint presentation.
Click the "Slide Show" tab in the PowerPoint ribbon.
Click "Presenter View."
The presenter view will display on your computer screen, showing the current slide, the next slide, speaker notes, and presentation controls.
Use this view to control your presentation while the audience sees only the slide.
Q: How can I resize an image while keeping the aspect ratio the same?
A: To resize an image while maintaining the aspect ratio in PowerPoint, follow these steps:
Select the image you want to resize.
Click and drag one of the corner handles of the image while holding down the Shift key on your keyboard.
This will resize the image proportionally, ensuring that the aspect ratio remains the same.
Q: How do I insert a page number in a WPS presentation?
A: To insert a page number in a WPS Presentation, follow these steps:
Click the "Insert" tab in the WPS Presentation toolbar.
Select "Page Number."
Choose the desired page number format and location (e.g., top or bottom of the slide).
The page number will be inserted into your presentation.
The article "How to Make PowerPoint Full Screen" provides a step-by-step guide for easily entering full-screen mode in PowerPoint, facilitating seamless presentations. Notably, WPS Office offers a robust alternative for creating PowerPoint presentations, with features such as image-based storytelling and progressive image reveal.With WPS Office, users can make their presentations captivating and engaging by following simple steps for entering full-screen mode. Download WPS Office now.
- 1. 3 Best Free Screen Recorders for Mac (in 2024)
- 2. How to Fix Windows Blue Screen of Death Error [Updated 2024]
- 3. Top 5 Free Screen Recording Software for Windows
- 4. How to Screen Record Using WPS Office: A Comprehensive Guide
- 5. Best Screen Recorders for Linux System (A Complete Guide)
- 6. 3 Easy Ways to Record Your Screen on Windows 10

15 years of office industry experience, tech lover and copywriter. Follow me for product reviews, comparisons, and recommendations for new apps and software.
How-To Geek
How to start a powerpoint slideshow.

Your changes have been saved
Email is sent
Email has already been sent
Please verify your email address.
You’ve reached your account maximum for followed topics.
Quick Links
Start a slideshow in powerpoint's desktop app, start a slideshow in powerpoint's web app, start a slideshow in powerpoint's mobile app, key takeaways.
To start a PowerPoint slideshow on your desktop, open your slideshow and click "Start Slide Show" in the "Slide Show" tab. If you're using the web app, select "From Beginning" in the "Slide Show" tab. On mobile, simply tap the Monitor icon at the top of your screen.
There's nothing quite like finishing a presentation after spending hours getting it just right. Now, show off your hard work by starting your Microsoft PowerPoint slideshow on desktop, web, and mobile using the methods below.
Related: How (and Why) to Start Microsoft PowerPoint from the Command Prompt
To play a slideshow in PowerPoint's desktop app, all you have to do is click an option or press a shortcut on your keyboard .
Start the process by opening your presentation with PowerPoint. Then, in the app's ribbon at the top, select the "Slide Show" tab.

In the "Slide Show" tab, from the "Start Slide Show" section, choose "From Beginning" (or press F5). Now your presentation will play from the very first slide.
If you'd like to start the slideshow from your current slide, choose the "From Current Slide" option. Alternatively, press Shift+F5 on your keyboard.

While your presentation is playing, you can perform various tasks, like moving to the next slide or ending the show. You can reveal these options by right-clicking anywhere on the slide.

Alternatively, you can use the following keyboard shortcuts while viewing your slideshow:
- Spacebar or Right Arrow Button: Go to the next slide in the presentation.
- Left Arrow Button: Go to the previous slide in the presentation.
- Esc: End the show.
- W: Hide your current slide and display a white screen. Press the same key again to bring back the slide's content.
- B: Hide your current slide and display a black screen. Revert back to the slide's content by pressing the same button.
- Ctrl+Left Mouse Button: Activate the laser point tool to point at things in your slides.
- Ctrl+P: Launch the pen tool to annotate your slide's content during your show. You can choose if you'd like to keep these annotations when you end the show.
- Ctrl+i: Access the highlighter tool to highlight items in your slides.
If you'd like to jump to a specific slide while presenting, press that slide's number on your keyboard and hit Enter. For example, press 12 and hit Enter to access that slide quickly.
To access the Presenter view, where you can see the upcoming slides and other options, right-click anywhere on your slide and choose "Show Presenter View."

With these options, you can start a slideshow and have it play exactly how you want.
To play a slideshow on the web, launch your preferred web browser and access PowerPoint on the web . Then, open your presentation.
From PowerPoint's ribbon at the top, select the "Slide Show" tab.

In the "Slide Show" tab, start your slideshow from the first slide by clicking the "From Beginning" option. To have your show play from your current slide, choose "From Current Slide."

Your presentation is now playing.
To reveal the options for moving slides, annotating items, and using Presenter Coach , bring your cursor to your screen's bottom-left corner. Then, click the appropriate icon.

Related: How to Practice Your Presentations with PowerPoint's Presenter Coach
To start a slideshow in the PowerPoint mobile app , launch the app on your phone and open your presentation.
On the presentation screen, at the top, tap the Monitor icon to play the slideshow.

Your presentation has now begun.
To move to the next slide, swipe left on your screen. To go to the previous slide, swipe right.

You can reveal PowerPoint's presentation options, like annotation and black screen tools, by tapping at the top of your presentation. Then, choose the option you'd like to use.

And that's it. Happy presenting!
Want to learn a few tips to help you make the best PowerPoint presentations ? If so, check out our guide.
Related: 8 Tips to Make the Best PowerPoint Presentations
- Microsoft Office
- Microsoft PowerPoint
Unsupported browser
This site was designed for modern browsers and tested with Internet Explorer version 10 and later.
It may not look or work correctly on your browser.
- Presentations
How to Learn PowerPoint Quickly (Complete 2024 Beginner's Guide + Video)
Trying to figure out how to use PowerPoint? This PowerPoint tutorial for beginners will help get you started. Learn basic tools as well as how to use PowerPoint templates in this PowerPoint beginner's guide.

In this PowerPoint tutorial for beginners, I'll help you get up and running in Microsoft PowerPoint. Ever wanted to know how to use PowerPoint templates? You'll learn how to use PowerPoint to build a presentation in less time than you ever thought possible. We'll also cover some PowerPoint best practices to make sure you're doing things the easy way.
Remember to check out Envato Elements. One low price gets you unlimited access to thousands of professional PowerPoint presentations —as well as fonts, stock photos, audio, and much more! It's the ultimate resource for fast, simple, and professional assets.
Guide to Making Great Presentations (Free eBook Download)
Before you read on, be sure to grab our free eBook: The Complete Guide to Making Great Presentations . It'll help you master the presentation process, from initial idea through to writing, design, and delivering with impact.

How to Learn PowerPoint Quickly (Beginner Tutorial With Tips Video)
Are you ready to start learning PowerPoint? Watch this quick screencast to learn all about what PowerPoint is and how to use it . It's a perfect PowerPoint tutorial for beginners.

Or study the complete written tutorial below.
Jump to content in this section:
What Is PowerPoint?
How to use powerpoint's ribbon, the steps to create a powerpoint presentation for beginners, how to power up powerpoint, how to customize a premium ppt template quickly (in 5 simple steps), powerpoint tools to learn (for presenters), 5 tips and tricks for a successful powerpoint presentation, more beginner powerpoint tutorials (free to learn online).
Microsoft PowerPoint is undoubtedly the most popular app used to give presentations. You're likely to see PowerPoint presentations being used for everything from presentations at the world's largest companies to grade schoolteachers sharing lessons.
PowerPoint is often the butt of the joke. Many decry PowerPoint as boring and a crutch for poorly prepared speakers.
Only a bad carpenter blames the tools. And like any tool, PowerPoint is incredibly useful when used properly. Use it as an aid on your speaking engagements to build comfort and drive points visually with your audience.

In this tutorial, we're going to focus on working inside of PowerPoint to build a presentation. This PowerPoint guide has everything you need to get comfortable in the app. To master the app, we'll talk about and cover the most common steps a rookie PowerPoint user needs to know.
Here are the key actions you'll need to take to build a PowerPoint presentation:
- You'll need to add slides, the individual pages in the presentation.
- You'll add content to the slides, such as text boxes, images, charts and graphs.
- Change themes and styles to make your presentation look professional and fit the occasion at hand.
- Prepare presentation aids like Speaker Notes and Presenter View to help you feel comfortable with presenting.
We'll cover each of these in this PowerPoint tutorial so that you can get up and running quickly.
To get up to speed with PowerPoint, it helps to understand the layout of the app. Let's walk through the key menu options so that you can learn PowerPoint quickly. If you understand the way that the app is laid out, you're likely to find any feature you need quickly.
This part of the PowerPoint guide will focus on the interface. Note that these previews are in Microsoft PowerPoint for Mac OS, but the same will apply for PC.
1. The Ribbon
The ribbon menu is found across many of Microsoft's apps, such as Word, Excel, and PowerPoint. It lives above the main area of the application. In this example, "Home" is the selected tab in the Ribbon.

The ribbon contains a series of tabs that you can switch between. Each of these have a unique set of tools to work with your presentation differently. When you switch tabs on the ribbon, you'll see new buttons and options to change your presentation:
- Home . A general-purpose collection of the most common tools that you'll use in PowerPoint.
- Insert . An all-in-one tool to add every imagine-able type of content, such as tables, pictures, charts, video, and more.
- Draw. Use this tab to draw elements in your presentation.
- Design . Controls the look and feel of your presentation with theme and style settings.
- Transitions . Add animations when you switch slides.
- Animations . Controls the order and style that objects will enter or exit your slide with.
- Slide Show . Control settings related to the way your presentation appears when sharing it with an audience.
- Review. Check spelling, check accessibility, and leave comments on your presentation here.
- View. You can choose multiple ways to view your work from this tab.
- Record. Record video, audio, or take a screenshot here.
- Acrobat. You can create PDF files using Adobe Acrobat from this tab.
- Tell Me. Click this to ask a question—it's an easy access help space.
Now that you understand the layout, you've got a better idea of how you can jump to the feature you need. Let's dive a bit deeper into how you can use several of these key tabs.
2. The Home Tab
Use it for: a general selection of the most popular tools in PowerPoint.
I usually stay on the Home tab when I'm working in PowerPoint. The reason is because it's got practically every tool you need. From adding a new slide to changing text and paragraph settings, the Home tab is the default for most users.

3. The Insert Tab
When you're working on adding content to a slide, the Insert tab has every possible tool to add new content to a slide. Choose one of these types of objects to add it to the slide.

PowerPoint has a variety of views that are simply different ways to work with the same presentation. Change the view to get a different perspective on your content.
Use views for a different way to edit and build your PowerPoint presentation.

In the screenshot below, you can see the difference between the default Normal view and Slide Sorter view. Normal view shows each slide front and center. Slide Sorter view creates thumbnails that you can drag and drop to reorder the presentation.

Normal View in Microsoft PowerPoint

Slide Sorter View in Microsoft PowerPoint
5. The Design Tab
An attractive presentation can really grab your audience's attention. We use themes and styles in PowerPoint to add visual appeal to the presentation, and the Design tab really controls these settings.

On the Design tab, click one of the themes to restyle the presentation. Or try out a different Style thumbnail to overhaul the color theme.
We've tackled the interface of PowerPoint, so you should be feeling comfortable with how to get around the app. Now, let's talk about the actions you'll find yourself using repeatedly and how you can do that in PowerPoint. Whether you want to know how to use PowerPoint templates or how to build a presentation from scratch, these will be handy.
1. How to Add Slides
Think of slides as the individual units in your presentation that you can fill with content. To insert a new slide, go to the Insert tab on PowerPoint's ribbon. Then, click on the New Slide button to add a new slide to your presentation.

Each of the thumbnails that you'll see on the sidebar represents a slide. Then, you'll add content to each slide.
There's no practical limit to the number of slides that your PowerPoint file can contain. But you should consider how many slides it actually takes to make your point. It's often the
2. How to Add Content
Content is what defines each slide. PowerPoint accommodates a wide range of content like text, graphs, tables, charts, and more.
The easiest way to add content is to start off by choosing a Layout, which you can choose from the Home tab. This PowerPoint template comes with premade layouts we can choose from too.

These layouts have content boxes that are easy to add your own content to. Simply choose a layout, and then start adding your content.
3. How to Choose a Theme and Style
After you build out your presentation's content, it's a great idea to think about adding visual style. For this, you'll jump over to the Design tab, and click on one of the thumbnails for a theme. Choosing a new theme in this PowerPoint template made it easy to switch from an orange to a green theme. Check it out.

Using a PowerPoint theme is the preferred alternative to adding backgrounds, color and type styles to each slide. Changing the theme typically will adjust the entire presentation simultaneously. This greatly reduces the time involved with building a presentation.
With just these three steps, you've got the repeatable sequence of actions needed to build a presentation.
With every creative app I've ever learned, there are always those insider tricks of the trade that you learn many months later. They make you wish that you had known them all along and think about the many hours you wasted on the learning curve.
PowerPoint is no exception to this rule. It's especially important that you can cut to the chase when you're rushing to prepare for your presentation.
The best way to save time on your presentation is to start with a pre-built PowerPoint theme . And you can find those on Envato Elements, which is an unlimited download service for creatives.

Discover simple PowerPoint template designs with powerful features on Envato Elements. The right premium PPT template will help you make a great presentation quickly.
Browse through these simple professional presentation designs that you can use today:

Now, most of the files that you'll grab from the Elements PPTX themes will appear to be finished presentations. You might be wondering how to use these pre-built presentations for your own needs.
Curious about how to use PowerPoint templates? To use Elements themes, it's really all about cutting it down to the slide designs that you'll use. A premium theme is really about the ideas that are included as part of it. Simply use these ideas as starting points that you can add your own content to.

Again, the value of Elements is that you can download as many files as you want while you're a subscriber. And if you stop subscribing, you'll still have the right to use the creative assets you grabbed. It's much faster than building every slide from scratch.
When you contemplate how to use PowerPoint, don’t imagine building slide decks from scratch. That’s where premium PPT templates come in. They take the hard work out of using PowerPoint.
You can take advantage of designer styles in a simple format. That’s the ultimate PowerPoint lesson to take to heart. Let’s look at just how easy it is to customize premium PPT templates in this quick PowerPoint training tutorial!
If you want to follow along, download the beautiful Agio PowerPoint template from Envato Elements.

Let's get started:
1. Choose Slides for Your Presentation
Premium PowerPoint PPT templates often include hundreds of handcrafted slides. For you, it’s best to select only a handful to build a slide deck. In PowerPoint, find Slide Sorter on the View tab.
In Slide Sorter view, click and drag on the slide thumbnails to reorder them. Hold down Shift , click, and press Delete to remove unwanted slides. Jump back and start working by clicking Normal on the View tab.

2. Add Your Own Text
The PowerPoint basics include text and images. Adding custom text is one of the easiest and most common edits to make.
Pre-built layouts include text boxes already arranged on the slide. To add your own words, highlight the contents of any text box. Then, simply start typing. Repeat throughout the presentation.

3. Add Images
Wondering how to add PowerPoint presentation images? The easiest way is to turn to premium templates with image placeholders. Identify them by finding the image icons on a given slide. Jump to where images are stored on your computer.
Then, simply drag and drop them onto the placeholder. Not only will all your photos import automatically, they’ll also size and scale to fit perfectly!

4. Change Object Colors
Changing theme colors is a fast way to adjust the visual look of your slides. For example, change object colors to add a bit of contrast.
To get started, click on any object, like a shape, to select it. Choose Format at the top menu, to view your formatting options. Try Format Object to open the Format Pane .
In the Format Pane, you can choose things like a new Fill Color for this shape.

5. Customize Fonts
No Microsoft PowerPoint tutorial would be complete without customizing fonts. Sometimes, it’s easy to overlook text as a design element, but with a few quick edits you can make your words really stand out.
Highlight a block of text, then go up to the Font section of the Home tab. You’ll see drop downs to change the font style, size, and color. After that, add quick effects like bold letters, italics, and more!

The content and design will vary greatly from one presentation next. But, no matter what the goal of your presentation is, there are common tools that every presenter can benefit from using. We've developed PowerPoint lessons for those tools.
Let's focus on the most valuable tools for speakers in this PowerPoint tutorial. I always mention these tools as a way to build confidence and comfort for presenters.
1. Speaker Notes
Forget writing out note cards or keeping a printed outline nearby. Speaker notes are a way to add the things you need to say to each slide.
Speaker notes are added to each individual slide, and the best way to add them is from Normal view. Click on Notes below the presentation area and type your slide-specific notes.

Speaker notes will show up in printed copies of your presentation. So, it's easier to build them into PowerPoint instead of scribbling note cards you may lose.
2. Presenter View
Another feature that's a must-use is Presenter View , which is perfect for two screen setups while presenting. While your audience will see the presentation you've built on the projector or LCD screen, you'll have your own private view with speaker notes, upcoming slides, and more.
Turn on Presenter View from the slideshow tab by clicking Use Presenter View.

Check out a full guide below on getting the most from Presenter View:

3. Spelling and Grammar Check
There's nothing worse than missing a key typo before you give your presentation. To avoid this problem, it's a great help to run a spelling and grammar check before you give your presentation.
To check for common spelling issues, simply jump to the Review tab and click Spelling . PowerPoint will check for the most common issues and allow you to correct them as needed.

4. Insert Multimedia
You can use multimedia in your PowerPoint presentations, and they can really enhance the experiences. Remember, you can find these tools in the Ribbon, via Insert . For example, how about inserting a short audio clip of a quote or maybe a short video relevant to your topic? If you'd like to make these additions, Insert makes it very easy to do.
Want to learn more about adding Multimedia to your PowerPoint presentations? Check out these free tutorials to learn more:

5. Add Bullet Points
How you organize your content can make a huge difference—both for your audience and for you, as the presenter. Presenting a long passage of text can be difficult and even boring for the viewer. Consider breaking your content up into easy to read and easy to digest bullet points.
PowerPoint makes this easy. When you edit your text, select Home in the Ribbon. There, again, you'll see your text options. Need some extra help with bullet points? Check out this easy-to-follow walkthrough:
6. Transitions and Animations
PowerPoint has so many different options, when it comes to transitions and animations. You can have specific transitions from slide to slide. You can animate specific elements in your presentations.
Looking the PowerPoint Ribbon, remember to turn to the Animations section. There, you can find a host of options that you can apply to your presentation.
Never used these tools before? Check out these walkthroughs. They'll show you how it's done.
In this PowerPoint tutorial for beginners, you’ve learned how to use PowerPoint presentation templates. We walked through a quick PowerPoint lesson to customize them. But you may be wondering: is that enough to deliver a winning PowerPoint presentation?
Part of PowerPoint training comes from adopting the tips and tricks used by the best presenters. Follow these, and you’ll have a happy (and engaged) audience every time!
1. Have a Clear Objective
Let’s face it: we’ve all endured lengthy, boring PowerPoint presentations that seem to drift without a clear purpose. When you build your own PowerPoint, start with a goal in mind. Typically, that goal will be to inform or persuade an audience. It pays to outline that goal in advance and work towards your objective with a series of clear and concise slides.
It may sound daunting, but you can learn the technique in moments with our full PowerPoint training to help build persuasive slide decks:

2. Illustrate Concepts With Infographics
A key PowerPoint lesson for beginners is this: never get bogged down trying to talk through concepts. Visual aids are essential, and audiences demand them today. Infographics are a successful presenter’s best friend. Infographics combine information and graphics to create stunning visuals.
Learn to build them yourself. Or sample from the very best pre-built PPT templates today in our infographic-centric set of PowerPoint instructions:

3. Be Subtle Animations and Transitions
Animations and transitions: fundamental elements of any deck, they should be used sparingly. When carefully applied, they create beautiful segues between slides. They can also help introduce new ideas in exact sequence. But use too many, and they become obnoxious distractions guaranteed to annoy an audience.
Moderation is the name of the game here. Read our full Microsoft PowerPoint tutorial on animations to use them with confidence:

4. Be Interactive to Engage the Audience
No matter how compelling your narrative, you can’t simply talk to an audience and expect full participation. Instead, you need to engage your audience. A quick and fun way is with a quiz slide. They get the audience involved and help your slide deck stay focused.
Even better: pre-built templates make it a breeze. They're PowerPoint instructions inside a PPTX file. Get started building interactive quizzes in PPT today with our guide on how to create PowerPoint quizzes:
5. Close Strong for an Enduring Message
The very best PowerPoint presentations make a great first impression. But equally (and perhaps even more) important is the winning last impression. It’s critical to conclude with a strong close. Leave on a memorable anecdote, recap your key points, or make a big “ask.” All these techniques and more help to ensure a strong close.
Don’t go it alone. We’ve created expert PowerPoint training on building a strong close. Check it out here:

This PowerPoint tutorial helped you get off the ground with using Microsoft PowerPoint. You learned the steps for creating slides and the shortcut to a better presentation with pre-built themes.
At Tuts+, we've been building out a series of PowerPoint tutorials that can help you build your presentation skills. Check out all these PowerPoint tutorials for free. One ideal place to start is the PowerPoint Ultimate Tutorial Guide that we've developed. If you're feeling nervous about giving a presentation for your job or freelance practice, try out more of these tutorials like the ones below.

Need Help? Grab Our Making Great Presentations eBook (Free)
You can find more information in our eBook on making great presentations . Download this PDF eBook now for FREE with your subscription to the Tuts+ Business Newsletter.
It'll help you master the presentation process, from: initial creative ideas, through to writing, design, and delivering with impact.
Get Started Using PowerPoint Today
Presentations can be daunting to take on, but a bit of knowledge about Microsoft PowerPoint can ease the process. We've got tutorials that show you how to create a PowerPoint presentation, for beginners. Jump to the following links to speed up your learning process and spend less time in PowerPoint:
- Envato Elements is the best place to grab premium PowerPoint templates that save you hours of design work and leave you with a finished presentation that you'll feel confident in.
- Courses included with Envato Elements are complete walkthroughs of how to build a presentation. They're perfect PowerPoint tutorials for beginners.
- The PowerPoint Ultimate Tutorial Guide is a complete learning resource with the top tutorials to take you from beginner to expert.
Editorial Note : This post was originally published in 2017. It's been comprehensively revised to make it current, accurate, and up to date by our staff—with special help from Andrew Childress and Daisy Ein .

- Use Presenter View Video
- Add speaker notes Video
- Practice and time your presentation Video
- Record a presentation Video
- Print a presentation Video

Use Presenter View

PowerPoint Presenter View shows you the current slide, the next slide, and your speaker notes, to help you focus while presenting and connect with your audience.
Select the Slide Show tab.
Select the Use Presenter View checkbox.

Select which monitor to display Presenter View on.

In Presenter View , you can:
See your current slide, next slide, and speaker notes.
Select the arrows next to the slide number to go between slides.
Select the pause button or reset button to pause or reset the slide timer in the upper left.
See the current time to help you pace your presentation.
Select the font icons to make the speaker notes larger or smaller.
Select the annotations pen icon to draw on the screen in real time, or select a laser pointer.
Select the thumbnail icon to see all the slides in your presentation and quickly jump to another slide.
Select the magnifying glass icon to zoom in on a particular part of a slide.
The screen icon let's you make the screen temporarily black to focus the attention on you.
Select END SLIDESHOW when you're done presenting.
Start the presentation and see your notes in Presenter view

Need more help?
Want more options.
Explore subscription benefits, browse training courses, learn how to secure your device, and more.

Microsoft 365 subscription benefits

Microsoft 365 training

Microsoft security

Accessibility center
Communities help you ask and answer questions, give feedback, and hear from experts with rich knowledge.

Ask the Microsoft Community

Microsoft Tech Community

Windows Insiders
Microsoft 365 Insiders
Was this information helpful?
Thank you for your feedback.
Login Sign Up
Supported Languages
Available in 95 Languages
Transform powerpoints into interactive quizzes.
Test your students on your classroom content with our AI Quiz Maker. Upload your PowerPoint or Google Slides , and let Arlinear craft engaging, personalized quizzes in seconds.

Quick & Easy Quiz Creation
Turn your PowerPoint or Google Slides into interactive quizzes in three simple steps.
1. Upload Your Presentation
Start by uploading the PowerPoint or linking Google Slides you want to convert into a quiz.
2. Generate your Quiz
Our advanced AI analyzes your PowerPoint or Google Slides content and generates relevant questions designed to challenge your student’s understanding of the given topic.
3. Quiz Ready to Take!
Your interactive quiz is now ready to send to your students or export/print!
Create a Quiz using your PowerPoint or Google Slides
Follow this step-by-step guide on how to create your first interactive quiz!
Import Your Documents
Google drive, google docs, google slides, google sheets, ms powerpoint, youtube video, why choose our ai quiz maker, create a quiz instantly.
Save time with AI that understands your PowerPoint or Google Slides’s content and creates relevant and challenging questions instantly.
Works in Any Subject & Language
Create quizzes on any topic… grammar, technology, science, and more! Our tool works in 95 languages.
Customizable Quizzes
Tailor your quizzes to fit your student’s learning goals. You can also adjust difficulty levels and what type of questions you wish to have.
Monitor Student Grades
Gain insights into quiz performance with detailed grades and feedback options.

Prep for Exams with: Practice mode
Students get instant written feedback automatically (yes even in short answer questions) using Arlinear’s practice mode. Exam prep has never been easier!
Join thousands of educators who have transformed their classrooms!

I use arlinear practice mode to help my students prepare for their GCSEs! The AI feedback helps them learn faster!

I love how much time it saves me, I don't need to think about good questions anymore!

Thanks for allowing me to create quizzes using my PDF textbook, you saved me so much time!

I give out arlinear practice quizzes as homework every week! My students are learning so much quicker!

I’m a student and I use practice mode to prepare for my exams! Thanks for the free study tool!!
Save time, teach smarter, accelerate learning!
Home Blog Google Slides Tutorials How to Curve Text in Google Slides
How to Curve Text in Google Slides

PowerPoint provides text effects to give it a curved look that can help transform text for PowerPoint templates . Currently, Google Slides does not have a similar curved text feature that can transform the look of text for slide decks you might create or the Google Slides templates you might use for your presentations. However, there are different methods that you can use to create curved text in Google Slides.
How to Curve Text in Google Slides Using Text Box Rotation
By rotating text boxes, you can bend text in Google Slides to create something similar to curved text designs. These text boxes can be aligned like a circle, semi-circle, or other curved design according to your design preferences.
To get started, insert a text box via Insert -> Text Box and enter your text.

You can add multiple text boxes to create the curved text look by adding relevant words and phrases. Once your curved text phrase is complete, click on the text box and move it using the line on top to rotate the text. This rotation requires holding the point highlighted in the image below and rotating your mouse to move the text box.

You can also rotate text by going to Format Options via the right-click context menu to access rotation options for text boxes.

The Rotate menu in Format Options provides comprehensive features to rotate and angle your text boxes to suit your needs. If you want to be specific about the angle you want to rotate your text, you can use this menu. From here, you can set an angle to rotate text, rotate the text box 90 degrees, or flip it vertically or horizontally.

The below image shows an example of curved text in Google Slides using text box rotation. By adding multiple text boxes and rotating them via Format Options or via drag and drop, you can create various curved text designs in Google Slides.
Using this method can provide you with a number of advantages. For example, you can edit the text boxes and align them anytime. This can give you control over the text natively in Google Slides, such as the color of the text, its size, shadow, reflection, etc.

How to Curve Text in Google Slides Using Text Stylizing Tools
There are a variety of text stylizing tools that can be used to create images with curved text. One such tool is MockoFun. You can create an account and log in to this tool to create curved text images for free. These images can then be used with Google Slides to create curved text slide designs. To get started, go to the MockoFun website and create a free account. Once logged in, go to Create . This will open a workspace where you can create creative content. To create curved text, go to Text -> Curved Text .

This will provide you with different curved text styles to choose from. Select a curved text style and drag it to the workspace.

Click the text to start typing to generate a curved text image. You will notice that the curved image will start generating as you type text. If the text is too large, it might begin overlapping. So, you will have to type and adjust the text accordingly. This can include curved text like a circle or arc, such as a semi-circle.

Once you have completed making your curved text image, go to Download and export your output file. When downloading the output file, you can use the given scale to select the quality of the image file. MockoFund supports downloading image files in JPG, PNG, SVG, GIF, WEBP, and PowerPoint (PPTX) file format.

To insert the curved text into Google Slides, go to the slide to which you want to add the text and select Insert -> Image -> Upload from Computer .

Adding the curved text image to your Google Slides presentations allows you to create various interesting designs to add visual appeal to your slides. You can adjust the image to add it to Google Slides themes in a way that it appears native to the slide design by ensuring that the colors used are compatible with your presentation theme.

How to Curve Text in Google Slides using PowerPoint
Since PowerPoint natively provides curved text styles, you can design your slides with curved text in PowerPoint and transfer them to Google Slides. For this purpose, you can use any version of PowerPoint, such as PowerPoint for desktop, PowerPoint for the web, or a mobile app.
Type your text into a PowerPoint slide to start using PowerPoint to curve text in Google Slides. You can add the text with a large, prominent font to create curved text that can stand out. Additionally, you can also stylize your text with custom colors before using the curved text effect.

Select the text and go to Shape Format -> Text Effects -> Transform and pick a curved text style. PowerPoint provides dozens of curved text styles that you can choose from.

Right-click to copy the slide in PowerPoint or use CTRL+C .

Open your Google Slides presentation to add the curved text and use CTRL+V , or paste the copied PowerPoint slide using the right-click context menu.

The curved text slide will be added to Google Slides. You can use drag and drop to adjust the text in your Google Slides presentation.

The pasted slide will provide the text as an image in Google Slides. By adjusting the copied slide from PowerPoint to your Google Slides presentation, you can bring PowerPoint curved text styles to Google Slides.

Frequently Asked Questions
Are there curved text effects in google slides.
As of August 2024, Google Slides does not have native features such as text effects to create curved text.
Can you create curved text in Google Slides?
While Google Slides does not provide native styles for generating curved text, you can create curved text in Google Slides by rotating text, using third-party tools to create curved text, and adding it to slides.
What external tools can be used to curve text in Google Slides?
You can use a number of third-party tools and apps to curve text and import it into Google Slides. Some commonly used tools and apps include PowerPoint, MockoFun, Canva, PicMonkey, and advanced image manipulation tools such as Adobe Photoshop, Adobe Illustrator, and Gimp.
Does the curved text in Google Slides appear in Slideshow mode?
Yes, curved text created through rotation or added via third-party tools as an image file appears in Slideshow mode in Google Slides.
Does Curved text affect the responsiveness of Google Slides presentations?
No, the curved text does not affect the responsiveness of Google Slides presentations. However, if you’re using image files of curved text, ensure that the images are of good quality, such as HD (720p) or Full HD (1080p) image files.
Can I edit the curved text in Google Slides imported as an image?
No, curved image files imported to Google Slides are not editable directly. You will need to edit the image from its source and upload a copy again with the changes.
How can I edit the curved text in Google Slides?
If you have created curved text using text boxes rotated to a curved angle, you can click the text boxes to edit the text.
When should you use Curved Text in Google Slides?
Curved text can be used in Google Slides to highlight content, create design consistency to match other curved slide elements, and add visual appeal to slides. The use of curved text is quite arbitrary, and it will largely depend on your design needs and preferences for your Google Slides presentation.
Final Words
Unlike PowerPoint, Google Slides lacks many native slide design features, including the ability to curve text using text styles. However, you can curve text in Google Slides by using text box rotation and third-party tools to create and import curved text as an image. The imported text can be stylized according to the colors and outlook of your Google Slides theme beforehand and then imported and merged in your slides to give it a look that might appear native to your theme. However, if you want text that can be easily edited, the best option is to add multiple text boxes and rotate them to create an angle that makes the text look curved. This text can also be stylized natively in Google Slides anytime.
If you are using a third-party tool to generate an image to curve text and import it to Google Slides, you should ensure that the style of the text matches your theme and that the output file is saved as a high-quality image. This will help prevent the image from pixelation when you add it to Google Slides or run your presentation in Slideshow mode. Some of the most commonly used image formats used with Google Slides include JPG, PNG, and BMP. While Google Slides also supports SVG file format, the vector graphic file support isn’t very robust and might not work properly.
Like this article? Please share
Design, Google Slides Filed under Google Slides Tutorials
Related Articles

Filed under Google Slides Tutorials • August 20th, 2024
How to Insert an Emoji in Google Slides
Add a creative touch to your slides by learning how to insert an emoji in Google Slides. Step-by-step instructions and third-party extensions list.

Filed under Design • August 14th, 2024
Creating Custom Themes for PowerPoint and Google Slides
Do you want your slides to go beyond the average result from a template? If so, learn how to create custom themes for presentations with this guide.

Filed under Google Slides Tutorials • August 6th, 2024
How to Use Google Slides Strikethrough Text
Customize your presentation slides by using Google Slides strikethrough and add a factor of humor, emphasize, or track changes in a truly visual method.
Leave a Reply
IMAGES
COMMENTS
Start presenting. On the Slide Show tab, in the Start Slide Show group, select From Beginning. Now, if you are working with PowerPoint on a single monitor and you want to display Presenter view, in Slide Show view, on the control bar at the bottom left, select , and then Show Presenter View.
Keep reading to find out more about using Presenter View in PowerPoint and the best features to try out.. Turn On PowerPoint Presenter View. In PowerPoint for macOS, simply click on Presenter View on the Slide Show tab to kick off the presentation in Presenter view. Turn on Presenter View by clicking on Presenter View on the Slide Show tab.. You'll see the Presenter View interface on one screen.
First, create a new custom slide show and select the slides that you want to display. Then, click Add, enter the name of the presentation and click OK. This new custom presentation will appear on the list. Select it and click Show to begin the presentation. Defining a custom slide show.
Select the Slide Show tab. Select the Use Presenter View checkbox. Select which monitor to display Presenter View on. Select From Beginning or press F5. In Presenter View, you can: See your current slide, next slide, and speaker notes. Select the arrows next to the slide number to go between slides. Select the pause button or reset button to ...
Step 1: Open your PowerPoint presentation. The first step to enter Presentation Mode in PowerPoint is to ensure that your presentation file is open and ready for display. To do so, open PowerPoint and locate the file containing your presentation. Click on the file to open it. Review that the slides are arranged in the correct order and that any ...
In this screencast, you'll learn how to present a PowerPoint slideshow with Presenter View. Download unlimited PPT templates with Envato Elements: https://...
Presenter view lets you take advantage of the dual monitor capability of a computer to separate what the audience sees from the mechanics of running a slideshow. The audience views your slides on the main screen, while you control the show with the Presenter view on another screen that only you can see. The Presenter view is like a dashboard ...
Take advantage of the PowerPoint Presenter View to practice and present your PowerPoint speaker notes. This view also helps you as a presenter by showing you...
A simple method for switching to Presenter View on a single monitor is to click the three dots ( More slideshow options) at the bottom in SlideShow mode and select Show Presenter View. You can also switch to Presenter View on a single monitor anytime using the ALT+F5 hotkey. The presenter can easily manage a PPT in presentation mode, with the ...
Check the box beside the "Use Presenter View." Select from the "Start Slide Show" section to start your presentation "From the Beginning." Click the three dots menu on your full-screen slideshow view and select "Show Presenter View." When your presentation displays "Presenter View," you can scroll and use it for your speech.
Navigate to the Slide Show tab. Hold down the Alt key on your keyboard. Click From Beginning. Holding down the Alt key and clicking From Beginning, the Presenter View will launch from the very first (non-hidden) slide in your presentation.
If so, we'd suggest you save presentation file as .ppsx type file, if you are using PowerPoint in Windows, we'd suggest you go to PowerPoint File > Save as > Click More Options > select PowerPoint Show under Save as type, the file is saved as a .ppsx file. When the file is double-clicked, it opens as a slide show.
There are three main sections in Presenter View: the current slide, the upcoming build/slide, and your notes. You can adjust the vertical and horizontal dividers in Presenter View to make the sections larger or smaller as desired. Some presenters find the preview of the next build or slide to be distracting so they make it very small.
Start in Settings (1) and select the tools you will be using. You have the option to use a microphone, or you can record yourself talking on camera. Choose your microphone and/or camera for recording. Next (2), decide whether you want to have the microphone or camera you selected turned on.
To open Presenter view in PowerPoint, click the Slide Show tab and select the Use Presenter View check box. 2. Start your slide show. 3. Click the Notes pane in the lower right corner of the PowerPoint window, then start typing. NOTE: You can also press the F6 key to select the Notes pane in Presenter view. When a white outline appears around ...
1. Select the Keep Slide Updated check box on the Slide Show tab on the ribbon. 2. Start the presentation by selecting the appropriate button on the Slide Show tab. 3. Whenever an update to a slide is made and detected, the content is automatically updated and visible in the slide show being presented.
Any link to PowerPoint presentations (PPT, PPTX, or PPSX files) takes users to the Edit mode of the file. Even if the users don't have permission to edit, SharePoint opens it in edit mode with a banner saying you can't edit the file.
Six steps for creating a slide show. 1. Plan your slide show. Before getting too deep into your slide show project, it's a good idea to select and save the photos and videos you want to use. This helps you create a slide show more efficiently and purposefully, ensuring a better outcome. 4.
After creating your presentation, make sure to save your work to avoid losing any changes. Click on 'File' in the top menu, then select 'Save' or 'Save As' to save your presentation file. Save the slides. Step 4: Full Screen Mode. To view your presentation in full-screen mode: Click on the "Slide Show" option in the top menu.
Alternatively, you can use the following keyboard shortcuts while viewing your slideshow: Spacebar or Right Arrow Button: Go to the next slide in the presentation.; Left Arrow Button: Go to the previous slide in the presentation. Esc: End the show. W: Hide your current slide and display a white screen. Press the same key again to bring back the slide's content.
Open the presentation that you want to play as a slide show. Select the slide that you want to start the slide show from. On the. button, and then click Custom Slide Show on the menu. In the Custom Shows screen, click the custom slide show you want to present. To end the slide show when you finish presenting, press ESC .
In this article I am using the Zoom app in Windows 10. The six options are: Share your entire screen/desktop. Share the Slide Show window. Share the editing window with a clean look. Run the Slide Show in a window and share that window. Use Presenter View to show the audience your slides while you see Presenter View.
5. The Design Tab. An attractive presentation can really grab your audience's attention. We use themes and styles in PowerPoint to add visual appeal to the presentation, and the Design tab really controls these settings. Click on one of the theme thumbnails to transform the look and feel of the presentation.
Select the Slide Show tab. Select the Use Presenter View checkbox. Select which monitor to display Presenter View on. Select From Beginning or press F5. In Presenter View, you can: See your current slide, next slide, and speaker notes. Select the arrows next to the slide number to go between slides. Select the pause button or reset button to ...
Easily convert your PowerPoint presentations into interactive quizzes with our AI Quiz Maker. Upload your PPT or Google Slides, and create personalized, engaging quizzes in seconds. Home; ... Students get instant written feedback automatically (yes even in short answer questions) using Arlinear's practice mode. Exam prep has never been easier!
PowerPoint provides text effects to give it a curved look that can help transform text for PowerPoint templates.Currently, Google Slides does not have a similar curved text feature that can transform the look of text for slide decks you might create or the Google Slides templates you might use for your presentations. However, there are different methods that you can use to create curved text ...